The Bully Build Begins

0 Members and 6 Guests are viewing this topic. Read 10686 times.

robwm

  • Jr. Member
  • Posts: 96
Re: The Bully Build Begins
« Reply #100 on: 29 Apr 2025, 03:34 pm »
It makes sense that no-rez isn't placed there. The amplifier mounts above the tube connectors and the bottom has a glued seam. I doubt that section could move in a way that would affect the overall sound.

robwm

  • Jr. Member
  • Posts: 96
Re: The Bully Build Begins
« Reply #101 on: 5 May 2025, 04:15 pm »
I have the crossovers installed.


NIGHTFALL1970

Re: The Bully Build Begins
« Reply #102 on: 5 May 2025, 04:54 pm »
Very cool!😎 you have a lot more room than I did.
I can’t wait for you to get to hear them. I listened to my new LP of the first Black Sabbath album remastered by Kevin Grey. It sounded amazing!🤩


« Last Edit: 5 May 2025, 08:20 pm by NIGHTFALL1970 »

robwm

  • Jr. Member
  • Posts: 96
Re: The Bully Build Begins
« Reply #103 on: 5 May 2025, 05:44 pm »
Does anyone have pictures of how the crossover, subwoofer, amplifier and jumper wires are installed?

NIGHTFALL1970

Re: The Bully Build Begins
« Reply #104 on: 5 May 2025, 08:39 pm »
Here are some. I hope they help.


The bottom two pictures rotated sideways. You can see where the wires for the jumpers go.
« Last Edit: 13 May 2025, 01:22 am by NIGHTFALL1970 »

NIGHTFALL1970

Re: The Bully Build Begins
« Reply #105 on: 5 May 2025, 08:49 pm »
Looking up. Wires that go up to the drivers.


robwm

  • Jr. Member
  • Posts: 96
Re: The Bully Build Begins
« Reply #106 on: 5 May 2025, 08:49 pm »
Thank you for the pictures!  :)

If I understood better how to build the crossovers when I was doing it, I would have built them in a way where the tweeter and woofer wiring is right under the MTM box. In the layout I used, I'm really concerned the wiring is not long enough to accommodate cable management. Rewiring these would be a real nightmare at this point. Those crossover boards are there to stay.

I'm about to find out if the wiring is long enough. :rock:

NIGHTFALL1970

Re: The Bully Build Begins
« Reply #107 on: 5 May 2025, 08:52 pm »
Back view where you can see subwoofer amp.


NIGHTFALL1970

Re: The Bully Build Begins
« Reply #108 on: 5 May 2025, 08:53 pm »
Let me know if you need anything else picture wise.

robwm

  • Jr. Member
  • Posts: 96
Re: The Bully Build Begins
« Reply #109 on: 9 May 2025, 02:44 pm »
I twisted and routed the wires. They seem like they will be long enough to reach the drivers, and the wire is firmly in place using hot glue at the mid-point. I can't imagine it coming loose or vibrating. Next up will be polyfil in the upper chambers.


NIGHTFALL1970

Re: The Bully Build Begins
« Reply #110 on: 9 May 2025, 05:33 pm »
I am glad that the wire reached. Are you adding the wires for the jumpers?

robwm

  • Jr. Member
  • Posts: 96
Re: The Bully Build Begins
« Reply #111 on: 9 May 2025, 05:39 pm »
Yeah, I did order jumpers. I might be able to do that later because I will not install the tube connectors until the finishing is completed.

robwm

  • Jr. Member
  • Posts: 96
Re: The Bully Build Begins
« Reply #112 on: 12 May 2025, 02:16 pm »
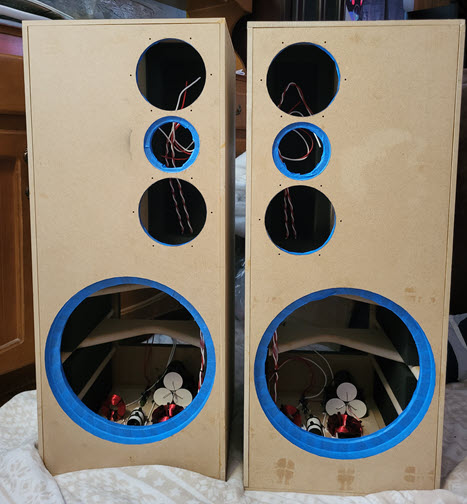
I was able to install the polyfil and get the front baffles glued on for both speakers this weekend. I also cut up the veneer. I noticed that the veneer was cracking, and you could see the paper backing through it. After cutting up everything, the cracking was only occurring in that one spot and ended up being scrap. Whew!

I will be able to remove the clamps after lunch today and then I can post more pictures.

I need some solid ideas on how to keep sawdust from going inside of the cabinet while I am doing the finishing stage. It has no-rez now and it will be a supreme pain to allow sawdust to freely go inside of the cabinet. I don't even want to know what cleaning up that mess would be like.


« Last Edit: 12 May 2025, 08:48 pm by robwm »

nlitworld

  • Full Member
  • Posts: 2440
  • Strange things are afoot at the Circle K
Re: The Bully Build Begins
« Reply #113 on: 12 May 2025, 05:40 pm »
1½" Masking tape in all the holes would be a start. A little tougher with the sub hole, but effective none the less. Maybe masking paper to build the gap. Try to build a border around the circle from the back side, then at the last bit close the hole with tape from the front side.


robwm

  • Jr. Member
  • Posts: 96
Re: The Bully Build Begins
« Reply #114 on: 12 May 2025, 05:49 pm »
That seems doable. I don't know why I didn't think of this yet.

robwm

  • Jr. Member
  • Posts: 96
Re: The Bully Build Begins
« Reply #115 on: 12 May 2025, 08:51 pm »
Should the wood filler be applied before or after the 1/2" round-over treatment? I'm not sure what could happen for each method.

Hobbsmeerkat

  • Industry Participant
  • Posts: 2738
Re: The Bully Build Begins
« Reply #116 on: 12 May 2025, 09:16 pm »
Should the wood filler be applied before or after the 1/2" round-over treatment? I'm not sure what could happen for each method.
I would round over the cabinet first, then fill in the gaps and sand smooth.
filling first likely wont get deep enough and would just add extra steps of needing to use more filler & sanding.

robwm

  • Jr. Member
  • Posts: 96
Re: The Bully Build Begins
« Reply #117 on: 13 May 2025, 04:44 pm »
Veneer is cut and ready for use.


Komoyuki

Re: The Bully Build Begins
« Reply #118 on: 14 May 2025, 11:59 am »
That veneer looks very nice !

Zuman

Re: The Bully Build Begins
« Reply #119 on: 14 May 2025, 02:29 pm »


I need some solid ideas on how to keep sawdust from going inside of the cabinet while I am doing the finishing stage. It has no-rez now and it will be a supreme pain to allow sawdust to freely go inside of the cabinet. I don't even want to know what cleaning up that mess would be like.


I used adhesive stencil film from Amazon. I'm sure that it was overkill, but I was going hardcore on every other aspect of my build, so I figured why not? I can't find the specific link for my purchase, but it came in a roll and I have enough for the next 347 pairs of speakers I build. I think that adhesive-backed shelf liners (like for kitchen cabinets) would work well, too.