NEW NX-Bravo speaker - Great Job Hobbs!

0 Members and 1 Guest are viewing this topic. Read 9393 times.

william2001

  • Jr. Member
  • Posts: 6
Re: NEW NX-Bravo speaker - Great Job Hobbs!
« Reply #60 on: 27 Oct 2024, 06:49 pm »
I appreciate the extra thought concerning bass response and the port length based on where the speaker is to be placed.  It's another thing that's nice about DIY vs store bought, the ability to customize and "dial in" a project to better fit a particular situation.  My pair will live close to a wall. 

I'm currently awaiting my flat packs.  Tweeter assemblies are finished and ready.  Well on my way with the crossovers, getting close to finalizing those..

jabouley

  • Jr. Member
  • Posts: 6
Re: NEW NX-Bravo speaker - Great Job Hobbs!
« Reply #61 on: 27 Oct 2024, 07:12 pm »
Thanks Hobbs for printing all of these waveguides. Is there any issue with sanding these to take some of the ridges out and painting them so that they look a little smoother?

dayneger

  • Full Member
  • Posts: 314
Re: NEW NX-Bravo speaker - Great Job Hobbs!
« Reply #62 on: 28 Oct 2024, 05:11 pm »
You've got me very curious about the relative performance of this new waveguide. 

How does the 3D printed geometry measure compared to the waveguides cut into the baffles, e.g. the Studio?  It looks visually more "sophisticated" in the surface lofting.

I'm particularly interested in anything that helps the system sound good from many listening angles.

Cheers, and congrats on the new addition to the NX line!

D.

P.S.  Being able to cross as low as 1 khz is pretty remarkable!

Hobbsmeerkat

  • Industry Participant
  • Posts: 2656
Re: NEW NX-Bravo speaker - Great Job Hobbs!
« Reply #63 on: 28 Oct 2024, 10:50 pm »
Thanks Hobbs for printing all of these waveguides. Is there any issue with sanding these to take some of the ridges out and painting them so that they look a little smoother?

No problem with that at all, just make sure the primer/paint is suitable for plastics like PLA.

You've got me very curious about the relative performance of this new waveguide. 

How does the 3D printed geometry measure compared to the waveguides cut into the baffles, e.g. the Studio?  It looks visually more "sophisticated" in the surface lofting.

I'm particularly interested in anything that helps the system sound good from many listening angles.

Cheers, and congrats on the new addition to the NX line!

D.

P.S.  Being able to cross as low as 1 khz is pretty remarkable!

The waveguide was based on a series of iterations I did, with the main goal of trying to keep them within the parameters of the old BG faceplates.
Danny's NX-Treme waveguide has a custom left/right sides that are similar to what I ended up designing in the end, as it allows for a smoother horizontal off-axis response than the standard NX waveguide, which has a bit more of a stair-stepped response.

they're a bit hard to compare directly tho, as the standard NX waveguide is also about 1.35" deep, and the NX-Bravo is only 0.8725" deep, though I could technically make it as deep as 1" with minimal adjustments which will boost the bottom end even more, but I haven't printed one out to compare it just yet.
the Standard NX was also designed around OB use so its design needs to be different than the new one which is centered around the more sealed-backed design.

Another thing to consider is wall thickness. The first tests of the NX-Bravo were done with a waveguide using 4-layer thick walls.
Bumping that up to 8 layers increased the bottom end output a bit, allowing for me to make use of the additional extension.
A 2-wall version would likely suffer down low a bit as some of that lower frequencies will end up passing through the thinner walls and interacting with the 40% infill.
A fully solid version would likely boost the bottom end a little further but it would take forever to print and use up a fair bit more filament.

you can see similar results in the different measurements Danny showed in the initial video between the thin-walled 3" deep plastic horn and the 3" deep MDF horn, with the MDF was smoother overall with better bottom end extension. had the plastic version used thicker walls it would have been more similar to the MDF version.

PLA

vs MDF


dayneger

  • Full Member
  • Posts: 314
Re: NEW NX-Bravo speaker - Great Job Hobbs!
« Reply #64 on: 29 Oct 2024, 05:48 pm »
No problem with that at all, just make sure the primer/paint is suitable for plastics like PLA.

PLA can be a real pain to get smooth, especially with sanding.  Probably better to spray with a paint in light layers and sand that.  I've never tried one of the chemical processes, though.

Did you cost out a batch run on a carbon printer?  Now that you have your geometry dialed, that might be an option.  Or make a golden, smooth sample and cast them in polyurethane from silicone molds.  Lots of ways you could make them over time.

The waveguide was based on a series of iterations I did, with the main goal of trying to keep them within the parameters of the old BG faceplates.
Danny's NX-Treme waveguide has a custom left/right sides that are similar to what I ended up designing in the end, as it allows for a smoother horizontal off-axis response than the standard NX waveguide, which has a bit more of a stair-stepped response.

they're a bit hard to compare directly tho, as the standard NX waveguide is also about 1.35" deep, and the NX-Bravo is only 0.8725" deep, though I could technically make it as deep as 1" with minimal adjustments which will boost the bottom end even more, but I haven't printed one out to compare it just yet.
the Standard NX was also designed around OB use so its design needs to be different than the new one which is centered around the more sealed-backed design.

Oh, you were targeting the old BG faceplates.  Makes sense.  I didn't realize that the NX-Treme has asymmetrical waveguides, thanks for mentioning it (although did Dannie say they're the same in the video?).

Those much larger, puffy waveguides looked really interesting.  Did they get discarded as a concept too quickly?

Another thing to consider is wall thickness. The first tests of the NX-Bravo were done with a waveguide using 4-layer thick walls.
Bumping that up to 8 layers increased the bottom end output a bit, allowing for me to make use of the additional extension.
A 2-wall version would likely suffer down low a bit as some of that lower frequencies will end up passing through the thinner walls and interacting with the 40% infill.
A fully solid version would likely boost the bottom end a little further but it would take forever to print and use up a fair bit more filament.

It sounds as though it'd be worthwhile to explore a few of the other production methodologies, which might also enable you to optimize the waveguide for stiffness or damping.  Reaction injection molding (RIM) is one that comes to mind... tooling is often quite a bit less since it's a low-pressure process, and you can have significant variation in your wall thicknesses (which is a challenge with standard plastic injection molding), at the expense of higher piece part cost.  Or again, the urethane casting mentioned above.  My guess is that if the orders ramp, you'll quickly find you have better things to do with your time than tend a 3D printer in production and answer customer requests about when their NX-Bravos will finally ship!   :wink:

As an aside, your NX header on the website might need to change with the exciting NX-Bravo addition--currently it's "Reference Open Baffle".

dayneger

  • Full Member
  • Posts: 314
Re: NEW NX-Bravo speaker - Great Job Hobbs!
« Reply #65 on: 29 Oct 2024, 06:39 pm »
I just noticed that the LGK 2.4 towers have a driver on the back for ambiance.  Would it make sense to do something similar with the NX-Bravo, and if so, what would the impact be (or was it, if you've already tried it)?

This would of course only be for those who have their speakers 1' or more from the rear wall, so may an option on this monitor and possibly standard on the upcoming tower version.

Hobbsmeerkat

  • Industry Participant
  • Posts: 2656
Re: NEW NX-Bravo speaker - Great Job Hobbs!
« Reply #66 on: 29 Oct 2024, 10:14 pm »
PLA can be a real pain to get smooth, especially with sanding.  Probably better to spray with a paint in light layers and sand that.  I've never tried one of the chemical processes, though.


With PLA, I typically see people add layers of primer and sand that smooth between coats then paint.
The chemical method could work so long as you tape off the screw holes and back-sides.

Quote
Did you cost out a batch run on a carbon printer?  Now that you have your geometry dialed, that might be an option.  Or make a golden, smooth sample and cast them in polyurethane from silicone molds.  Lots of ways you could make them over time.

I can print about 22 waveguides per 3KG spool, but we had some recent issues with adhesion that slowed us way down & sadly wasted a lot of filament.
I think I've finally got it figured out and the prints are finally sticking a lot better now.

Quote
Oh, you were targeting the old BG faceplates.  Makes sense.  I didn't realize that the NX-Treme has asymmetrical waveguides, thanks for mentioning it (although did Dannie say they're the same in the video?).

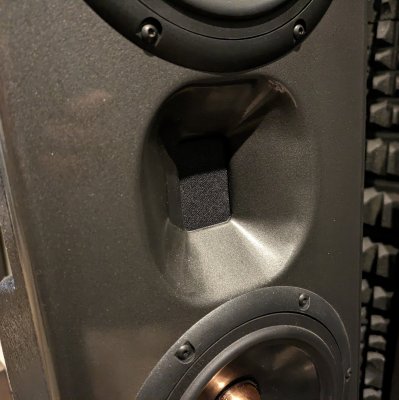
No, they are symmetrical but they are also a little different from the standard OB NX waveguides, the left/right edges were sanded down a bit extra on the edges

Standard:
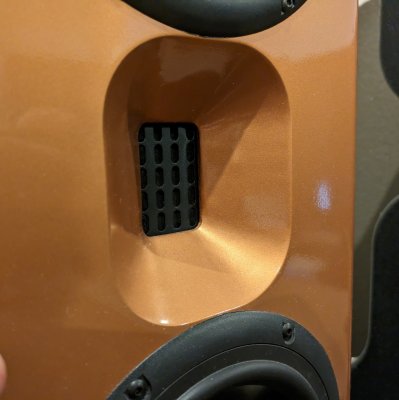

Danny's NX-Tremes

Quote
Those much larger, puffy waveguides looked really interesting. Did they get discarded as a concept too quickly?

It was just an idea we wanted to try, but we don't really have a place for them

[/quote]
It sounds as though it'd be worthwhile to explore a few of the other production methodologies, which might also enable you to optimize the waveguide for stiffness or damping.  Reaction injection molding (RIM) is one that comes to mind... tooling is often quite a bit less since it's a low-pressure process, and you can have significant variation in your wall thicknesses (which is a challenge with standard plastic injection molding), at the expense of higher piece part cost.  Or again, the urethane casting mentioned above.  My guess is that if the orders ramp, you'll quickly find you have better things to do with your time than tend a 3D printer in production and answer customer requests about when their NX-Bravos will finally ship!   :wink:

As an aside, your NX header on the website might need to change with the exciting NX-Bravo addition--currently it's "Reference Open Baffle".
[/quote]

It's certainly possible that we'll need to reconsider things if volume really picks up in the future.


I just noticed that the LGK 2.4 towers have a driver on the back for ambiance.  Would it make sense to do something similar with the NX-Bravo, and if so, what would the impact be (or was it, if you've already tried it)?

This would of course only be for those who have their speakers 1' or more from the rear wall, so may an option on this monitor and possibly standard on the upcoming tower version.

We don't have any plans for a rear driver on these new NX models, plus that would be a really expensive use of a Neo 3. If we explore that option, we'll probably look at having a custom soft dome made that we can put on the back instead.

But that rear driver has done some amazing things when it comes to soundstage performance, especially on the new LGK prototypes.

mkrawcz

  • Full Member
  • Posts: 548
Re: NEW NX-Bravo speaker - Great Job Hobbs!
« Reply #67 on: 29 Oct 2024, 10:48 pm »
I can print about 22 waveguides per 3KG spool, but we had some recent issues with adhesion that slowed us way down & sadly wasted a lot of filament.
I think I've finally got it figured out and the prints are finally sticking a lot better now.

I would try using petg, it sticks to the plate better during printing and it’s a little stronger than pla.

dayneger

  • Full Member
  • Posts: 314
Re: NEW NX-Bravo speaker - Great Job Hobbs!
« Reply #68 on: 30 Oct 2024, 02:56 pm »

No, they are symmetrical but they are also a little different from the standard OB NX waveguides, the left/right edges were sanded down a bit extra on the edges

Standard:


Danny's NX-Tremes


Sanded down a bit extra on the edges... to try to make them a smoother waveguide that measures better?  I'm still trying to make sense of the geometry differences, and honestly find it hard to imagine that the angular waveguide used for the NX OB series is actually optimal given what the 3D printed version for the closed back version of the exact same tweeter looks like (and most other waveguides I've seen).  But maybe it is for some reason?


...It sounds as though it'd be worthwhile to explore a few of the other production methodologies, which might also enable you to optimize the waveguide for stiffness or damping.  Reaction injection molding (RIM) is one that comes to mind... tooling is often quite a bit less since it's a low-pressure process, and you can have significant variation in your wall thicknesses (which is a challenge with standard plastic injection molding), at the expense of higher piece part cost.  Or again, the urethane casting mentioned above.  My guess is that if the orders ramp, you'll quickly find you have better things to do with your time than tend a 3D printer in production and answer customer requests about when their NX-Bravos will finally ship!   :wink:
...
It's certainly possible that we'll need to reconsider things if volume really picks up in the future.

Beyond the opportunity cost of your own time, I'm also referring to the visual quality of the result.  The waveguides are by definition pretty large and prominent on the baffle, so figuring out how to deliver a non-stepped version over time would likely be warmly received.  However, I do feel the option to print your own is a nice addition, especially for other DIY experimentation!

We don't have any plans for a rear driver on these new NX models, plus that would be a really expensive use of a Neo 3. If we explore that option, we'll probably look at having a custom soft dome made that we can put on the back instead.

But that rear driver has done some amazing things when it comes to soundstage performance, especially on the new LGK prototypes.

I wasn't thinking a Neo 3 on the back, which I agree would seem disproportionately expensive.  But yes, something more cost-effective might be a fun addition!  Now I'm curious to add some to the back of my current speakers to see what happens.   :)

I'm also quite intrigued to see what the new LGK prototypes offer.


Hobbsmeerkat

  • Industry Participant
  • Posts: 2656
Re: NEW NX-Bravo speaker - Great Job Hobbs!
« Reply #69 on: 30 Oct 2024, 08:50 pm »
Sanded down a bit extra on the edges... to try to make them a smoother waveguide that measures better?  I'm still trying to make sense of the geometry differences, and honestly find it hard to imagine that the angular waveguide used for the NX OB series is actually optimal given what the 3D printed version for the closed back version of the exact same tweeter looks like (and most other waveguides I've seen).  But maybe it is for some reason?

Sharp edges tend to create edge diffraction, softening the edge reduces/prevent edge diffraction.

Putting the tweeter into a waveguide puts pressure on one side, as the tweeter essentially becomes "front-loaded" and the shape determines the effect that loading has on the driver and it affects the response. Adding a back cup helps to balance that pressure. In this case, we mimicked the standard BG "deep back cup". Their shallow back cup really reduces the extension of the tweeter, and creates a sharp knee rather than a smooth roll-off that makes them tough to work with.

For instance, here's now the tweeter responds based on the tweeter being opened or sealed in the NX-Bravo waveguide:

Red = back cup
Green = open backed


The standard NX waveguide doesn't have that ~2KHz dip that the NX-Bravo waveguide does. other waveguide prototypes were even more drastic in variance depending on the use of an open back or deep cup being used.

The other option would be to put a second waveguide on the back to perfectly balance the front/back wave.

Quote
Beyond the opportunity cost of your own time, I'm also referring to the visual quality of the result.  The waveguides are by definition pretty large and prominent on the baffle, so figuring out how to deliver a non-stepped version over time would likely be warmly received.  However, I do feel the option to print your own is a nice addition, especially for other DIY experimentation!

If we end up going that far, we'll likely just have them made for us.

Quote
I wasn't thinking a Neo 3 on the back, which I agree would seem disproportionately expensive.  But yes, something more cost-effective might be a fun addition!  Now I'm curious to add some to the back of my current speakers to see what happens.   :)

I'm also quite intrigued to see what the new LGK prototypes offer.
It's an evolution of the ideas that started with the LGK 2.4

It's been seen in the background of some of Danny's more recent videos as well as a few of those of Ron from New Record Day.
Ron has the most recent prototype, and they are incredible when it comes to vocals & acoustic instruments, but they really excel in terms of soundstage layering and imaging.
First model is a bookshelf, with a tower model currently getting prepped for cutting its first prototype.

We'll have more to talk about with those models soon.
« Last Edit: 30 Oct 2024, 09:55 pm by Hobbsmeerkat »

jmimac351

  • Full Member
  • Posts: 509
  • Chief Instructor - ChinTrackDays.com
Re: NEW NX-Bravo speaker - Great Job Hobbs!
« Reply #70 on: 30 Oct 2024, 09:44 pm »
Sometimes I wonder if folks think the rear firing tweeter thing is a gimmick.  It's OK.  The uber pricey Wilson at the top of the line... a tweeter firing up, AND a midrange - on the back of the speaker.

The little Sony SuperTweeter / Dome Midrange module would be slick for something like that.  A rectangular notch is cut into the back of the speaker.  On a similar sized panel holding the drivers for the module, add provisions for tube connectors / preferred binding posts.  Also, include 2 post points of some sort... for attaching a wire / resistor on the outside of the speaker to control output of the entire module.  Dial it in for taste - or turn it off completely (if no resistor / wire). 

Then, put that same module on the front and make a network for the M165NQ and I'll have another speaker to add to the pile.


Hobbsmeerkat

  • Industry Participant
  • Posts: 2656
Re: NEW NX-Bravo speaker - Great Job Hobbs!
« Reply #71 on: 30 Oct 2024, 10:22 pm »
For 99% of people, a rear driver is  definitely a gimmick. Most people have their speakers shoved right against a wall with a large TV and entertainment center between them.

To really get the benefit from a rear driver the speakers need to be pulled away from the walls, just like an OB speaker.

I think Sonus Faber has some high-end models with drivers on the back side as well.
Even the new Aspen FR30 from PS audio has a rear tweeter as well. Not sure about the FR20 though.

dayneger

  • Full Member
  • Posts: 314
Re: NEW NX-Bravo speaker - Great Job Hobbs!
« Reply #72 on: 1 Nov 2024, 03:45 pm »
The standard NX waveguide doesn't have that ~2KHz dip that the NX-Bravo waveguide does. other waveguide prototypes were even more drastic in variance depending on the use of an open back or deep cup being used.

The other option would be to put a second waveguide on the back to perfectly balance the front/back wave.

First, thank you for taking the time to give solid answers, Hobbs.  Really appreciated!

This comment made me wonder whether, say, the Studio would sound better (or just different) with a matching waveguide on the back side of the tweeter?  (Sorry for the possible thread drift  :oops:... inspired by the new waveguide as a key piece of the NX-Bravo offering!)

Hobbsmeerkat

  • Industry Participant
  • Posts: 2656
Re: NEW NX-Bravo speaker - Great Job Hobbs!
« Reply #73 on: 2 Nov 2024, 10:30 pm »
First, thank you for taking the time to give solid answers, Hobbs.  Really appreciated!

This comment made me wonder whether, say, the Studio would sound better (or just different) with a matching waveguide on the back side of the tweeter?  (Sorry for the possible thread drift  :oops:... inspired by the new waveguide as a key piece of the NX-Bravo offering!)

"Different" would likely be a more apt description, likely sounding more open and spacious than a standard Studio, but losing its near-wall capabilities.
Now if the studio didn't have the ramp or side walls but was more like a mini X-Statik with just the tweeter on a small baffle, overall performance would be very similar between them.

We've got our 2nd pair of in house NX-Bravos burned in (about 250hrs currently) and they're really starting to sound nice.

We've also got the printing issue behind us, so I'm printing waveguides non stop to build up a stock pile.

The matching center-channel cabinet should be finished this weekend, so we'll likely be working on the network for that model sometime next weekend.  :thumb:

mkrawcz

  • Full Member
  • Posts: 548
Re: NEW NX-Bravo speaker - Great Job Hobbs!
« Reply #74 on: 2 Nov 2024, 10:38 pm »
I’ve got about 50hrs or so on mine and they’re starting the open up now. I ended up adding Duelund JDM copper bypass caps that I had on hand to all the caps in the tweeter circuit and the results are starting to pay off. Great speaker

PcChip

  • Jr. Member
  • Posts: 5
Re: NEW NX-Bravo speaker - Great Job Hobbs!
« Reply #75 on: 12 Nov 2024, 06:08 pm »
@hobbs I have a few questions on the NX-Bravo kit,  I didn't see any instructions or build guides written up so apologies if I missed them 
 
1. are we supposed to build the crossovers on the small mdf boards included in the cabinet flatpack?
2. what is the overall process for this, do most people just hot-glue all crossover components the board first, then wire them up and solder? 
3. what are the corner-brace looking things for? (there are only 4 per speaker) where exactly do they go? can they just be glued in while gluing up the box, or do these need to be screwed in with wood screws during or after the initial box glue/clamp up?

https://i.imgur.com/Y34uxqo.jpeg

thank you for any assistance you can provide!

Hobbsmeerkat

  • Industry Participant
  • Posts: 2656
Re: NEW NX-Bravo speaker - Great Job Hobbs!
« Reply #76 on: 12 Nov 2024, 10:04 pm »
@hobbs I have a few questions on the NX-Bravo kit,  I didn't see any instructions or build guides written up so apologies if I missed them 
 
1. are we supposed to build the crossovers on the small mdf boards included in the cabinet flatpack?
2. what is the overall process for this, do most people just hot-glue all crossover components the board first, then wire them up and solder? 
3. what are the corner-brace looking things for? (there are only 4 per speaker) where exactly do they go? can they just be glued in while gluing up the box, or do these need to be screwed in with wood screws during or after the initial box glue/clamp up?

https://i.imgur.com/Y34uxqo.jpeg

thank you for any assistance you can provide!

1. I'm not sure if the flatpack comes with a board or not, but you need one that is roughly 4.5" by 9" to really fit the crossover neatly & to get it to fit through the 4.75" woofer hole.


2. First it to lay everything out onto the board, cut your boards to size, mark your board for drilling holes, and drill the hole for you to use zip-ties to secure the parts to the board, then twist and solder everything together, then use hot glue to further secure the crossover to the board. You will also need some holes for mounting screws, or use 3M heavy duty double sided adhesive tape, just don't put any screws through the woofer coil.

3. The corner braces are seen on page 2 of the cabinet plans which is available on the kit page. Two connect the top panel to the sides, and the other 2 connect the sides to the back panel.
They are easiest to glue into place once you already have the rest of the cabinet glued up.