A Neo Home Theater Build

0 Members and 1 Guest are viewing this topic. Read 10769 times.

HT cOz

A Neo Home Theater Build
« on: 22 Nov 2010, 09:09 pm »
Well everyone else posts about their builds so I thought I would share mine. 

The kits are AV/3 Neos which are basically Neo3 Towers and Center that don't use the deep cup Neo tweeter.  They are old and pre-date the Neo Series.

The flat packs weighed 118 pounds so lots of wood to glue up.  They are all mittered so this is a little different.

Here are a few pictures and I am sure I will have many questions for the pros.


Ok so I don't really know what I am doing so things are messy and probably not the most logical...  :lol:


« Last Edit: 23 Nov 2010, 04:19 am by HT cOz »

django11

  • Full Member
  • Posts: 1099
  • Canuckistani
Re: A Neo Home Theater Build
« Reply #1 on: 22 Nov 2010, 11:37 pm »
Be careful with the glue on that nice looking floor!  You need a temporary work table....

HT cOz

Re: A Neo Home Theater Build
« Reply #2 on: 23 Nov 2010, 04:21 am »
Oh yes I won't mess those up.  They were a lot of work to get looking this good.


A table would be nice!

HT cOz

Re: A Neo Home Theater Build
« Reply #3 on: 23 Nov 2010, 06:29 pm »
Ok the first large speaker is getting some serious glue.  This is somewhat challenging as the thing doesn't want to stay square very long.  I messed up one of the top braces, but I don't think it will hurt much...  The wife was a big help, needed 4 hands for sure.

How do you guys attach wire to the speaker terminals?  How about to the speaker posts?  Those little clips look like they work well but I can't imagine that sounds best?

Work will continue.  I'm looking forward to veneering and finishing.  The wiring looks like a Bleeepe  :duh:


Danny Richie

Re: A Neo Home Theater Build
« Reply #4 on: 23 Nov 2010, 10:43 pm »
Quote
How do you guys attach wire to the speaker terminals?

Solder the wire straight to it.

Quote
How about to the speaker posts?

Old style GR Research binding post cups? If so, also solder the wire straight to it.

Quote
Those little clips look like they work well but I can't imagine that sounds best?

You must be talking about the ones on the back of the binding post cups. They aren't bad, but they aren't tube connectors. Want tube connectors?

HT cOz

Re: A Neo Home Theater Build
« Reply #5 on: 29 Nov 2010, 05:12 am »
Ok so the first tower is making good progress.  For the pros out there does the placement of the NoRez look correct?  Also for those of you looking to use NoRez this little $20 Harbor Frieght cutting tool is great.  Slices through the asphalt like butter!


Thanks,
Robert

django11

  • Full Member
  • Posts: 1099
  • Canuckistani
Re: A Neo Home Theater Build
« Reply #6 on: 30 Nov 2010, 11:57 am »
Those tools are great.  With the straight blade you can plunge cut into wood and make cut outs you can't do with any other saw...

You might want to check if the No-Rez interferes with the driver.  You might have to trim it back a bit...

HT cOz

Re: A Neo Home Theater Build
« Reply #7 on: 18 Dec 2010, 03:07 pm »
Progress continues on my build.  I am getting very excited at this point as this has been more than a year in the making.  Having my own room is going to be killer!  :thumb:

In this picture you can see how easy it is to wrap the solid core wire around the capacitor.  I love the solid core wire it is so much easier to work with!  You get a solid mechanical connection and the soldier just flows on to complete the job


The front baffles were not rounded over so I bought a $25 Habor Freight router to finish them off.  This was a good use of Habor Freight!  I like the little router.


The cabs are coming together.


I can't wait to get on to veneering!


A few lessons learned:
1). I should have bought better clamps, these Habor Freight clamps were too cheap and did not work that well. As a result I am spending a lot of time going back over the joints with a surenge and am having to sand the edges.  This kinda sucks and could have been avoided if I had either bought real clamps or atleast the pipe clamps from harbor.  The $5 strap clamp worked well and was a real value.  On a side note I saw a set of clamps at Rockler yesterday that looked awesome.  4 for $80.  If I was going to do this again I would invest in two sets of 4.  Here is a link of the Rockler clamps... Really they were nice http://www.rockler.com/product.cfm?page=26859

Cheers,
Robert

django11

  • Full Member
  • Posts: 1099
  • Canuckistani
Re: A Neo Home Theater Build
« Reply #8 on: 18 Dec 2010, 03:41 pm »
That is a pretty good price for those.  I had anyone who wanted to buy me a birthday or Christmas present  get me these, which are great: 


aharami

Re: A Neo Home Theater Build
« Reply #9 on: 18 Dec 2010, 09:32 pm »
yea, the harbor freight clamps are not that good.  but can't really complain at $3.29 a piece.  I do need a couple 48" clamps for the top and bottom though

HT cOz

Re: A Neo Home Theater Build
« Reply #10 on: 19 Dec 2010, 04:45 am »
Ok things are getting excited! 

Holly batman you don't realize how much veneer you've bought until you lay it out


This is the front of the towers.  Should be pretty cool in that the grain tapers to the top just a bit.


This will be the sides.  I struggled if I should have a stripe or just use the figured portion.  I ended with the stripe because it is just so cool looking.  Hopefully it is a good move.


I can't find heatlock local anywhere.  I'm thinking of doing the hot iron method with Titebond Cold Press for Veneer which is available.  However, I don't want to mess up.  I'm also trying to get them ready for Xmas... Dang procrastination!

More to come,
Robert

HT cOz

Re: A Neo Home Theater Build
« Reply #11 on: 20 Dec 2010, 04:26 am »
More progress...

I got the veneer cut for all the speaker sides.  This tool was very helpfull as the venner is tough stuff with the paper backing.  I honestly can't imagine this project without this thing.  However, I don't know if it will make it to project two as it is kinda sputtering.


The Three Amigos before clothing.  I actually made all the cuts in one night.  :green:


I went to Ikea this afternoon and got this little table to use as a front rack.  Looks nice with the floor color.


I think I have enough veneer left for that servo sub someday!  I also ordered the cloth to cover the boxes and the accoustic transparent screen.  I decided to wait for the Heat Lock to finish the glue job.  Should have planned a little better.  No sleep is getting old. 

Robert

sl_1800

  • Full Member
  • Posts: 406
Re: A Neo Home Theater Build
« Reply #12 on: 20 Dec 2010, 07:59 pm »
Your doing a great job.

HT cOz

Re: A Neo Home Theater Build
« Reply #13 on: 21 Dec 2010, 03:41 pm »
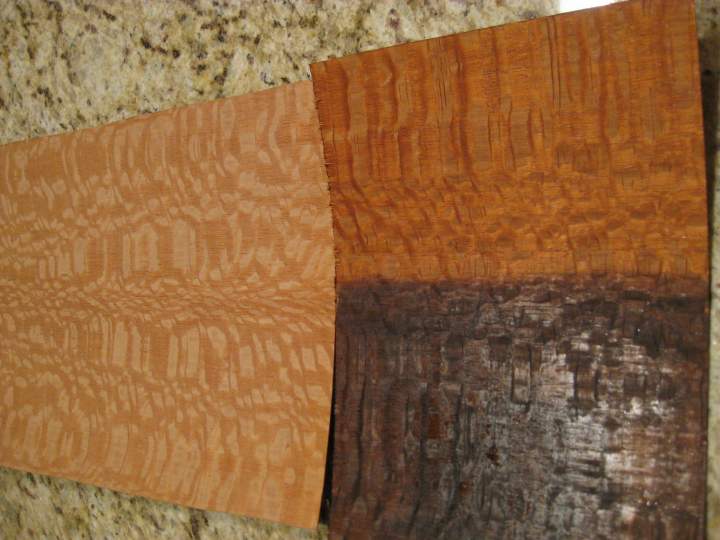
I've started to test for finishing methods.  This photo is of raw veneer, veneer with 1 coat of Waterlox, and dyed veneer with 1 coat of Waterlox.

I would never dye it this color but I wanted to see how the veneer would take Transtint mixed with Denatured Alchohol.  It did take it well.  You can see in the middle where I poured it on and where I wiped it on the sides.  This is concentration of dye to alchohol is 2oz to a pint -> that is supper strong.


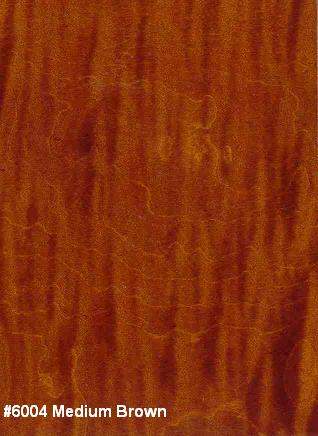
Now that I've determined that I can dye the wood without spotting, I need to choose a color.  I'm thinking of going with this color as it seems like it will enhance what is there naturally.  I don't want to end up with a muddy color.


Finally everyone needs a plan.  I found this post on the Homestead Finishing forum.  It is a formula for a guitar project.  I will use this as my basic plan of attack.
"Here's my latest guitar project....

sand 220 3m frecut
1/16 oz. of dk mission brown
8 oz. alcohol
wipe the dye and let dry .....4 hrs is plenty
sand back.......grain enhance
re dye
apply a few coats of shellac
follow with compatible top coats
at this point I will use 400grit and above to level sand in between coats.
for the buff I'll start at 800 and work up to 2000

pictured is the guitar with a few washcoats of blonde dewaxed shellac. I still have to topcoat where I'll be using roughly 10 coats of nitro lacquer. I was after a dk golden brwn and tried several dye combinations.
I ended up with the above recipe....a weak mix of dk mission brwn. "
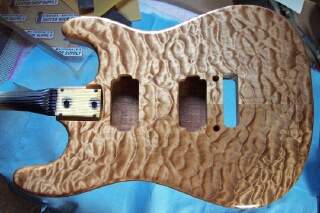
Here is a Picture of his outcome... Stunning to say the least.


If anyone has any advice please let me know.  I'm a total Noob at this!

Thanks,
Robert


HT cOz

Re: A Neo Home Theater Build
« Reply #14 on: 28 Dec 2010, 07:54 am »
The last few days have been great.  Christmas was amazing with the little ones running wild!  But it's time to get back to work.  I need this project finished in two weeks.  I bought the brown dye and it adds just a little definition to the wood.  Here are some photos.


0000 steel wool, one light coat of dye, 2 coats waterlox


The ball bearing froze up.  I have to zip quick to get this cut without messing it up bigtime.


Ok you can see this starting to come together.  Got the center veneered in one night  :green:

skeeter99

Re: A Neo Home Theater Build
« Reply #15 on: 28 Dec 2010, 04:53 pm »
The last few days have been great.  Christmas was amazing with the little ones running wild!  But it's time to get back to work.  I need this project finished in two weeks.  I bought the brown dye and it adds just a little definition to the wood.  Here are some photos.


0000 steel wool, one light coat of dye, 2 coats waterlox


Ok you can see this starting to come together.  Got the center veneered in one night  :green:

Love the stained color, very figured and distinct. The veneered center looks fantastic, well done  :thumb:

django11

  • Full Member
  • Posts: 1099
  • Canuckistani
Re: A Neo Home Theater Build
« Reply #16 on: 29 Dec 2010, 09:20 pm »
Nice job so far.  When you get the finish on that veneer it gets shimmery.  :thumb:

HT cOz

Re: A Neo Home Theater Build
« Reply #17 on: 30 Dec 2010, 08:03 pm »
Thanks for the kind words so far.  For a total noob, I'm feeling pretty good so far... :icon_surprised:

Here are some more pictures of the work from the last 3 days.  Cabinets are completely covered in veneer and all the holes are cut.  Now I will install my rear two speakers and then start cleaning my room of dust.  Then I'm on to finishing the speakers!!!


Thanks,
Robert

aharami

Re: A Neo Home Theater Build
« Reply #18 on: 30 Dec 2010, 08:40 pm »
did you install the electra tube connectors after you veneered or before?
« Last Edit: 30 Dec 2010, 10:00 pm by aharami »

HT cOz

Re: A Neo Home Theater Build
« Reply #19 on: 30 Dec 2010, 08:54 pm »
I installed the plugs before the veneer. That was a.bit of a catch 22 because if you wait how do you get to the wires and if you don't wait the how do you put the veneer over then and avoid stuff like glue.

I positioned the veneer where I wanted it and then pressed hard enough to leave marks in the paper. Next I drilled holes. Certainly not perfect but I'm not sure how I could have done better.