Praedet asked for me to comment further on my experiences working with Baltic birch plywood in the context of this thread specifically stacked laminations designs. For years now I have built several designs using the transverse lamination technique, often referred to as ‘translam’ on the web audio forums. My goal is to arrive at a set of techniques that will allow ACG to offer speakers using the translam feature in the ‘expensive but not crazy money’ category. From a commercial standpoint what I have learned tends to justify the crazy money prices charged as translam is very material, labor and/or CNC machine intensive to build and especially finish to high end standards. The good news for the DIYers reading this is the end result of all your sweat equity will be worth it both sonically and visually. I am convinced a well designed translam box beats one made from flat stock by a wide margin.
We will start with a question Praedet asked me then onto more general suggestions.
“Yours did not have a separate baffle, but what would you have done to the baffle if they had? Do you think a satin black painted baffle would match with the rest of the finish?” He also asked: “Any hints, exact directions, and/or specific tools/brands you used to do your speakers that you might want to share? I have been looking to duplicate your speakers from the beginning and I would love to know how you did the veneer and how you finished the speakers.”
My opinion is black on a hi-fi speaker has reached the same status it enjoys on formal attire, i.e. it’s the go-to color of choice. No doubt this is aided by the fact that 90% of the time the drivers we are mounting on the baffle are black or silver. In the specific case of translam enclosures Magico (
www.magico.net) has established the black baffle + clear coated stacked birch ply look.
The other comment I will make about the baffles is to consider making them removable. The sides of this design look thick enough to accept threaded inserts for countersunk machine screws to hold the baffle on.* I recommend removable both to allow reusing the enclosure with other drivers in the future and so that the finishing operations on the birch ply enclosure and MDF baffle can be separately optimized and completed. As you are in the process of finding out there will be many hours of work into these by the time you complete the gluing, sanding, and finishing. The flexibility of a removable baffle will look good as the hours pile up. I make removable baffles by using ½” MDF to make a template the exact size of the baffle into which I carefully layout and drill pilot holes for the mounting screws. The template is then used to transfer the hole locations to both the baffle and the enclosure so everything lines up. I write the project name on the template and save it for use when the upgrade bug hits and I am wanting to try different drivers then the template has both the mounting hole locations and the baffle dimension all ready to go.
*As I wrote the above paragraph it occurred to me with the curved sides of the design for baffle mounting hole locations another option is glue four 1”x1”oak blocks in the corners of the enclosure opening. The flat top and bottom panels will provide surfaces to which the blocks will glue. Using something like oak will accept the threaded insert and be very strong. I suggest the blocks hidden inside the enclosure because they give us an out in case something goes wrong. If you are drilling into the sides of the enclosure into the CNC machined parts and the drill breaks through or an insert splits the wood that makes for a very bad day in the shop. If one of these blocks get buggered up just cut it out and try again.
We are getting bogged down in this baffle issue, let’s get back to translam tips. If you want to glue on the baffle I can offer some hints there as well.
The disclaimer before we start is what follows has worked for me. Others will have methods and materials that work for them. Where one ends up on a process like this is related to both what one has tried and the cost vs. time tradeoff. I tend to prefer materials that are re-workable because I often do one of a kind projects, the trade off is more hours and days until we are done. If I were setting up a factory to pump these out in even moderate quantities I would switch to materials like epoxies and sprayed polyester finishes. These are much quicker but when something goes wrong scrapping the item and go onto the next is the cost effective way.
Recipe for this enclosure’s construction and finish.
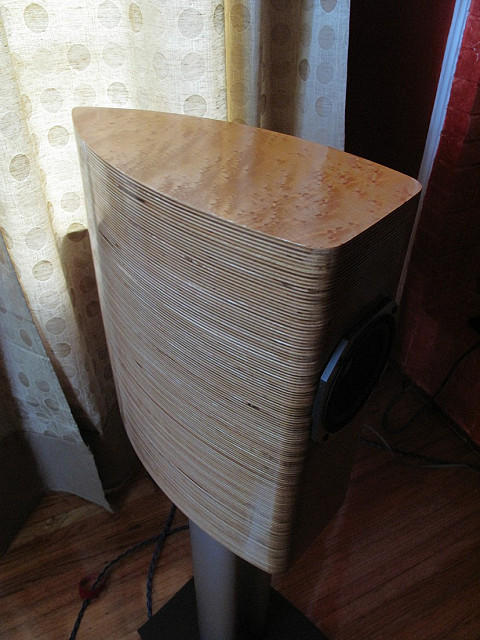
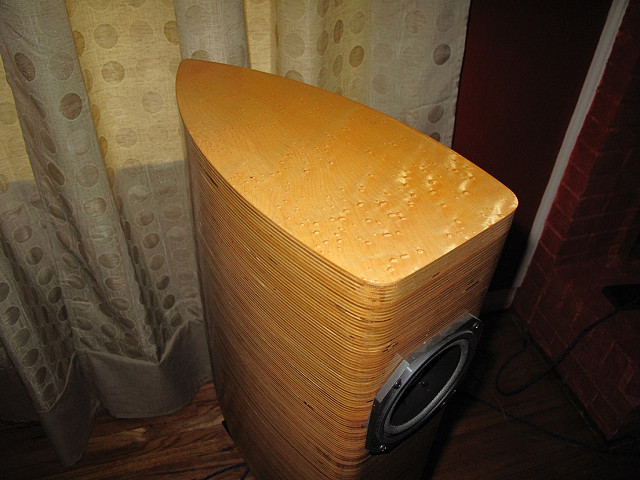
The shapes for individual layers were laser cut. That was a failed experiment looking for a quicker and therefore less expensive alternative to CNC milling/router. Any cost saving on the CNC side was lost to the fact laser cutting of thick materials results in an edge that is not exactly at a right angle. This is because the laser beam is ever so slightly cone shaped. Also the edges are blackened because after all the wood is being burned to cut it. Therefore after the glue up MASSIVE amounts of sanding went into getting the result seen here, I was warned but had to try anyway.
Speaking of the glue up I always use Titebond II wood glue and it has yet to let me down. I have considered using epoxy but with costs of materials and machining time always high I am loath to use the several time more expensive epoxies given we will use it by the quart or liter. I also like the water cleanup of wood glues. A hint is to get one of the small disposable paint rollers to apply the glue. I like to get a thin layer completely covering the wood surfaces to be joined and rolling it on is quicker and more precise then squirting it on out of a squeeze bottle or with a brush. Clean the roller in water and its good for a few applications.
I have yet to discover a method to align and glue the layers precisely enough that the sanding step can be only for finishing as in a typical wood work process. For translam we can think of the initial sanding as a secondary machining process to level out the layers. I use both sanding blocks and the indispensable powered orbital sanders. I have also tried belt sanding so let us go there for a bit.
I actually built two pairs of the laser cut translam enclosures. After all the work sanding the first pair using blocks and orbital sander I bought a belt sander looking to speed the process on the second. I advise you not to use a belt sander or if you must do so with great caution. The good and bad/dangerous things about belt sanders is the same thing, that is they can remove a lot of material quickly. In these translam projects we have paid good money to have lovely curves CNC machined into the layers. If one lets a belt sander ‘get away’ and have its way that curve will quickly be a different shape flattened out. It can be done, it just takes intense unbroken concentration.
When using manual sanding blocks and powered orbital sanders the first step is to clamp the speaker down on a stout work surface. Cradle and protect the opposite side with something like an old beach towel and clamp that sucker down. Movement of the enclosure while you are sanding robs the energy you want applied to cutting down the wood and glue. Sorry if this is too obvious but early in my haste I would just hold the part on the bench with one hand and sand with the other. Twice the muscles involved for half the work. Self taught woodworker mistake, but it does make for excellent isometric exercise!
So with the work piece clamped down I prefer to start with a 100 grit and work to finer 180 and 220. I won’t say I never used 80 grit especially getting past the charred edges on the laser cut units but my experience is time saved using 80 grit I end up spending using 100 grit to cut off the scratches left by the 80. Reading the thread above it seems Praedet may be there now. On the other hand Wayne (WGH) who I believe is a true professional wood craftsman of the 1st order suggests using 80 grit so again I will repeat this is what worked for me not the only way. My emphasis is get it right the first time as I have no units to scrap and if it takes more time and sheets of 100 grit so be it. Looking at the photos of Praedet’s work in progress above judging from the still visible glue I would say you have some more sanding at 100 grit ahead of you. After the 100 sanding I go to just a little 180 &/or 220 to get the surface nice and smooth. Not too much time at finer than 100 because as soon as we start with the polyurethane it will raise the grain and we will be knocking that down. Of course from here on dust control is task one so clean up the work space and buy some tack cloths along with the sandpaper and polyurethane. Wipe off dust with a tack cloth before every finish coat in the process detailed below.
Now I am assuming you are heading toward a clear finish over the natural Birch plywood layers. I have some experience to share staining these but this is already getting quite long so that will go in a later post. If you are staining stop here until I get that written up. For a DIY friendly clear finish I use Minwax Wipe-on Poly for both sealing and topcoats. As has already been pointed out there are sealers and topcoats that will build up faster but I know this works and keeps it simple. The tradeoffs are a downside of a more time intensive process with an upside of easy and hard to screw up. Apply the Wipe-On with a brush or I use a lint free cloth held in a gloved hand. For now just apply to the end grain sides/back as the top and bottom will require fewer coats. After all the real work of the sanding applying the first coat of finish is for me always a special milestone. Seeing the wood surface pop out as the finish enhances it is a real payoff. This is a temporary effect as the first few applications will just seem to disappear into the wood as they dry, because that is where it is going as especially the end grain layers just drink it in. Depending on the plywood your working with after 2 to 6 applications of the Wipe-on Poly the grain will fill and the polyurethane film start to build on the surface.
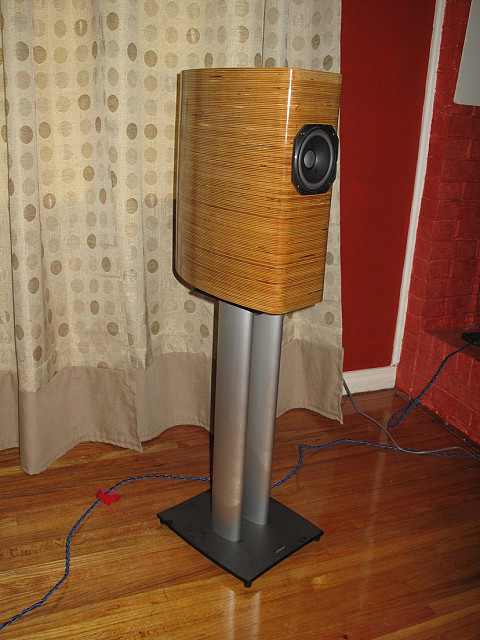
Let’s take a break while another coat of poly dries and talk about veneering. Here I am assuming you may want to veneer the top and perhaps bottom end cap as I have in the units shown above. I have never veneered over the edges of a translam project so no comment on that (well maybe to ask WHY!?!??). I bring up veneering at this point because I apply the veneer after sanding and initial sealing of the edge and before final finishing. My thinking is experience teaches with translam part of the big sanding task is getting the glue squeeze out left from gluing the layers together off the end grain sides. With veneering comes the danger of more glue getting on the end grain. One could veneer before starting the sanding, the downside of that is the veneer sits there in harms way while I am wailing away on the end grain sanding. My preference is to get the edges sanded and sealed then if any glue gets past the masking tape onto the edge grain it is sitting on top of the poly rather than soaking into the end grain and hardening in the wood. The speakers shown above have the tops veneered with birds eye maple. I used un-backed veneer. This has the advantage of no paper backing showing along the edges. One does have to be careful that the glue does not go through the veneer. I used my trusty Titebond II wood glue because my experiences with contact cement have ranged from mild disappointment to total two weeks of reworking disasters. On the speakers above I wet glued the veneer clamping the entire surface with a flat call of MDF or plywood. With the call down, then veneer, then speaker upside down on top extra glue won’t run down the speaker sides. In one case I had to veneer that speaker twice as I applied too much glue and it came through the veneer. Second try I used less glue and it went A-OK. I have read a coat of shellac applied and dried on the veneer before glue up will prevent the glue soaking through. I have not tried that because for recent veneering projects I have switched to the endlessly discussed iron on method using, how did you guess, Titebond II. Instructions abound on the web for doing veneering with the iron on method so I will not repeat those here beyond this hint. When using general purpose wood glue like Titebond be aware of its phases of chemical cure. In the case of Titebond II the period after it tacks up (30 minutes to an hour after application to the veneer and surface being veneered) and before a several hour cure is when it can be re-softened with heat to fuse veneer to substrate. After an overnight cure Titebond II undergoes a chemical reaction and can no longer be softened with heat. So do not get interrupted during veneering OR look into the types of glues know as ‘hide glue’ as used by luthiers for musical instrument assembly. Hide glues remain in a chemical state where they soften whenever heat is applied.
However I get the veneer on after the glue sets I trim it using a bearing equipted flush trim router bit carefully setup in my plunge router. Router or hand trimming my goal is to get the veneer almost flush with the sides so I can finish it up with careful hand sanding using 100 grit on a block.
Ok, that turned into quite the diversion, back to finishing with Wipe-on Poly. With the end grain layers sealed a couple of coats on the ends get them started, from here on we are finishing all sides. The first coats of poly also function as a primer. By that I am referring to the fact we only really see the exact nature of a surface’s state after we begin to coat it. It is essentially 100% certain at this stage you will find imperfections, fixing them now is part of the process, NOT a sign the project is going south! If you missed some glue that need to be sanded off go to it. Some little voids in the plywood may show up (or some not so little voids if the false economy of using Chinese over Euro/USA plywood was selected). Fill these with wood filler designed to match light woods like birch and maple that takes stain and the filler will disappear into the random layering of the plywood end grain/long grain pattern. Don’t get obsessive about filling small imperfections say under 1/8” (2mm) as we will fill these using the poly as we work the surface smooth. Finish the priming stage with another coat of poly and sanding with 220 grit paper.
Once we have the surface filled and sealed we come to the step I find great fun and frustration all wrapped together (that statement betraying my borderline OCD tendencies). That is working to the final finish. As the plywood grain stops soaking up the poly it will begin to build up on the surface. At this point I switch to a routine of applying a coat of poly, let it cure for several hours/overnight, wet sand with 400 grit wet/dry sandpaper, clean surface, and repeat. This process is advancing by taking one step forward (another coat of poly) and half-step back (sanding part of it off). What it buys us is twofold; first removing any imperfections before they get imbedded in the poly, second flattening the surface. When you are wet sanding the water should sit on the poly’s surface otherwise apply more poly to seal the wood. Use a sanding block, I spray both the paper and surface. Sand gently as always being careful near any edges lest you sand through the building finish. Use an old towel or paper towels to wipe off the water and cut off finish slurry to judge your progress. At first you will see after sanding a mottled pattern of shiny low spots and dull cut down high spots. As you repeat the coat/wet-sand cycle and the surface builds and flattens a little sanding will yield a flat dull surface telling you it is getting there, nice and flat.
For some projects I have pushed it by only sanding between ever other coat of poly to get a faster build. In my constantly multiplexing life this was accomplished by getting up a little early so I could apply a coat in the morning to dry while I am at work. Another coat after work early in the evening that is dry enough to sand before I go to bed that night. This works but does not yield quite as fine a finish.
How far to take this is strictly up to you. Lots of fine woodworking projects are finished with thin finishes that let the wood grain texture show through. A little deeper build and the grain disappear under the finish where it just serves to catch the light. The deepest builds with polishing and we get the French polish a.k.a. ‘piano gloss’ finishes. As the build approaches the look I want I switch to 800 then 1000 grit wet sandpaper and/or polishing compound to literally get to a final polish. This gets us to a rich semi-gloss finish which in my opinion is the optimum end point for this process using Minwax Wipe-on Poly. For higher gloss let the final coats cure longer and you can polish it more aggressively.
However regarding very high gloss I have two warnings. If your heart is set on a very high gloss finish there is a limit to how much you can polish Minwax’s Wipe-on Poly. The issue here is polyurethane finishes build up in discreet layers. Really aggressive polishing and you can cut though the top layer and see the banding. This typically (always?) happens to the edges as we try and get then as glossy as the broad inner surfaces. This is discouraging to the max because we have the finish line in sight and now its repair time and back to the coat/sand cycle loop we go. So my advice is if you want really high gloss look into the processes like French polish shellac or lacquer for DIY or pay a sympathetic & adventuresome auto painter or cabinet builder to spray them in a dust controlled professional booth. Shellacs and lacquers melt their layers into each other as they are built up so you have to polish right through to the wood to jack that up. The finish is not a tuff and mar resistant as poly but more repairable. Always the trade-offs! The second point of going for deep high gloss with Minwax’s Wipe-on Poly is that it is nor a water clear finish. Built up to thick films we get a yellow gold tint. For many wood or stain colors this is an enhancement looking similar to amber tint shellacs. If your heart is set on something like light blond maple a water clear product is what you want.
Well, that’s a lot of info; Word says I am up to 5 pages and closing in on 3,300 words. We'll get this posted and let the discussions and progress reports continue. Questions welcomed.
Happy listening
Norman Tracy
Audio Crafters Guild