LS-9 Build

0 Members and 1 Guest are viewing this topic. Read 5268 times.

dgshtav

LS-9 Build
« on: 16 Mar 2010, 06:31 am »
Just wanted to share some pics of my LS-9 build with you all.

Took me about 3 months balancing this project with work and family. It’s a lot of work, especially the braces (with 7 holes each times 2 sides of each hole in each brace to be rounded off times 22 braces times) and the front panels.

I am grateful to everyone who extended their guidance and feedback on this build. Thanks to Danny as well who was very patient with my numerous questions and emails throughout the build!

I will spare you all the details of the build, but would like to mention one thing….given the scale of this speaker build, I opted to start with as perfect a master brace and side panel as I could and copied the same with the router. I believe this approach saved me a lot of grief later in the build. I also opted to leave an extra 3/8 on each edge on the top, botton, front and back panels which were then flush trimmed.

Here are some pics of the build (Comments added to the pics).

I am not done with the base design yet. Neither have I finished the speakers yet in veneer/paint (because I don’t know yet what finish I would like the most on these).

These are currently breaking-in in my living/dining room which is doubling up as music room. Eventually, once broken-in/finished, they will go in the dedicated media room with proper room treatment and placement.

Enough has been spoken about their sonic delivery and I find those postings justified. I still need to tweak the bass and the insulation fill around the port tubes and also build a base that allows removal of the crossover but still seals the bottom when installed (currently speakers are open from bottom though letting them stand w/o the bases kinda "seals" the bottom)

Thanks again!

- Dinesh

EDIT: Fixed the photo album link. Sign-in not required anymore.
« Last Edit: 3 Apr 2012, 05:43 pm by dgshtav »

Cacophonix

Re: LS-9 Build
« Reply #1 on: 16 Mar 2010, 10:07 pm »
Great stuff, Dinesh! Very impressive build!

Christof

Re: LS-9 Build
« Reply #2 on: 16 Mar 2010, 10:11 pm »
I love image #4496

Nick77

Re: LS-9 Build
« Reply #3 on: 16 Mar 2010, 10:21 pm »
Quote
     EDIT: Fixed the photo album link. Sign-in not required anymore.                                                               

Thanks! Enjoyed the show, awesome speaks!  :drool:

poseidonsvoice

  • Full Member
  • Posts: 4019
  • Science is not a democracy - Earl Geddes
    • 2 channel/7 channel setup
Re: LS-9 Build
« Reply #4 on: 16 Mar 2010, 11:13 pm »
Just wanted to share some pics of my LS-9 build with you all.

Took me about 3 months balancing this project with work and family. It’s a lot of work, especially the braces (with 7 holes each times 2 sides of each hole in each brace to be rounded off times 22 braces times) and the front panels.

I am grateful to everyone who extended their guidance and feedback on this build. Thanks to Danny as well who was very patient with my numerous questions and emails throughout the build!

I will spare you all the details of the build, but would like to mention one thing….given the scale of this speaker build, I opted to start with as perfect a master brace and side panel as I could and copied the same with the router. I believe this approach saved me a lot of grief later in the build. I also opted to leave an extra 3/8 on each edge on the top, botton, front and back panels which were then flush trimmed.

Here are some pics of the build (Comments added to the pics).

I am not done with the base design yet. Neither have I finished the speakers yet in veneer/paint (because I don’t know yet what finish I would like the most on these).

These are currently breaking-in in my living/dining room which is doubling up as music room. Eventually, once broken-in/finished, they will go in the dedicated media room with proper room treatment and placement.

Enough has been spoken about their sonic delivery and I find those postings justified. I still need to tweak the bass and the insulation fill around the port tubes and also build a base that allows removal of the crossover but still seals the bottom when installed (currently speakers are open from bottom though letting them stand w/o the bases kinda "seals" the bottom)

Thanks again!

- Dinesh

EDIT: Fixed the photo album link. Sign-in not required anymore.

Hats off to you Dinesh.

A job very well done. You'll have a nice state of the art line source to listen to for a long, long time. In fact, the only line source that Danny has designed that I will ever consider building is the LS-9. It is very tall and exemplifies true line source behavior compared to the LS-6 and LS-4, and other shorter designs. The only problem is you need a sizeable room, which you have since your room is 22 feet long. You need to sit at least the length of the array away from the speakers; preferably even a little more. This speaker is 81 inches tall! So that is a minimum of 7 feet. I am sure at 9 feet or more the speaker really integrates well.

Have fun,

Anand.

arthurs

Re: LS-9 Build
« Reply #5 on: 16 Mar 2010, 11:18 pm »
Fantastic job Dinesh!  Enjoy your new speakers!   :thumb:

shadowlight

  • Full Member
  • Posts: 1103
Re: LS-9 Build
« Reply #6 on: 16 Mar 2010, 11:36 pm »
Excellent, thanks for sharing.

Outofthewoods

  • Industry Participant
  • Posts: 980
  • Fallen Enclosures, Inc. Crafted with Passion
Re: LS-9 Build
« Reply #7 on: 17 Mar 2010, 03:08 pm »
Well done! 8)

I look forward to seeing them when they're finished. :drool:

Enjoy!

Ruben


dgshtav

Re: LS-9 Build
« Reply #8 on: 17 Mar 2010, 04:03 pm »
Thanks everyone!  :D

Joey Skinner

  • Jr. Member
  • Posts: 33
Re: LS-9 Build
« Reply #9 on: 21 Mar 2010, 04:32 pm »
Quote
I love image #4496
Me too. Also #4787. Your photo skills are right up there with your speaker building skills.

hesster

Re: LS-9 Build
« Reply #10 on: 6 Apr 2010, 04:01 pm »
Is the use of the fiberglass packing around the port tubes offer any positive dampening if using a good sidewall stick on absorber?  I used No-Rez throughout, and am wondering of the need to also use the fiberglass in the woofer enclosure like you have.  As for outside finishes, it is the owners choice, but these baby's warrant something that does them justice.  I finished mine in South American Premium Rosewood 22ml veneer - not cheap or easy to finish, but absolutely gorgeous.  Crossovers are in seperate box's with a flourescent edge glass top and internal LED lighting - the components are too beautiful to hide when assembled with detail.  Should be ready to finish them up in a few weeks and will post pics.

KCI-JohnP

Re: LS-9 Build
« Reply #11 on: 6 Apr 2010, 04:41 pm »
Wow, very nice! And in only three months, sounds pretty quick to me. Great job Dinesh!! :thumb:

dgshtav

Re: LS-9 Build
« Reply #12 on: 19 Apr 2010, 09:33 pm »
Is the use of the fiberglass packing around the port tubes offer any positive dampening if using a good sidewall stick on absorber?  I used No-Rez throughout, and am wondering of the need to also use the fiberglass in the woofer enclosure like you have.  As for outside finishes, it is the owners choice, but these baby's warrant something that does them justice.  I finished mine in South American Premium Rosewood 22ml veneer - not cheap or easy to finish, but absolutely gorgeous.  Crossovers are in seperate box's with a flourescent edge glass top and internal LED lighting - the components are too beautiful to hide when assembled with detail.  Should be ready to finish them up in a few weeks and will post pics.

I am thinking that it’s intent is not to dampen the speaker (which is left to the materials applied on the side and back walls), but rather to minimize internal reflections with absorption, especially the lower end of the spectrum and eventually aiding the port tubes in doing their intended job better. But I think Danny can best comment on the functional aspects of the fiberglass around the port tubes.

On my build, I think I have packed it in way too dense so much so that it probably alters the internal volume of the cabinet. I intend to take it all out and try just polyfill or the fiberglass insulation much more lightly filled.

As for the finish, I am really undecided at this point, primarily for the same exact reasons you cited! Also, I only get one shot to get it right!

One of the thoughts I have been having is an all around gloss black with detachable veneer sides. That way, I can have the best of all worlds....They can be rosewood one month, cherry another, maple the third and all gloss black too!!

Attached drawing is one of the ways I was thinking I could do it.


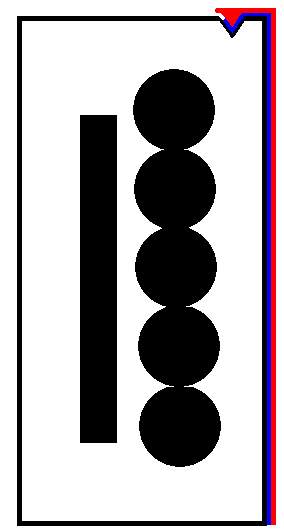
* The Black is speaker frame.
* The Blue is weather/sound proofing strip (Not the vinyl covered one, but the one that’s like felt or dense soft fibres. Or probably something similar that is usually used as lining behind the mount on a speaker driver frame. Goes around under all edges of the veneer side panel.
* The Red is the Hang-On veneered side panel.

The veener panel can be made in 1/4" thick MDF. This thickness has almost even density throughout. Is heavy enough not to become a diaphragm and it's weight pivoted off the top of the speaker should keep it steady. The continuos felt/fibrous strip lining will keep it from rattling against the speaker and will give it something to rest on while also “sealing” the airspace between the speaker and the hang-on side so that the hang on side does not become a “port”.

The groove on the top and the extension of the side over the top won't be as big and prominent as it looks in the attached drawing.

Easy on - Easy off leaving a clean looking speaker when taken off!

Another thought is to use very strong magnet discs at all four corners of the snap-on veneered side. Positive is that it's easy to do, negative is the magnet discs will show on the speaker side when the veenered side is removed, but their visibility may not be a problem if I can find some that are shaped aesthetically and are a brushed steel, anodized black aluminum or a carbon-fiber (or some other matching) finish.

Floating bases for sure!!

All that said, I am also struggling with my HT room plan. If I decide to go with a left to right wall to wall fabric screen, then these might end up going behind the screen in which case there is no point in finishing these!  Time will tell but one thing is for sure; If I do finish these, I want to finish these in such a way so that I can change the looks once in a while.


Wow, very nice! And in only three months, sounds pretty quick to me. Great job Dinesh!! :thumb:

Thanks. I had a lot of inspiration and guidance here.

As for “Only three months”….that’s what I try to tell my wife when the project comes up for discussion with friends/family. She is very quick to correct me with “Three very long months”. To her credit, she did put up with the project being executed in our living room as it was too cold to work in the garage. It was a pain cleaning up everytime after the project work was done for the day though!
 
« Last Edit: 20 Apr 2010, 09:17 pm by dgshtav »