My build of Gr-research OB-7's from Custom Concepts flatpack

0 Members and 1 Guest are viewing this topic. Read 18398 times.

TRADERXFAN

  • Full Member
  • Posts: 1062
  • Trillions will vanish... it's a debt blackhole.
    • GALLERY
I started a photo album while I am waiting for glue to dry, if anyone in interested...

http://www.audiocircle.com/index.php?action=gallery;area=browse;user=42928

hoosier21

Re: My build of Gr-research OB-7's from Custom Concepts flatpack
« Reply #1 on: 10 Feb 2008, 02:10 am »
cool, looks good so far

Daygloworange

  • Industry Participant
  • Posts: 2113
  • www.customconcepts.ca
Re: My build of Gr-research OB-7's from Custom Concepts flatpack
« Reply #2 on: 11 Feb 2008, 11:33 pm »
Tony,

You seem to be coming along nicely on your enclosures.  :P 


BTW, looking at the gasket you've done on your false bottoms, if all you were to do was drill right through the gasket, you'd be ok. You just don't want any glaring breaks in the gasket. I'd use a #6 wood screw for attaching the solid bottoms.

What have you decided to do for a finish on these?

Cheers

Bill Baker

  • Industry Participant
  • Posts: 4887
  • Purity Audio Design -Custom Design and Manufacturi
    • Musica Bella Audio
Re: My build of Gr-research OB-7's from Custom Concepts flatpack
« Reply #3 on: 11 Feb 2008, 11:59 pm »
Looking real good Tony,
 I think the cats are a good idea for the fill. Nice choice :lol: (just kidding)

 Can't wait to see the finished product. Let us know when you start applying the finish.

TRADERXFAN

  • Full Member
  • Posts: 1062
  • Trillions will vanish... it's a debt blackhole.
    • GALLERY
Re: My build of Gr-research OB-7's from Custom Concepts flatpack
« Reply #4 on: 12 Feb 2008, 08:23 pm »
Thanks for the support guys...

I am still debating what I am going to attempt on the finish. But there is still a lot to do. I spent a good bit of time cutting up the no-rez and attaching that last night. I still need to do the sand-putty-sand step. I have the kit here now so I can do the drilling for the holes.

I might just wait for it to get warmer and do the bedliner. But our puppy keeps trying to lick the mdf...
http://www.audiocircle.com/index.php?action=gallery;area=browse;album=1355&pos=28
On the other hand my wife likes the idea of the silver vinyl wrap from parts express though. But based on the picture they show, I don't get the gist of what it might look like -it could turn out really tacky. hmm... some big shiny silver boxes in the middle of the room? Nah can't do it.

Bill, as far as stuffing material... the cats just won't sit still when I try and put them in there  :wink:
I think I am going to have to actually pay for the acoustastuff.

mcgsxr

Re: My build of Gr-research OB-7's from Custom Concepts flatpack
« Reply #5 on: 12 Feb 2008, 09:52 pm »
Nice work, looks like you are making excellent headway in assembling your cabinets.

No surprise that the flat pack goes together well, I have had the pleasure of standing in Denny's shop, and can attest to the phenomenal gear he has - quite the investment!

Couple that with his passion, and you are in good hands with Denny.

As for the finish, I have applied bedliner a number of times, and you are absolutely on the right track to be applying the putty, and sanding like crazy.  My DIY speakers did not benefit from that, and if seen from the wrong angle (meaning just about ALL angles but a few!) the lines are quite evident where the butt joints are.

pbrstreetgang

  • Full Member
  • Posts: 604
Re: My build of Gr-research OB-7's from Custom Concepts flatpack
« Reply #6 on: 12 Feb 2008, 11:43 pm »
Man that is starting to look good!

TRADERXFAN

  • Full Member
  • Posts: 1062
  • Trillions will vanish... it's a debt blackhole.
    • GALLERY
Re: My build of Gr-research OB-7's from Custom Concepts flatpack
« Reply #7 on: 13 Feb 2008, 02:16 am »
Thanks Mark and PBR!

Kind of a funny story. I had showed the wife these comments and the pictures. I was saying how Response Audio wants about $3500 for the speakers... somehow she thought I was saying that they wanted to buy the speakers FROM ME for $3500 and she got very excited and asked me how many pairs a month I could build! When I finally figured out and corrected her misunderstanding we had a good laugh on that one.

I do have a tip, don't let the glue drip into the area where the removable bottom is suppose to go. I had to chip that out last night to get the bottom to fit, and its still not right.

Also, I went to the store and was going to buy the wood putty, but both the minwax and another brand said that the putty was not sandable. So I bought the minwax wood filler which said it did sand to a smooth finish. Is that the right stuff??

Denny, I picked out a #8 wood screw because they didn't have a 2.5 inch screw in the #6 variety that you suggested. I thought 2.5 inch should be enough length for the 3 boards, but maybe that was overkill. I didn't measure before I wentto the store and didn't want to make another trip...

Bill, I must say I know how you feel. This project came along at the right time. It's taking my mind off some things in my life too... The company today is indicating about 20% layoffs by the end of March. At this point I think I am pretty well insulated because of my specific position, but you never know.  I should be able to get a severance package for at least 6 months of pay if it happens. I think there are a couple of other things that I would like to do, so even if that happens I wouldn't feel too bad. -being a professional speaker builder would not be one of them, despite the dollar signs in my wife's eyes!

But anyway... let's finish building some speakers!   
« Last Edit: 13 Feb 2008, 05:31 am by TRADERXFAN »

Daygloworange

  • Industry Participant
  • Posts: 2113
  • www.customconcepts.ca
Re: My build of Gr-research OB-7's from Custom Concepts flatpack
« Reply #8 on: 14 Feb 2008, 05:22 am »

Denny, I picked out a #8 wood screw because they didn't have a 2.5 inch screw in the #6 variety that you suggested. I thought 2.5 inch should be enough length for the 3 boards, but maybe that was overkill. I didn't measure before I wentto the store and didn't want to make another trip...

Tony,

I would recommend getting some #6 1 1/4" screws to secure the solid base to the perimeter of the false base.

Then I would use regular #8 (or larger) 1 1/4" screws with washers to secure the base to the bottom.

Quote
So I bought the minwax wood filler which said it did sand to a smooth finish. Is that the right stuff??

Yeah, that stuff will work fine. We've used that brand before. I've got dried up tubes of that stuff all over the place. We don't have much use for fillers.  :P   :wink:

Quote
But anyway... let's finish building some speakers!

Git 'er done!

Cheers

TRADERXFAN

  • Full Member
  • Posts: 1062
  • Trillions will vanish... it's a debt blackhole.
    • GALLERY
Re: My build of Gr-research OB-7's from Custom Concepts flatpack
« Reply #9 on: 14 Feb 2008, 06:02 am »
Thanks again for all of the info!  :thumb:

But again, more questions for the guys who are have been so gracious in willing to share what they know...

Are you supposed to No Rez the very bottom space, where the false bottom is? I didn't because I thought I would need the room for all of these crossover components. But from my knuckle tests I thought it could use it. Also I did put some scrap strips on the top...
http://www.audiocircle.com/index.php?action=gallery;area=browse;album=1355&pos=26

Denny, I see in your picture of the OB-5 with No Rez applied you didn't have it in either of these spaces:
http://www.audiocircle.com/index.php?action=gallerysearch&cat=0&pos=23

So I was trying to see how much room I was going to need for the crossover, and traced out the usable space on the bottom that will clear the false bottom. -It's not much! There are a lot of inductors. I read somewhere that the inductors should be spaced apart by a few inches... which doesn't seem like a possibility if its mounted internally. I see that on Bill's external box he put them at different angles -some on the flat, some on the side, others on the side but rotated to a different axis, etc...  How big of a deal is the spacing and orientation?

http://www.audiocircle.com/index.php?action=gallery;area=browse;album=1355&pos=27

If it IS a big deal for sound quality, maybe I should mount the crossover externally too. This would make it a bit of a bigger project, and the wife doesn't like the idea of another couple of boxes, especially considering that there is going to be one or two of the servo subs planned for the future.


« Last Edit: 14 Feb 2008, 06:13 am by TRADERXFAN »

Daygloworange

  • Industry Participant
  • Posts: 2113
  • www.customconcepts.ca
Re: My build of Gr-research OB-7's from Custom Concepts flatpack
« Reply #10 on: 14 Feb 2008, 07:28 am »
Tony,

These are all great questions.

Yes, in fact, I've got NoRez anywhere you can stick it!   :thumb:  
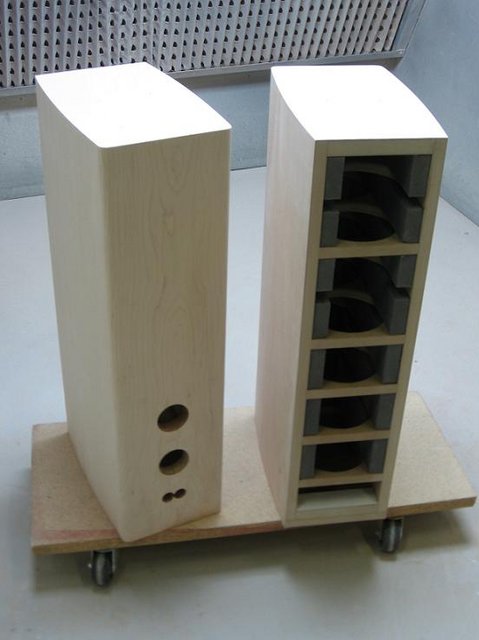
I did in fact do the underside of the top, and the very bottom portions of the enclosure.

In the photo I posted, I hadn't finished putting all the NoRez in the enclosure because I hadn't done the holes in the top for the hookup wire to the open baffle MTM section. We clamp a backing block to the underside of the top to prevent blowout of the MDF as the drill exits through the bottom of the hole.  :P


Quote
read somewhere that the inductors should be spaced apart by a few inches... which doesn't seem like a possibility if its mounted internally. I see that on Bill's external box he put them at different angles -some on the flat, some on the side, others on the side but rotated to a different axis, etc...  How big of a deal is the spacing and orientation?

Great question. Yes it is very important how you arrange the inductors. Otherwise you cause cross inductance, and the values of the inductors changes. Basically, (IIRC) the hole through the middle of the inductor is like a pole, you don't want the poles to be in line with each other (like 2 doughnuts on a single pole). You want the poles arranged as far apart(physically) and with the poles arranged at far apart magnetically(?) as possible. So in practical terms, the best way is usually to lay the bigger inductor flat, and the other one up, as if it's going to roll away from the flat (bigger) inductor. This way, the poles are not inline, nor parallel, but at perpendicular to each other. This will minimize the cross inductance in the tight physical constaints usually found in internal speaker crossovers.

The devil is in the details.

As far as internal vs external. That's a personal judgement call. In theory, not having the components in a box that's being pummeled by soundwaves and vibrations is a good thing. Also not infringing on the air flow and box volumes is a good thing.

Cheers


TRADERXFAN

  • Full Member
  • Posts: 1062
  • Trillions will vanish... it's a debt blackhole.
    • GALLERY
Re: My build of Gr-research OB-7's from Custom Concepts flatpack
« Reply #11 on: 18 Feb 2008, 02:39 am »
Well, I am going to go with internal crossover after learning that it WILL be just fine putting the inductors closer together, as long as they face different poles.

Also I have decided to use the bedliner finish.

Now a question is, should I spray the baffle separately before its attached to the enclosure, or will it be just as easy to spray everything after its attached?

Also, I jumped the gun and drilled out the holes for the drivers before I finished them.  :duh: How big a deal is that going to be? I figured that I could put nails, loosely in the holes while I spray and then take them out after. I would leave just like a 1/4-1/2 inch sticking out so that I can pull them out after I spray...

S Clark

  • Guest
Re: My build of Gr-research OB-7's from Custom Concepts flatpack
« Reply #12 on: 18 Feb 2008, 03:18 am »
Denny, Those beveled sides absolutely make that speaker :inlove:.  Everytime I look at one of your cabinets I come away more impressed.
Scott

Bill Baker

  • Industry Participant
  • Posts: 4887
  • Purity Audio Design -Custom Design and Manufacturi
    • Musica Bella Audio
Re: My build of Gr-research OB-7's from Custom Concepts flatpack
« Reply #13 on: 18 Feb 2008, 03:05 pm »
Quote
Also, I jumped the gun and drilled out the holes for the drivers before I finished them.   How big a deal is that going to be? I figured that I could put nails, loosely in the holes while I spray and then take them out after. I would leave just like a 1/4-1/2 inch sticking out so that I can pull them out after I spray...


 I wouldn't worry too much about this if going with the spray on finish. The 'paint' will sink into the drilled holes so you should still be able to see them after the finish is applied.

Quote
Now a question is, should I spray the baffle separately before its attached to the enclosure, or will it be just as easy to spray everything after its attached?

 If you are doing the whole cabinet in the spray on finish, I would mount the baffle first then spray the completed unit. This will also allow you to spray the back side of the open baffle area as well as preventint messing up the front baffle finish when you clamp it to the bass cabinet if done seperately.

Quote
Well, I am going to go with internal crossover after learning that it WILL be just fine putting the inductors closer together, as long as they face different poles
.

 It's all about the orientation as Denny also mentions above.

TRADERXFAN

  • Full Member
  • Posts: 1062
  • Trillions will vanish... it's a debt blackhole.
    • GALLERY
Re: My build of Gr-research OB-7's from Custom Concepts flatpack
« Reply #14 on: 23 Feb 2008, 05:15 pm »
Well its the weekend so I am back on the job.

I found a couple of links about doing the bedliner finish
http://www.audiocircle.com/index.php?topic=40637.msg363024#msg363024
and
http://www.audiocircle.com/index.php?topic=33185.msg294930#msg294930

Now in this last one Danny suggests using an Elmers wood glue and water mixture in equal parts and brushing it onto the edges of the MDF. Al from Raw and Denny from Custom Concepts agreed on that.  Will titebond type I glue work the same on this? I found an elmers wood glue but I didn't notice until I left the store that they charged me $6 for a small bottle. I see now that its waterproof. So I don't think that is the right stuff, is it?  And of course more questions...

How thick does should this be put on? Do you sand this again after applying it? Does it go on the rounded over front baffle and driver holes too? And to make sure I understand, it does NOT go on the flat surfaces correct?

Then as far as the primer. I have a rustoleum flat black latex that I picked up and cleans with soap and water, so I believe that means its water based. I need to brush that on the whole thing, then sand it, and brush another layer on, and repeat until its not being absorbed in the mdf, correct? I guess my question is how do I tell when I have sanded and filled enough? What am I looking for?
Then once thats all done then I can spray on the bedliner. I shouldn't need to sand the bedlinger unless there is a seam showing, right?

Please feel free to share any tips or more details that may be helpful.

Thanks everyone!

Bill Baker

  • Industry Participant
  • Posts: 4887
  • Purity Audio Design -Custom Design and Manufacturi
    • Musica Bella Audio
Re: My build of Gr-research OB-7's from Custom Concepts flatpack
« Reply #15 on: 23 Feb 2008, 05:38 pm »
When working with the bedliner, you do not have to apply a primer coat. However, you can apply an initial coat to the cut edges of the MDF, let dry and sand (bed liner sands easily when dry). This would act as your primer coat.
 You do not want to sand any of the smooth surfaces of the MDF as this will open the 'skin' and absorb more of the liner paint.
 You can sand the wood glue after it cures. The reasoning for diluting it withwater is simply to absorb more easily into the cut or machined edges of the MDF acting as a sealer. There is no need to do this to any of the smooth sides of the MDF. Afterwards, the liner will not absorb into the wood.

TRADERXFAN

  • Full Member
  • Posts: 1062
  • Trillions will vanish... it's a debt blackhole.
    • GALLERY
Re: My build of Gr-research OB-7's from Custom Concepts flatpack
« Reply #16 on: 23 Feb 2008, 09:57 pm »
Thanks again Bill. For clarifying that....

Ok after running into a couple of stumbling blocks on trying to get the crossover to fit internally, I have decided to go externally. It just wasn't working for me, and it was ticking me off. So I bought these pretty ideal sized boxes from Michaels for $20 a piece, already sanded ready to finish. Kind of pricey, but I coulnd't have made them.
http://www.audiocircle.com/index.php?action=gallery;area=browse;album=1355&pos=33

I really think this is going to be a lot easier for me. (but I have been known to be wrong more than I care to admit). The width is about 9.5" and 12 inches deep by 3.25" high. It really doesnt look too conspicuous on the floor behind the speaker. Since you have to have them out from the wall a few feet anyway its really not going to be an issue.
http://www.audiocircle.com/index.php?action=gallery;area=browse;album=1355&pos=34

As far as the wiring, I am thinking of just running 3 pairs of the hookup wire out all the way to the drivers without binding posts. Like taking all 3 negative wires as a group and the 3 positives as a separate group. Maybe twist them around eachother? Is any of this a bad idea?  I have some cable clamps to clamp them to the insides of the speaker and crossover boxes to make a secure connection. Then use the supplied binding posts on the crossover boxes for the speaker wire connection from the amp. I am pretty sure I can fit 3 wires into one of the holes precut for the binidng post. Then just need to seal that up. -This is almost what Ric Schultz says on his site for a tweak... see #2
http://www.tweakaudio.com/EVS-2/Speaker_Tweaks.html 


« Last Edit: 23 Feb 2008, 10:14 pm by TRADERXFAN »

TRADERXFAN

  • Full Member
  • Posts: 1062
  • Trillions will vanish... it's a debt blackhole.
    • GALLERY
Re: My build of Gr-research OB-7's from Custom Concepts flatpack
« Reply #17 on: 24 Feb 2008, 03:10 pm »
If anyone else is thinking of using these boxes -
The hinges on the box have some iron content, so I am taking them off to avoid interference with the inductors...

jonwb

Re: My build of Gr-research OB-7's from Custom Concepts flatpack
« Reply #18 on: 24 Feb 2008, 06:25 pm »
That's a good idea to use those boxes TRADER.  I built my Alpha LS speakers a couple years ago and I've yet to build a decent enclosure for my external cross-overs and now all the bits are covered in dust  :duh:.  Not to mention it looks like i have a science experiment going on back there.

Interesting thought about the iron in the hinges... I'm no expert, but I can't believe that would make much difference.

TRADERXFAN

  • Full Member
  • Posts: 1062
  • Trillions will vanish... it's a debt blackhole.
    • GALLERY
Re: My build of Gr-research OB-7's from Custom Concepts flatpack
« Reply #19 on: 24 Feb 2008, 06:59 pm »
Well, these boxes were causing a dusty condition too. I had put the components in there, lining them up pretty much the way Bill from Response Audio did on his page.  Then I was doing some other stuff and open and closed the box a few times. Just from that there was dust all over the componets, and I had already take a brush to the insides of it. So after I took off the hinges, I sanded the edges of the box, and then glue-sized the interior and edges (the glue/water mixture) to keep it from getting dusty again. I figured that was the easiest thing to do, and I think it worked.

As far as the inductors and iron, I don't know how much it matters either, but I figure every little bit helps. I read that warning here:
http://sound.westhost.com/lr-passive.htm#s4.3

-and my hat is off to you building a line source!