OB-5 build pictures

0 Members and 1 Guest are viewing this topic. Read 5978 times.

mas

  • Jr. Member
  • Posts: 44
OB-5 build pictures
« on: 24 Jan 2008, 01:58 am »
I'm just about finished with my OB-5's. I still need to complete the base for both speakers. Whew - lots of learning experiences along the way! The cabinet was the simplified version, but I think the simplified cabinet made the veneering that much tougher. In spite of the problems I experienced, or maybe because of them, it was a very gratifying project to complete. 

I'll post some listening comments after I have had some time with them. 


Here are some pictures

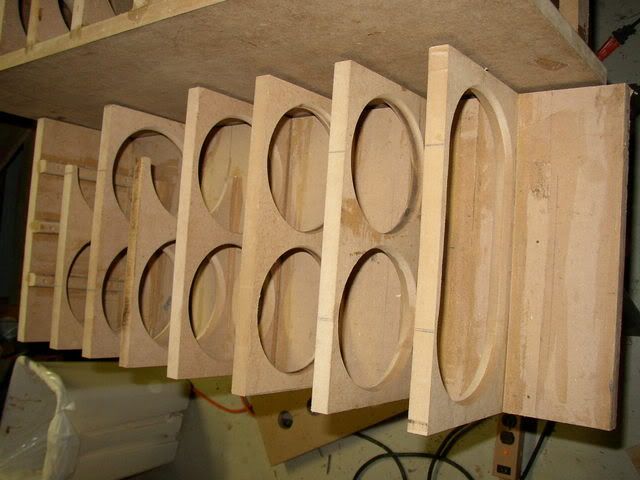
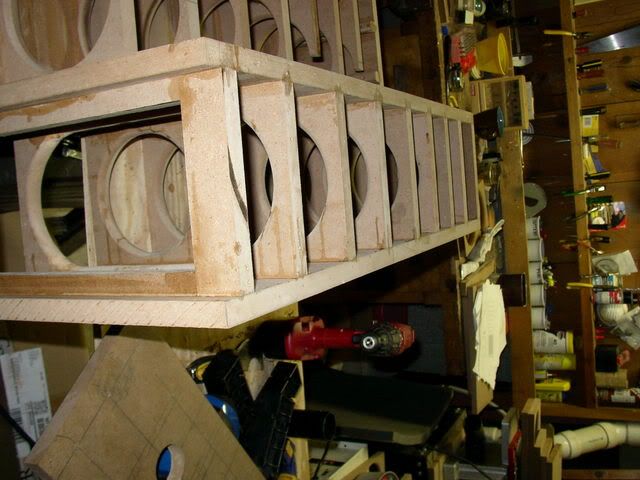
I ended up scrapping this one because of too much variance on the width of the braces.


I ended up scrapping this front because the veneer should go on before the roundover is done. My first set of fronts I scrapped because I cut the channel for the wiring too shallow, and couldn't pull the cable through. In fact, I broke one off and couldn't get it back out. 


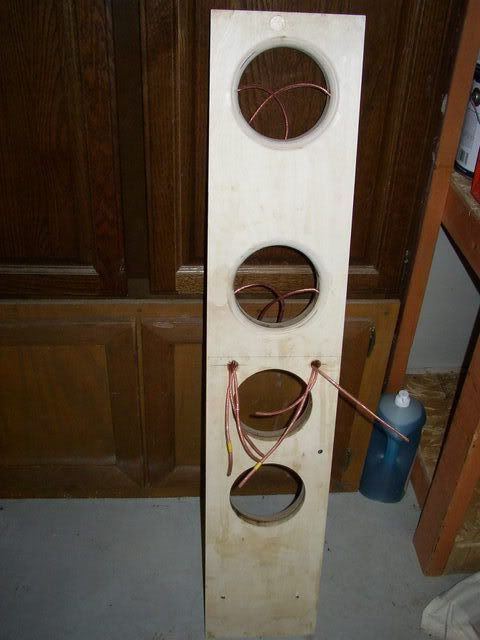
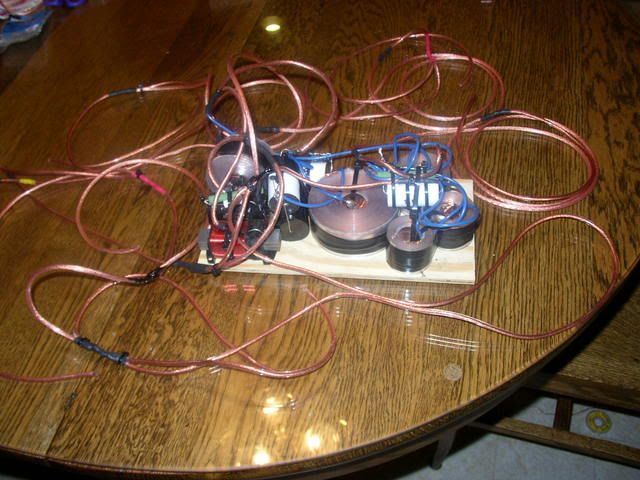
The crossover and wiring ready for installation. Worked the first time!


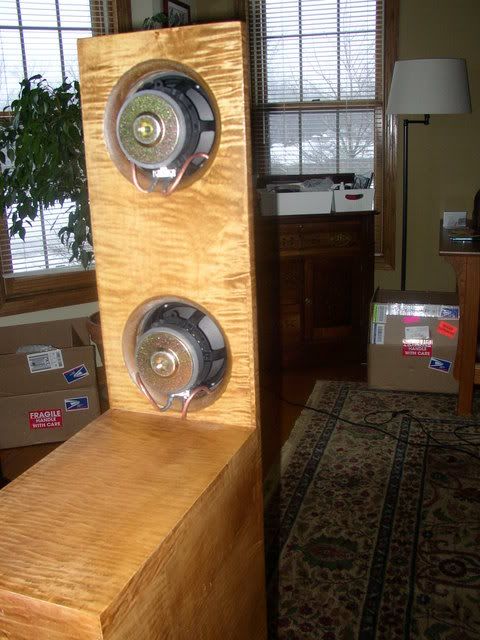
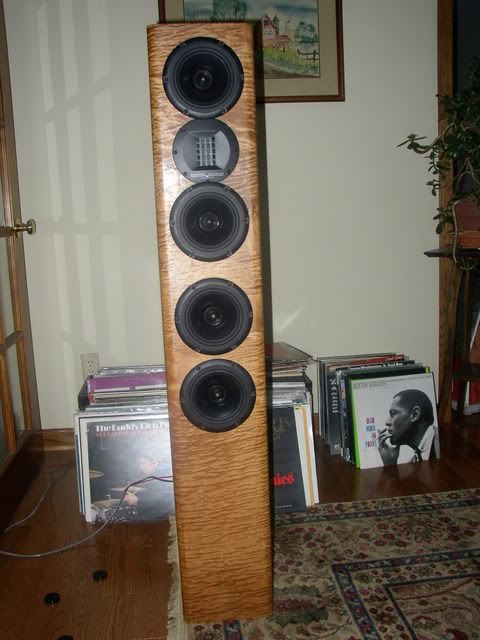
The best side of the best speaker


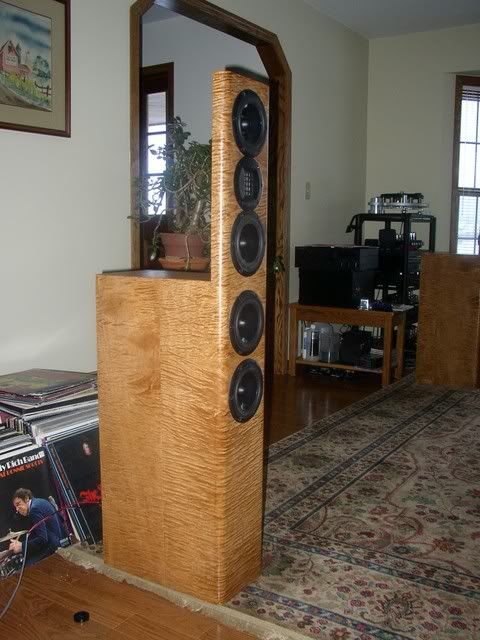
At least I remembered to bookmatch the veneer on this side


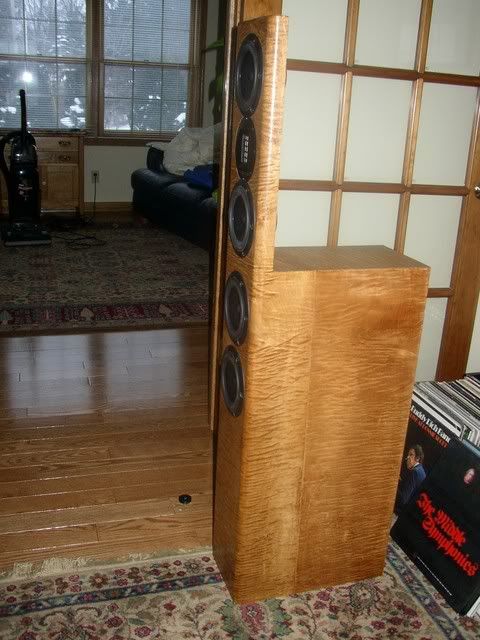
I had a router mishap on the cabinet in the next picture. You can see the patch at the top part of the bass cabinet. The guide and ball bearing of my flush trim bit fell off and gouged a pretty good gash into the cabinet. I ended up having to cut some veneer off so I could patch it. I might have started over but I had already installed the no rez. Note to self: install no rez last!
 

Notice how close the seam is to the front? I had to replace the first sheet I had becasue of severe curling and kinking when wet heat was applied. Note to self - test response to wet heat on a scrap piece first. Unlike the sapele veneer I used on the A/V-3 veneer,  the maple would not tolerate moisture to steam.  So, I had to cut another piece to butt up against the one already glued on. I found it easier to overlap the seams a little and sand it down than try to cut them identically with no  gaps. That way I also avoided the cursed veneer tape. I did not have great success at getting the glue mark up from the places where I did use the veneer tape. 


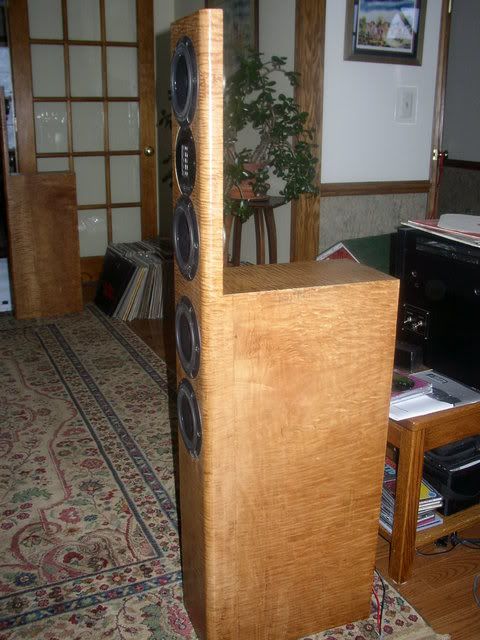
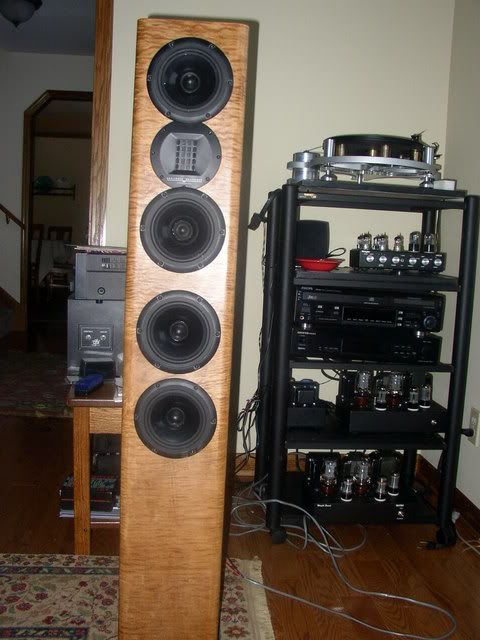
Notice the less pronounced figuring on this speaker. I should have used the other side of the veneer. The differences between the sides of the veneer were even more pronounced than the sapele.

In the backgound you can see my new Wright-Sound WPL20 preamp and Mono 25 amps. I've had the turntable for a while now - it is a Michell Gyro SE with SME309 arm and Ortofon 540MKII cartridge.   I have some work to do to optimize the cables and shelves.


The backs and tops turned out great - no seams.


I had the wires  in the wrong spot on the first one so I had to cross them, but got smarter on the second one.


Bill Baker

  • Industry Participant
  • Posts: 4887
  • Purity Audio Design -Custom Design and Manufacturi
    • Musica Bella Audio
Re: OB-5 build pictures
« Reply #1 on: 24 Jan 2008, 02:06 am »
Nice looking speakers mas, I really like your choice of veneer.
 Do keep us posted on how they sound once you get some time on them.

klh

  • Full Member
  • Posts: 925
Re: OB-5 build pictures
« Reply #2 on: 24 Jan 2008, 04:07 am »
They look very nice... and thanks for including the mistakes you made along the way. Hopefully others can learn from your experience.

Rocket_Ronny

  • Full Member
  • Posts: 1399
  • Your Room Is Everything - Use It Well.
    • ScriptureSongs.com
Re: OB-5 build pictures
« Reply #3 on: 24 Jan 2008, 04:52 am »

Hey, nice job:

What wood is that?

Makes me think of a wild African safari.

Rocket_Ronny

Cacophonix

Re: OB-5 build pictures
« Reply #4 on: 24 Jan 2008, 05:29 am »
Great Job!

These have turned out much better than my effort. Woodworking can be so damn painful if you don't have the right tools!  :duh:
Whats the finish on the veneer?

mas

  • Jr. Member
  • Posts: 44
Re: OB-5 build pictures
« Reply #5 on: 24 Jan 2008, 01:35 pm »
Thanks guys.

The veneer was raw figured maple. I stained it puritan pine (light brown) and finished with fast drying satin polyurethane. I looked for the widest veneer I could find to minimize the number of seams. I had 6 sheets of 22" x 51". My original idea was to use two sheets and put the seam in the front, but my wife talked me into two seams so they would be on the sides.

If I had to do it over, I would use design it more like rocket ronnie's so that the sides and front were distinct. I think veneering the front piece before it was attached would put the seam in a perfect place.

I used titebond III this time instead of the original titebond. It seemed like the veneer stayed down better.  I did not have as many  bubbles with the titebond III, and so did not have to reheat as much. 

I forgot to give props to rocket ronnie for his inspirational post. Your glowing reccomendation of the OB-5's kept me going when I ran into troubles.  Kudos for finishing in a month - wow! 
« Last Edit: 24 Jan 2008, 10:23 pm by mas »

ecramer

  • Volunteer
  • Posts: 3121
  • In time whats deserved always get served.
Re: OB-5 build pictures
« Reply #6 on: 24 Jan 2008, 01:36 pm »
I was just going to ask that myself I'm getting close to that stage in my speaker project and while i cane have them cleared by a buddy who owns a shop i would rather do it myself.

Great Job!

These have turned out much better than my effort. Woodworking can be so damn painful if you don't have the right tools!  :duh:
Whats the finish on the veneer?

kp93300

Re: OB-5 build pictures
« Reply #7 on: 26 Jan 2008, 04:24 am »
Hi MAS,
I just ordered the OB 5 kit with 2 pieces of the  HI REz .
Can you tell me where to place the HI REZ as I understand that 2 pieces of the HI REZ will not be able to line all the inner surfaces of the boxes.
What do you use fill the bass compartment -polyfill ? Is this the same material found in washable pillows?
I live in Malaysia and have to try to source material   that are available locally .
Is there a schematic for the cross over assembly ?
Thanks

KP

Daygloworange

  • Industry Participant
  • Posts: 2113
  • www.customconcepts.ca
Re: OB-5 build pictures
« Reply #8 on: 26 Jan 2008, 05:46 am »
KP,

Here are some pics of OB 5's during the build process that show how the NoRez should be applied to the insides of the enclosure.

http://www.audiocircle.com/index.php?topic=32448.20

The schematics for the crossovers and wiring diagram for the driver connections come included in the kit.

Cheers


pbrstreetgang

  • Full Member
  • Posts: 604
Re: OB-5 build pictures
« Reply #9 on: 26 Jan 2008, 06:36 am »
Wait I thought 2 pieces of no rez was supposed to be enough for the OB5/7s. If not I gotta get another piece to Denny for the COB7s

mas

  • Jr. Member
  • Posts: 44
Re: OB-5 build pictures
« Reply #10 on: 26 Jan 2008, 01:44 pm »
pbstreetgang, two sheets of no-rez was just enough for the simplified ob-5 cabinet I built.

kp93300, I haven't put any stuffing in yet, and meant to ask Danny how much to put in. I used 100% polyester stuffing to fill my A/V-3's, about 1/2 lb. per speaker.

poseidonsvoice

  • Full Member
  • Posts: 4019
  • Science is not a democracy - Earl Geddes
    • 2 channel/7 channel setup
Re: OB-5 build pictures
« Reply #11 on: 26 Jan 2008, 01:55 pm »
Do you have a picture of your A/V-3's? Can you post it?

Great work!

Thanks,
Anand.

Bill Baker

  • Industry Participant
  • Posts: 4887
  • Purity Audio Design -Custom Design and Manufacturi
    • Musica Bella Audio
Re: OB-5 build pictures
« Reply #12 on: 26 Jan 2008, 02:47 pm »
Hi guys,
 My recomendation for fill would be the Acousta Stuff in place of the Poly fill. I don't how easy this is to get in Malaysia but for all the US/Canada guys building these speakers, it's readily available from Parts Express for around $10 lb.
 It would add only $30-$40 to the total price of your speakers but well worth considering the quality of the speaker you are building.

mas

  • Jr. Member
  • Posts: 44
Re: OB-5 build pictures
« Reply #13 on: 26 Jan 2008, 03:44 pm »
Anand, I posted pictures of my A/V-3 speakers here already at ==> http://www.audiocircle.com/index.php?topic=40193.10 The veneer turned out better on that one because the sapele was more forgiving, with its darker, more consistent color and pattern.

Bill, thanks for the tip on the Acousta Stuff. How much stuffing per OB-5?

Bill Baker

  • Industry Participant
  • Posts: 4887
  • Purity Audio Design -Custom Design and Manufacturi
    • Musica Bella Audio
Re: OB-5 build pictures
« Reply #14 on: 26 Jan 2008, 04:26 pm »
Quote
Bill, thanks for the tip on the Acousta Stuff. How much stuffing per OB-5?


 With the OB-5 being a ported design, I would go with about 1/4 lb. per cu. ft. of volume. The recommended application is 1/2 lb. per cu. ft. (it comes in 1 lb. bags). If you overdo it, the bass could become boomy so you may want to experiment a little. The key to using Acoustic Stuff is to take the time to "pull" it apart (like fluffing a pillow) and install it directly behind the drivers. It will not bunch up over time either.
 If you have some spray contact cement on hand, a quick squirt will hold it in place nicely.

Danny Richie

Re: OB-5 build pictures
« Reply #15 on: 26 Jan 2008, 04:31 pm »
You guys can lightly fill the area behind the drivers with Acousta Stuff, poly fill, or fiberglass insolation. Just be sure to leave a clean path to the port.

kp93300

Re: OB-5 build pictures
« Reply #16 on: 26 Jan 2008, 11:10 pm »
Hi ,
Thank you all for offering these advice.
It is great to know that there are so many DIY ers who are so willing to help .
This make me more confident of building my first speaker.
I am greatly inspired to undertake the OB 5 project after seeing the beautiful pictures and the glowing reviews of OB 5 !
Looking forward to a great time !
I am sure there are more questions to follow when the buiding start.
Kp

Bill Baker

  • Industry Participant
  • Posts: 4887
  • Purity Audio Design -Custom Design and Manufacturi
    • Musica Bella Audio
Re: OB-5 build pictures
« Reply #17 on: 27 Jan 2008, 01:33 am »
Hi Kp,
 Just do yourself a favor and take your time on the build. If you have any concerns, think them through before reacting. Remember the old saying, measure twice cut once. I measure 4 times :scratch: Don't glue anything without a dry fitting first and don't cut any wires before thinking through your routing.
 Trying to rush things is human nature but much better rewards are realized by those utilizing patients.
 Also, don't forget to take some pictures along the way. AC members love pictures.

ecramer

  • Volunteer
  • Posts: 3121
  • In time whats deserved always get served.
Re: OB-5 build pictures
« Reply #18 on: 27 Jan 2008, 01:48 am »
Being in the middle of a speaker build my self, this rings so true. It only takes one second of rush to screw up a couple of hours work or worse. The satisfaction of the finished product is well worth all the effort.  :thumb:


Hi Kp,
 Just do yourself a favor and take your time on the build. If you have any concerns, think them through before reacting. Remember the old saying, measure twice cut once. I measure 4 times :scratch: Don't glue anything without a dry fitting first and don't cut any wires before thinking through your routing.
 Trying to rush things is human nature but much better rewards are realized by those utilizing patients.
 Also, don't forget to take some pictures along the way. AC members love pictures.

kp93300

Re: OB-5 build pictures
« Reply #19 on: 31 Jan 2008, 03:12 pm »
You guys can lightly fill the area behind the drivers with Acousta Stuff, poly fill, or fiberglass insolation. Just be sure to leave a clean path to the port.

Hi Danny,
If I  am using Hi Rez , is filling the cabinet with Acousta Stuff, poly fill, or fiberglass insolation  necessary ?
Thank you

Kp