Allen NX-Treme Build

0 Members and 1 Guest are viewing this topic. Read 5698 times.

allensound

Re: Allen NX-Treme Build
« Reply #20 on: 20 Feb 2025, 11:46 pm »
VERY comprehensive chronicle of your build.
I appreciate it. I hope you have them up and playing soon.

Thank you so much Oskar - I was hoping I wasn't doing this in vain!  :-)

allensound

Re: Allen NX-Treme Build
« Reply #21 on: 21 Feb 2025, 12:02 am »
Sanded a Speaker Base - More Lessons Learned

I mentioned that I might buy that Super Assilex sandpaper - I did...
https://amzn.to/4b3SDkp

Unfortunately, it won't be here (some of it), until tomorrow night, and the rest of it this coming Monday  :(

So, to keep the bus moving along, I went ahead and sanded one of the speaker bases.  This time I started with 320 and used it everywhere - BY HAND.  On the top I used the Dura-Block wrapped with 320 grit. 


Around the curves and along the sides, I first curved my hand around the edge with the sandpaper sort of cupped in my palm....that was a mistake as I had a fairly long line along the very bottom that went through to the primer.   :duh:


There was a spot that I don't know that I could have avoided - for some reason it just didn't have much clear on it. 


Here's another spot where I went though - just got too close to the bottom


Here I wisened up (just a little) and avoided the bottom edge - you can see a thin line where I didn't sand. 


I think the biggest takeaway here is DO NOT GO NEAR THE VERY EDGE!!!!. The reality is nobody is ever going to look at a half inch of that thing sitting on the floor and notice anything - so I probably should have left a good half inch completely alone. 

And lastly - if you ever get nervous while doing all this sanding, just remember there's a pretty painted piece under there that you just have to do some more work to reveal. If you spray some of that Sprayway cleaner on there, it fills in all the tiny little scratches and gives you a glimpse into the future.


I'm not gonna lie - having never heard these things, with all these time-consuming mistakes I've made, I REALLY hope the journey is worth it in the end! 

While I'm waiting on my new (and hopefully amazing) sandpaper to get here, I may switch over and start prepping the veneer, tomorrow, maybe...


KTS

Re: Allen NX-Treme Buil
« Reply #22 on: 21 Feb 2025, 12:20 am »
Looking good, the journey is always worth it, especially if it challenges you! Thank you for sharing.

nlitworld

  • Full Member
  • Posts: 2436
  • Strange things are afoot at the Circle K
Re: Allen NX-Treme Build
« Reply #23 on: 21 Feb 2025, 03:04 am »
There are so many good things going on with this build I have to give you lots of kudos. First off, congratulations and thank you for actually using proper safety attire!  :thumb: Lots of people don't and this stuff is a one-way ticket to the hospital if you ignore that. As in, do not pass go, do not live to 60, out with 17 different types of cancer if you're lucky to live that long. Secondly, I absolutely love the Assilex paper (Sky and Lemon are the two most used in prep, Orange is fantastic for nib sanding basecoat if there's some texture or dust). Third, you are actually trying to filter your air and keep proper air movement. Most people fixate on temperature,  but air movement is much more critical for proper paint application, drying and maintaininga clean-room environmentas best as possible. And lastly Spraymax packages excellent spray cans so those are always worth the investment.

Couple tips though. First if you're going to re-color and clearcoat on black, get your sanding up to 800grit before painting using the Assilex Lemon paper. If you can, scuff it down with a gray scotchbrite pad (3M #37448) as well to further improve adhesion. Make sure to wipe with wax&grease remover really well before painting more. Secondly, when you spray the low gloss clears, make sure to spray medium wet coats about like your 2nd coat from about 6" distance and let them flash off until they are uniformly matte (10-15 minutes) before hitting the second coat. Looks like you did this well, but if you see shiny spots, don't hit it with your second coat yet. Also, 2 good coats is all you'll need for that clear. The slightly closer distance should make the clear to reach the panel slightly wetter and allow it to smooth out a bit better and not leave as much orange peel.

If you ever paint another set of speakers, you'll be better off using actual automotive basecoat packed into Spraymax cans from your local paint store. Basecoat flashes off and sprays much more uniformly, and gives you much better chemical compatibility with the clear.

All in all I'm super pumped at your progress. It's looking fantastic!

allensound

Re: Allen NX-Treme Build
« Reply #24 on: 22 Feb 2025, 01:09 am »
KTS and Nlitworld - thank you guys so much. 

Also, Nlitworld - REALLY thank you for the tips.  I did get the Sky, Lemon and Orange sanding pads today - it's crazy you only get two per in these packs, but I have to imagine they go a lot further than the regular sandpaper - that stuff goes so fast.


Also, for sure, if I'd known to grab the SprayMax blacks before doing all this, I would have gone that route.  Future me will do better :)

Again, really appreciate the tips - will probably get back to it at some point tomorrow!


jmimac351

  • Full Member
  • Posts: 645
  • Chief Instructor - ChinTrackDays.com
Re: Allen NX-Treme Build
« Reply #25 on: 23 Feb 2025, 09:13 pm »
Thank you so much Oskar - I was hoping I wasn't doing this in vain!  :-)

Thanks for sharing all of this.  It's awesome. 

Unfortunately, the forum doesn't have a way to "Like" a post, so you don't get feedback if people don't post, which probably means less engagement in the forum overall.

So...   8) :thumb:

allensound

Re: Allen NX-Treme Build
« Reply #26 on: 26 Feb 2025, 01:50 am »
Thank you jmimac351!  Really appreciate that!

Sorry for the pause in updates, but unfortunately due to baseball season starting up, my time is in spurts here and there.

So onto some of the latest progress. 
First, the Assilex sandpaper is legit.  It’s not magic - like it doesn’t make things go any faster in terms of the process of sanding, HOWEVER, there are a few things that is a bit game changing in terms of sanding
  • Super flexible - so you can really be precise when just trying to hit a certain spot or get around curves like in the wave guide
  • The stuff just seems to last forever - meaning it doesn’t lose its “grittiness” nearly as quickly as a real sheet of sandpaper
  • Can just vacuum the dust off it and keep going

It does a much better job at not clogging up compared to real sandpaper, however, you really do still need to be cleaning off the surface you’re sanding FREQUENTLY and vacuuming the dust off the Assilex just as frequently.  I found that doing little sections at a time rather than trying to get it all done at once worked much better.

Another thing that is truly excellent about the Assilex is the higher grit number, like the 600 “Sky” sands like a 320 grit in terms of removing product, but it finishes like a 600 grit regular sandpaper - so you get a much cleaner surface with a single grit that happens to cut like a heavier grit.  So I guess in that regard it could be a bit faster, but I still find this particular part SOOOOOoooo tedious :)

I don’t think I got any intermediate pictures on this last baffle that I was sanding, but in the past I think I mentioned I’d dropped down to 320 grit (regular sandpaper) to try and cut the orange peel faster.  That was still taking way too much time so on the last baffle I dropped down to 220 and that seemed to be the “right” grit.  I did attempt to use the 600 Assilex as the main cutter for the orange peel but it was like using the 320 - it was just taking too long.  Ultimately, I started with 220, then touched up areas that I wanted to be more precise with the 600 Sky Assilex, and then the areas that need to be repainted and cleared, I then hit with 800 Lemon Assilex all around the general area so I can spray the paint, and then come back and do a clear to blend into the surrounding areas.

Like I said, this part is really tedious.  It’s the only part I’ve not really “enjoyed” so much during the build - I think it wouldn’t have been so bad if I hadn’t gotten down to the primer in so many spots that will now require touching up. 

Also, being new to the whole finishing with spray cans thing, I’m sure if I was better at it I could have reduced the amount of orange peel that I ended up with, but there’s no way to know the “right” way to do it without actually doing it!

So here’s some photos…

Here I tried really hard not to touch the very edge while sanding the round over on the baffle.  I think I did much better on this one than the first baffle.


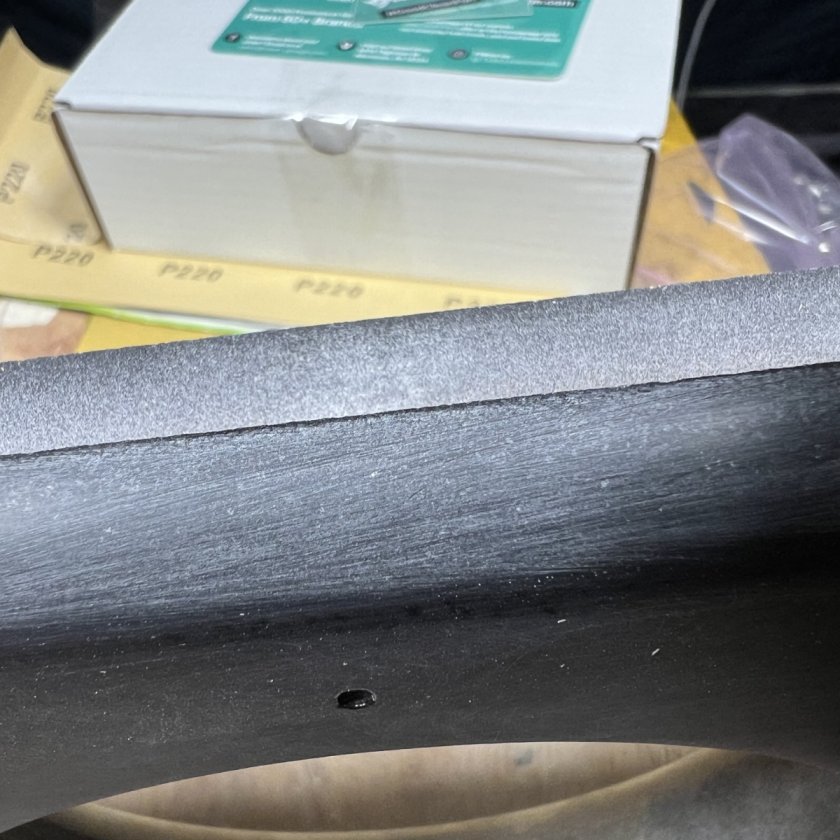
A tiny spot at the end of the baffle that needs to be touched up.


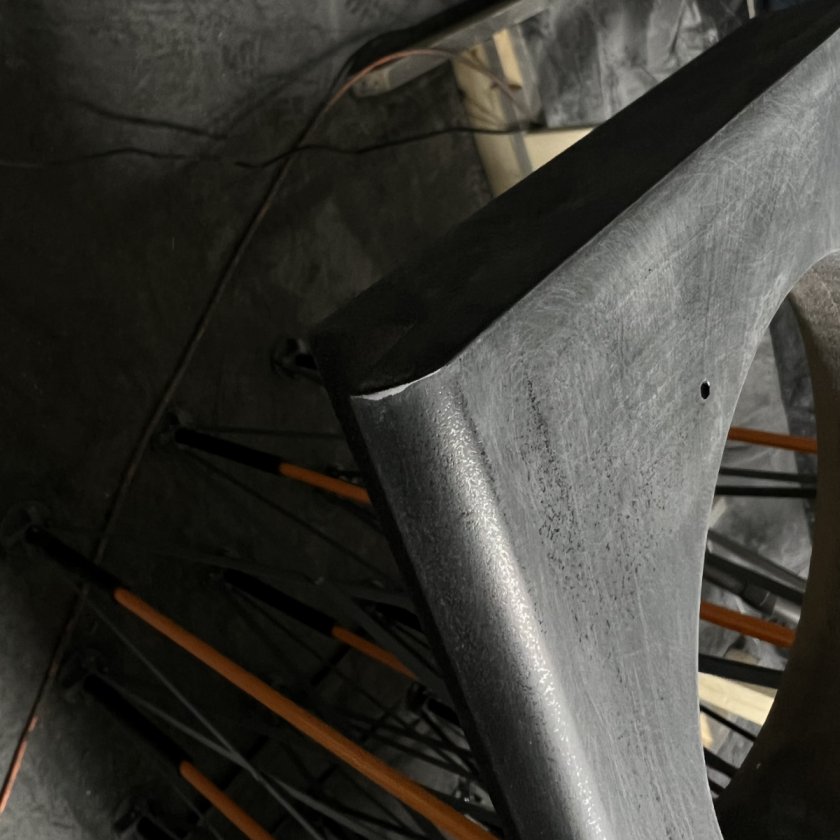
Another tiny spot at the other end of the baffle that needs to be touched up.


Here’s a shot of the round over where I sanded down to the 600 sky Assilex.


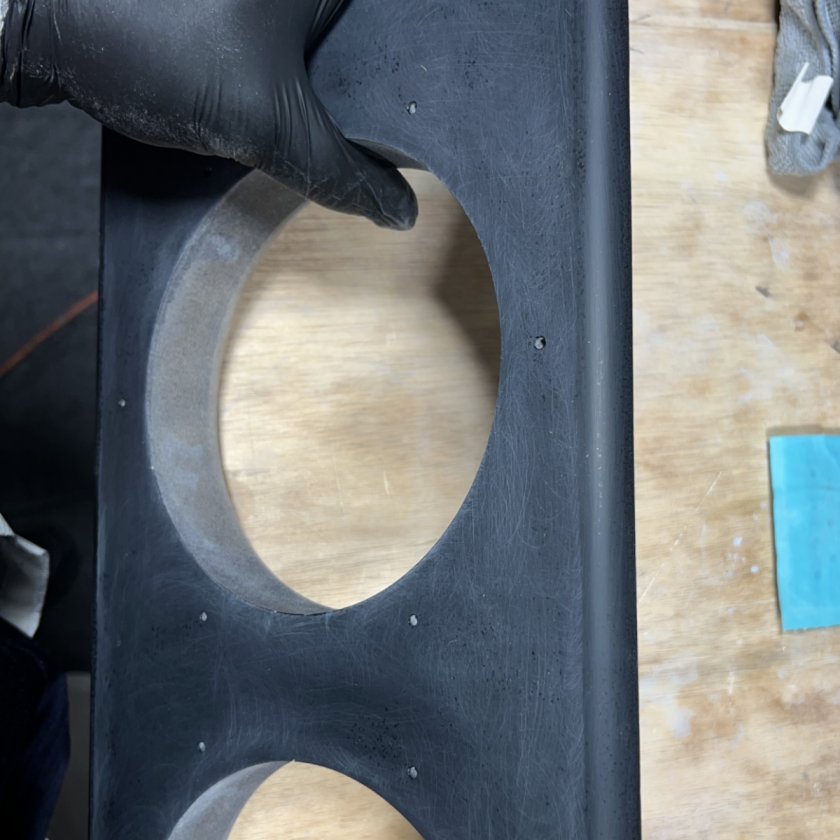
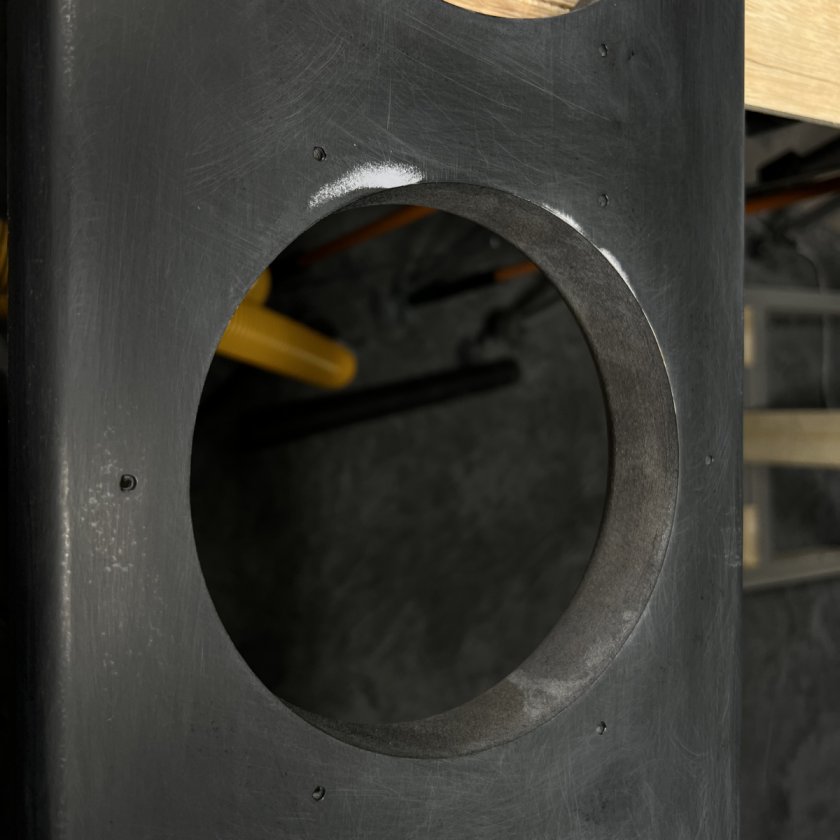
Here’s a picture of one of the speaker openings where I got down to the primer - I think I’ll probably just tape off the baffle later and maybe hit this with a small bit of clear coat - this doesn’t have to be pretty because it’ll be behind the installed drivers.


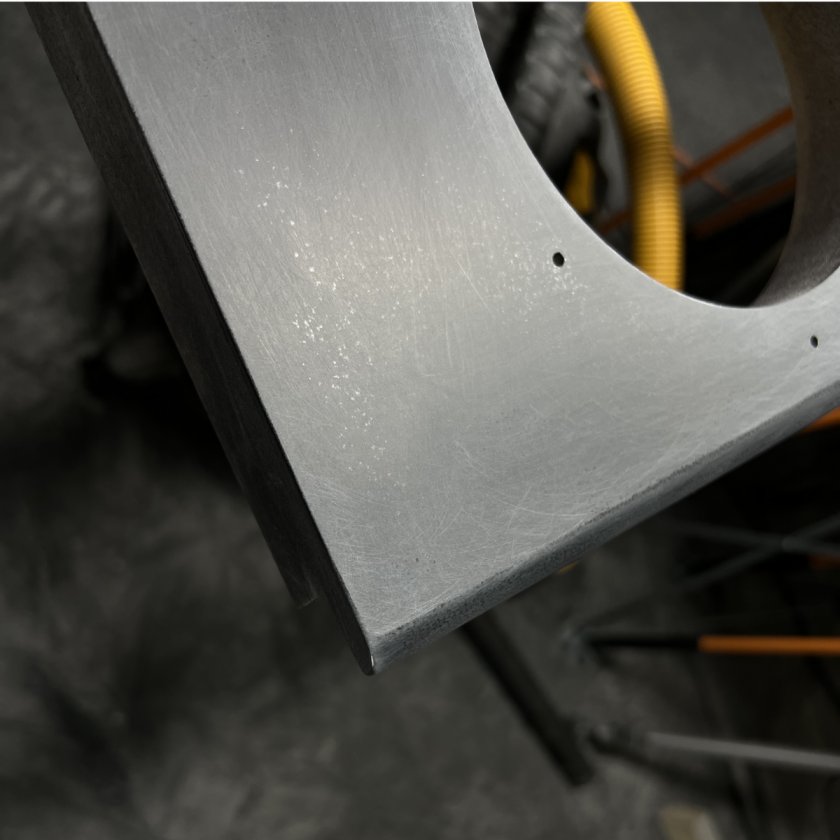
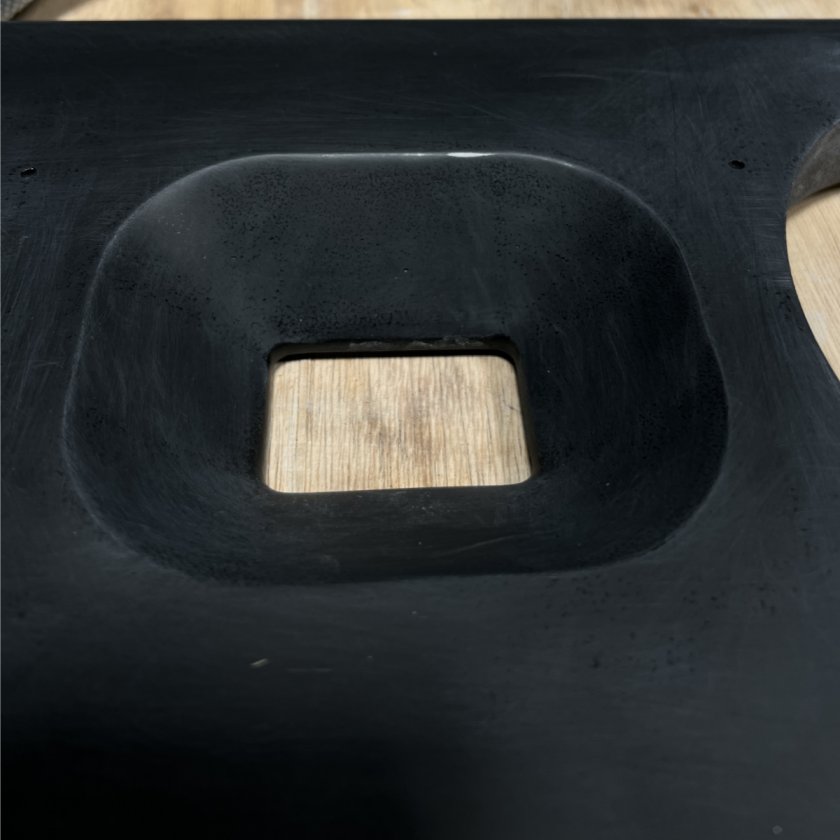
And lastly here’s the wave guide sanded to 800 lemon Assilex and the surrounding area ready to be touched up with paint and clear.


Next up

Someone please tell me if I’m barking up the wrong tree - but my current goal is to sand to 800 lemon Assilex around the areas that need to be touched up - then as nlitworld suggested, hitting it with a scotch pad.  Spray it off with cleaner/degreaser, then just lightly spray the areas to re-cover the primer…then, after that’s filled in nicely, come back and spray a couple coats of clear directly over that and just barely fan it to the surrounding areas so I can sand it back and blend it in when it’s dried.

If that sounds wrong, please let me know.  My guess is I probably won’t make much more progress on this until this weekend.

nlitworld

  • Full Member
  • Posts: 2436
  • Strange things are afoot at the Circle K
Re: Allen NX-Treme Build
« Reply #27 on: 26 Feb 2025, 06:09 am »

Someone please tell me if I’m barking up the wrong tree - but my current goal is to sand to 800 lemon Assilex around the areas that need to be touched up - then as nlitworld suggested, hitting it with a scotch pad.  Spray it off with cleaner/degreaser, then just lightly spray the areas to re-cover the primer…then, after that’s filled in nicely, come back and spray a couple coats of clear directly over that and just barely fan it to the surrounding areas so I can sand it back and blend it in when it’s dried.

If that sounds wrong, please let me know.  My guess is I probably won’t make much more progress on this until this weekend.

You are correct to sand up to the Lemon P800, gray scotchbrite and then clean. Lightly spray in your areas of black to re-cover, let sit until dry is all great stuff. The one exemption is for the clearcoat you will need to apply 2 more full coats over the whole front baffle. So no sanding, blending in and polishing allowed on flat clears.  :nono:

When you spray the clear, just make your first coat slightly wetter than before by keeping the can ~6" from the surface rather than 8-10". That'll allow the clearcoat to land on the panel still slightly wetter and flow out that first cost nicely. Then once that first coat goes uniformly matte, slap one more on and do a little happy dance at the end results. Just quirks of spraying matte clears and you jumping into the 300 level painting techniques college course.  :popcorn:

allensound

Re: Allen NX-Treme Build
« Reply #28 on: 26 Feb 2025, 08:08 pm »
Mannnn…..I guess I’ll buy some more SprayMax clear satin.  I had read somewhere that the non-gloss finishes have additives to the clears that mean you can’t ever polish them completely gloss, so I was assuming that means I could polish it back to a satin finish?!

Yeah, I definitely didn’t start at the kiddie pool side of things did I?!

nlitworld

  • Full Member
  • Posts: 2436
  • Strange things are afoot at the Circle K
Re: Allen NX-Treme Build
« Reply #29 on: 26 Feb 2025, 08:27 pm »
Yeah, satin/matte finishes actually work the other way where polishing them makes it go shiny, but never able to make them uniformly matte again. The clear would also still stay a little cloudy if you tried to make it fully shiny as well. They're technically a micro porous surface of talc powder and acetone that diffuse the light rather than reflects it back. Think diffusion panels but with light waves instead of sound waves. Unfortunately those pores collect dust/dirt/oils real easily and when you clean or touch it, it will slowly smooth out the micro-textured surface and you're left with smooth, shiny parts. Only way to kinda get a uniform finish again would be to essentially burnish the clearcoat with 2000 or 3000 grit sandpaper and leave those tiny sanding scratches in there. You'd likely never know it was a sanded finish, but it'd fake it from 10' pretty easily.

allensound

Re: Allen NX-Treme Build
« Reply #30 on: 26 Feb 2025, 09:11 pm »
So one more question nlitworld - when you say put that first coat on 6” away instead of 8-10 - am I still moving fast so I don’t create a run, or will that top clear bond better because of the underlying clear so sags/runs are less likely? 

Definitely my first go-around, when I sprayed on that first coat, it ended up being a very tacky dusting and wasn’t “wet” looking much at all…so you’re saying put it on to where it is more wet, but probably not a smooth “wet” look, otherwise I’ll get a run right?

nlitworld

  • Full Member
  • Posts: 2436
  • Strange things are afoot at the Circle K
Re: Allen NX-Treme Build
« Reply #31 on: 26 Feb 2025, 09:34 pm »
If your first coat was just a dusty tack coat, you'll need it a bit wetter than that. Spray 2 coats where both coats are about the same as you sprayed your 2nd cost last time so that it actually covers. Be a little careful around the waveguide and corners but otherwise get a bit more material on there to spray a proper coat. With such a long flash time, that clear will hang pretty good when applied properly. Don't HAMMER it on there, but don't be scared to get after it.

allensound

Re: Allen NX-Treme Build
« Reply #32 on: 26 Feb 2025, 09:39 pm »
Alright man. I’m going to give it a shot!  Thank you so much!

Crockett

  • Jr. Member
  • Posts: 4
Re: Allen NX-Treme Build
« Reply #33 on: 2 Mar 2025, 03:27 am »
I really like the finish of the speaker you drew your inspiration from. I have been enjoying your journey in educating yourself during your speaker build, good times and good luck!

allensound

Re: Allen NX-Treme Build
« Reply #34 on: 4 Mar 2025, 03:32 am »
Thank you Crockett - definitely a journey  :D

Nlitworld- another question as I got out and sanded to 800 this evening on one of the baffles.  Do these itty bitty little dots of clear need to be completely sanded out to where you can’t see them?


nlitworld

  • Full Member
  • Posts: 2436
  • Strange things are afoot at the Circle K
Re: Allen NX-Treme Build
« Reply #35 on: 4 Mar 2025, 04:50 am »
I wouldn't worry about those. Unless they're everywhere, you'll only really notice them right now because everything else is sanded super smooth and those are Itty bitty recesses still shiny. Scuff everything with gray scotchbrite and that'll put tiny micro scratches into those little indents and you'll be fine.  :thumb:

allensound

Re: Allen NX-Treme Build
« Reply #36 on: 5 Mar 2025, 01:43 am »
Again I appreciate your guidance nlitworld!  This sanding is a slog :(

I've finished the one baffle all the way down to the scotchpad.  Just finished the other baffle down to 220 to get the little sparkles off there as best I could.  I'll likely be back at it tomorrow night to finish that down to the scotchpad. 

The only thing that keeps sticking in my brain that's REALLY going to suck if it happens - is if I get all this sanded back down, paint it and I end up with orange peel again...that's really going to be demoralizing

Hoping that doesn't happen. 

Oh, I think I'm going to buy some of the lower grit Assilex - that stuff is just amazing - it is SO much easier to work with, especially when you're trying to be detailed in little areas.

Hope to be back soon with some more progress pics!

nlitworld

  • Full Member
  • Posts: 2436
  • Strange things are afoot at the Circle K
Re: Allen NX-Treme Build
« Reply #37 on: 5 Mar 2025, 04:39 am »
Again I appreciate your guidance nlitworld!  This sanding is a slog :(

The only thing that keeps sticking in my brain that's REALLY going to suck if it happens - is if I get all this sanded back down, paint it and I end up with orange peel again...that's really going to be demoralizing

Hoping that doesn't happen. 

I always joke with customers that worst case scenario just sand it down and do it again. :lol: Honestly, second time around should go much smoother for you now that you have a feel for it.

-Lloyd

allensound

Re: Allen NX-Treme Build
« Reply #38 on: 8 Mar 2025, 01:52 am »
Nlitworld / Lloyd - you're so right - I mean, it's excellent to know that you really CAN go and fix anything that you mess up during this process, it's really just how much time, money and effort you want to put into it.

I probably wouldn't have hated the sanding so much if I wasn't seeing myself go through the clear coat no matter how precise I tried to be.  But, it's all part of the learning curve....

SPEAKING OF learning curve - I think I learned a bit of a lesson.  Now that I've sanded everything back down and am ready to touch up and re-clear-coat...rather than doing them all back to back again, I'm going to just try a base.  The plan over the weekend is to touch up primer in some spots (you'll see why below), touch up paint in many spots (thinking about going along all the edges), and then doing the two coats of wet clear coat on just one base.  First coat, as Lloyd mentioned, get it nice and wet and let it completely flash off which will likely take 15 minutes or so in the cooler weather...then do the same thing for round two.  HOPEFULLY everything will lay out completely smooth with no orange peel...if not, I'll evaluate what I want to do from there.  If things aren't "perfect" (or as good as I want them to be) - I may try my hand at wet-sanding out the orange peel and just going to finer and finer grits of sandpaper - maybe up to 5000 grit and see what that looks like...HOPEFULLY I won't have to do that as I'm really wanting my clear satin to just be beautiful this next go-around. 

Anyways, with all that said, here's some more pictures of the progress (regress?!)
First thing that REALLY frustrated me is I think I remember knocking one of the bases over, and at the time I remember thinking - "I'm not even going to look because I'm going to be mad"...well, I forgot about that until I went back to sand things down...and look at what I did.

That's right, there's a nice little knick out of the side of the base  :cry:


Like Nlitworld said, you can always just sand things back down and do the steps again.
This is where I sanded with the Super Assilex Sky (after already having hit it with 220 to knock off the orange peel).


Then I wiped that down and hit it with the Lemon Super Assilex


This is what that knick looked like after sanding - you can see there's a tiny little divot in there so I went and bought another can of filler primer that I'll hit that spot with before painting...


After the sanding, I hit it with a Scotch Pad (technically I used a Duragold gray pad as I'd read they are supposedly slightly higher quality with a more consistent micro-scratch) - plus the Duragolds were cheaper to boot.


Now I'm mostly back to where I can get to trying to finish everything again - I have the baffles and bases sanded and scuffed and ready to be touched up and re-cleared.


And last shot I adjusted the exposure and took a photo so you can get an idea of how truly black this stuff looks if you went it after sanding - I think these are going to be gorgeous if I can ever do all the steps right  :D


Did I mention I'm REALLY itching to get on with this but I'm TRYING to be patient and do it right?!  I REALLLLLLLLLYYYYY want to get to the veneer and then onto the crossover building because I really would like to hear these things one day!   

Again - Nlitworld - I really do appreciate the tips along the way.  I'll get there soon!

nlitworld

  • Full Member
  • Posts: 2436
  • Strange things are afoot at the Circle K
Re: Allen NX-Treme Build
« Reply #39 on: 8 Mar 2025, 02:16 am »


Lol. Sorry, had to post that gif cause it's too fitting. All looking very good and like you're on your way. Good on you for not being in a rush to finish these, as that's when silly mistakes happen. Smooth and steady.  :thumb: