Building a Paul Hynes SE1 Power Amplifier

0 Members and 1 Guest are viewing this topic. Read 12107 times.

sondale

Building a Paul Hynes SE1 Power Amplifier
« on: 26 Sep 2010, 02:21 pm »
Building a Paul Hynes SE1 Amplifier.

Firstly a little background to why I wanted to build this amplifier. As with most diyer's I build this, try it with that and then along comes another amp / speaker / pre-amp whatever.

Sometimes I stop to wonder what it is I am after? On one such ocassion it struck me that everything was getting too complicated - digital crossovers, equalisers, multiple amps etc. As luck would have it in one of the threads I was reading Paul Hynes mentioned his B200 line arrays and a single amp to drive them.

So I went back to earlier threads concerning these arrays and amplifiers and thought that this could well be the way I should go.

There are two basic circuits the SE1 (single ended) and the CIRC-1 (circlotron) both of which seemed to be very easy to build - so after a few emails to convince myself to do it I started getting the bits together for the build. The SE1 has unbalanced input whilst the CIRC1 must be driven from a balanced source, initially I will concern myself with the SE1.

Paul's Line Array speakers consist of 8 (yes eight) Visaton B200s connected in parallel - so they are quite a load for any amplifier! Most amps will take one look and die - however the SE1 is designed to drive this odd load still delivering power at .75 ohms. If you have queries on any technical details of this design could you please direct them to Paul Hynes (via this thread) as I am not that competant - I am building that which Paul has designed/built/tested.

First up is the circuit diagram and the parts for the main amplifier.


The main device is the IXTH 20N50D - a depletion mosfet which is becoming more popular with the diy fraternity, the rest of the circuit consists of three resistors and two zener diodes! Of course a psu is needed, amd as I had various bits for other amplifier projects I decided to start with these whilst waiting for some regulated power-supplies from Paul. I will not go into the details of the initial build - suffice it to say that it worked first time with no nasties (hum / distortion) but it did show that this configuration I needed either a pair of horn type speakers or a gain stage. I tried both and either way was successful, however to keep everything simple I will not be using a gain stage in the main build.

Some pictures of the first / test build.


sondale

Re: Building a Paul Hynes SE1 Power Amplifier
« Reply #1 on: 26 Sep 2010, 06:16 pm »
Next step is to build the main amplifier. I am going to do this on the heatsinks using some two row tag board.


Here is the plan.


So first the heatsink is drilled and tapped to take 3mm bolts which will be used to clamp the depletion mosfets to the heatsink - note that the mosfets are mounted on isolation pads. The holes are one third of the way up heatsink, the devices are mounted upside down with the tag board mounted just close enough to allow the legs of the mosfets to poke through the holes by a couple of millimetres. Establish a star-ground.


Solder the two diodes back to back - note the orientation of the bands. Poke the resistors and diodes (R1, R2, Z1 and Z2) from the input into the appropriate holes. To start with none of the joints are soldered, I left this until all the basic components and wires are mounted.


Next comes the wires which will come from the input sockets.


Then over to the other mosfet, connect R3 between the source and gate, connect Source (T1) to the Drain (T2).


Solder all of the joints so far.

Now connect the speaker leads.


Next is the power-supply cables - note that I have used RED for +12 and for -12, 0V is always black.


Solder the rest of the joints.

Repeat for the other channel and we have -


Time for a break!

Puffin

  • Jr. Member
  • Posts: 16
Re: Building a Paul Hynes SE1 Power Amplifier
« Reply #2 on: 26 Sep 2010, 07:49 pm »
My Hat is seriously Doffed to you Sir. Have a break, have a Kitten!

Tripmaster

  • Newbie
  • Posts: 1
Re: Building a Paul Hynes SE1 Power Amplifier
« Reply #3 on: 26 Sep 2010, 09:13 pm »
Well done Alan! Keep the pictures coming, I know this is going to sound great  :wink:

sondale

Re: Building a Paul Hynes SE1 Power Amplifier
« Reply #4 on: 27 Sep 2010, 06:58 pm »
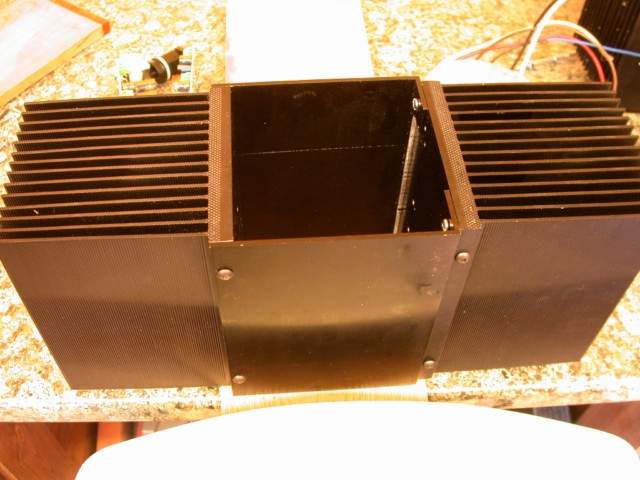
Before going on with build a few words about the heatsinks I am using. On my initial test build I was using some heatsinks rated at .4 degrees Centigrade per watt. They ran hot - so I looked around for some bigger heatsinks and found some that are normally used for mounting industrial sized diodes.

They came with mounting plates for a fan and were rated at better than .1 deg/watt in this configuration; even without the fan they are supposed to be capable of .2 to .3 deg/watt. I have not had any problems with heat using them.

Initially I was going to mount the mosfets for one channel on one of these and put the Paul Hynes regulators on a smaller heatsink as they only require 1 deg C / watt. However I decided to use the same type of heatsink for both the mosfets and the regulators and connect them with aluminium sheets so that when dealing with the expected .75 ohm load of the paralleled B200s the second heatsink could help with the additional heat.


I am hoping that this will work - I have not yet purchased the 16 required B200s.

Suffice it to say that my amplifiers run cool!

OK - on with the next part of the build.

The PH regulators PR3G2-12 (12volts positive) and NR3G2-12 (12volts negative) come with a nice lump of copper to which the main regulator is clamped. So the second heatsink is drilled / tapped (3mm is fine) to take both a -ve and +ve regulator.


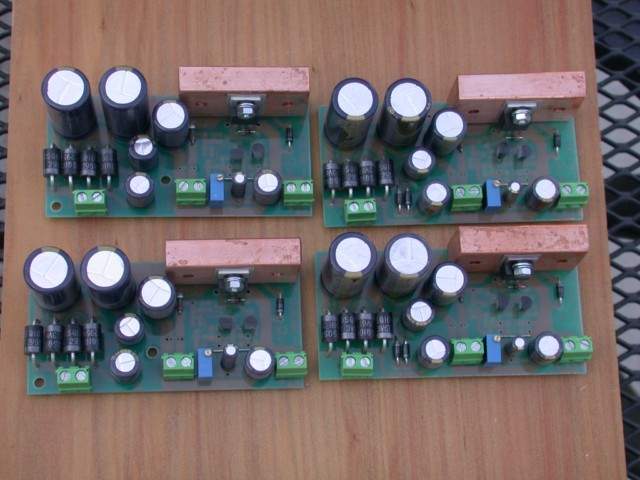
The way I had to mount them (vertically) did give me some problems in connecting them to the transformer and adjusting the regulators, I had to be careful with the screwdriver when doing the adjustment. It would make more sense to have the regulators horizontal - next time!

Plenty of goop to ensure a good heat transfer to the heatsink.


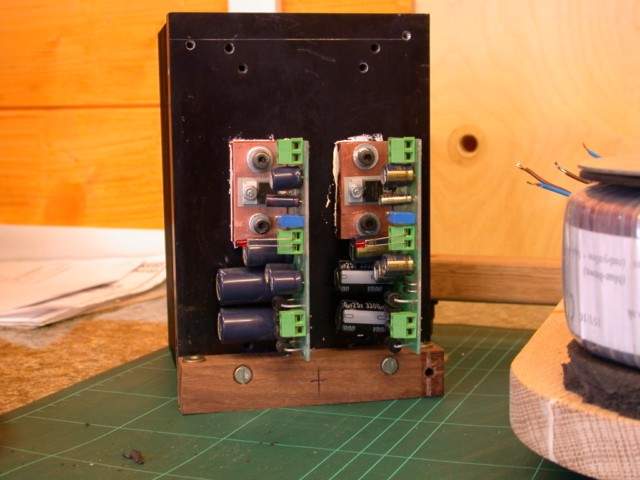
I made a base out of oak onto which the heatsinks will be mounted, to this end I attached a strip of wood to the bottom of each heatsink (drilled and tapped for 4mm bolts). Each of these strips had a pair of captive nut screwed into place so that they could be screwed into from the underside of the oak base.

The oak base was shaped to take the transformer which is mounted outside the main amplifier case. It has captive nuts into which spikes will be mounted.


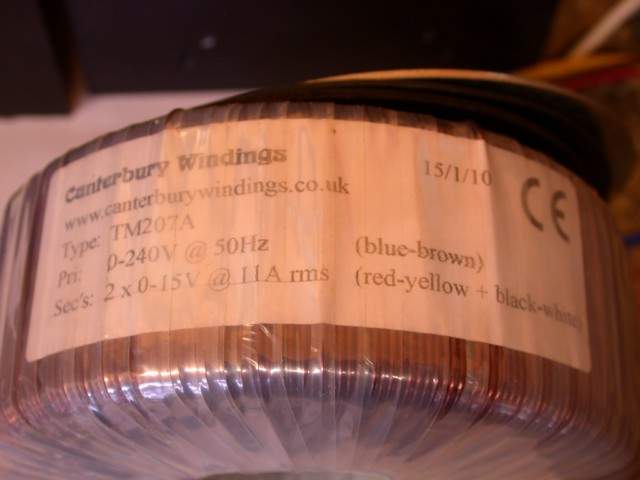
The transformer for one channel, 12-0-12 volts 330VA, a single primary 240 volts for the UK (we are supposed to be on 230V - usually it is well over 240v so if I am having a transformer made I go for a 240v primary).


The front panel has only an on off switch - there are two LEDs on the regulated power-supplies which could be wired into this panel if required. As I am going for perforated ally sheet on the top I will get a nice glow from inside the cases. The cutout at the bottom caters for the transformer wires - primary and secondaries - needless to say they are well rounded.


The rear panel has a mains inlet and should have a fuse-holder, unfortunately due to slight miscalculation it would have interfered with the regulators. So I will fit an internal fuse. :duh:

Also on the rear panel are a phono input socket and loudspeaker posts.


Next time - putting them together.

sondale

Re: Building a Paul Hynes SE1 Power Amplifier
« Reply #5 on: 13 Oct 2010, 08:06 pm »
First a diagram of the regulators - inputs / outputs / LEDs


OK, the transformer is bolted to oak base, note that it will be outside the heatsink case.


A four-way connecting block joins the transformer to the AC inputs on each regulator. The leads from this transformer are 0-15 0-15 Red-Yellow Black-White; 0-240 Blue-Brown.


The Blue goes to the bottom connector of the AC connectors and brown to the upper connector - or the other way round! It does not matter - just make sure that both regulators are wired in the same way. The LEDs are connected - long leg is the positive! The regulator heatsink is now bolted to the base as well.


Before going any further the output voltages on the regulators are checked - I connected to the mains via a plastic block (chocolate block style) as a quick and easy method,


and then adjusted to give +/- 12 volts; it should be noted that the voltage takes a few seconds to rise to the required level, so let it settle for a few minutes before using the pcb mounted pots (blue) to slowly adjust to +/- 12 volts, after each adjustment leave for a few seconds to settle and so on. As you may notice mine eventually settled at 12.01 volts.


Now the amplifier heatsink is bolted to the base and connected to the appropriate regulator outputs - re-check that the +12volts and -12volts are connected to the correct outputs. It would have been better if I had used 4 different coloured wires - but I did check a few times before switching anything on! BLUE is always 0 volts BROWN being +12 or -12 volts - yes different coloured wires would definitely be better.


Then the rear plate was bolted to the two heatsinks and the phono input soldered and the speaker leads bolted to the posts - I did this because my soldering iron could not heat that very large amount of copper, this could be why Cardas have thoughtfully drilled a hole in each post :green:


OK - onto the mains - next

sts9fan

Re: Building a Paul Hynes SE1 Power Amplifier
« Reply #6 on: 13 Oct 2010, 08:54 pm »
nice write up!

sondale

Re: Building a Paul Hynes SE1 Power Amplifier
« Reply #7 on: 13 Oct 2010, 09:17 pm »

Mike B.

Re: Building a Paul Hynes SE1 Power Amplifier
« Reply #8 on: 13 Oct 2010, 10:20 pm »
What is the voltage range on this amplifier? You chose 12 volts. Can voltage be higher? What about transformer VA?

sondale

Re: Building a Paul Hynes SE1 Power Amplifier
« Reply #9 on: 14 Oct 2010, 11:42 am »
What is the voltage range on this amplifier? You chose 12 volts. Can voltage be higher? What about transformer VA?
Easy answer first - each channel has a 330VA transformer.

The object of the amplifier (as I understand it) is to produce current into low ohm loads, so really rather than increasing voltage you would be more likely to be decreasing it. I found this thread useful http://www.audiocircle.com/index.php?topic=66518.0.

I hope that helps.

sondale

Re: Building a Paul Hynes SE1 Power Amplifier
« Reply #10 on: 18 Oct 2010, 06:28 pm »
OK - connecting to the mains.

The transformer wires are connected to the switch - I always switch both the live and neutral - just to be sure! I have used heatshrink to cover the terminals as much as possible.

A nice beefy mains cable (Belden shielded 3 core 19364) is fed through the gland -both the neutral lead (blue) and the live (brown) are connected directly to the switch. Again heatshrink is used on the switch terminals.

The earth lead is terminated with a tabbed washer and attached to the earth post on the rear panel.


So what about the fuse I hear you say?? Well I was going to have an internal fuse, but at this point in the build I changed my mind and felt it would be better to go with the original idea and have a case mounted fuse holder. So the earth post was sacrificed - the hole was enlarged to take the fuse holder which this time did not interfere with the internal boards.

The live wire was cut and soldered to the fuse which in turn was connected to the switch - a safer method and now easier to replace any blown fuse. I am currently using a 2amp slow blow fuse and there have been no problem.

The earth is now connected directly to one of the heatsinks.


Switch on and two little red eyes appear inside the case, all is working well with both amplifiers so now I can finish off the case. this will involve making the transformer disappear (somehow) and some perforated aluminium sheet will be cut and screwed to the top of the heatsinks to stop prying fingers but still allow the glowing leds to be seen.

So how do they sound?

sondale

Re: Building a Paul Hynes SE1 Power Amplifier
« Reply #11 on: 18 Oct 2010, 07:15 pm »
The amps have been running now for a couple of weeks and are settling down very nicely.

To put any comments into context my system consists of a cMP2 computer, Buffalo 32 dac, a White Noise Audio buffer set to about x6 gain, the SE1s, Woden Design Maeshowe speakers.

Both the cMP2 and the Buffalo 32 have digital volume controls so no analogue control is needed.

The Maeshowes have an spl of 84.5 db 1metre/1watt and a nominal 4ohm impedance and therefore present an easy (if inefficient) load for the SE1s.

My normal amplifiers are PassDIY F5 mono-blocks used without the WNA buffer/gain stage.

It is not easy to quickly switch between the amps without introducing a couple of sets of switches which will affect the sound, so I generally listen to one setup for a while (days) and then switch over.

Both amplifiers drive the speakers with ease, the F5 seeming to have a slightly more pronounced bass but the SE1s seeming to have an extremely flat response with power across the entire spectrum. I have no means of measuring the amps at all and I can only report on their subjective qualities.

Neither set of amps seem to have a sonic signature (apart from the slight bass elevation), they are both easy to listen to, have control over the speaker and never seem to be flustered no matter what is thrown at them. That is the amps seem to be very transparent.

The SE1s have also had an evening driving some very efficient horns without using the gain-stage and here they were up against a PassDIY F2 amplifier, the differences here being that the F2 seemed to be slightly brighter with the SE1s having more bass!

The SE1s with this heatsink arrangement run warm - not hot as the F5s do.

One SE1 has about 100mv DC offset and the other about 2mv - as far as I can tell this does not seem to affect the sound quality - however I may try matching the depletion mosfets when I build the Circlotron version of the amplifier.

Am I happy with the SE1s? Very happy indeed - apart from the sound quality there is no hum, no switch on/off thump.

When funds permit I will be making the B200 arrays that these amplifiers are designed to drive however they seem happy driving my Maeshowe speakers and I am happy to let them.

Can I recommend them? Yes! The amplifier part is so simple to build and it can be run from a 'normal' power supply as I did originally or from a highly regulated supply as I ended up using.

I will post pictures of the finished (tarted-up) version as soon as I can drag the amps out of my system.