Electra tube connector installation instructions.

0 Members and 1 Guest are viewing this topic. Read 118651 times.

Danny Richie

Re: Electra tube connector installation instructions.
« Reply #60 on: 5 Jan 2021, 02:22 pm »
Question: I know these are the best connection when you have to have some kind of post, but would there be any benefit to speaker wires directly attached?  Like your 24 strand version soldered directly to the crossover?

At some point that wire needed to pass through the cabinet. So that makes a cable like our 24 strand braid a bit unpractical. There needs to be some type of connection that allows it to pass through the cabinet.

Quote
Also, what is the best connection for on the amp end? Banana? Bare wire?

Bare wire will oxidize and degrade the signal.

Another set of tube connectors is best. If that isn't an option that a spade connection is the best connection for a typical binding post.


kwatz

  • Jr. Member
  • Posts: 21
Re: Electra tube connector installation instructions.
« Reply #61 on: 11 Jan 2021, 02:56 pm »
Another set of tube connectors is best. If that isn't an option that a spade connection is the best connection for a typical binding post.

Hi Danny, are tube connectors compatible with the type of outputs featured in these pics (Marantz SR8015)?


corndog71

  • Full Member
  • Posts: 1670
  • Some people call me Rob.
Re: Electra tube connector installation instructions.
« Reply #62 on: 11 Jan 2021, 05:42 pm »
Male tube connectors will fit into traditional binding posts but are slightly smaller and therefore can fall out if the cable is bumped.  I still use them.

Male tube connectors are very snug in the female tube connectors.


Danny Richie

Re: Electra tube connector installation instructions.
« Reply #63 on: 11 Jan 2021, 05:58 pm »
Hi Danny, are tube connectors compatible with the type of outputs featured in these pics (Marantz SR8015)?

The male ends are really only designed to work with the female tube connectors.

kwatz

  • Jr. Member
  • Posts: 21
Re: Electra tube connector installation instructions.
« Reply #64 on: 11 Jan 2021, 07:05 pm »
The male ends are really only designed to work with the female tube connectors.

Male tube connectors are very snug in the female tube connectors.

Got it, thanks. So for binding posts like this, are spades, raw wire connections or banana plugs preferred? I'm building out my theater system now and plan to get one of Marantz's AVRs, and the manuals only mention doing a raw wire connection. Just wondering which connection on the amp side of the DIY cables I should order. I got the tube connectors on the X-Statiks I bought.

Hobbsmeerkat

  • Industry Participant
  • Posts: 2533
Re: Electra tube connector installation instructions.
« Reply #65 on: 11 Jan 2021, 07:21 pm »
Got it, thanks. So for binding posts like this, are spades, raw wire connections or banana plugs preferred? I'm building out my theater system now and plan to get one of Marantz's AVRs, and the manuals only mention doing a raw wire connection. Just wondering which connection on the amp side of the DIY cables I should order. I got the tube connectors on the X-Statiks I bought.

From most people, spades seem to be the best option, but bananas should be good too, just a tad more convenient.

Cblan1224

  • Jr. Member
  • Posts: 34
Re: Electra tube connector installation instructions.
« Reply #66 on: 18 Mar 2021, 07:18 am »
-  Hi Hobbs , Thank you for the Ideas, but I really want to leave the option open to be able to Bi-Amp or not Bi-Amp...

- I really hope another idea shows up... I have another friend with the same issue and I wanted to recommend Tube Connectors to him too.


 ---  I do have one other idea on how to do the same thing as the Tube Connectors but will make the speaker cables that run to my speakers unable to be used with other speakers that I have....

Best regards,
Why not replace both with tube connectors and do a traditional bi-wire speaker cable instead of using a jumper? If you want to leave the option for bi-amping, and still have tube connectors, this is the way to go.
I have been having similar thoughts. This will mean if you are not biamping, you will have to biwire, which is what you're doing already anyway. You'd just have the jumper to be on the cable instead of the binding post, which some people prefer anyway. Mostly anyone who sells cables will have a biwire cable, or you can make it yourself by counter braiding 4 16awg cables together(2 pairs), connecting both positives into the single amp end, and one each for the Tube connector. Same for negative. Easy to do as well with a braided cable like the one Danny sells.

So if you don't want to connect the wires internally, you can do it externally, without a binding post. Upgrading your speakers components usually does not hurt resale, I've come to find.

Apologies if this has already been addressed, I'm still on page 3 of the thread!

dvenardos

Re: Electra tube connector installation instructions.
« Reply #67 on: 29 Mar 2021, 01:23 am »
I don’t solder very often and am am having trouble with the sealing the male plug with solder step. How are you guys doing this? I seem to be heating up the entire plug and not getting the solder to melt.

Edit: just going with crimp and no solder and then heat shrink tubing.
« Last Edit: 29 Mar 2021, 03:01 am by dvenardos »

jlucas

  • Jr. Member
  • Posts: 51
Re: Electra tube connector installation instructions.
« Reply #68 on: 7 Oct 2021, 09:41 am »
Th way the first post reads it sounds like there should be pictures.  Did those get lost along the way?   Can they get fixed?

Hobbsmeerkat

  • Industry Participant
  • Posts: 2533
Re: Electra tube connector installation instructions.
« Reply #69 on: 7 Oct 2021, 01:29 pm »
Th way the first post reads it sounds like there should be pictures.  Did those get lost along the way?   Can they get fixed?

It happened when Danny moved off the old website/server, it broke all of his pictures that it hosted.
It's not likely to be fixed, unfortunately.

But danny does have this video installing them on the XLS:
https://youtu.be/uevd5RFXwCU

DGoosen

  • Jr. Member
  • Posts: 28
Re: Electra tube connector installation instructions.
« Reply #70 on: 5 Nov 2021, 04:42 pm »
Not sure if this already got answered, but here goes:
If you can't change your binding posts (it's a long story) on your amp but have pin connectors on your speakers is there a problem or much of a compromise in using a banana to pin speaker cable?

Danny Richie

Re: Electra tube connector installation instructions.
« Reply #71 on: 12 Nov 2021, 01:46 pm »
Not sure if this already got answered, but here goes:
If you can't change your binding posts (it's a long story) on your amp but have pin connectors on your speakers is there a problem or much of a compromise in using a banana to pin speaker cable?

Pins and banana's are both pretty low on the totem pole. If there is any way you can use a pure Copper spade it will be an improvement.

jrocks29ms@gmail.com

  • Jr. Member
  • Posts: 74
Re: Electra tube connector installation instructions.
« Reply #72 on: 23 Jan 2022, 12:31 pm »
If you refer to the photo of the marantz amplifier, the black connector protector/guide prevents spades from being able to be used on most all marantz or denon amplifiers and receivers. I found bare wire to be not only brutish but not good for adjustments. So far, besides tube connectors, the best banana plug I’ve found so far are rhodium plated solid silver, low mass, and can be crimped and soldered to bare wire. These sound the best of any banana or plug I’ve ever used.


One note on the tube connector Installation. The instructional videos I’ve watched were awesome and a great help. I have one tip. When you are determining how much speaker wire to insert into the female tube connector post, by using the male plug, inserted as a guide. Let the wire touch the tip, then insert about 1/8to 1/16 of an inch more than will touch the tip of the male tube connector. This ensures when crimping and soldering is performed that there will be contact between the male tube connector end, and your bare wire leading to the crossover. This tiny contact point makes a dramatic difference when made, and is a dramatic setback when missed. The clarity level is way higher when it is touching, if your tube connectors “fully slide into the tube connector female sleeve, how do you actually know if it is touching. Mine have about. 1/16” gap to the end, and therefore I know the main benifit is being realized. Tip to tip “docking” lol
I have not seen anyone recommend doing this, and I think it’s worth passing along.

jmimac351

  • Full Member
  • Posts: 311
  • Chief Instructor - ChinTrackDays.com
Re: Electra tube connector installation instructions.
« Reply #73 on: 23 Aug 2023, 10:29 pm »

Original Post from Danny regarding assembly...

===========

I have been asked to post some instructions on how to install the Electra tube connectors.


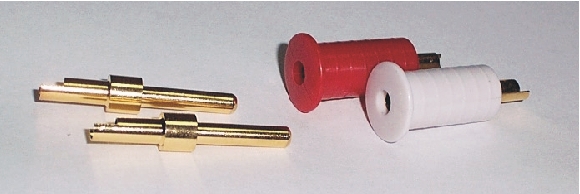
If you have not seen the Electra tube connectors then follow this link to the Electra Cable website and read all about them: http://www.electracable.com/tubeconnector.htm

These things beat any binding post ever made.

They install faster and easier than any binding post as well. Just follow these step by step instruction and you'll see just how easy it really is.

First you'll need to drill a 7/16" hole in your enclosure. These also work just as well in any enclosure thickness so no problems even with thick or multilayer walls.

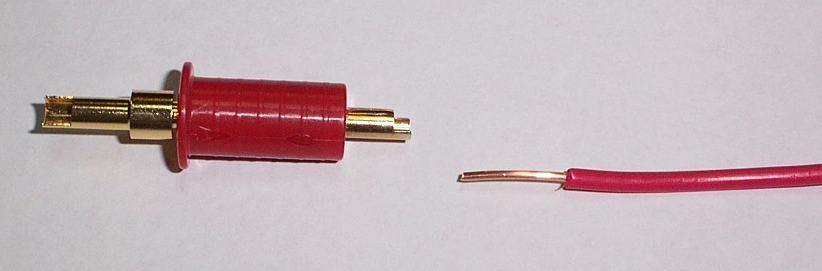
Then feed the wire through the hole until it pokes out far enough for you to get a hold of it. 2 to 3 inches is fine. And slide your heat shrink on before you forget it.

Now a very important part to remember is to take the male stud that comes with the tube connectors and insert it into the end of the tube connector. This gives the internal wire a stopping point when you insert it. And the whole idea behind the tube connector is to get tip to tip contact from the internal wire to the speaker wire.

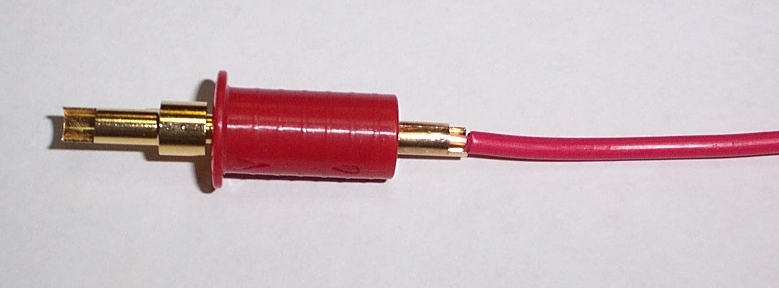
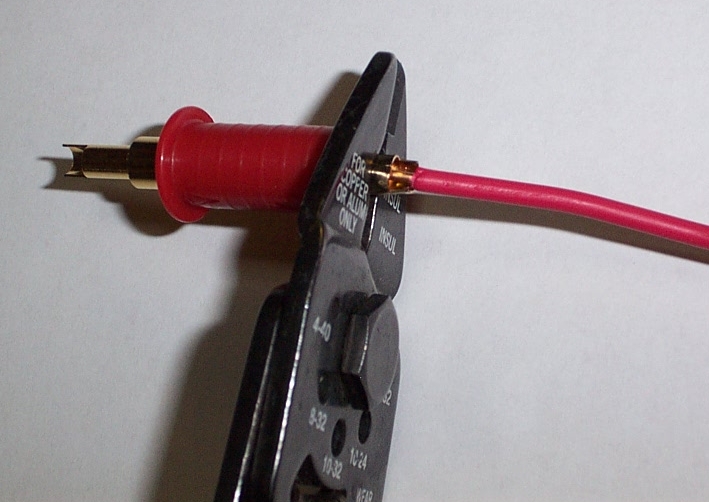
Now that you have a stopping point you can insert the internal wire from the speaker into the tube connector until it touches the stud inside of it. Then you mark its depth and strip it that far back.


Insert it and note that the insulation comes to the end of the tube connector. Now you are ready to crimp it.


When you go to crimp it make sure that the part of the crimping tool that pokes up goes into the back side of the tube connector because there is a slit in the tube on the front side.


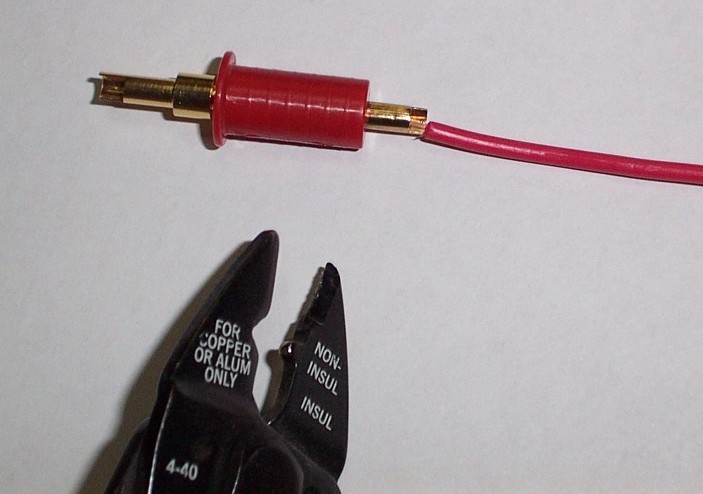
Then crimp it right in the middle of the end of it.


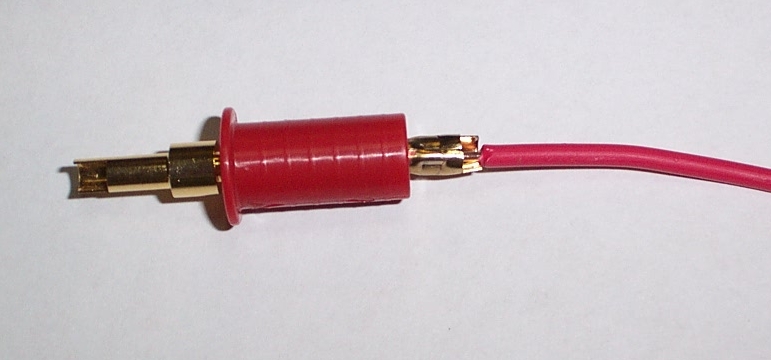
Now note how it looks on the back side.


And the front side.


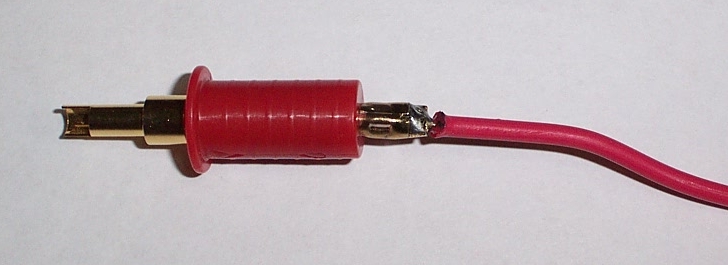
Then you solder it to seal the opening from any air passage.


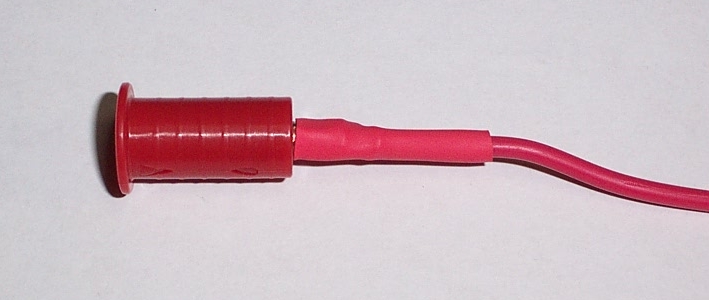
Then slide the heat shrink down over it and seal it.


Now you can add just a slight amount of sealer around the outside of the tube connector. I use clear Silicone myself. Then press it into the pre-drilled hole. If you have to lightly tap it in with a small hammer that's okay too. It will smoothly drive in with very light taps.

Now wasn't that fast and easy?  :thumb:

And a bonus is that it sounds better than a binding post.  :banana piano:

Rikard Ekval

Re: Electra tube connector installation instructions.
« Reply #74 on: 5 Nov 2023, 07:18 pm »
Loose Tube Connectors?
I move my speakers and stands out from wall and out in the room every time that wifey is away and I can do some great listening. Standing by the wall for casual listening.


Some of the connectors want to slide out a bit and even after I poke a little on the connector, bending the outer part of the hole, they do want to slide anyway.
So I made a piece of HDF as bracket with a stainless screw.
Now they stay put.


KTS

Re: Electra tube connector installation instructions.
« Reply #75 on: 6 Nov 2023, 02:23 am »
Nice tweak!

Speaker Challenged

  • Jr. Member
  • Posts: 161
Re: Electra tube connector installation instructions.
« Reply #76 on: 6 Nov 2023, 12:21 pm »
Loose Tube Connectors?
I move my speakers and stands out from wall and out in the room every time that wifey is away and I can do some great listening. Standing by the wall for casual listening.


Some of the connectors want to slide out a bit and even after I poke a little on the connector, bending the outer part of the hole, they do want to slide anyway.
So I made a piece of HDF as bracket with a stainless screw.
Now they stay put.


Great tweak to keep them in, great idea. I'll have to give that a go on mine.