More description and pictures of my Piccolo project

0 Members and 1 Guest are viewing this topic. Read 6325 times.

tubesforever

  • Full Member
  • Posts: 441
This is the first of my Piccolo project posts.  Over the last couple of months I have been assembling parts and pieces to build the quietest Piccolo on earth. 

First and foremost, it needs decent power, so I purchased the Bugle kit and was very happy with the results.  Excellent parts and pieces, the board, the transformer....in fact everything except the casework.   


jcg0322 has put together a complete kit of all the parts and pieces you need to build a competent power supply worthy of a Bugle or a Piccolo.  I made only minor changes to mine and I hope the results will be worth the extra slight expense and trouble. 

Later this weekend I will post the case work for the PS.  Being a tweak-a-holic, my changes were to use PRP resistors where I could and upgrade to Panasonic caps vs the Xicon pieces.  PRP does not have 1 ohm resistors so I decided to use the Holco 1/2 watt pieces.


The power supply utilizes ballast capacitors to smooth the power supply.  I used Panasonic EB pieces for this stage.  They have very high ripple capability combined with extremely low esr.  They are the 4 smaller capacitors on the board.

The 4700 uf PS caps are also Panasonics.  I might also bypass these with FT-1 0.022uf teflons just to get a little extra air and clarity.  These are blue in color and they sound very decent for their modest price. 

Basically, your equipment will never sound better than its power supply.  Build this right and you will have lots of smiles ahead of you.

Check out the awesome transformer Jim selected for this piece.  It will do either 120 or 240v so simply it makes my mind spin.  Jim this is a sweet circuit! 

The Bugle power supply is designed to dish out a nicely regulated 15.5 v 1000 ma to the next stage for a Bugle or Piccolo.  It will work with many other applications and might be the most important thing you do for your Bugle. 

Finally I am providing pics of my Piccolo cartridge loading blocks.  ECIR38 posted great pics about using blocks to make cartridge loading easier. 

I found these and they fit perfectly on the board. 


One issue, I had to use about 1.5 mm teflon tubing to space up the blocks so they will not interfere with the 475 ohm resistors on the board.  These blocks are mounted to the back side of the board.  I needed easy access so I could change them without disassemblying the Piccolo.

Thanks for the idea ECIR38!  I think this is going to work out great.  I plan to use the Piccolo mounted in a Hammond extruded aluminum case, so access to these will require only a few seconds time.

More to follow soon....

Also....I hope the instructions to go from pin one to pin eight to push the DC offset device to 25khz is correct.  Jim can you verify this for me.   I also have replaced a pair of 221 ohm resistors with 232 ohm resistors per your build sheet specs.  I think this was also used to keep DC out of the picture.

Hope everyone has a great weekend!

Cheers!
« Last Edit: 16 Apr 2009, 07:04 am by tubesforever »

jameshuls

Looking good Jim! I'm right behind you on this one. I have all the Blackgate electrolytics (I hope these are worth it - they are $$$) prp resistors and 0.1 uF Russian teflons (courtesy of you!) for the Piccolo. I am replacing the spec loading resistor values with some on either side of my favorite loading value for my dynavector cartridge so I can get it just right. I was not aware of the adjustable units you are using - that's a great idea!

I am still plugging away on the enclosure for my Cornet and I am not going to start another project until I finish that! That's OK though, as I can see how things turn out for you and get your feedback on the upgraded project. I particularly like the idea of the upgraded power supply.

Keep us posted!

pretzel_logic60

Very interesting Jim. I haven't touched my Piccolo yet and am still hoping to get to my casework for the Cornet 2. The board is done except for AC and RCA. I'm hoping to get back to that either tonight or next week. My drill press crapped out on me and I have a new one setup but haven't had a chance to do anything.

As far as the Piccolo goes what upgrades did you use there? I'll look around for other posts on that. And I'm also not going to start that until the Cornet is up and running. I still need to find a rectifier for that as well. I found Brent Jesse Recording online, sheesh I'm 45 minutes from the guy but I'm going to see what he has for me, I could use some other tubes as well.

But hopefully this week I'll be able to get my casework done and get the board mounted, it's been crazy around here.

Brian

tubesforever

  • Full Member
  • Posts: 441
Re: More description and pictures of my Piccolo project
« Reply #3 on: 16 Apr 2009, 07:47 am »
I built my Piccolo with just a few minor changes to the overall piece. 

First, I am using the superb Vampire direct gold plated oxygen free copper female RCA jacks.  These are my favorite cost responsible RCA's I have found.  They are a little more clear and quiet than the Vampire hex head gold on brass pieces I used to use.  They cost only a couple dollars more. 

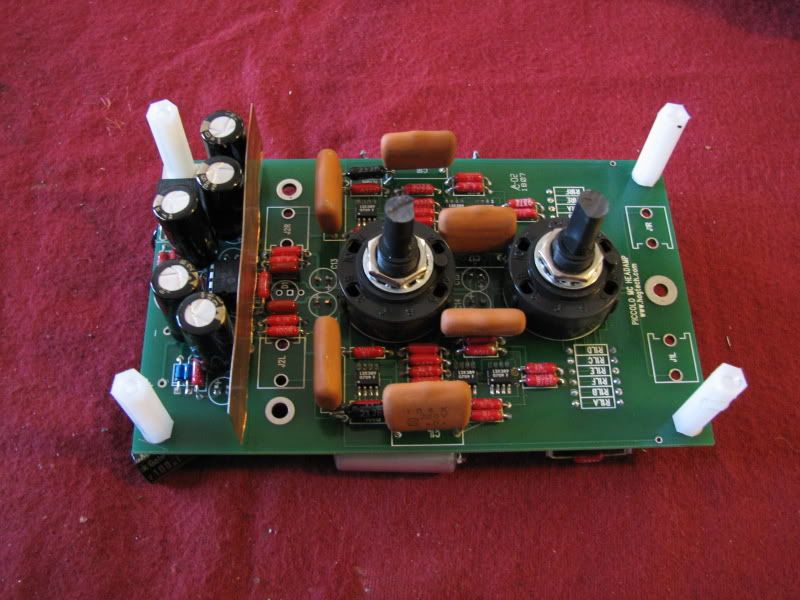
The switches are nostalgic pieces.  Anyone owning a Fender amp will recognize these.  You can buy them from Antique Electronics where you get the Hammond transformers and stainless hardware for the Clarinet and Cornet 2 projects.


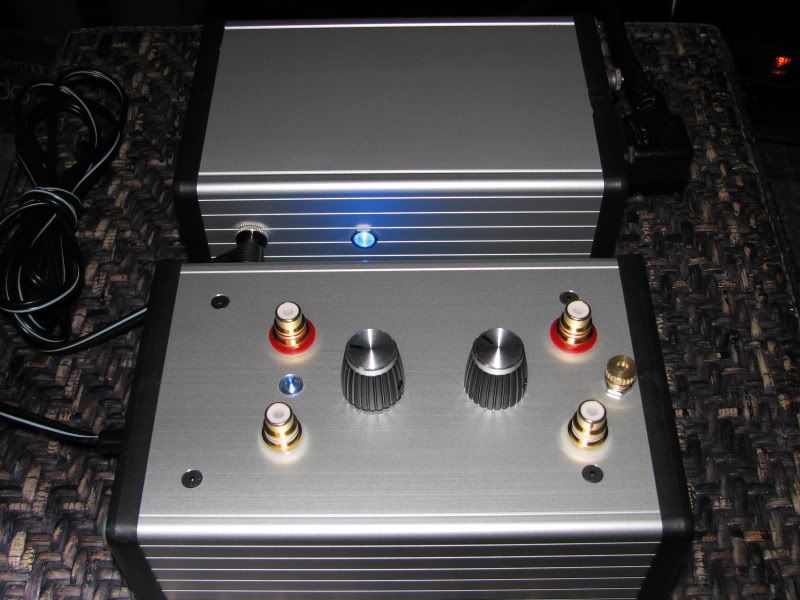
I built my Piccolo into an attractive and efficient Hammond extruded aluminum case.  These cost less than 20 dollars on Digikey and they come in clear or in black.    The case was extremely important to the success of the project as you will see in other pictures.

On the board, I am using PRP 1/4 watt resistors with only a couple exceptions.  Jim has spec'd a 232 ohm resistor to correctly balance the circuit.  PRP does not have this value, so I selected a 1/2 watt Holco resistor to do that duty.  I bought these at Parts Connexion.  Please beware that all 4 of my 470R resistors were way out of spec.  One of my two 390R resistors were also way out of spec.  Parts Connexion has replaced these quickly and painlessly with correctly valued pieces.  Their customer service is top notch.  The other odd resistor is a Yageo 1/4 watt 400 ohm resistor pair in the cartridge loading bay.  They are there until my 390R replacement arrives from Parts Connexion. 

I am using a socket for the DC offset device.  I did this because I hope that some day I can find a better piece for this device.  From what I have seen on the scope these have a fairly nasty high frequency resonance around 19-20khz.  I hope some day they will have one that is out beyond 30khz.
Using a socket will make such a change a lot easier to accomplish.     

I upgraded the Panasonic 100 volt film resistors to 200 volt models and have bypassed these with teflon caps at 0.010 or 0.015uf values.  The teflon gives you that clarity and growl in the bass lines that is really something to witness first hand.


I have a big piece of TI shield across the power supply aspect of the Piccolo.  I soldered these to the supplied connector lugs Jim provides on the kit. 

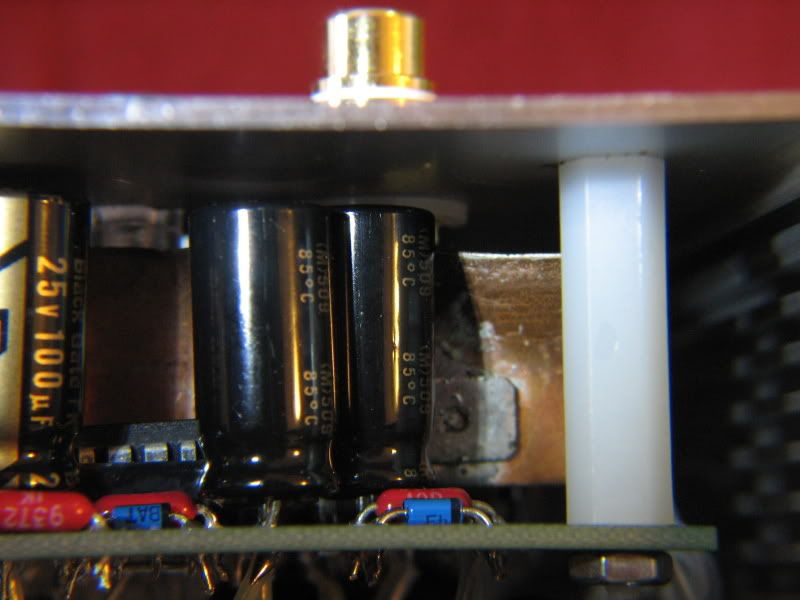
The big change was to use Black Gate caps for the electrolytics.  These are 100uf 25v models from Percy Audio.  These run 5.75 each so this is an 85 dollar upgrade.  Their noise floor is the lowest of any capacitor on earth.  These are so large I had to stagger these caps.


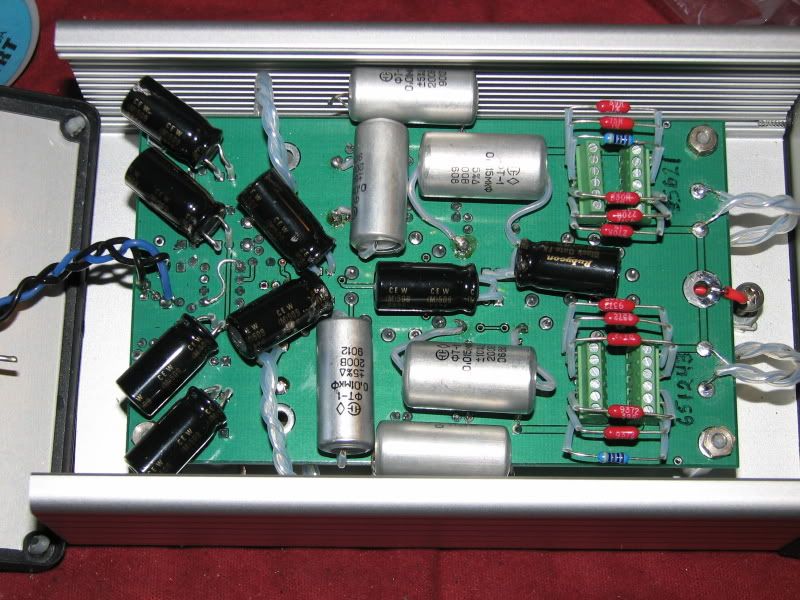
One is on top and the adjacent cap is soldered to the board below.  This is the only way I could use these caps.  The Hammond box is deep enough to make this work out as long as I bent them over the board.  I used teflon tubing to make sure these leads don't ever short to anything.


I am using 1 inch nylon risers on the board just as you do with the Clarinet and Cornet 2.  This gives you the room you need for these taller pieces.   Because of this it was not really possible to use the recommended RCA jacks as Jim does on his Piccolo.  I like the Vampires better anyway so this was not an issue in my build.  I use solid 0.025" silver from A-M Systems.  This is bare wire.  I run this inside a big teflon tube to allow air to be the primary dielectric.  I twist this to help reject RF interference. 

I like the connection pieces on the bottom which are similar to what ECIR38 used on his Piccolo.  You can swap resistors in minutes--without any risk of ruining a trace.  I bought a bunch of other PRP resistors in order to make resistor swaps fun and easy on my upcoming vacation where this will plug into other friend's systems for evaluation. 

Everything is breaking in nicely right now.  The teflons and film caps are going through their break in periods and the Black Gates will take at least another week. 

More to follow regarding the sound.  So far the noise floor is lower than my CineMag SUT and the low level detail has a lot more visceral growl and weight.  Mission accomplished at this juncture in time.
« Last Edit: 17 Apr 2009, 07:56 pm by tubesforever »

analog97

  • Full Member
  • Posts: 373
Re: More description and pictures of my Piccolo project
« Reply #4 on: 16 Apr 2009, 11:08 pm »
Wowee!  Absolutely beautiful build.  My hat's off to you.  My Piccolo is green with envy. :green: :green:

tubesforever

  • Full Member
  • Posts: 441
Re: More description and pictures of my Piccolo project
« Reply #5 on: 17 Apr 2009, 08:01 pm »
James and Analog97, thanks for the kind words.  The Hammond extruded aluminum cases are gorgeous.  It took a little time for me to sort out the best way to do the under/over so I could get everything mounted and easily accessed for resistor changes in the future.  In some ways the Bugle P/S box is tighter fitted because of the lighted rocker, iec and fuse. 

So far the Piccolo project is really quiet.  Even quieter than my SUT and that was my design goal.  The frequency response on the Piccolo is superb. 

I think you could easily build this all into a single component box.  In my system, space is at a premium.  It worked out better for me to put the two pieces in separate Hammond boxes.

I hope your builds are as fun and fruitful.  I wish I had built my first Piccolo this way. 

Cheers!

tubesforever

  • Full Member
  • Posts: 441
Re: More description and pictures of my Piccolo project
« Reply #6 on: 10 May 2009, 08:00 am »
Third week comments on my Piccolo2, Buggle P/S project:

I have a good three weeks of 24/7 power up on the Piccolo 2 and Buggle P/S and I thought it would be good to re-evaluate it against my CineMag SUT. 

I built my CineMag into the same type of Hammond case with two 4 pole 3 selector switches so I could engage all three transformer windings. 

First off, the CineMag is a real gem of an SUT.  These cost under 140 dollars for a pair of cans.  Add into this equasion the best chassis RCA's you can afford and one or two simple switches and you have a great SUT for under 250 dollars. 

The sound of the CineMag is very neutral.  It has very good dynamics, lots of detail, and a nice precision to the overall presentation of the performance. 

Next up came the Piccolo 2.  The Piccolo 2 has a quieter noise floor than the SUT. 

Is this even possible?  I understand the Black Gate noise level is -160db, but really how can an active stage sound quieter than an SUT transformer?  Perhaps the dsr of the CineMags conspires against getting a totally quiet noise floor. 

The bass lines of the Piccolo are deep, extended, clean and detailed.  They put the Piccolo in a different playing field in my opinion.  Midbass has decent slam and impact.  This was almost a toss up between the two.  The CineMag sounded a little less round and whole compared to the rich bass and midbass character of the Piccolo 2. 

In midrange detail I expected the CineMag to win hands down.  I can say I was surprised  because the Piccolo beat it out.  I get a lot more inner detail and without any added sibilance or analytical etch.  Basically you hear more minute inner detail and without any unpleasant after taste.    In terms of sound stage, the Piccolo seems bigger.  It also seems easier on the ears.  I hear less overall etch and grit.  I would have thought the CineMag to be superior here but I was very wrong.

In the upper highs I think it was almost a toss up.  However in the upper mid range where vocalists can get irritatingly raw, the Piccolo was clearly superior.  Sibilance seems more neutral and natural with the Piccolo.

Finally, having 6 loading options on the fly is way cool.  You can do this iwth your CineMag but it is built into the Hagerman Piccolo. 

My VDH MC-10 calls for 200 ohms loading.  I have mine at 75, 100, 180, 220, 300 and 490 ohms.  I can exactly dial in the amount of sibilance and inner midrange detail vs overall bass response.  This is a balancing act, but one that is easy to adjust.  Bright albums can be toned down a little and  dull albums can be better detailed.  This is really great fun.

What lends to the success of my Piccolo 2 project vs the stock build?   First, my Piccolo 1 was decent, built with the stock resistors and Nichicon electrolytics. 

The noise floor was louder than my Cornet 2 and louder than the CineMag SUT. 

With the Piccolo 2 which sports a Bugle regulated power supply, my incoming power is smoother and regulated.  This is worlds better than a wall wort.  Then it hits those Rubicon Black Gates and the noise floor is indiscernable.  Actually I hear the noise of the diamond to the vinyl 100 times more than I hear any noise from the head amp.  I can really crank it up a lot louder than I probably should and not hear any audible nasties.  In fact I hear accoustic feedback from the table before any noise from the head amp.

Mission accomplished.  Better noise floor, better bass, better mid bass, better midrange, better upper mids, and better highs.

The Piccolo 2 is a winner.

With the two chassis, upgraded parts and pieces my project came in just under 500 dollars. 

How much better is mine than a stock diy built Piccolo?  I can only say that for me I prefer the hotrodded piece.  The hot rodded Piccolo has a different level of performance.

BTW I plan to try some Russian FT-2 200v 0.10uf teflon caps in place of the Panasonic 200w film caps when they arrive from the Ukraine.  I suspect these will sound a little more clear, wide, focused, and dynamic.  I just hope not to lose any deep bass or overall 3D magic. 

I hope this helps those out there considering a Piccolo build of their own.
« Last Edit: 21 Jun 2009, 06:32 am by tubesforever »

amandarae

Re: More description and pictures of my Piccolo project
« Reply #7 on: 10 May 2009, 11:39 pm »
Hey Tubes,

Great build my friend!  Hope you enjoy your Piccolo for a very very long time.    Just wondering, and if the case have enough room, why not build a capacitor array through 6 or 8 pin tabs and take off the wires from there connecting to the points on the board where you want it to be (ala umbilical cord) instead of soldering them directly underneath the board.  Much easier to replace and try other kinds no?

Neverthless, great projects you have there!

regards,

Abe

jameshuls

Re: More description and pictures of my Piccolo project
« Reply #8 on: 11 May 2009, 05:16 am »
Inspiring descriptions tubes! I better get off my arse and get busy!

tubesforever

  • Full Member
  • Posts: 441
Re: More description and pictures of my Piccolo project
« Reply #9 on: 7 Jun 2009, 10:02 pm »
Before I went to Muzikmikes Ribfest in Chambersburg Pennsylvania, I made a couple last minute cap changes to sparkle up the sonics a bit.  My Piccolo was just a little less clear than the Cinemag SUT so I did the following.

I pulled out all the smaller FT-1 teflon bypass caps and all the 200v Panasonic film caps.  In their place I put Dynamicap 0.10uf 250v caps at C 10, C 11, C 16 and C 17.  Then I replaced the C-1 right and left with Russian FT-2 0.10uf 200v teflons.


I like the extra clarity, it now matches the wonderful sparkle and transient detail I hear in the Cinemag SUT. 

The FT-2 caps were glued to the top panel of the Hammond chassis.  I run a short umbilical back to the pcb.


The thing is still just as quiet as when everything was surface mounted.

And now some listening notes...

The Piccolo has better bass response than my previous Cinemag SUT.  It goes a little deeper and it has incredible finese in the upper mid bass detail and slam department. 

Vocals have less sibilance.  I really like that.  Midrange detail is enhanced so I can more clearly hear what's going on in the sound stage.  In fact I sense there is just a little more information about the room.  I can clearly hear the boundarys of the space and don't have to turn up the volume as much as I did with the Cinemag to hear this level of detail. 

Highs seem to be a little more natural and less zingy.

I compared my Piccolo against Mikes Aesthetix line stage and phono section with a switchable MC section.

The Piccolo was quite a bit quieter.  I had more space and detail.  Overall the vocals were what gets me most about the Piccolo.  If there is someone singing on the LP, they are there in the room and holding out a hand expecting you to tip them. 

Jim should be proud....the Piccolo is a winner!

The one mistake I made is that Mike owns one of Jim's HAL Piccolo's.  I never took the time to swap them in and out to see how mine compared to Jim's HAL model. 

Mike loves his HAL Piccolo.  He says it beats out his Aesthetix as well.  I doubt the apple would fall too far from the tree.

I will get to that comparison during Ribfest 2010! 

I am taking my Cinemag and Piccolo up to Portland Oregon next month to show it off to an audio club in Portland.  This should be fun.  I think I will take the Clarinet and Cornet 2 up as well.  I suspect they are going to really love the ALL Hagerman vinyl front end!