For the past several weekends, I've been working on a "home run" wiring project. This is where you run all connections (phone, cable, network, IR, speakers, etc.) to one location. Here is a picture of the end result:

Another picture, showing the cable modem and router (Ugate 3000, the case of which I had to take apart as the router was overheating) on a shelf:
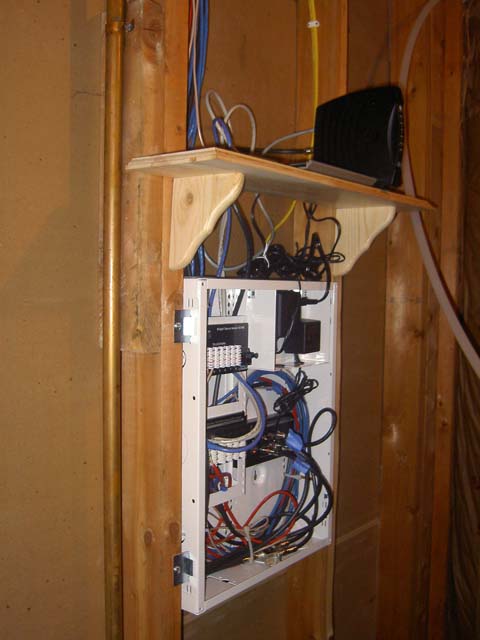
I currently have three locations actually wired and two sets of cables in the attic (and at the structured wiring box) to wire two more locations. I ran one RG-6 Quad Shielded, two cat5e, and one phone to each room. I plan on using the second cat5e for IR or network. I also have another cat5e I'm running with speaker wire (not shown -- runs from my HT room in the basement to where outside speakers will go; I'll use two currently unused channels of my Bryston 5-channel amp to power the speakers) for IR.
For those contemplating this type of project, if you have to drill many holes in the attic (as I did), I highly recommend buying an "all in one" cable, which has cable, network, and phone all in one cable. Running independent wires is incredibly hard and time consuming -- the wires will kink and knot. Also, I used this type of RG-6 connector:
http://www.partsexpress.com/pe/showdetl.cfm?&DID=7&Partnumber=092-491Parts Express also has a RG-6 Quad Shielded connector, which I also tried to use. These connectors are very finicky and I couldn't get either of them to work well with my RG6QS, but did get them to work well with my old RG6 and the cable company's RG6. You really have to push these connectors on hard prior to crimping. When I ordered these connectors, Parts Express was having a problem and every link on a part's description page went to the same, incorrect link. I see now they recommend a different cable stripper than what I purchase. Perhaps that would help, becaise neither of the strippers I have worked well with these connectors.
I also had a problem with the Leviton Cat5e female connectors that are put into face plates for the boxes in the wall. The documentation with these appears to be partially incorrect. They have a section of the directions that is completely wrong. However, if you follow the colors on the connectors, you will wire the connectors correctly. By the way, trying to figure out if a wire is white/green or white/blue is challenging in low light environments.
I found this to be helpful as a fish tape:
http://www.partsexpress.com/pe/showdetl.cfm?&DID=7&Partnumber=362-640As an overall job, this is by far the most challenging home project I've done. I expected this to take one-two weekends. It has taken about five weekends, most of which were spent working all day, and I spent at least two days working 12+ hours. Plus, crawling around in the attic is exhausting. And I started this project so that I could do the project I really want to do -- add insulation in my attic. I should also note that part of my attic has wood (particle board) nailed to the rafters (correct term?). I had to move the particle board, which added a level of complexity.


