Welcome Guys,
Lots of great people and knowledge here!
I might be able to help a little. I recently completed a pair of the triples and Danny's crossover upgrade to my Maggie 1.6's (one's he discusses in the video). The results of the crossover upgrade were stunning and took the Maggie's to a whole new level of depth, clarity, and smoothness. The Maggie's blended so well with the subs and I hear so much more detail. I did one upgrade so I could compare the difference and it was like lifting a blanket off the speakers. The improvement was that noticeable right away.
So I highly recommend the crossovers and subs. You won't regret it.
I can't speak directly to the 1.7 crossover components since I have the 1.6's but the process for both is the same to remove the cover and get to the internal crossovers.
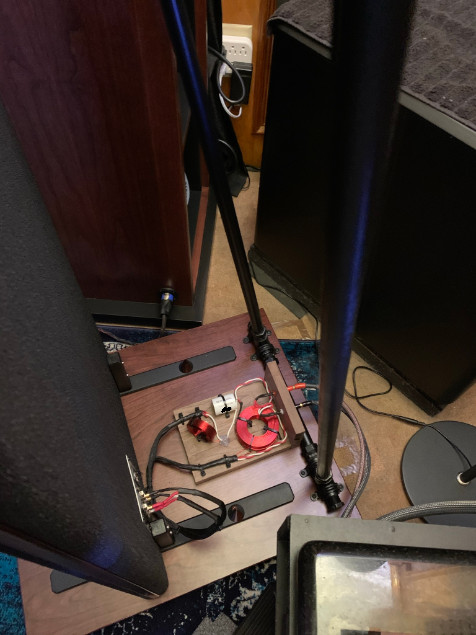
There was not enough room inside the Maggie's to put the new crossover components so I did external crossovers.
First make sure you have a good flat work area to lay the Maggie's on. Get a couple of boards longer than the width of the speaker to raise the speaker off the work area. Cover them in a towel so as not to damage the speaker. place the speaker with the front facing down. You want to see the back side of the speaker when you lift the sock.
Remove the stands from the speaker.
Next remove the trim panels
Yes it will make you sweat a little because the first step is to remove the side trim panels. Starting from one end put a flat tip screwdriver (tip being close the size of the trim) under the edge and GENTLY begin to pry it up. Be very careful not to strain the trim too much or you will break it. I used 2 screwdrivers to get a little more leverage and work it until you get to the other end.
Remove 120 staples!
Looking at the bottom of the speaker you will see a boat load of staples that will have to be removed. I used a small flat tip screwdriver and needle nose pliers to remove the. Once you get the first layer of them off life the cloth and you will see another boatload of staples! remove them too.
Now your ready to slide the sock up.
Now you can slide the sock up to reveal the factory crossover. Be careful when sliding the sock in case any of the trim nails that may not have come off with the trim. Also you will be exposing the speaker, handle it from the edges only.
Slide the sock up past the crossover to the point where you can see the wires going to the speaker.
A picture is worth a 1000 words
Take a picture of the connections where they come out the the crossover for reference.
Next you will need to flip the speaker over to expose the connections from the factory crossover to the speaker terminals. They should be under a small black cover that is glued down. It peels off easily. I discarded them.
Take another picture and remember to verify polarity (+/-). It will make it easier and you won't end up having to flip wires later.
Remove the spade wires from the connectors. Tape and pull back to the other side and tuck them around the factory crossover. Make sure they are secure, you don't want them to rattle when you play music.
Time to flip the speaker back over so you can get to the Maggie speaker connection face plate.
Remove the factory crossover connections from the Maggie's speaker connection face plate. (I cut them and tucked with the other crossover wires)
Next route and solder wires from the face plate speaker connector for both low and high to the speaker connections on the front side of the speaker. I used the same wire as for the crossover build and it came from Danny. Remember where you pulled the old crossover wires from now route these the same way.
Time to flip the speaker over again so you can make the connections to the speaker terminals with the wire you just ran.
Go back to the pictures you took of all the crossover connects and verify which are the high and low speaker connections.
There are 2 ways to go to connect the wires to the terminals. You can crimp spade connectors on the wire or solder the wires to the terminals (Preferred). I soldered them with a good grade of silver solder. Make sure to put a heat sink (needle nose with a rubber band to hold them will do) on each connector as you solder to keep heat from the speaker.
Almost done!
Flip the speaker over once again so you can see the back side. Tuck the wires you just ran and reattach the Maggie's face plate.
Time to reverse the order and put it back together. Pull the sock down and get ready to put new staples back in to secure the sock cloth.
Now put the stands back on. For the trim I propped the speaker up on edge and GENTLY tapped the trim panels back in place.
Now you are ready to stand the speaker up and do the next one!
I searched "how to remove the covers from Magnepan 1.6 speakers" and found a couple of good links that have pictures with the step when I did mine.
Maggies with the triples

Crossover
Hope the information helps. Let me know if I can answer any questions.