LGKs

0 Members and 1 Guest are viewing this topic. Read 3386 times.

cody69

LGKs
« on: 28 Jun 2014, 12:40 pm »
Have been real busy and never had time to post on LGK build. Now that I am all caught up, wanted to share my experience with these gems.
Like many, I followed Danny's updates during the design, build, testing and shipping of these drivers -- and ordered a pair when they were available. I wanted to get experience with this driver in the desk top configuration, as I have ideas of using it in many different applications.

The build was straight-forward. Since I have a shop and sheets of MDF on-hand, I built the cabinets in the shop vs outsourcing. I used a slightly textured "Hammered" paint finish, which matches the color scheme on the desk where these reside. Three coats were used.

Af for sound quality, I knew they were going to be great the moment I unplugged the shop's A/V-1s and plugged in the LGKs to break them in. After a week or two I put them in my main system and played them with a pair of Danny's servo subs. I thought they sounded amazing, especially considering the small desk top factor. After coaxing my wife in to listen, which lasts all of 20 seconds (she's not big in this stuff), her comment, pointing to the main speakers next to them was "Why do you need those big things if these play just as good?"... oh well.

These hung around a week or so while I worked on the rest of the desk top system. Taking a page out of Lacro's book, I put together a power amp based on the TPA3110 class-D board. For source I'm using an iMac, with a DragonFly USB DAC that also controls sound level.

Putting this together I am pleased with the results -- the parts all pair well together -- and the LGKs sing nicely.


Guy 13

Re: LGKs
« Reply #1 on: 28 Jun 2014, 12:47 pm »
 :thumb:

gregfisk

  • Restricted
  • Posts: 1349
  • Us alone in the universe? sure is a waste of SPACE
Re: LGKs
« Reply #2 on: 29 Jun 2014, 12:08 am »
Quote
After coaxing my wife in to listen, which lasts all of 20 seconds (she's not big in this stuff), her comment, pointing to the main speakers next to them was "Why do you need those big things if these play just as good?"... oh well.

That's very funny, I get a similar reaction when I ask for input. Or I get "it's too loud" :roll:

Nice build by the way :thumb:

SetterP

  • Jr. Member
  • Posts: 95
  • Dual-Channel Zealot
Re: LGKs
« Reply #3 on: 29 Jun 2014, 05:49 am »
Nice build, I like the biscuit joints.  Nice router setup too.

Enjoy the tunes!  :thumb:

seaverd

  • Jr. Member
  • Posts: 9
Re: LGKs
« Reply #4 on: 29 Jun 2014, 06:33 pm »
Cody,

Looks great.  I see your router circle jig...by any chance do you have a link or something you could share on its construction.

cody69

Re: LGKs
« Reply #5 on: 30 Jun 2014, 11:24 am »
Quote
Looks great.  I see your router circle jig...by any chance do you have a link or something you could share on its construction.

The jig is based on the design in Bill Hylton's book, "Router Magic". It is essentially a trammel that has a steel pin in a hardwood bar that slides in a plywood base. A thumbscrew is held in place with a T-nut that securely locks the bar in the base. Set the distance from the center of the pin to the outside of your router bit to the radius of the circle you want to cut.

The pin is nothing more than a finishing nail with the head clipped off that is let into an undersized hole you drill in the bar. A few holes at several location in the bar will allow you to position the pin in different location for cutting holes from 2" in diameter, on up. Drill a hole in your workpiece at the center point for your circle, slide in the pin, and rotate the router jig, removing about 1/4" of material with each pass.


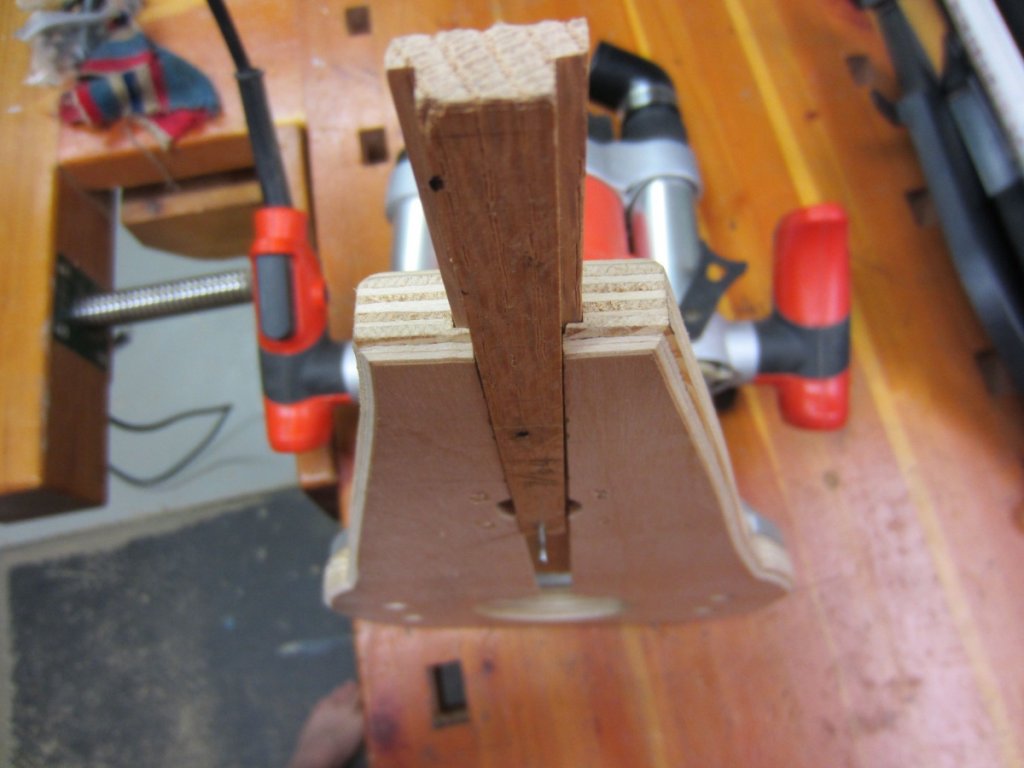
I had a problem with the first jig I made with the plywood delaminating where the T-nut was installed... a result of over-tightening the thumbscrew. I added some screws you see in the picture below to prevent the laminates from separating.


A few thoughts regarding using the jig.
MDF is very messy and if you're working indoors, you need good dust collection. If you can, look for a router with good dust collection ports to pick up the fine dust that kicks up when cutting MDF.

Theoretically, I like having a the completely variable setting capability provided by the sliding bar, versus the digital setting design of some of the popular commercial jigs. In practice, I doubt that this makes much of a difference.

If you use a spiral uncut bit, be sure the router collet is clean and tight, otherwise you run the risk of having the bit crawl out of the end of your router and into the top of your workbench.

MarvinTheMartian

  • Jr. Member
  • Posts: 130
Re: LGKs
« Reply #6 on: 1 Jul 2014, 06:41 pm »
Cody:
Rather than fix the router to the trammel it is much easier to use a router guide bushing.
This way the router handles , power cord and dust collection maintain the same orientation as you rotate the trammel around the center point.

A 12mm piece pf scrap plywood a 30mm hole at one end and multiple 4mm center point holes at the other end. The 30mm guide bushing is fixed to the router, and then placed into the 30mm hole.

I don't need infinite variability I need repeatability ie. specific center points for ... GR SW12 through hole, SW12 recess, M165 through hole etc. etc all clearly labeled. You also have to record which diameter bit goes with which center point.

If I get too many center point holes to keep track of I simply start on a new piece of scrap.

Google "Making a trammel for any router"
Peter is a bit long winded but the guide bushing concept is explained early in the video.

Shawn

cody69

Re: LGKs
« Reply #7 on: 1 Jul 2014, 11:49 pm »
Quote
Rather than fix the router to the trammel it is much easier to use a router guide bushing.

This is genius... maintaining router orientation is huge advantage... thanks for posting.

MarvinTheMartian

  • Jr. Member
  • Posts: 130
Re: LGKs
« Reply #8 on: 2 Jul 2014, 01:10 am »
Cody:
Router Tip #2 ... Through Holes ... this one is from my Father.
Plunge from the front side, trammel route the driver recess first, trammel route the driver hole almost all of the way through, punch only one 1/2" hole through the full depth. Flip the baffle over and use a round over bit with a 1/2" bottom bearing to follow the original front side profile and you are done.

Easy P'easy ... A very practical man.
Shawn

Raiderone

  • Jr. Member
  • Posts: 47
Re: LGKs
« Reply #9 on: 2 Jul 2014, 05:21 am »
cody69:  Thanks for posting your build and sharing your impressions of how the LGK sounds.

MarvinTheMartian:  Great tips. 

Router bushing is so obvious that it is not obvious.  Also, I've been routing driver holes for over 10 years and have not thought of the flip the baffle over tip.  I would imagine that it would prevent that last ragged bit and splintering as the inner cutout collapses.  Also, you don't need any clearance under the the baffle for the bit to protrude through.

What type of bit do you use for cutting out the hole?  Spiral up or downcut, double flute?  And how do you address screw hole tearout when drilling holes?

cody69

Re: LGKs
« Reply #10 on: 2 Jul 2014, 10:37 am »
Quote
A very practical man.

Indeed, this is a very practical idea. Great to have ideas to work smarter & better. Thanks Shawn

MarvinTheMartian

  • Jr. Member
  • Posts: 130
Re: LGKs
« Reply #11 on: 2 Jul 2014, 11:28 am »
Raider:
For wood working I mostly use carbide tipped brad-point drill bits. Clean in and with a backer board clean out's.
http://www.leevalley.com/en/Wood/page.aspx?p=45534&cat=1,180,42240

A double flute carbide plunge straight router bit works okay up to 3/4" deep. Any deeper and I would use a solid carbide spiral-up bit just to get the waste ejection.
Shawn