Modifying VPI Classic 1 for vta adjustment

0 Members and 1 Guest are viewing this topic. Read 5383 times.

Scottdazzle

Modifying VPI Classic 1 for vta adjustment
« on: 29 Nov 2012, 10:11 pm »
I had been considering selling my original version VPI Classic so I could get a Classic 2 with the vertical tracking angle adjustment. I called VPI and Harry told me I could remove the tonearm base and replace it with the one for the Classic 2.  I had no idea they would sell the part (it's $800), but they did. Buyer beware: this involves drilling on the top of the plinth and might void the warranty.

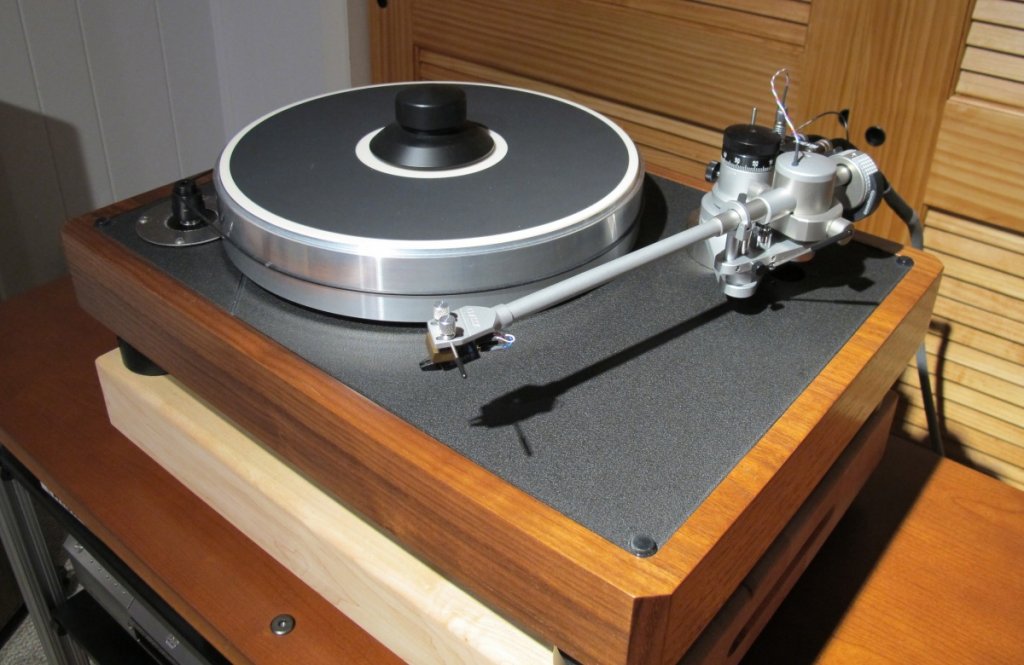
I'm not too handy with tools so I took my sweet time, but it turned out fine. You need to locate the best spot for the assembly and then drill and tap 3 sholes for the mounting screws.  VPI supplies the screws, but you're on your own with the drill and taps.  Here's what the Classic 1 looks like before the mod:


Here's what mine looks like after the mod:


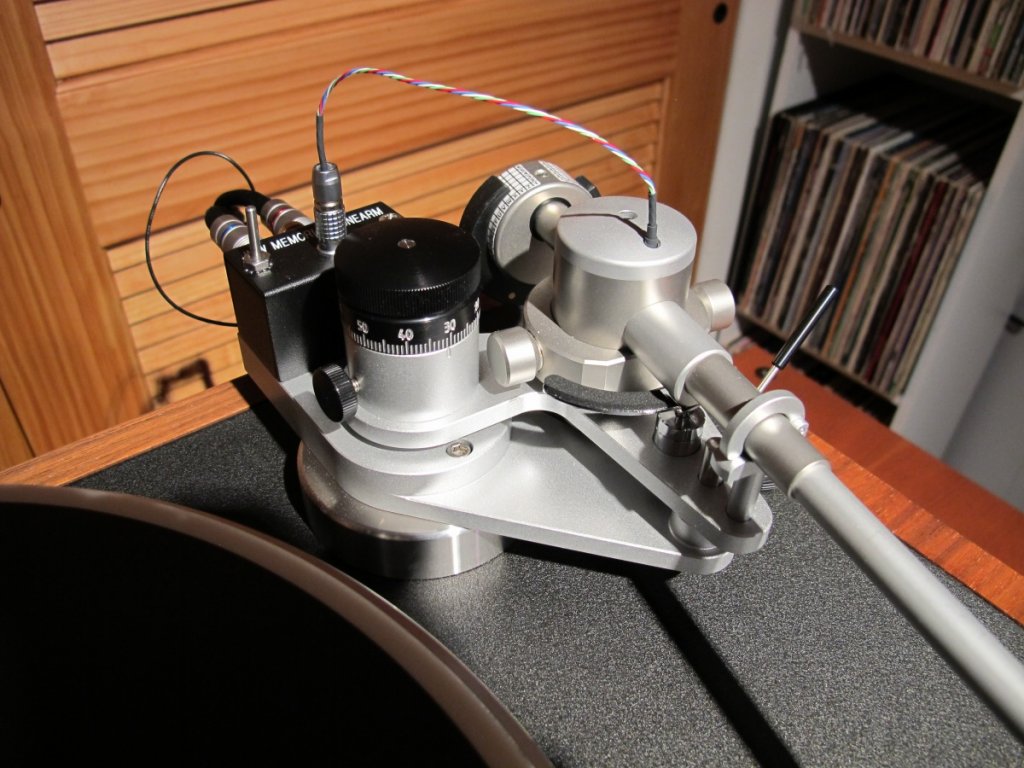
The only drawback is that you can see the hole where the original tonearm base mounted to the plinth. That probably reduces any resale value, so keep that in mind if you're thinking about trying this. It's hidden by the shadow in my photo.
« Last Edit: 30 Nov 2012, 02:04 pm by Scottdazzle »

Devil Doc

  • Full Member
  • Posts: 2191
  • On the road to Perdition
Re: Modifying VPI Classic 1 for vta adjustment
« Reply #1 on: 29 Nov 2012, 10:23 pm »
Did you use a drill press? What kind of bit did you use?

Doc

Sonny

Re: Modifying VPI Classic 1 for vta adjustment
« Reply #2 on: 29 Nov 2012, 10:51 pm »
I have the original Classic, it does have the VTA adjustment, just not on the fly, but it only takes a few seconds to do.
Do you have the old armbase?  Willing to sell it?

T

Scottdazzle

Re: Modifying VPI Classic 1 for vta adjustment
« Reply #3 on: 29 Nov 2012, 10:56 pm »
The vta assembly is a surface mount. You only need to locate precisely where the new one will go and drill the 3 screw holes accordingly.  VPI does not provide a template for this.  You need to use the VPI alignment jig to determine where to mount the assembly - if you want to be able to get the stylus overhang right!

The bit for the screw holes was a good 9/64" and the tap was a tapered 8-32. The tap needs to be reversed and oiled every quarter turn.
« Last Edit: 30 Nov 2012, 02:02 pm by Scottdazzle »

Scottdazzle

Re: Modifying VPI Classic 1 for vta adjustment
« Reply #4 on: 29 Nov 2012, 10:58 pm »
I have the original Classic, it does have the VTA adjustment, just not on the fly, but it only takes a few seconds to do.
Do you have the old armbase?  Willing to sell it?

T

Sonny, that's true about adjustable vta. It's just a slow and tedious process with the Classic.  On the fly is so much easier. Yes, I kept the original base and yes I'm willing to sell it. Send a pm please if you want to pursue this further.

Sonny

Re: Modifying VPI Classic 1 for vta adjustment
« Reply #5 on: 29 Nov 2012, 11:34 pm »
Sonny, that's true about adjustable vta. It's just a slow and tedious process with the Classic.  On the fly is so much easier. Yes, I kept the original base and yes I'm willing to sell it. Send a pm please if you want to pursue this further.

Scott, having both the on the fly version and the regular version, the on the fly version is definitely nicer!

orthobiz

Re: Modifying VPI Classic 1 for vta adjustment
« Reply #6 on: 30 Nov 2012, 03:33 am »
You can twist the base a bit making the hole drilling less nerve wracking...just a little room for fudge factor. Nice job!

Plus the 10.5 arm makes the tracking error potential less than the 9".

Paul

Scottdazzle

Re: Modifying VPI Classic 1 for vta adjustment
« Reply #7 on: 30 Nov 2012, 02:08 pm »
Did you use a drill press? What kind of bit did you use?

Doc

Doc and Orthobiz, no drill press is necessary. I apologize for misstating this in my original post. I have corrected it.  :oops:  :duh:

Letitroll98

  • Volunteer
  • Posts: 5752
  • Too loud is just right
Re: Modifying VPI Classic 1 for vta adjustment
« Reply #8 on: 1 Dec 2012, 04:52 am »
I would think a drill guide to be a prudent recommendation if you don't own a drill press (like most of us here I'm sure).  They're pretty cheap and insuring precision holes on something that needs exact alignment would lessen any chance of errors.  I know there a level bubble on most of our cordless drills, but I'm too shaky to trust myself freehand.   

That being said, it looks like a splendid installation Scott.  Strange that Harry wouldn't include a template, perhaps there's a reason.

orthobiz

Re: Modifying VPI Classic 1 for vta adjustment
« Reply #9 on: 1 Dec 2012, 01:28 pm »
Is that the newer stainless steel arm? I think mine is all aluminum.

Paul

Scottdazzle

Re: Modifying VPI Classic 1 for vta adjustment
« Reply #10 on: 1 Dec 2012, 06:47 pm »
I would think a drill guide to be a prudent recommendation if you don't own a drill press (like most of us here I'm sure).  They're pretty cheap and insuring precision holes on something that needs exact alignment would lessen any chance of errors.  I know there a level bubble on most of our cordless drills, but I'm too shaky to trust myself freehand.   

That being said, it looks like a splendid installation Scott.  Strange that Harry wouldn't include a template, perhaps there's a reason.

Maybe I was the guinea pig for Harry!  :o

Scottdazzle

Re: Modifying VPI Classic 1 for vta adjustment
« Reply #11 on: 1 Dec 2012, 06:48 pm »
Is that the newer stainless steel arm? I think mine is all aluminum.

Paul

It's the original tonearm which I think is aluminum. Looks like it.

putz

Re: Modifying VPI Classic 1 for vta adjustment
« Reply #12 on: 1 Dec 2012, 09:17 pm »
I see you have the Soundsmith Counter Intuitive. Best tweak out there for the VPI tonearm.

Sonny

Re: Modifying VPI Classic 1 for vta adjustment
« Reply #13 on: 1 Dec 2012, 09:24 pm »
Scot, i like the new steel ring that is under the base, instead of the acrylic!  Looks mighty fine!