I just posted this in the Technics BB at Vinyl Engine and thought I'd share it here as well.
In the past year I've been converted to the audio religion of Zu. Listening to their speakers has been transformational in my enjoyment of music. Their primary music source is a highly modified SL1200
http://zuaudio.blogspot.com/2011/03/zu-sl-1200-turntable.html so I decided to pick one up and bang on it to hear what I could get out of it. I found one on ebay with a SME armboard instead of a stock arm so I grabbed it. Lots of SL1200 upgrade stuff out there. I focused initially on mounting my Graham arm, treating the aluminum plinth with Sound Coat and reworking the power supply.
I looked at some of the external PS boxes made for the SL1200 and couldn't justify that kind of money for such simple "regulator in a box" power supplies. Besides, to work correctly, the regulator needs to be near the circuit, not in a box three feet away.
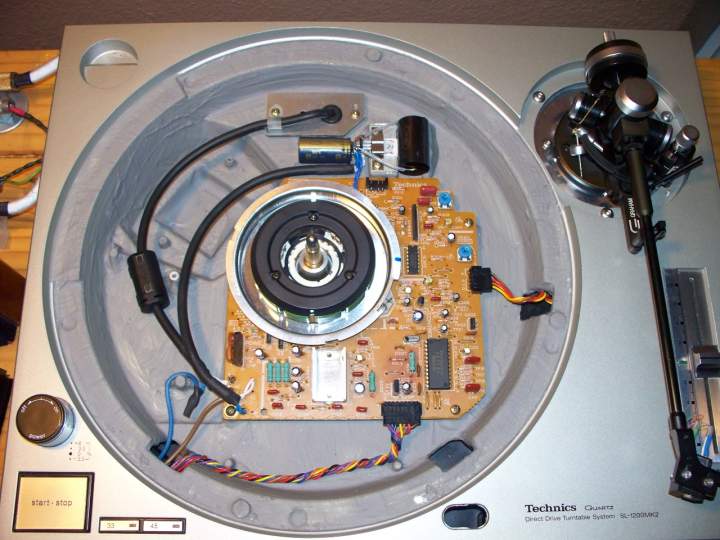
There’s no magic to the SL1200’s power supply needs. All it needs is filtered, regulated +21vdc and current capacity of around 1 amp to start the platter and .25 amps to keep it moving. Having more current capacity would be nice if I decide to try some of the heavy metal record weights and mats that are en vogue with the SL1200 these days. Since there's enough room under the hood, I decided to update the PS inside the deck. Here's what I did.
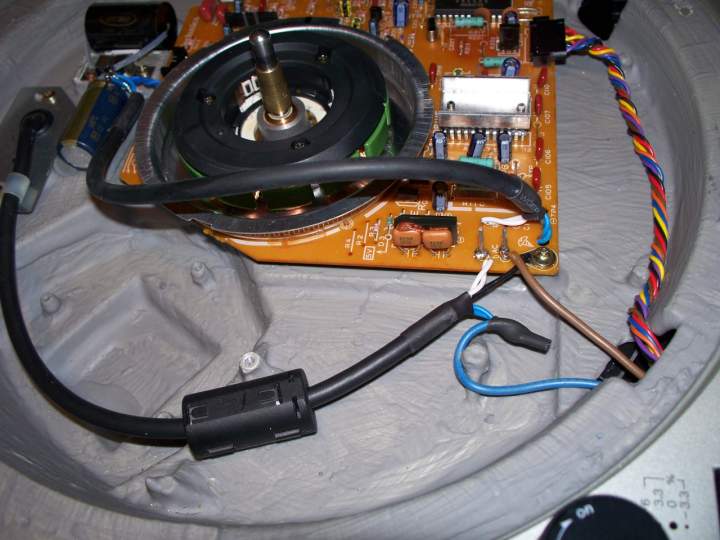
Remove The Transformer: First I mounted the transformer in an external metal box. Why? Because I don’t want my Denon DL103 cartridge moving through the radiating field of the transformer under the platter as it plays a record. The yellow 31VAC transformer secondary leads were extended from the box to the deck with microphone cable, connected to the original power switch and attached to AC input on the main board. I used the drain wire in the microphone cable to connect the AC power ground to the deck’s ground point.
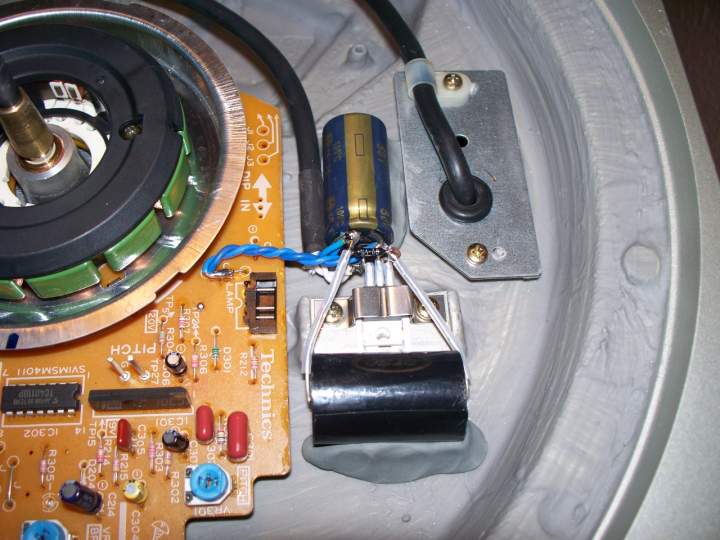
Upgrade the Filter Cap: To help the PS deliver more instantaneous current for platter start-ups, I replaced the stock 470uf 50v filter cap with a Panasonic FC 2200uf 50v. The stock bridge rectifier with snubber caps looks fine to me so I left it there. I removed the old cap and (using more microphone cable) ran the DC output from the rectifier up to the new filter cap mounted on its side near the regulator.
Replace the Regulator: To regulate the +40vdc from the filter cap down to +21vdc I used a Linear Technology LT317 regulator. (Thanks to Mike Galusha for direction on this.) The LT317 is an improved version of the LM317, as reflected in its price ($4 for a LT317 vs. 40 cents for a LM317). The resistor values to get +21vdc are 100 ohms for R1 and 1500 ohms for R2. The leads from the 2200uf filter cap were soldered directly to the regulator pins for a short power path. I added a 10uF poly cap in parallel with R2 for improved ripple rejection. See the datasheet for connection schematic. The LT317 was mounted to the chassis with the same clamp as the original regulator.
REALLY IMPORTANT NOTE: Because the back of the LT317 is voltage out, not ground, I had to use a ceramic insulator between the regulator and chassis for isolation. Mounting the LT317 directly to the chassis (like the original regulator is mounted) would short the +21vdc output directly to ground. Not good.
Connect the New Power Supply: I removed Q1 (the stock regulator), R2, R4, and C3 from the main board and connected the +21vdc from the regulator to the wire jumper located between C3 and the stylus lamp connector. That’s it for the power supply. Parts cost under $30.
Note: The Zu link above shows a picture of the SL1200 with the stock transformer and AC board in place.
Russ


