One of the last Super V builds

0 Members and 1 Guest are viewing this topic. Read 3536 times.

fishboat

  • Jr. Member
  • Posts: 74
One of the last Super V builds
« on: 7 Feb 2013, 02:55 am »
Eventually this thread will end with a finished set of Super V's, but for now I'd appreciate a reality-check.  I've only been aware of Danny and the Super V for a few weeks.   I've done a fair amount of research on other sort of similar designs, but Danny's SV  seems to check all my boxes, so here I am.  Of course I've never heard the SVs..but I'm optimistic.. :D

Attached are a couple pics from my model.  This is an adaption of stevenkelby's SU model. Thanks again Steve!!.   Steve and I have discussed a few things off line & he's been great help.   

PLEASE feel free to point me in the right direction if I've changed anything that matters.  Redrawing at this stage is much preferred to rebuilding later.

My SV version is essentially drawn to Danny's spec.  Mine is about 5/8ths to 3/4 inch taller than the spec.  I also drew the internals of the speaker square and plumb with all board edges at 90 degrees.  The 3 degree setback is achieved via a wedge base.


The top baffles are moved back slightly to allow the grill to stand proud of the bow tie by just an 1/8th inch:


The top baffle will be 2.25 inches with the driver pinched between the front and mid baffle-panel:


The sides will be 1.125 inch MDF cores with a 1/8th inch (3/32nds nominal) veneer on each face to yield sides that are 1 3/8ths thick total.  Is there any advantage to going thicker?


The sub baffle is 1.5 inches thick & again the drivers will be pinched between panels:


The wedge on the bottom yields the 3 degree set back.  Spikes will be installed.


To accommodate the the slightly taller sides (<3/4 inch) the sides were raised and the lower rear tips were adjusted to be level with the floor..the tan overlay shows the original design:


The dimensions below are approximate:


In general, the edges of nearly everything will be hit with a round-over bit.  The MDF edges between the veneers will be satin black.  The veneer wood may be sapele(TBD), cut in my shop.  All MDF lines between boards will be filled and sanded smooth.    The xover box will have a glass top and be accessible (not sure about this part yet).  The grills will be 1/2 inch thick.   The sides, bow tie, wedge and top baffles will be cut from full sized templates (arch E paper transferred to 1/4 inch masonite, then MDF cut with a template router bit.)

Any suggestions/comments are more than welcome.
« Last Edit: 7 Feb 2013, 06:00 pm by fishboat »

Jonathon Janusz

  • Full Member
  • Posts: 908
Re: One of the last Super V builds
« Reply #1 on: 7 Feb 2013, 03:18 am »
Please keep in mind, Danny will be able to say for sure on all these kinds of things, but from what I see in your plans:

Sandwiching the drivers inside a baffle - I don't think it would matter as much on the subs, but if the coax is recessed from the front baffle, you might end up with some performance issues compared to mounting it flush to the baffle face?

Thickness in the side panels will add stiffness to the woofer boxes.  Most folks seem to sit around 1.5" thick (2 layers of 3/4" MDF), and with that Danny consistently recommends No-Rez.  Only thought besides in my mind is to be aware of how that thickness affects the coax baffle dimensions.

The reference design as published specifically keeps the side panels off the floor.  I'm guessing for structural reasons?

I can't tell exactly by the drawings, but I might watch out how aggressive the curve is on the bottom back woofer panels.  The size of those panels determines the depth of the H-frame for the lower woofer, affecting its output if it varies drastically front-back.

I like the extra thick woofer baffle - adds some additional mass to the base without adding size, and from what has been said before, anything to strengthen the woofer box is a good thing.

Have fun with your build!

fishboat

  • Jr. Member
  • Posts: 74
Re: One of the last Super V builds
« Reply #2 on: 7 Feb 2013, 03:30 am »
Thanks Jon..
Good point on recessing the coax in the baffle...didn't think about that.  I thought about it from a construction point of view.

I did order the No Rez and 1.5 inch sides..works for me..but not sure what you mean by side thickness impacting the coax baffle dimensions..

The side panels are still off the floor, by about 1/4 to 3/8ths.  The speakers rest solely on the spikes.

Jonathon Janusz

  • Full Member
  • Posts: 908
Re: One of the last Super V builds
« Reply #3 on: 7 Feb 2013, 04:02 am »
Just that Danny has made mention that keeping the overall size of the coax baffle (face plus wings) to spec is important.  If one were to go a little crazy thickening the side panels, the thickness of the side panels adds to the overall dimensions of the coax baffle face.  For example, the recent build the with the sand-filled woofer boxes solved the problem by building the coax baffle separately (and smaller) from the design of the woofer box.

I thought I remembered seeing some folks do something with the coax similar to what you are thinking, but I can't remember if they made the outermost face a smaller thickness (1/4"? 1/8"?) to avoid the potential problems the recess could cause, the end result being a coax mounted with no hardware showing from the front.

Glad you managed to pick up a kit!

sl_1800

  • Full Member
  • Posts: 406
Re: One of the last Super V builds
« Reply #4 on: 7 Feb 2013, 05:27 am »
I understand your desire to pinch the P-Audio driver between panels, I did that on mine with no detriment to the sound and to my eye it looked much better.  As for pinching the sub drivers........I'm not sure what you will gain from that since they are very difficult to see anyway, not to mention the complexity of replacing a driver if it were to fail.

As for your drawings I really like the little details you have changed such as the front feet and the lines on the sides of the woofer box.  Best of luck with your build and be sure to keep us up dated with pics.

PDR

  • Full Member
  • Posts: 820
  • May the best man win
Re: One of the last Super V builds
« Reply #5 on: 7 Feb 2013, 06:57 am »
When I was deciding on the radius for the top of the side panels I was looking at the drawings, but was always
drawn back to this photo of the flat  packs offered by Danny.
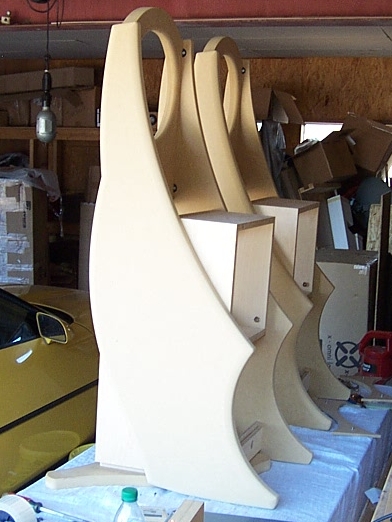
Notice how the panel tip protrudes past the back of the sub box, looks like a couple of inches.
On your sketch it shows the tip finishing even with the sub box.
I think this is because the flat packs were modified to allow more room (height) for the x-over box.
You can see this comparing your sketch to the picture below.
I also think your bottom radius cut should not come in so far, it should be at the point where the top box is.
This would help with your longer back leg.
Again you can compare to the pic of the flat pack.
So considering that the panel passes the top of the sub box about mid point (yours might be a bit shy of mid)
this would make the cut of the top round longer ....I worked on this for a long time before I came to a decision
on exactly what I would do, because I had to take into consideration the extra width (2") of the sand filled bottom baffles.
So you have three points to strike the radius with. (1)The top (2) the point where it intersects the top of the sub box,
(3) how far past (if past at all) from the back of the sub box.

I did what you plan on doing with the template, then using it to router out the side panels.
I build a lot of round walls and barrel ceilings in my job and I was wondering how to strike the
radius. I finally just took a flexible 3' steel ruler and bent it to the 3 plotted points, then traced.....worked like a charm.

These builds are just a lot of fun......especially from scratch. Have fun!

Pic of the flat packs assembled:


fishboat

  • Jr. Member
  • Posts: 74
Re: One of the last Super V builds
« Reply #6 on: 7 Feb 2013, 11:31 am »
Great comments guys.  The educated eyeballs seeing things I haven't really help.  I hadn't seen the pic of the assembled flatpack..PDR..I can see why you come back to it.  I'll write up a more thorough response this eve, but it'll probably be useful to have an image of Danny's drawing up for comparison's sake.


fishboat

  • Jr. Member
  • Posts: 74
Re: One of the last Super V builds
« Reply #7 on: 7 Feb 2013, 02:14 pm »
I don't suppose anyone has a dimensioned drawing of the flat pack that was offered?

rockdrummer

  • Full Member
  • Posts: 392
Re: One of the last Super V builds
« Reply #8 on: 7 Feb 2013, 02:54 pm »
Hi everyone.  Like fishboat, i was lucky enough to get my hands on the super v top, while planning for a servo woofer bottom purchase soon.  Like you, I was going to use 1.5" sides.  I will plan to eventually add norez, and would really like to make this speaker right.  But the front baffle face width, combined with the addition of the small wings that gradually get larger as the sides move down the coax baffle, makes me feel like I should stick with the 1.25" sides.  I really wanted to have really thick and strong sides, though.

PDR, you mentioned the tip of the wing going past the center of the sub box a few inches.  Is that important for surface area behind the two woofers?  I wanted to use a side that looks like the former V-2.  I like the more rounded circular look with the straight down backs.  I'm curious just how much I need to measure and tweek the sides of the v2 when added onto a Super V.

Congrats fishboat.  I feel lucky to have one and have so much help.  I bet you do too.

Looking forward to your progress and can't wait for pics.

Ben

Danny Richie

Re: One of the last Super V builds
« Reply #9 on: 7 Feb 2013, 03:30 pm »
You guys have some areas that you can tweak without issue. Sides can be 1.25" or 1.5" thick with little change. And you can alter the wing depth a little near the upper driver, but don't stray to far from the plans. They are there for a reason. So stay fairly close.

Sandwiching the upper driver will alter the response if there is added depth around the driver. So I don't recommend that. Also, the thicker the front baffle gets the larger the radius needs to be on the back side of the driver through hole. Like with an 1.25 to 1.5 inch baffle a good 3/4" radius on the back side is recommended. If the baffle were to shoot up to 2.25" thick then a good 1.5" radius would be needed and I don't think the width of the baffle will support that. 

PDR

  • Full Member
  • Posts: 820
  • May the best man win
Re: One of the last Super V builds
« Reply #10 on: 8 Feb 2013, 01:29 am »

PDR, you mentioned the tip of the wing going past the center of the sub box a few inches.  Is that important for surface area behind the two woofers?  I wanted to use a side that looks like the former V-2.  I like the more rounded circular look with the straight down backs.  I'm curious just how much I need to measure and tweek the sides of the v2 when added onto a Super V.

When I built my Super V, I just came straight down.
When I built my V-1 I came past about 1 1/2 ", but also came straight down.
I hear no difference, they both produce terrific lows.

Heres a pic of the V-1 under construction:


fishboat

  • Jr. Member
  • Posts: 74
Re: One of the last Super V builds
« Reply #11 on: 8 Feb 2013, 05:49 pm »
rock..yes, I do feel fortunate to have been able to pick up an SV kit.  I found out about them, got interested in them, and was researching things & hoping for a chance at an audition when..poof..only two kits left and no more.   :cry:     I missed both of them (thanks in part to you I suppose  :) ), but the "11th hour one more set of coaxes were turned" in was my chance, so I grabbed them.  I also picked up the already-built, with ~100hrs on them, with jupiter caps, xovers.  So that part is done I guess.   Having this forum/group of guys to bounce ideas off of is REALLY appreciated.

Coax Baffle..I eliminated one thickness (3/4 inch) of the baffle, I'm now down to 1.5 inches total thickness.  I'll mount the coax in a rabbet on the front surface using threaded inserts.  I'll find some decorative machine screws to dress them up.  The subs will be installed the same way.


EDIT:  I also increased the side thickness to 1.5 inches total (1.25 inch core + 2 x 1/8 inch veneers)


PDR..I looked into the depth of the lower radius as it did look deep.  I turned the side panel black in sketchup, adjusted the image to the same size as my side-view printout of Danny's 2D drawing, & overlayed the 2-d paper on my screen.  Danny's drawing & my model matches up nearly identical.   I think the reason the bottom radius looks deeper is the sub box is moved to the rear by 3/4 inch (due to the sub baffle being 1.5 inches thick total, rather than 3/4 inch).  See below..I added in the overlay of the old point (tan triangle) before I made an adjustment..that new point probably makes the radius appear deeper also.


What you're saying does make sense, so I adjusted the curve out a bit to compensate for the thicker sub baffle:


Seem reasonable?  I did notice what look like attachment points in the flat pack picture..what are they, any idea? (up where the side is attached to the coax baffle, in the sub box & vertical plate on the bottom)..thx to all..any additional suggestions are welcome.
« Last Edit: 8 Feb 2013, 09:45 pm by fishboat »

sl_1800

  • Full Member
  • Posts: 406
Re: One of the last Super V builds
« Reply #12 on: 8 Feb 2013, 06:23 pm »
fishboat,  the attachment points you mentioned, to me they look like these http://www.leevalley.com/US/hardware/Page.aspx?p=50311&cat=3,41306,41312

But I  have not seen those in person without the sides on so I can't say for sure but I believe these items will do the same job.

fishboat

  • Jr. Member
  • Posts: 74
Re: One of the last Super V builds
« Reply #13 on: 8 Feb 2013, 06:33 pm »
fishboat,  the attachment points you mentioned, to me they look like these http://www.leevalley.com/US/hardware/Page.aspx?p=50311&cat=3,41306,41312

But I  have not seen those in person without the sides on so I can't say for sure but I believe these items will do the same job.

Interesting..the figure 8 hardware is typically used for attaching table tops or wider, solid wood panels, to frames/carcasses to allow for wood movement.  MDF is immune to wood movement like that, but they can be convenient to attach one piece to another.  I like good glue...and tenons..

sl_1800

  • Full Member
  • Posts: 406
Re: One of the last Super V builds
« Reply #14 on: 8 Feb 2013, 06:43 pm »
I agree with the tenons and glue!!!  I have recently found out how week MDF and glue actually can be.  I seems the glue doesn't soak into the MDF very far and since MDF is so weak it is easy to break a glued MDF joint so for my next subwoofer build I'm going to use glue and 50mm confirmat screws from McFeely's.  Just counter sink the screws and cover the heads with bondo.

fishboat

  • Jr. Member
  • Posts: 74
Re: One of the last Super V builds
« Reply #15 on: 8 Feb 2013, 10:01 pm »
I agree with the tenons and glue!!!  I have recently found out how week MDF and glue actually can be.  I seems the glue doesn't soak into the MDF very far and since MDF is so weak it is easy to break a glued MDF joint so for my next subwoofer build I'm going to use glue and 50mm confirmat screws from McFeely's.  Just counter sink the screws and cover the heads with bondo.

Yep..exactly. The adhesive that's used to make MDF seals up the surface pretty well and glues have a hard time getting a bite.  You almost have to treat gluing MDF like making a wood end-grain butt joint where you need something to strengthen it up..a spline, tenons, dowels, or confirmat screws plus glue.   There are some glues that work better with MDF than others, though none that I know of will lessen substrate failure.  I use Titebond II or III on wood (or occasionally hide clue), but have used the moisture cure urethane glues on MDF with good success. They're really tough.  They can be messy though as a little too much and it foams out the edges once the cure kicks in.

(and McFeely's rocks!)

stevenkelby

  • Full Member
  • Posts: 546
  • Adelaide, South Australia
Re: One of the last Super V builds
« Reply #16 on: 9 Feb 2013, 10:48 am »
Looking great Kevin!

I wouldn't sandwich the bass drivers, I don't think there is any advantage and it makes assembly a lot harder plus a pain if you ever need to swap a driver, as mentioned by SL_1800.

If sandwiching the top driver I would use a thin panel in front. I would have used a thicker baffle for the top panel if I did it again, it's fine but just seems thin, once rebated for the driver to sit in. If thicker I would have done this with the roundover in back:


I used these fasteners for all drivers (Dave of piaudiogroup sent me some, thanks Dave!) :


http://www.amazon.com/E-Z-LOK-Threaded-Insert-Thread/dp/B002KSZ0GE

http://www.amazon.com/gp/product/B005DS8EPW/ref=oh_details_o02_s00_i00

http://www.reidsupply.com/sku/500-2/

I fastened my side panels with 4 screws through the lower sub boxes into the side panels in the front, 4 screws through the upper sub boxes in the back, and dowels right at the top of the side panels into the coax baffle with glue.

I used weather stripping all the way around the side panels between the panels and the frames because there was a slight gap in some places and I wanted a perfect seal for peace of mind. I used this kind of stuff:


http://www.homedepot.ca/product/industrial-strength-self-adhesive-neoprene-weatherstripping-closed-cell-tap/947899

I just ran it all along the edges of the baffles, and along the sides following the curve of where the panels would sit. With the sides on it's completely covered, though you can just see it in the gap between side panels and baffle/box.

Can't wait to see your pics!

fishboat

  • Jr. Member
  • Posts: 74
Re: One of the last Super V builds
« Reply #17 on: 9 Feb 2013, 01:29 pm »
Steve..we had a foot of snow in the last day or so, looks like a winter-wonderland postcard outside..I trust you're enjoying your summer down-under.  Thanks for the construction tips & links..(love links to materials..nice looking machine screws).  I've abandoned sandwiching the bass drivers.  The construction part would be fairly easy, but it is a one-way trip & heaven-forbid I'd ever need to pull one out.   :duh:

Thicker baffle on top..I remember you mentioning that..interesting pic.  I could cut that.  I'll need to think about  the baffle more and take advantage of the pluses while avoiding the minuses.

I was planning to use dowels & glue up on top, probably on the top and bottom of the baffle.  Confirmat screws & glue will be used elsewhere...my biscuit joiner may even get pulled out in some places(or more dowels). I like the idea of weatherstripping gaskets.

Pics of actual pieces will be after the weather breaks.  There's lots of milling to do early-on and I'd like to do as much of that as possible outside(dust).  Sounds like a good thing to do on nice spring day.  I am looking for boards to cut veneer from.  I found a guy locally that is selling padauk for $5/bdft..good price. I'd like to see some sapele also.  I'm visiting a place today that has some...and many others.