Just ordered an OB7 kit and posted some pictures in a gallery

0 Members and 2 Guests are viewing this topic. Read 16316 times.

NeilT

Great and helpful documentation Brian. Looking forward to the rest of the project.  :thumb:
What circle jig did you use and did you use an upward cut spiral bit?
Neil

jdbrian

Next Up was to finish the baffle holes and then cut the edge pieces to shape. Then using the same router fence setting I cut the upper baffle to width so that the edge pieces fit exactly to the baffle. I glued on the edging and flush trimmed it front and back, then added the 3/4" roundover to the front sides.
This was a lot of work and was certainly the hard way to do it. I wanted the inner baffle mdf to glue to the mdf box so the edging is 3/4" thick at the front and has a rabbit cut into it's back side so it is only 1/4" wide at the back. The back layer of the baffle overlaps the box sides by 1/2". Hard to explain, easy to see.
  Next I finished gluing the boxes - I let the sides overlap top and back by about 3/32" and inset the back panel. I will be painting these semi gloss black and it is really hard to hide seams in MDF so this eliminates that problem. Hopefully it won't be too ugly. :lol:


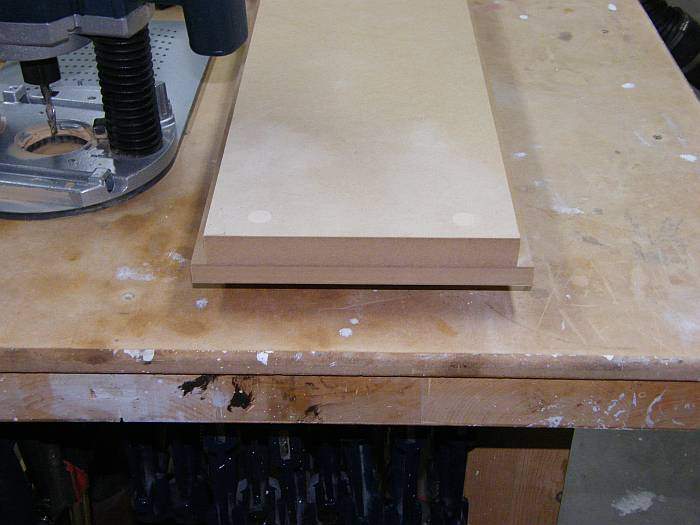
Baffle end view before veneer and solid edging/roundover


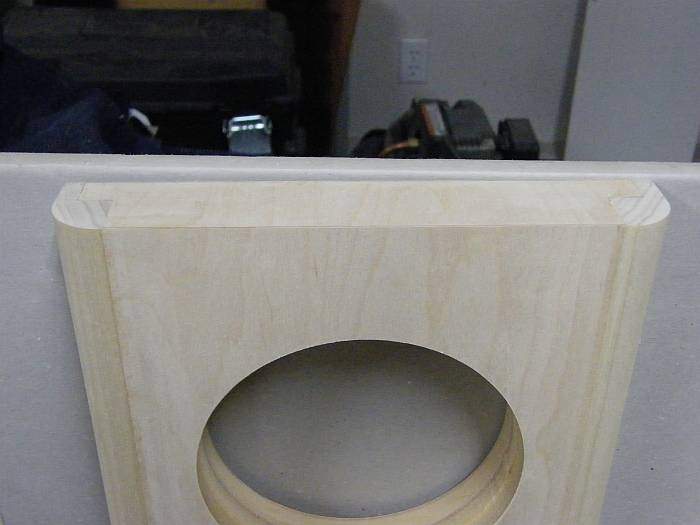
Baffle top view after edging and roundover
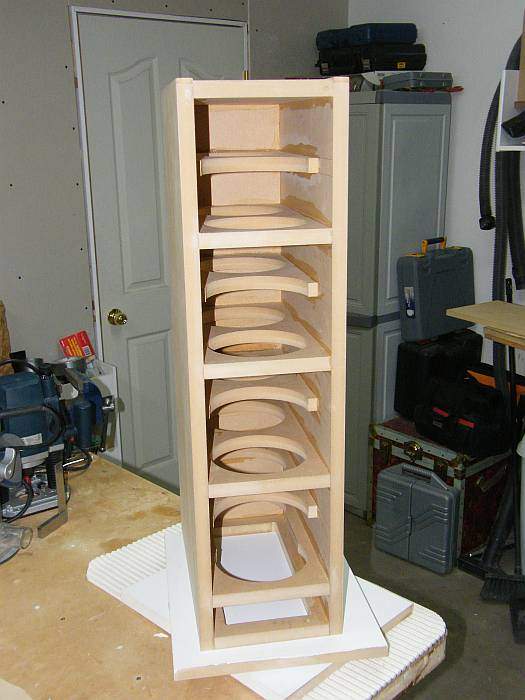


Completed box


« Last Edit: 3 Dec 2010, 04:29 pm by jdbrian »

jdbrian

OK here is pictures of the box sitting on the base and with the baffle clamped on. Also a detail shot of the side panel overlap.


Mock up of parts


Rear view


  This is where it sits today. Half the kit came yesterday so I will be able to start assembly when the other box gets here. I am sanding and getting set up to start finishing. The baffle will be a gloss rub on oil base poly. I find this works well on closed grain woods like maple. 
   There are many ways to do a kit like this. We all have our own methods and ideas on what is best so if you have any thoughts or questions post them. I have gone to some extra work to create an enclosure that will hopefuly look decent and be structurally sound so it complements the work of the speaker designer.

Cheers
Brian


Nick77

Nice touches Brian, welcome to the club. hehe  :thumb:

jdbrian

Great and helpful documentation Brian. Looking forward to the rest of the project.  :thumb:
What circle jig did you use and did you use an upward cut spiral bit?
Neil

Hi Neil

 Yes, I used an upward spiral bit. It helps move the dust up out of the groove. Don't buy a cheap one -they won't last in MDF. Carbide works best. I used a Jasper Jig but I am not really that impressed with it. It fits my Bosch 1613 but the holes are a bit off and the pin tends to come out of the jig after every hole so you have to keep reinserting it with the possibility of puting it in the wrong hole. I haven't done any woodworking for a few years and it's taken me a bit to get back up to speed. You need to enlarge the hole in the workpiece a bit to keep the pin from sticking in the work.
   If I was looking for a circle jig now I would buy a smaller one. The Jasper is large and it make it a bit awkward. For small holes like in the OB7 kit a smaller jig would bre easier to use. Lee Valley Tools has some nice jigs as I am sure other woodworking stores do. The Jasper was overpriced when I bought it but I don't know what it cost's now.

Brian

jdbrian

Nice touches Brian, welcome to the club. hehe  :thumb:

Thanks Nick
It's a lot of work but hopefully I will be able to enjoy them for a long time. When I get these done I am going to put my Newform 645's up for sale and put the proceeds towards a pair of servo subs.

Brian


NeilT

How many bits did you go through?
What about this Jig?
http://www.parts-express.com/pe/showdetl.cfm?Partnumber=365-255

And a question for you and other speaker builders:
What about using a Pocket hole system? I have had great sucess using it on various projects?
Thanks for the feedback.
Neil

jdbrian

Hi again Neil

  I bought a 1/4" carbide bit when I built my Newform enclosures about 10years ago. I used it for all the ob7 holes and it still works like new. I think I bought my bit at Lee Valley as they are one of the few place here that carries decent tools. I ran it at about 18000 rpm. I thought I would try a freebee bit that came with a router I bought. It was toast after cutting 6 -3/8" deep woofer holes. I tend to cut about 3/8" deep at a time then vacuum out the dust and cut deeper. I cut 1 time from the veneered front of the baffle then cut the rest from the back to minimize the chance of damage/wear on the veneer. I did use some biscuits and dowels for this project but have never used pocket hole jigs. My concern would be with splitting the mdf. It tends to split easily if you use anything larger than a No. 6 screw into the 3/4 wide edge. Others may be able to comment. It seems to me that the Geddes speaker kits come with the panels pre drilled for pocket screws. Check their site for kit pictures.
   
Brian

Nick77

Thanks Nick
It's a lot of work but hopefully I will be able to enjoy them for a long time. When I get these done I am going to put my Newform 645's up for sale and put the proceeds towards a pair of servo subs.

Brian


A pair of servo subs will rock! I was at a GTG here in Austin and Brian Ding brought a pair of servo's and dialed them in with my ob/7's and they never sounded so good. Gotta get me a pair too.  :drool:

NeilT

Thanks again for the feedback Brian.
Fine thread #6 screws work well with 3/4 MDF, helps hold things together while clamping.
I was just wondering if the steel / ferrous  screws were a no no with speakers boxes?
Lee Valley looks like a great site, thanks for the heads up and tips.
Keep the pics coming.
Neil


TomS

Brian,

Terrific job with these.  The craftsmanship and thought you've put into the construction is first rate.  The final result should be awesome.

Thanks for the construction details as it really helps those of us with less experience and skill at this.

Tom

poseidonsvoice

  • Full Member
  • Posts: 4027
  • Science is not a democracy - Earl Geddes
    • 2 channel/7 channel setup
Very nice work Brian  :thumb: With your skills, you might want to build external crossover enclosures as well  :eyebrows:

Anand.

jdbrian

Thanks again for the feedback Brian.
Fine thread #6 screws work well with 3/4 MDF, helps hold things together while clamping.
I was just wondering if the steel / ferrous  screws were a no no with speakers boxes?
Lee Valley looks like a great site, thanks for the heads up and tips.
Keep the pics coming.
Neil

Hi Neil

  Lee Valley is one of my favorite stores. They do mail order as well. I spend many$$ there for gardening and woodworking tools.  I don't think the magnetic screws will be a problem in the cabinet. The only time you would have an issue with them is if you use them to secure an iron cored coil that has mounting holes in the core. In that case the screws can increase the inductance a bit by adding to the core mass.
  Thanks everyone for the compliments. I am going to set them up with 2 sets of binding posts and leave enough wire inside to connect the woofers directly to the posts. In the future I may experiment with driving the woofers directly from an amp with a low level crossover.

Brian

NeilT

Brian,
Thanks again for the feedback.
The pics and construction details are awesome, thank you for taking the extra time to share your knowledge and expertise, excellent job all around

Neil

jdbrian

Brian,
Thanks again for the feedback.
The pics and construction details are awesome, thank you for taking the extra time to share your knowledge and expertise, excellent job all around

Neil

  No problem Neil

  I just wanted to talk about adhesives for a minute. I used Lee Valley's GF2000 glue for most of the construction of the boxes. It is a PVA carpenters glue with a high solids content so it can fill small gaps (GF stands for gap filler) and has a long open time which is important if you are doing a lamination or a complex setup that takes more than a few minutes to clamp up. I also used weldbond on the C braces and to install the spike inserts. Weldbond cures fast and has goods strength even if you can't get much clamping pressure on it. 
   The other adhesive I used is PL premium construction adhesive. It is very strong and you don't need to clamp it at all. I used it on the C braces to back wall joint as there is no way to easily apply clamping pressure and the position of the front of the c braces is not critical. It has almost no odor but it does take at least 24hrs to cure properly.
   I will probably start priming the boxes and bases tomorrow night and maybe get the first coat of poly on the baffles.


Brian

NeilT

Good stuff, thanks.
What are you using for Poly?
Spray, brush, wipe-on?

jdbrian

Minwax rub on poly - gloss. I used this on the Maple side panels of my tube amp and it gave a really nice finish.
Takes about 5 coats to get a good build but you can put 3 coats on in a day if drying conditions are good. No brush strokes or runs to worry about. No compressors or spray guns to fuss with and clean up after.
  A tip about removing dust from mdf. I find that even after vacuuming there is a lot of fine dust that clings to the surface. You can see it on your hand if you rub it across the surface. A microfibre cloth removes it very well. The quantity of dust you pick up is amazing. You can easily see the dirty spots on the cloth after rubbing it across even a small area. This seems to work beter than tack cloth to remove dust. There dosen't seem to be any lint left behind. This may depend on the cloth. The ones I have came from Costco and were for car polishing.

Brian
 

NeilT

Brian, I have used the minwax Wipe on Poly and love it. But on my last project, see gallery, I used General Arm-R-Seal wipe on finish. I am almost convinced that I got better results. It seems to flow out a little better. This feature helps out a lot on larger areas, like the table top on my sub.
Neil


jdbrian

Neil, your sub looks great! :thumb: Is it a 15"?  One thing I learned about polyurethane is that temperature has an effect on the viscosity and how it levels and dries. If the temperature is warmer it flows better so may level better but it will also dry quicker. A varathane sales rep. told me that if I warmed the can in warm water before applying the finish it would go on easier. In that case I was brushing it on and it did make a difference, however it also tends to run more. I tend to apply thin coats with the wipe on poly.
  I have 2 coats on the baffle now and the rest of it has 1 coat of black on it. The other box of parts came yesterday so I can put the norez in and get the internal wiring installed before I glue the baffle on.
   
Brian

NeilT

Thanks and yes it is a 15 inch. I am going to try the warming thing with the poly, good tip.  One more question, do you need to use a plunge router with the Jasper circle jigs?

Can't wait to see more pics.

Neil