I have owned the Von Schweikert VR2's for a year and have gotten to know their sound which in stock form is very good, but they can be modified to sound much, much better.
Technical Info The VR2's are set up on the short wall of a 11' x 15' x 9' high room, driver centers are 47" from the front wall, 90" center-to-center, and slightly toed in. The room is well damped with carpeted wood floor, a couch, and large leather chair with ottoman. Electronics include an AVA Insight 440 amp, AVA Insight+ EC pre-amp, Cornet2 phono pre-amp, a Harmon/Kardon T55C with power supply mod and a Goldring 1042 cartridge. Digital is performed by computer .wav files --> HagUSB --> AVA Insight DAC.
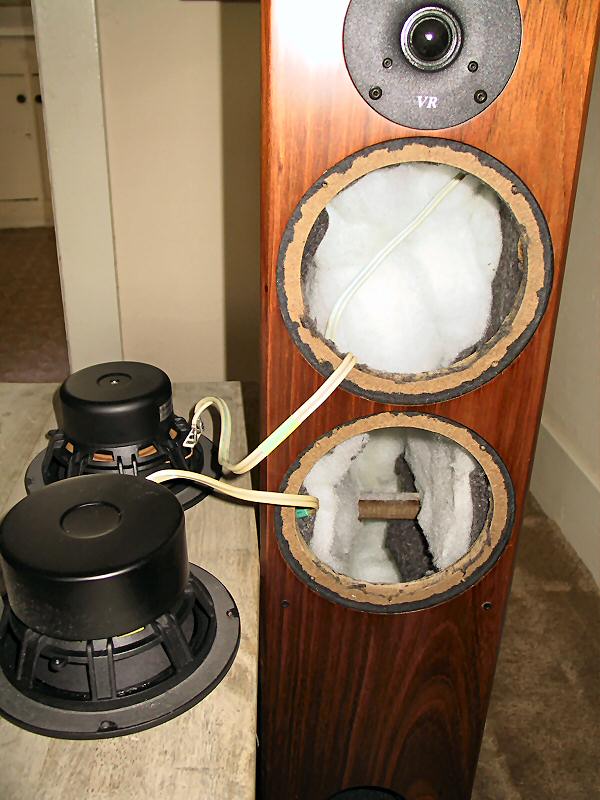
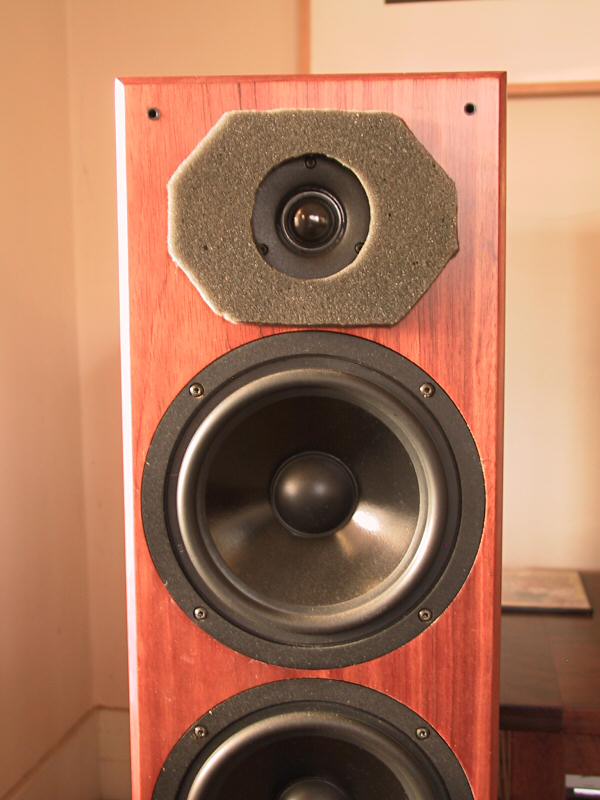
The SpeakerThe VR2 is a 2.5 way floor standing speaker that has a 25Hz low frequency response, which is unique for a speaker this size. Each VR2 is loaded with 40 lbs a lead shot/silica sand mix. Before the modifications, the knuckle rap test on the side of the VR2's revealed the side panels were not as dead as my modified JBL 88's so more internal bracing looked like a good place to start.
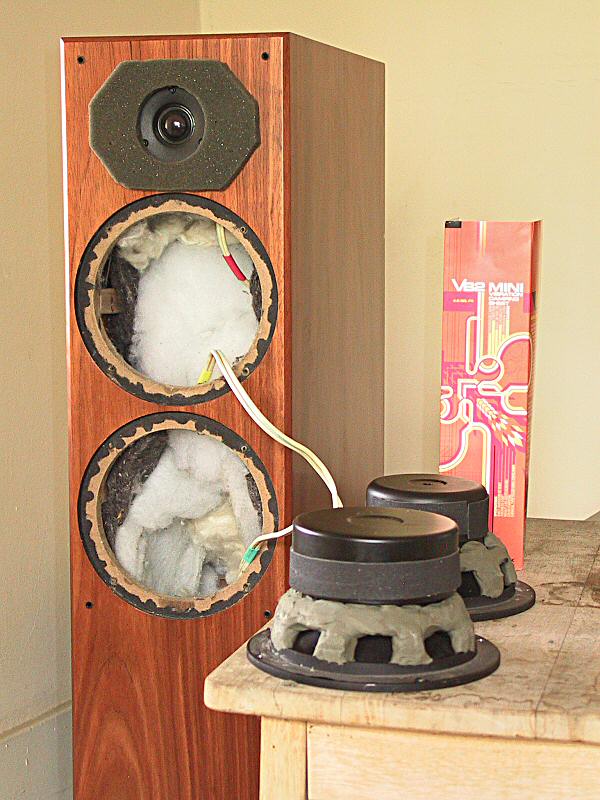
The VR2's are not a traditional transmission line speaker, except for a couple of braces in the middle and an awful lot of stuffing it is basically an empty box. Stuffing fills the upper half of the speaker from the the middle midrange speaker up to the top The bottom midrange/woofer is the only speaker directly open to the port, as you can see below the speaker magnets are also different sizes.
 The Modifications
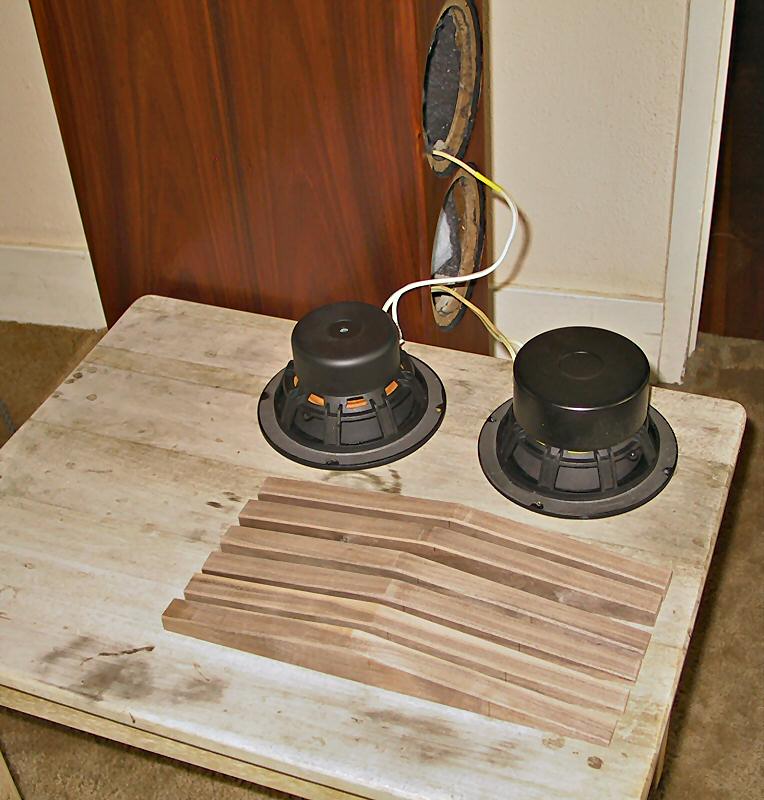
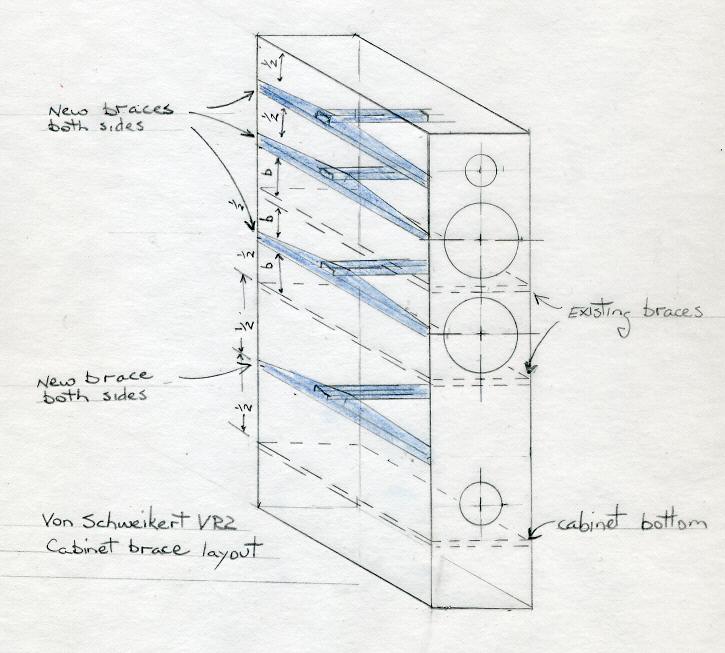
Adding braces is very easy and highly recommended. The triangular walnut braces are 14 1/4" long, 1 1/2" high at the peak, and 1" thick. I also made a couple heavier red oak triangular braces (not shown) for the woofer section. The triangle shape take up less volume, has a non-parallel face, and are thick in the middle where the speaker sides need the most dampening. Each speaker has 8 braces installed, which measured out to 3 1/2" between each brace. I used three dabs of hot melt glue and Titebond III. The hot melt glue acted as a clamp until the Titebond dried and made a permanent bond.
The bottom woofer brace had to be installed through the terminal porthole which gave me a chance to check out the crossover. The entire crossover is in a plastic tub and filled with epoxy resin, no user replaceable parts here. I won't be playing with exotic caps with this speaker.
After installing the braces make sure the top stuffing is back up where it should be and there is a clear open path from the bottom woofer to the port. The stuffing is not glued in and should be checked anyway even if you decide not to modify the speaker, shipping shakes it lose and moves it around.
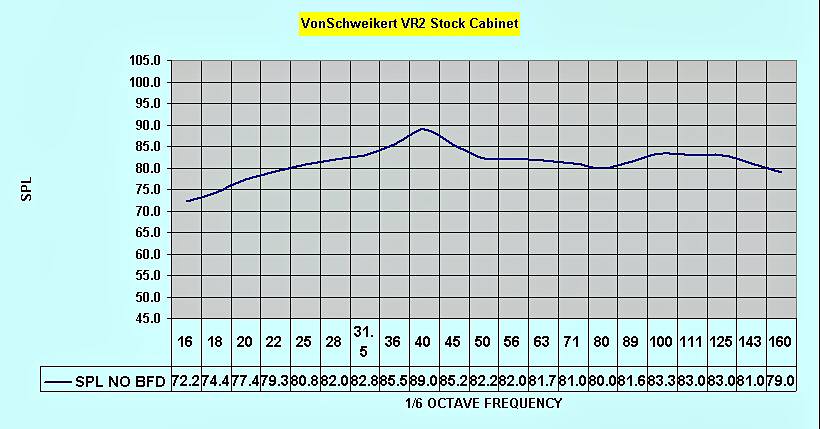
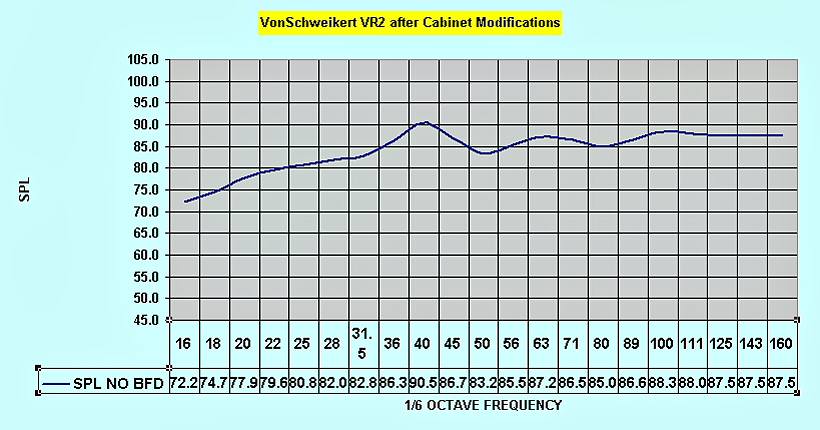
The ResultsAfter completion, the first thing I noticed was the presentation. Music is now more focused with the center image locked in place. Midrange is clearer, there is more "there" there and the 125 Hz bump where the male voice is centered is less prominent, the main reason for the mod.
At first listen the bass may seem lighter, but only because cabinet resonances are attenuated. The bass is now tighter and just as deep and full as before the mod. Saguaro, the first cut on the excellent Ron Carter album
Piccolo (vinyl) has a duet with Ron carter on the piccolo bass and Buster Williams on the double bass; both musicians are playing the same notes at the same time, with the double bass notes being felt just as much as being heard just under the piccolo bass.
The 1987 album
Yello One Second has synth and bass notes that should pressurize your whole room, and after the mod it still does. Get the vinyl, a friend has the cd and it is flat and dead sounding compared to the record.
The tightened up midrange make trumpets and saxophones punch right through, just as they should. If you can find the Jazz Heritage vinyl re-issues of Miles Davis's early albums you are in for a treat. Dead quiet, excellent dynamics, and wonderful music too.
Relaxin' with the Miles Davis Quintet sounds like Miles, John Coltrane, Red Garland, Paul Chambers, and Philly Joe Jones are playing in your living room. The VR2's do not have a hyper-detailed presentation but make music that draws you in.
12/30/07 Update: I added more bracing inside the cabinet, short horizontal wood braces between the side walls connecting the each triangular brace to the one on the opposite side, if you could see inside it would look like a ladder. The bass is now much more forceful because the cabinet sides no longer flex and absorb the energy. The more forceful bass was a little too much of a good thing so I stuffed more Kapok behind the middle woofer and added 1 oz. behind the lower woofer. The final sound is definitely a WOW!
 Measurements
Of course some in room measurements would demonstrate what I hear, so I did some tests with the free Room EQ Wizard software from the Home Theater Shack using a Radio Shack 33-2050 sound level meter. You can manually plot your own curves or run a cable from the meter to your computer the results then are completely automatic.
I set up the meter at the location where my head would be when listening, set the volume to 75-80dB with a 1000Hz test tone at C weighting and did some tests both before the mod and after.
8/16/08 - The speaker locations have changed since I made the above graphs, so I made some new measurements.
20-300 Hz, 1/24 octave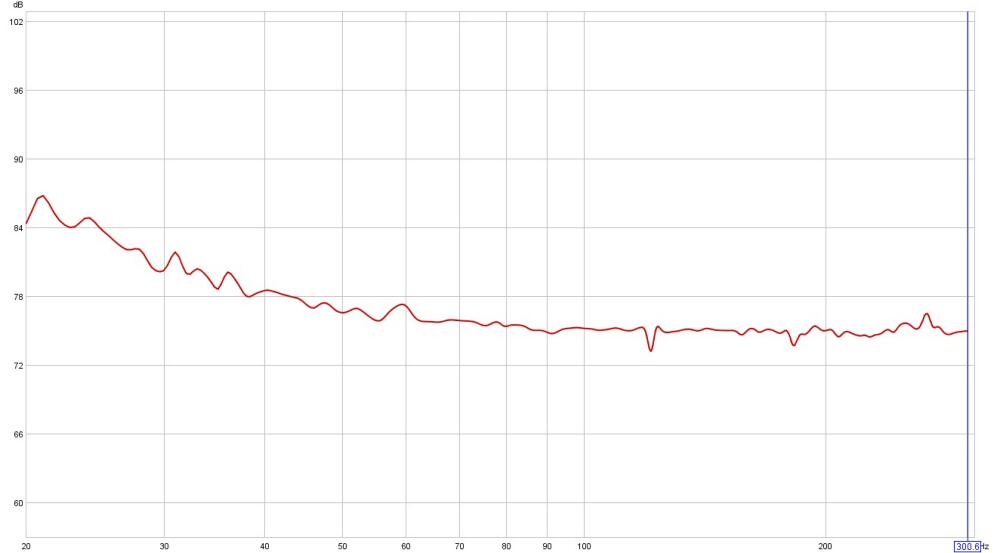 20-300 Hz waterfall plot
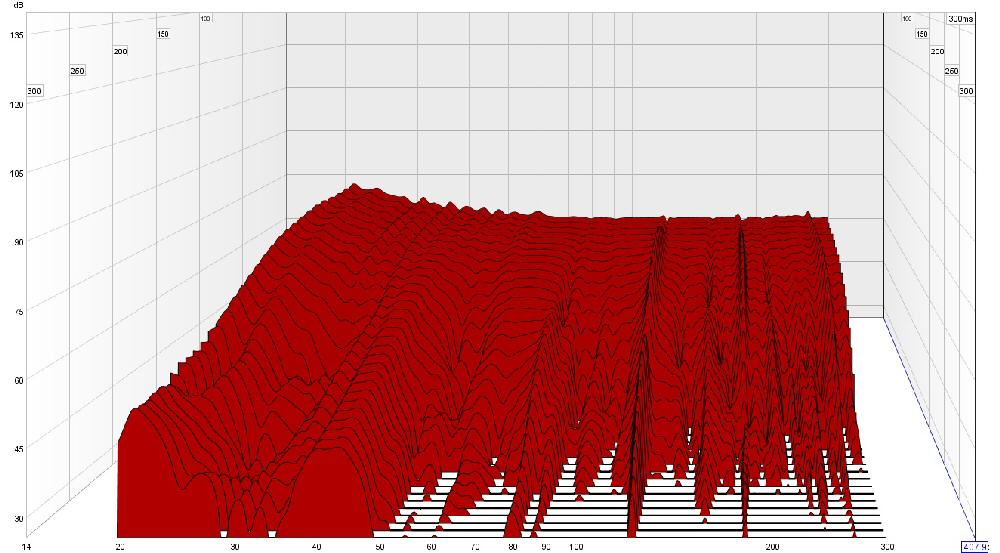 20-9,000 Hz, 1/3 octave
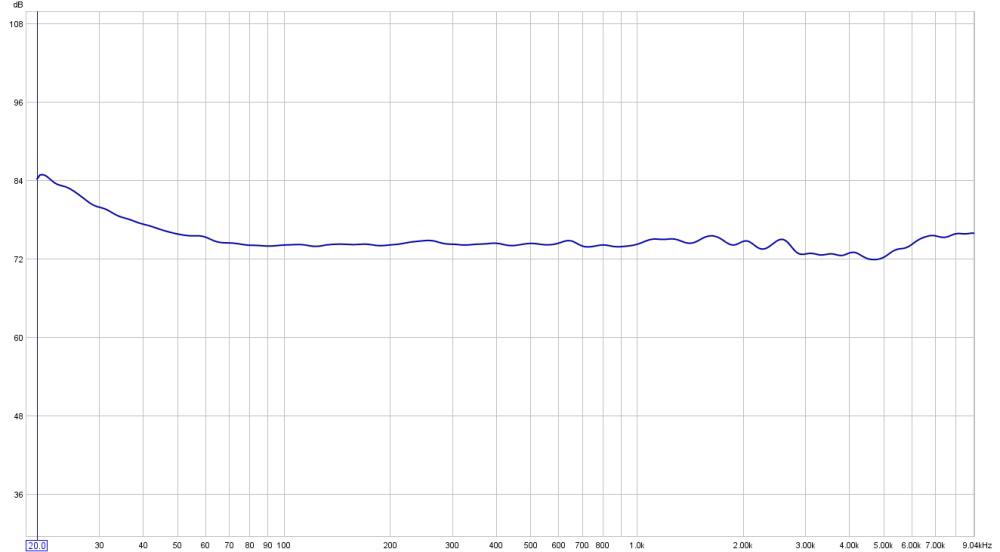 Rear Ambiance Tweeter Enhancement
I came up with the idea (as far as I know) of these simple ambiance enhancers for speakers that have a rear ambiance tweeter.
In my listening room, half of the sound of the ambiance tweeter is absorbed by carpeting and turning up the level overpowered the front speakers. I figured room ambiance is supposed to be up, not down around my feet, so I designed a stick on diffuser that redirects some of the sound back up. The ambiance level is enhanced, easily filling the space behind the speaker resulting in an increased sense of depth and a slightly more focused image as a bonus.
 Tweeter Defraction Controller
Imaging is enhanced by using a 3/8" foam high frequency defraction controller. The custom shape allows the grills to be installed when needed.
 Woofer Damping
While I was ordering an Insight DAC, Frank Van Alstine said damping my speakers with PlastiClay would improve their sound. As I had already opened the VR2's many times adding more damping to the speaker baskets was easy. I used about 1/3 lbs. per speaker.
Frank first wrote about this tweak in the very first
Audio Basics newsletter, Volume One Number One, January 1982, which is still available on the AVA website, and it is still as valid today as it was 26 years ago.
The results were just as Frank described with the sound now clearer, less colored, quicker, and smoother.
While playing with the clay I also noticed the housing around the magnet
rang like a bell when struck, so I wrapped the housing with some left over
VB-2 vibration damping material.
This is a great, cheap way to spend an afternoon and you will be pleasantly surprised at the end of the day with how much clearer your speakers sound.
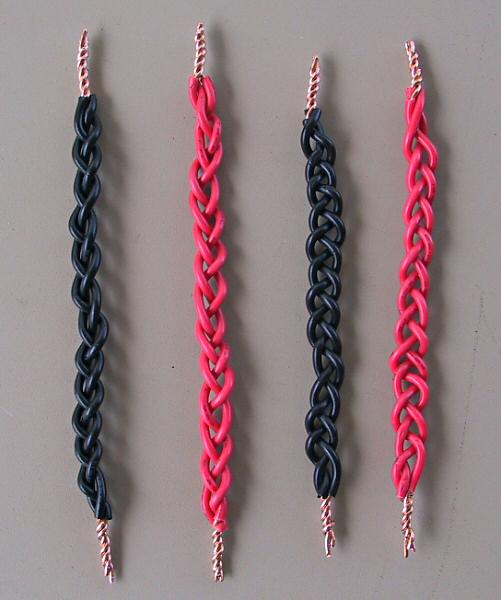
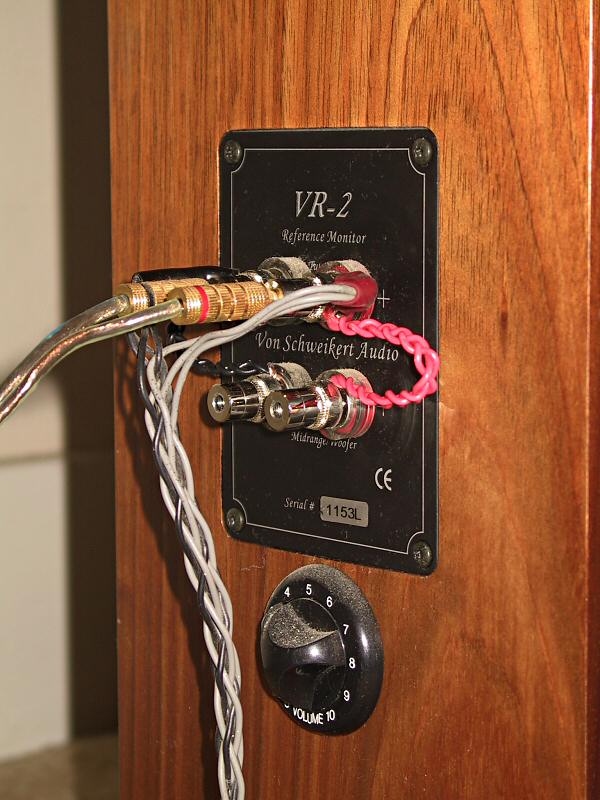
Jumper ReplacementI get a smoother, cleaner sound by simply replacing the chrome plated jumpers with homemade wire jumpers. I used 3-5" lengths of 18 gauge hookup wire from Radio Shack braided together, but any wire will work.
 Conclusion
I am happy with the modifications. The cost was close to zero and the results are well worth the effort and exceeded my expectations. Highly Recommended!
Resources and further readingPart 1
http://www.audiocircle.com/index.php?topic=40953.0Part 3 Triple wall laminate modifications
https://www.audiocircle.com/index.php?topic=72808.msg683847#msg683847Room EQ Wizard
http://www.hometheatershack.com/forums/bfd-rew-forum/Review with interesting comments by Albert Von Schweikert
http://www.audioholics.com/reviews/speakers/floorstanding/von-schweikert-vr2Wayne
edit 5-25-2020 - broken links fixed


