PRIOR TO BUYING A STREAMING PLAYER, TRY THIS ALTERNATIVE FIRST. You don't need to spend $3,000 to $15,000 on a fancy, high-end commercial streamer. You can obtain pristine, bit-perfect audiophile performance using an old laptop you already have sitting in your closet and a cheap USB flash drive. Here is the step-by-step guide on how to build your own reference-grade music transport, plus a killer network upgrade that competes with the high-priced streamers.
Phase 1: Preparing Your Gear
To get started, you only need three basic items:
1. An Old Laptop or PC: It doesn't need to be fast. Slower, older laptops actually create less electronic background noise! An old machine with a solid-state drive (SSD) and plenty of RAM is the ultimate setup. I'm using a old Dell Inspirion 5559 with updated SSD drive and 16Gb of ram. This 10 year old laptap is in perfect condition, and it's super quiet. Even if the cooling fan is running, from my listening position it's not audible. I barely hear it with my ear next to it.
2. A USB Flash Drive: A basic 4GB or 8GB USB stick is plenty. You can use an existing one or buy a cheap one online. Even if you have a larger memory flash drive it will work fine too.
3. Your Smartphone: You will use your phone as your remote control to scroll through your music tracks while sitting in your listening chair. Android or Iphone compatible
_______________________________________ _______________________________________ ______________________________________
Phase 2: Installing the Magic Software (Daphile)
https://www.daphile.com/We are going to use a free, ultra-lightweight operating system called Daphile. It completely bypasses Windows, meaning your laptop stops acting like a heavy, noisy computer and turns into a dedicated, silent music box.
Step 1: Download Daphile
On your everyday computer, open your web browser and go to the official Daphile website. Download the latest version of the software file (called an ISO file). It is incredibly small—only about 250 Megabytes!
Step 2: "Flash" the USB Drive
You cannot just drag and drop the file onto your USB stick. You need a free tool to install it correctly. Download a simple program like Rufus
https://rufus.ie/en/ (for Windows) or BalenaEtcher
https://etcher.balena.io/ (for Mac/Windows).
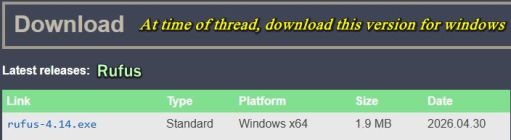
• Plug your USB flash drive into your computer.
• Open Rufus or Etcher.
• Select your downloaded Daphile file, select your USB stick, and click "Start" or "Flash."
• In two minutes, your magic audiophile USB stick is ready!
_______________________________________ _______________________________________ ______________________________________
Phase 3: Firing Up the System
1. Plug the USB Stick In: Take your newly flashed USB drive and plug it into your dedicated audio laptop.
2. Connect Your DAC: Run your high-quality USB audio cable from the laptop directly into your DAC.
3. Boot the Laptop: Turn on the laptop. You need to press a key right when it boots (usually F12, F11, or Delete depending on your brand) to enter the boot menu. Select "Boot from USB."
4. The Silent Screen: Daphile will load entirely into your laptop's RAM chips. Once it loads, the laptop screen will go black or just show a simple text web address. You can now close the laptop lid and tuck it away in your audio rack. It is now a "Headless Server."
_______________________________________ _______________________________________ ______________________________________
Phase 4: Controlling the Music From Your Phone
1. Grab Your Phone: Make sure your smartphone is connected to your home Wi-Fi network.
2. Open Your Browser: Open Safari or Chrome on your phone. Look at the laptop screen text or type
http://daphile.local into your phone's browser address bar.
3. Play Your Tracks: Daphile's beautiful control dashboard will instantly pop up on your phone screen! You can link your local music files or pull up your favorite high-resolution web streams.
• Why this sounds so amazing: Because Daphile copies the entire music file into your laptop's RAM before playing it, the internal hard drive goes to sleep. Data is handed over to your DAC with zero software delay and zero background static.
_______________________________________ _______________________________________ _______________________________________
Phase 5: The "Next-Level" Network Upgrade
(Using this in tandom with above, steps up the quality of the signal path significantly.)
If you want to completely finish off the job and unlock a massive, deep 3D soundstage with a dead-silent background floor, you need to fix your home network noise.
Standard home internet routers use cheap plastic switching power plugs that inject loud, high-frequency electrical "hash" directly onto your network lines, causing digital glare in your speakers.
The Network Fix:
1. Get a Linear Power Supply (LPS): Buy an industrial-grade Regulated Linear Power Supply that matches the exact voltage of your home router (usually 12V).
2. Power the Router Cleanly: Throw away the router's cheap factory plastic power brick and plug it into your new linear supply. This acts like an electronic concrete barrier, trapping 100% of the wall-power noise.
3. Hardwire via Ethernet: Do not use Wi-Fi for your audio laptop. Plug a high-quality, solid-core Ethernet Cable directly from your newly cleaned router straight into the network port of your Daphile laptop.
The Sonic Result
By hardwiring your network and feeding your router clean linear power, your digital front end is completely isolated from electrical noise. The data flowing into your DAC's clock network is perfectly pure. When that signal hits your sound system, the background hiss disappears completely. Your speakers will paint an incredibly wide, deep, lifelike 3D image where instruments float precisely in thin air. You get explosive, tight low-frequency bass tracking—even at quiet, moderate listening levels.
-----------------------------------------------------------------------------------------------------------------------------------------------------------------
Setting up phone
Step 1: Get onto the Same Wi-Fi Network
Daphile works like a private radio station inside your house. For your iPhone to talk to the laptop, they must be connected to the exact same home internet network.
• Make sure your iPhone’s Wi-Fi is turned on and connected to your main home router.
Step 2: Open the Daphile Site on Your iPhone
1. Open the Safari app (the web browser icon that looks like a blue compass) on your iPhone.
2. Tap the long search/address bar at the bottom of the screen.
3. Type in this exact address: http://daphile.local and hit the blue Go button on your keyboard.
• Troubleshooting Trick: If that address doesn't pop up after a minute, look at your laptop screen. It will display a series of numbers called an IP address. Type your exact numbers into your iPhone's Safari bar instead, and hit Go.
Step 3: Turn it Into a Permanent "App"
Because Daphile doesn't have a regular app in the Apple App Store, you can make your own shortcut so you never have to type that web link again:
1. While looking at the Daphile screen in Safari, tap the Share button at the bottom of your iPhone screen
(it looks like a square with an arrow pointing up).
2. Scroll down the menu and tap "Add to Home Screen."
3. Type in the name "Daphile" and tap Add in the top right corner.
• The Result: A neat little icon will appear directly on your iPhone screen alongside your regular apps. Now, you can just tap it like a normal app to instantly jump to your music!
Step 4: How to Use the Daphile Screen (Easy Terms)
When the screen opens on your iPhone, it is split into a few simple sections. Here is how to navigate it without any guesswork:
1. The Left Side Menu (Finding Your Music)
Tap the menu bars to find what you want to play:
• My Music: This is where you click if you want to play audio files saved on your laptop. You can browse by Artist, Album, or Folder.
• Internet Radio: This is your portal for web streaming. Click this, then look for a button called "URL" or "Add Custom Station." This is where you copy and paste the lossless FLAC streaming link for Audiophile.fm!
2. The Center/Right Side (Choosing Your DAC)
Before hitting play, you need to tell Daphile where to send the music:
• Look for the "Settings" tab (usually a gear icon) and click "Audio Player."
• You will see a list of audio outputs. Look for your connected device (it will currently show what ever dac your using).
Tap the checkbox next to it to select it. This locks the laptop's USB port directly to your DAC.
3. The Bottom Bar (Playing the Music)
Once you click a song or your Audiophile.fm station https://audiophile.fm/, or what ever station you wish to use, to control it using the standard buttons at the very bottom of your screen:
• Play / Pause / Skip: Standard tape-player style shapes.
• The Volume Slider: Leave this slider turned all the way up to 100% (Maximum) inside the Daphile software.
Note: Phone batter charge levels, have absolutely no detremental affects on the audio, it soley functions as a remote control. Also don't use the phone for attenuating the signal, it slices off bottom bits of your music file resolution. 
Enjoy
Putting some perspective regarding topic, this is a "BUDGET ALTERNATIVE." Never claimed it's the holy grail!

