Nice job on the speakers and GREAT writeup. I especially liked the laser image explaining how soundstage expanded. 
Thanks Tyson!
Sorry for the slow response back.
I really like your layout of your audio equipment, those speakers are awesome, what a collection.
Looks like your getting low on tubes though!

_______________________________________
_______________________________________
_______________________________________
_
I'm actually in the middle of upgrading my second pair of Mordaunt Short 2's now. One thing I just completed, that I didn't do on the first pair, was providing a 3/16" roundover on the 5 1/2" backside hole on the front baffle. I had hoped I could go larger, but the sidewalls are so close, I didn't have room to do it. It's still better than a sharpe edge, which causes diffraction. I also went with a 3/4" dia. crossbrace too. Not that the 5/8" dia. didn't work well. I just used what I had laying around. 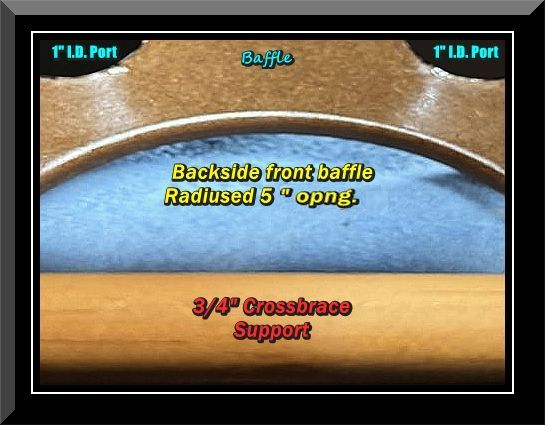
 Finished upgrading my second pair of Mordaunt Short Carnival 2 speakers. The project came out excellent, now I'm starting the burn in process on all the upgraded crossover parts.
 _______________________________________
_______________________________________
_______________________________________
___
Adding bypass crossover's.I've held off for a while, before considering the final bypass upgrade.

_______________________________________
_______________________________________
_______________________________________
___
More additional tweaks, improving upon, what has been previously documented above, to an even higher level of fidelity.
Subtle, but indeed beneficial. If you spend any time in the GR Research circle, you know that cleaning up cabinet and component resonance is the secret to unlocking true transparency. Here is the exact breakdown of the locations treated and the specific audiophile benefits of each tweak, on my cabinets:
1. Thin Layer on the Back of the Plastic Tweeter Faceplate • The Specific Mod: Unmounted the tweeter and spread a thin, even layer of Mortite directly onto the back of the plastic faceplate before reinstalling it.
• The Sonic Benefit: Lightweight plastic faceplates are highly susceptible to micro-vibrations tracking up from the woofer through the front baffle. This energy causes the plastic to ring, which micro-modulates the tweeter dome and adds harshness. Mass-damping the faceplate absorbs this energy, resulting in a significantly smoother, more natural high-frequency response with zero glare.
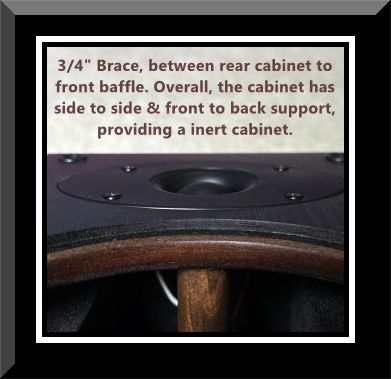
2. Front Baffle: Between the Tweeter and Woofer Cutouts (Surrounding the 3/4" Dowel) • The Specific Mod: Added a solid 3/4" hardwood dowel to mechanically tie the front baffle to the rear panel. Around this critical joint—right in the high-stress zone between the tweeter and woofer cutouts—I heavily applied Mortite and GR Research damping sheets.
• The Sonic Benefit: The dowel provides immense structural rigidity to stop the baffle from flexing. However, the wood-to-wood joint can still transfer high-frequency energy. Packing Mortite around this intersection isolates the two cutouts. This completely decouples the drivers, dramatically lowering the noise floor and locking in a razor-sharp, three-dimensional center image.
3. Front Baffle: Lower Area Below the Woofer Cutout • The Specific Mod: Layered Mortite and GR Research material across the lower front baffle face, beneath the woofer cutout down to the bottom of the cabinet.
• The Sonic Benefit: The lower section of the baffle acts like an unanchored diving board, vibrating heavily under the physical energy of the woofer's excursion. Dampening this large surface area transforms that kinetic vibration into negligible heat. It stops the wood from "singing along," which instantly cleans up midrange coloration and lets vocals sound incredibly transparent.
4. Woofer Flange & Basket Mass-Loading • The Specific Mod: Applied Mortite heavily along the stamped metal woofer basket legs and ran a thick bead directly behind the woofer mounting flange.
• The Sonic Benefit: This kills the mechanical "bell-like" ringing inherent to standard stamped metal frames. It also creates a high-compliance, 100% airtight gasket. The bass response immediately tightens up—becoming punchier and more articulate, while completely removing the muddy "one-note" bass bloom.
5. Backside of the Plastic Terminal Cup • The Specific Mod: Heavily packed and layered Mortite across the entire backside of the internal plastic terminal binding post cup.
• The Sonic Benefit: Lightweight plastic terminal cups act like tiny passive radiators, vibrating and flexing from the massive internal air pressure shifts inside the cabinet. The Mortite adds heavy deadening mass to stop the plastic from vibrating. It also seals micro-leaks around the binding posts and dampens the delicate crossover wires against airborne acoustic energy.
Overall Performance Summary
The classic "knuckle-knock" test now results in a dead, solid thud across every square inch of the cabinet. By combining heavy mechanical bracing to stop cabinet flex with strategic Mortite mass-loading to kill localized surface resonance, these budget monitors have completely transformed. Transients are lightning-fast, midrange grain is gone, and the speakers completely disappear into a massive soundstage.
By acute attention to cabinet upgrades, I've discovered, the cabinets are now more inert than my GR-Research NX-Studio's I've built.
Listening results: Reduced Harshness: Damping the tweeter's rear structure with Mortite material, has suppressed high-frequency ringing and "break-up," with listening fatigue playing at higher volumes. Not that it was that bad from the initial upgrades.
Better Clarity and Imaging: The Sorbothane Film was cut out to the oval shape of the tweeter plate, then positioned onto the cabinet. The addition has given the Carnvial 2's a cleaner soundstage and more precise detail.
Refined Highs: The combination of Sorbothane and Mortite added to the tweeter, has removed the little bit of remaining "grain" & "shimmer" caused by cabinet resonance. Prior to doing this tweak, I noticed these characteristics happening at higher listening levels. This tweak really makes a differnce on the tweeter, not having any residual resonance carying through the plastic oval plate structure.
Increase Transparency: With the noise floor reduced from the vibration of the cabinet walls and driver frames, I'm noticing further improved micro-details.
_______________________________________
_______________________________________
_______________________________________
__
Next Tweak
These new rubber plugs give me the option of ported or sealed cabinet.
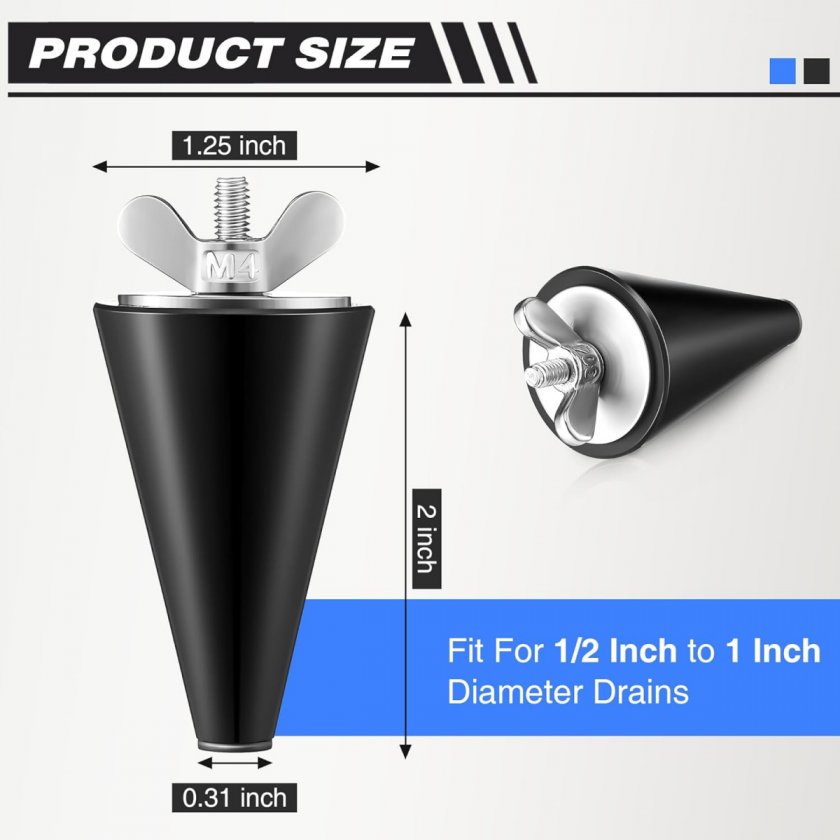
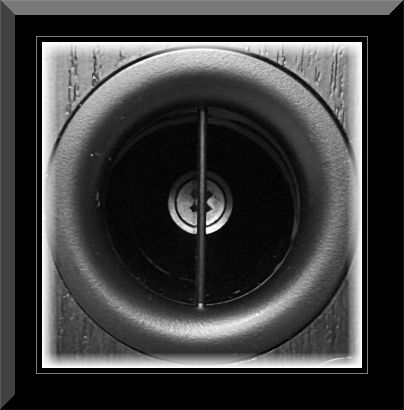
Sealed conversion provides a much smoother transition between sub.