So, a number of AC users noted my comment on how I planned on opening the Raven and taking a peek inside and asked me to post photos of the inside. The designers of the Raven have in previous posts commented on the design and components inside the Raven and opening the bottom panel finds it exactly as they have described it.
But a picture is with a 1000 words, so I reached out to Spatial and asked if they minded if I posted a picture of the inside. They stated they had no issue with me posting a general overview photo, so here we are.
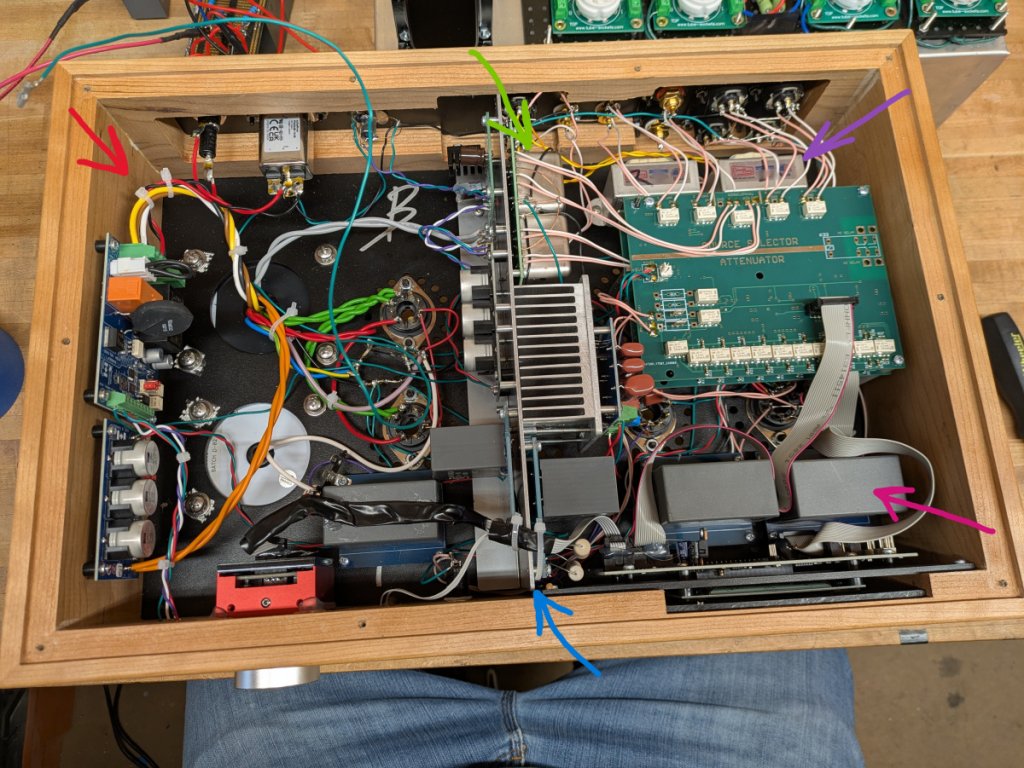
In this photo you can see the general lay out of the Raven. I have drawn a few colored arrows on the image to point to notable areas and my comments are below:
The RED arrow points to the AC side of the Raven. This is also called the dirty side in Amp design. This refers to the noise that the AC can cause inside the enclosure and it is generally accepted best practice to isolate it away from the low voltage signal side of the amp, the designers have done a very good job here in the chosen layout. All wires that carry AC and even ones that don’t, as standard, are twisted to help cancel out AC noise. In the center of this section you can see the central star grounding point, also a best practice.
All non-PCB locations of the Raven are Point to Point wired and soldered. Looking over all of the soldered connection points and using a DVOM, I was not able to see any cold solder joints nor did I measure any. To the builder and QC of my build, good job, and thank you.
The BLUE arrow points to the aluminum divider that transverses the entire length and depth of the Raven, yes, its grounded as it should be. This helps shield the AC side from the DC signal side of the Raven. This is also a best practice.
The GREEN arrow points the location of the Input signal transformers build by Cinemag. As the designers have stated, the Raven is a transformer coupled preamp. The input transformer build by Cinemag USA is also encased in a shielded and grounded housing. This is the point where the signal enters the Raven, any noise picked up here would get amplified, they have taken great care to reduce / eliminate that risk here with the extra shielding.
The LAVENDAR arrow points to the location of the output transformers built by Cinemag. The output coupling transformers replace the need for a coupling capacitor and the (coloration) they can cause. Both the input and output transformers are located as close as possible to the input and output jacks to limit the wire length. This is also a best practice.
The PINK arrow points to one of the many film capacitors used throughout the Raven as power filters. All are over rated for the voltages they see. This choice shows the designer wanted reliable, long life and high DCR filter caps for the best possible filtering. No electrolytics used here, these film caps are the best choice for power filtering and not inexpensive.
The large green looking PCB board on the signal side of the Raven is the Khozmo volume control ladder resistor and input selection relay circuit. As this Preamp is designed as a dual mono circuit, there are two of them, one on top of the other.
As you can see, the bottom panel is well ventilated, this, in combination with the vent holes drilled in the top plate ensures that the Raven operates cooler than most. Once again ensuring long trouble-free life. I have built or repaired a number tube amps and guitar amps in my life and can say the Raven meets or beats the care I would have put into one of my own designs. I am proud to own such a quality product. Thank you, Lynn and Don, excellent job.
