Hobbs NX-Studio Build

0 Members and 1 Guest are viewing this topic. Read 44103 times.

Hobbsmeerkat

  • Industry Participant
  • Posts: 2533
Re: Hobbs NX-Studio Build
« Reply #100 on: 17 Dec 2020, 12:48 am »
Both cabinets are tone coated, but still need a few more layers.

And in the process of working on these I learned a neat technique today that will replace the issues with sanding.
It's basically taking a razor & scraping along the length of the cabinet to flatten out the surface by taking down the high spots. Wish I had known about this technique sooner, but hey it'll make my life a little easier going forward.  :thumb:

Hopefully Sunday I can make some more progress!

CaptainBill

  • Jr. Member
  • Posts: 40
Re: Hobbs NX-Studio Build
« Reply #101 on: 22 Dec 2020, 03:24 am »
Hi Hobbs,

How are you planning to install the NoRez?  If you already had it on hand, would you have chosen to install it prior to completing the boxes?  I assume it has to be cut into smaller pieces to get through the woofer hole if installing after completing the box.

I have the flat pack but not the speaker kit.

Thanks!
Billy

Hobbsmeerkat

  • Industry Participant
  • Posts: 2533
Re: Hobbs NX-Studio Build
« Reply #102 on: 22 Dec 2020, 12:24 pm »
Hi Hobbs,

How are you planning to install the NoRez?  If you already had it on hand, would you have chosen to install it prior to completing the boxes?  I assume it has to be cut into smaller pieces to get through the woofer hole if installing after completing the box.

I have the flat pack but not the speaker kit.

Thanks!
Billy

I think I would still plan to apply the norez after assembly.
I did the same with my XLS build.
And that is largely since its easier to glue up without having to worry about the norez being in the way.
It can be a little more cumbersome to apply after assembly, but I dont mind cutting the Norez into smaller strips, its fairly easy to do with a sharp razor or bow saw blade

I dont have the speaker kit either tbh. I'm still waiting on availability of the next batch of NQ woofers.

Hobbsmeerkat

  • Industry Participant
  • Posts: 2533
Re: Hobbs NX-Studio Build
« Reply #103 on: 2 Jan 2021, 10:55 pm »
Small update!

Done with tone coats! Now onto preparing the rest of the speaker!

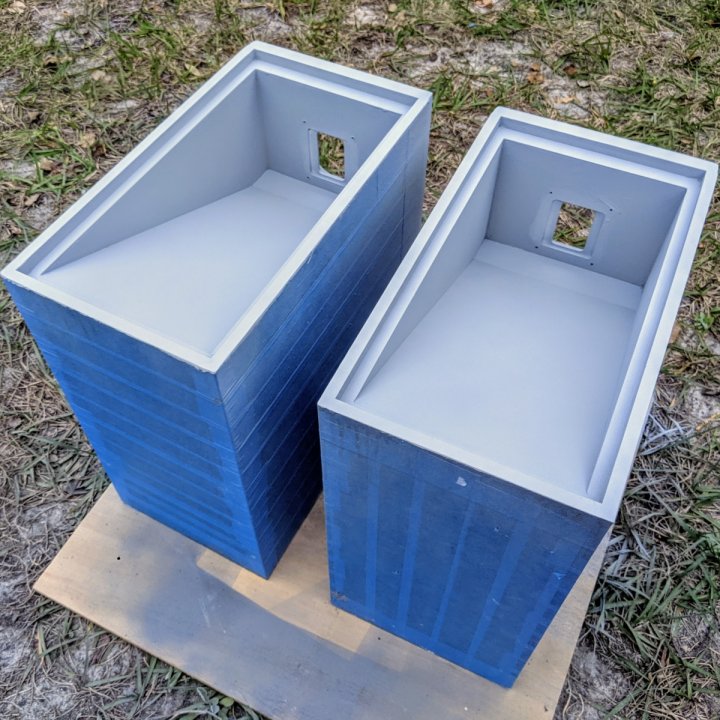
I used wood filler to help hide the edges of the veneer, and fixed some small dings caused from frequently handling them for the tone coats, sanding, etc.
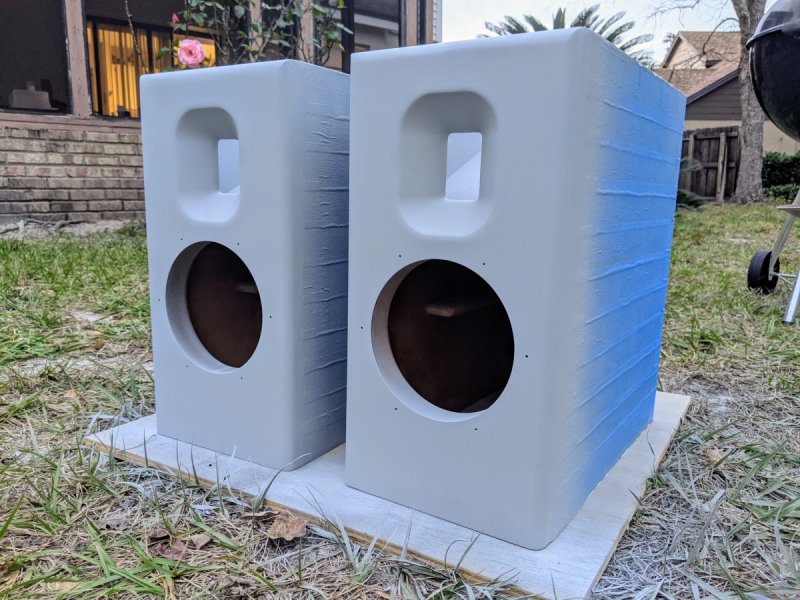
Used de-waxed shellac as recommended by others to help seal the MDF, tho the edges were far too absorbant, even after several coats. So I switched to a latex-based sealing primer for those sections, which has worked really well!

And how they're in the process of being primed!


Hopefully tomorrow I can do a little sanding, and start the painting process!  :thumb:

Peter J

  • Full Member
  • Posts: 1875
  • Hmmmm
Re: Hobbs NX-Studio Build
« Reply #104 on: 3 Jan 2021, 01:02 am »
Hobbs, I'm curious about the "latex based sealer/primer". What is it? My experience with sanding latex paint is it's  like sanding an inner tube. OK maybe not that bad, but you get the drift. Do they give a "dry enough to sand" time?

Argoncat

  • Jr. Member
  • Posts: 70
Re: Hobbs NX-Studio Build
« Reply #105 on: 3 Jan 2021, 02:02 am »
I used a two heavy coats of dewaxed shellac sealer (zinsler) followed by a 2-part high build epoxy primer 70-80 um layer all MDF parts. (Taken from the auto body world)

https://www.amazon.com/gp/product/B00B3I2E8E/ref=ppx_yo_dt_b_search_asin_title?ie=UTF8&psc=1

Ventilation is key, this is certainly nothing you want to breath or saturated your kitchen...  light sand with 800 grit followed by a few coats of black on top followed by the spray max 2k matte clear coat..  hope this helps

Hobbsmeerkat

  • Industry Participant
  • Posts: 2533
Re: Hobbs NX-Studio Build
« Reply #106 on: 3 Jan 2021, 02:43 am »
Hobbs, I'm curious about the "latex based sealer/primer". What is it? My experience with sanding latex paint is it's  like sanding an inner tube. OK maybe not that bad, but you get the drift. Do they give a "dry enough to sand" time?

It's the Valspar bonding latex primer. It says it has a "30min dry time," but thats likely more "to the touch." i gave it 2 layers and let it for 24 hours since i had plans for the evening and work at 4am..
I sanded it with 600grit to smooth the texture from the brush i used, but It actually sanded really nicely. No gumminess or clogging, thankfully. I used it on all exposed edges and it does a pretty good job sealing over the open fibers and allowing for a smooth finish.

Lebo

  • Jr. Member
  • Posts: 24
Re: Hobbs NX-Studio Build
« Reply #107 on: 3 Jan 2021, 02:50 am »
Hobbs, sorry to jump in here but I have a suggestion for Peter.  If you are going to use a latex paint as a sealer/primer I recommend using a flat paint. That might solve your sanding issues.   Or better yet, Sherwin Williams has a latex product called Premium Wall and Wood Primer. It sands very nice.  But the best stuff to use IMO if you don't mind the set up time, smell, and have the ability to spray is a white lacquer undercoat.  As you may know cabinets are often sprayed with a lacquer sanding sealer before they are stained.  For paint grade house trim some painters will spray the pine or MDF with a tinted lacquer undercoat so they will have an easy time sanding the trim smooth before applying paint. 

 Sherwin Williams used to carry a product by GSW paint called Bushwhacker which was a nice white pigmented lacquer undercoat but I can't find it locally any more.  I finally found a product by PPG paints (their house paint stores not their auto paint stores)  called Speedline Lacquer which is a white lacquer undercoat and it sands beautifully and allows you to build up a very smooth base for paint without breaking the bank.

Lastly, to keep MDF from soaking up the paint or sanding sealer I know painters that take drywall compound and basically smear it into the pours.  I'd use the powder drywall mud and play with the consistency by adding more or less water.  Sounds like a hassle but it is really quite easy. Drywall mud sands really easy as long as you buy the right one.  They have a few different types.  Little longer than I planned but hope it helps.
Lebo

Hobbsmeerkat

  • Industry Participant
  • Posts: 2533
Re: Hobbs NX-Studio Build
« Reply #108 on: 3 Jan 2021, 02:56 am »
Yeah, mine is a flat-white latex primer.

Peter J

  • Full Member
  • Posts: 1875
  • Hmmmm
Re: Hobbs NX-Studio Build
« Reply #109 on: 3 Jan 2021, 03:18 am »
Hobbs, sorry to jump in here but I have a suggestion for Peter.  If you are going to use a latex paint as a sealer/primer I recommend using a flat paint. That might solve your sanding issues.   Or better yet, Sherwin Williams has a latex product called Premium Wall and Wood Primer. It sands very nice.  But the best stuff to use IMO if you don't mind the set up time, smell, and have the ability to spray is a white lacquer undercoat.  As you may know cabinets are often sprayed with a lacquer sanding sealer before they are stained.  For paint grade house trim some painters will spray the pine or MDF with a tinted lacquer undercoat so they will have an easy time sanding the trim smooth before applying paint. 

 Sherwin Williams used to carry a product by GSW paint called Bushwhacker which was a nice white pigmented lacquer undercoat but I can't find it locally any more.  I finally found a product by PPG paints (their house paint stores not their auto paint stores)  called Speedline Lacquer which is a white lacquer undercoat and it sands beautifully and allows you to build up a very smooth base for paint without breaking the bank.

Lastly, to keep MDF from soaking up the paint or sanding sealer I know painters that take drywall compound and basically smear it into the pours.  I'd use the powder drywall mud and play with the consistency by adding more or less water.  Sounds like a hassle but it is really quite easy. Drywall mud sands really easy as long as you buy the right one.  They have a few different types.  Little longer than I planned but hope it helps.
Lebo

I'm just not a latex kinda guy, preferring nasty solvent based primers and top coats. But I am curious what others find useful. I've read of folks using drywall mud, but it is really ill suited for the task. Hot mud (powder) would be a little better but when better products exist I have to ask why? To me, painting a speaker cabinet has little in common with house painting.

 Lacquer is another story. There's lots to like about it from my point of view, but less and less available to consumers. Sherwin Williams has an industrial coatings side, but not all stores carry it or even know it exists.

Hobbsmeerkat

  • Industry Participant
  • Posts: 2533
Re: Hobbs NX-Studio Build
« Reply #110 on: 6 Jan 2021, 10:08 pm »
Rain on my previous day off, Sunday, prevented any progress so I made some progress today instead!


I plan to do some more coats over the next couple days, with plenty of drying time in between. This is a satin black, and its pretty cool getting to see it finally all coming together!

Once im happy with the coverage, ill pull off the tape and begin coating the whole cabinet with clear spray lacquer, and probably by brush for the shelf/rear baffle. Since getting any sort of coverage in there has been a big test of my patience.. lol

Edgar77

  • Jr. Member
  • Posts: 59
Re: Hobbs NX-Studio Build
« Reply #111 on: 7 Jan 2021, 12:03 am »
Rain on my previous day off, Sunday, prevented any progress so I made some progress today instead!


I plan to do some more coats over the next couple days, with plenty of drying time in between. This is a satin black, and its pretty cool getting to see it finally all coming together!

Once im happy with the coverage, ill pull off the tape and begin coating the whole cabinet with clear spray lacquer, and probably by brush for the shelf/rear baffle. Since getting any sort of coverage in there has been a big test of my patience.. lol

That looks promising.

Do you sand down the surface after each coat? I have no experience with this but that's what I saw in several YouTube videos of people who looked like they know what they are doing.

Hobbsmeerkat

  • Industry Participant
  • Posts: 2533
Re: Hobbs NX-Studio Build
« Reply #112 on: 7 Jan 2021, 12:55 am »
That looks promising.

Do you sand down the surface after each coat? I have no experience with this but that's what I saw in several YouTube videos of people who looked like they know what they are doing.
Not after each coat, but i did do it once after i was starting to finally see full coverage, with an abrasive pad, and ill probably do it again before I lay down the next coat. And before I plan to finish it all with clear lacquer.

jonsk2514

Re: Hobbs NX-Studio Build
« Reply #113 on: 7 Jan 2021, 03:35 pm »
Nicely done. Looking forward to seeing these through to completion  :thumb:

CaptainBill

  • Jr. Member
  • Posts: 40
Re: Hobbs NX-Studio Build
« Reply #114 on: 8 Jan 2021, 05:30 am »
I’m planning to use Minwax Sanding Sealer for my base coat on the MDF.  I already sanded the MDF down to a pretty good surface quality.   I bought Krylon satin finish paint but am second guessing that decision.  The plan was a dark baffle with light colored panels.  I have a large supply of high quality sandpaper, all grits.

When you start cutting the NoRez, do you mind documenting the dimensions for the pieces?  I forgot to measure the box pieces before assembling them.  Otherwise, I’ll probably just cut up cardboard pieces and go through the guess and check iterations.

Thanks!

jonsk2514

Re: Hobbs NX-Studio Build
« Reply #115 on: 8 Jan 2021, 01:05 pm »
How were you thinking of applying the Krylon?  I would suggest trying it on a practice piece first.  I used Krylon satan black for the back and bottom of the cabinets I am building.  This was applied with a brush and I found that it didn’t level much at all and brush marks were left when it dried.  I suppose that, if applied with a roller, it would leave a nubby texture.  That could an interesting.  As a simple way to finish his smaller speakers, Danny showed how using a roller with the black he sells results in a similar finish.  I considered that sort of finish for mine, but went with a more traditional varnish finish.

CaptainBill

  • Jr. Member
  • Posts: 40
Re: Hobbs NX-Studio Build
« Reply #116 on: 8 Jan 2021, 01:28 pm »
I was planning to build it up, spraying thin coats over a few days, then sand it down.  If the orange peel gets too bad, then sand down after a few coats before I lay down some more.

Hobbsmeerkat

  • Industry Participant
  • Posts: 2533
Re: Hobbs NX-Studio Build
« Reply #117 on: 13 Jan 2021, 06:00 pm »
Weather today ain the best so im gunna hold off on the cabinets,
But in the meantime, I've been working on the top grills instead, and got the first one finished!  :thumb:


Hopefully soon I can finish some painting & final touch-ups & work on finishing the cabinets with clear coats of lacquer.

WarmColors

  • Jr. Member
  • Posts: 166
Re: Hobbs NX-Studio Build
« Reply #118 on: 14 Jan 2021, 12:01 pm »
Did you purchase the fabric through simply speakers? Amazon? Not entirely sure how I will do this part. I will need to watch a few videos before I even start.

Hobbsmeerkat

  • Industry Participant
  • Posts: 2533
Re: Hobbs NX-Studio Build
« Reply #119 on: 14 Jan 2021, 01:41 pm »
I ordered it thru PartsExpress!
Its held on with lots of strips of 3M moulding tape, and glue in the corners fo prevent any lifting. Its not the cleanest look, but it works well enough to look clean.