My V-1s new digs

0 Members and 1 Guest are viewing this topic. Read 14373 times.

signatureaudiolabs

Re: My V-1s new digs
« Reply #20 on: 24 Oct 2011, 01:56 pm »
Your room is awesome, looks like a place that you could should charge people to enter!  :thumb:

Danny Richie

Re: My V-1s new digs
« Reply #21 on: 24 Oct 2011, 03:13 pm »
Very nice!

Word of caution though. Dimmer switches often put a lot of AC noise back on the line, and you may be able to hear the noise through the system.

PDR

  • Full Member
  • Posts: 820
  • May the best man win
Re: My V-1s new digs
« Reply #22 on: 24 Oct 2011, 10:42 pm »
Thanks everyone.....

Danny, there is a dedicated 20 amp line behind the rear diffusor, so far no issues with the dimmer.

Danny Richie

Re: My V-1s new digs
« Reply #23 on: 25 Oct 2011, 01:34 pm »
Thanks everyone.....

Danny, there is a dedicated 20 amp line behind the rear diffusor, so far no issues with the dimmer.

Oh, if you have the system on a dedicated circuit then you're good.

Voncarlos

  • Jr. Member
  • Posts: 156
  • OB5s in Stripes
Re: My V-1s new digs
« Reply #24 on: 25 Oct 2011, 02:23 pm »
Wow! Absolutely gorgeous, beautiful color combos. I'm very impressed with the equipment rack, actually, I'm very impressed with the whole build. Great job!
The steel building studs, are they a special order from Europe?

alienderivative

Re: My V-1s new digs
« Reply #25 on: 25 Oct 2011, 05:26 pm »
Steel walls have been utilized in commercial buildings for a long time but residential homes now are being built of steel so steel studs are available there as well.

PDR

  • Full Member
  • Posts: 820
  • May the best man win
Re: My V-1s new digs
« Reply #26 on: 25 Oct 2011, 09:11 pm »
Voncarlos, to get a thumbs up from the master is wonderful....thanks

The steel stud is called a 'Delta stud', you should be able to find a supplier in any major
city. Mine came from 'Steel Form' out of Canada, members of my family own it and have been manufacturing steel stud for over 40 yrs. I have been putting them up for over 30yrs and we have built more than 30 houses with them, but the bulk of our work comes from the commercial building sector.

dbarnet

  • Jr. Member
  • Posts: 31
Re: My V-1s new digs
« Reply #27 on: 27 Oct 2011, 01:08 am »
Looks great Perry, I am glad the diffuser worked out for you.  I am envious of your room, what a great listening space.

Can you comment on what you heard with the installation of the ceiling treatments?

Best,
Ed

Ebag4,
I am interested in building a diffuser like this for my Super-V’s can you please provide some construction information or where I might go on the net to get more information?

The Best to you……..David


ebag4

Re: My V-1s new digs
« Reply #28 on: 27 Oct 2011, 01:26 am »
Ebag4,
I am interested in building a diffuser like this for my Super-V’s can you please provide some construction information or where I might go on the net to get more information?

The Best to you……..David

Hi David,
Take a look at the thread linked below, if you still have questions feel free to post them here or PM me.

Best,
Ed
http://www.hawthorneaudio.com/forums/viewtopic.php?f=21&t=3631

dbarnet

  • Jr. Member
  • Posts: 31
Re: My V-1s new digs
« Reply #29 on: 27 Oct 2011, 06:12 pm »
Ebag4,

Thanks for the link. It looks like it will be easy to build.

The best to you....David

PDR

  • Full Member
  • Posts: 820
  • May the best man win
Re: My V-1s new digs
« Reply #30 on: 6 Jan 2012, 11:06 pm »
I have built a new QRD diffuser, and some have asked how I like it, and where
it came from.
Here it is installed:


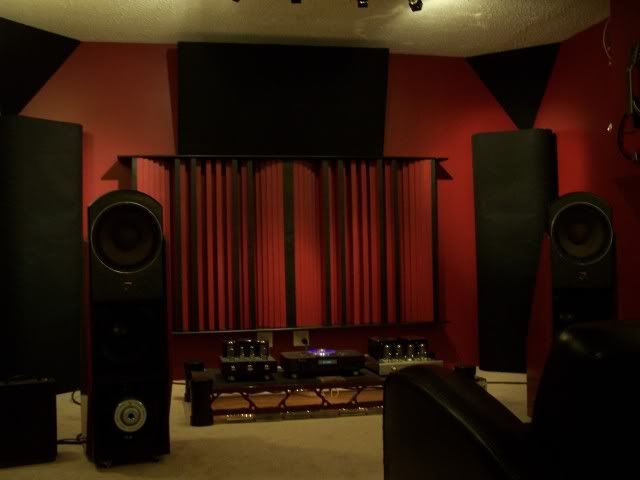
Like everything in my room (except amp and CDP) I built it DIY.
It was very easy and matches with my V-1 better than I ever imagined.
It was designed on the QRD Dude, a user friendly program. You simply punch in the well width you want, the length you want and the depth you want. It explains how it will perform and what you can do to improve it.
My diffuser was made in mind with material I had on hand, and the space I had to work with. There are probably better designs, but this was an experiment and I wanted to keep the costs low in case of failure....... :duh:

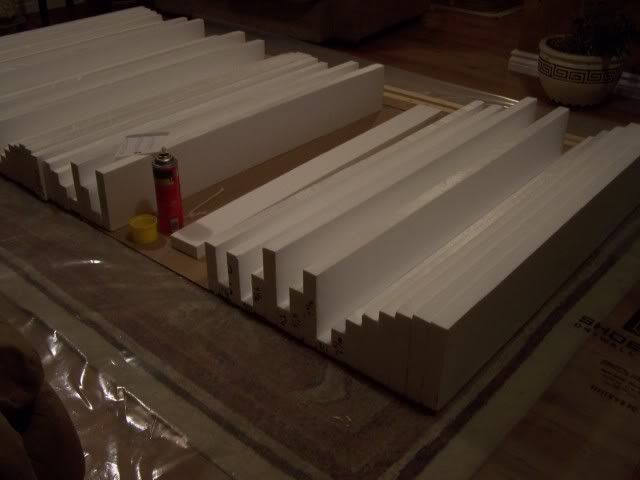
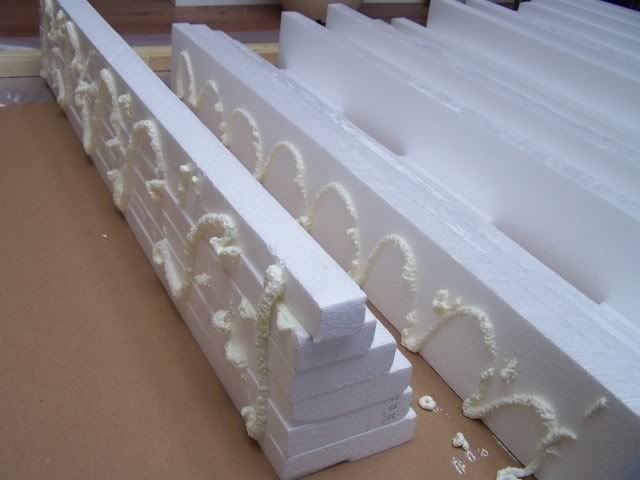
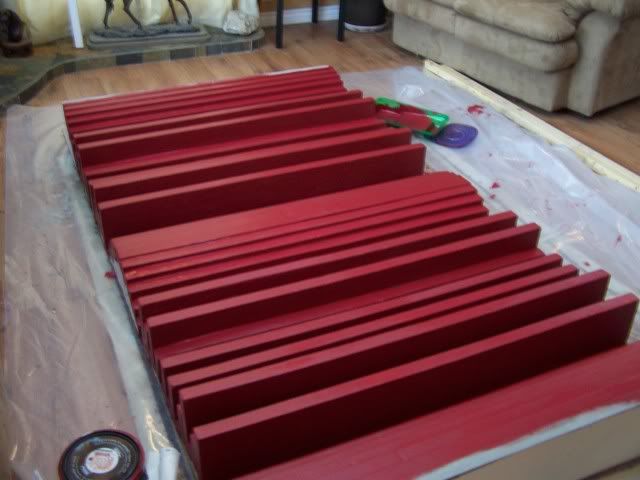
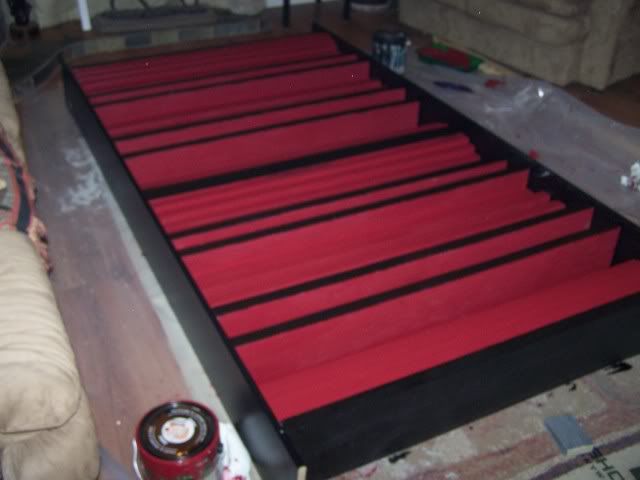
I work with styrofoam so thats what I used, white popcorn type, 1-1/2" wide. I have access to a hot wire cutter but you can easily cut it on a table saw. Its glued on to a 1/8" backer board, the glue being  spray foam in a can. Spray foam is also what is used to bond the styrofoam pieces to each other, very simple....so simple that I built the QRD in my living room. It took about 9hrs total over 3 days.

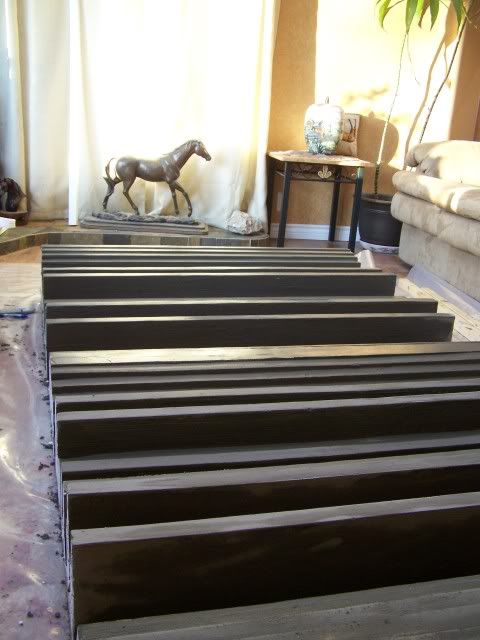
After the pieces were adhered to the board and set overnight I used a thin set mortar
mixed to a paste consistency. Then I used a 2" paintbrush and coated the whole QRD
with a thin coat. The next day I painted and then glued.....again with sprayfoam...a pre finished black shelf from Home Depot to the top and bottom.

The whole QRD is about 7'-6" long and 4' wide, weighs less than about 40 lbs. My wife and I hung it easily.

Some construction pics:


The poly diffuser that I have had in my room for a while now did a great job. This one just seems to get me more overall depth in the soundstage,and a bit more width. The biggest improvement seems to be in that voices and instruments are coming from a more precise point....if that makes sense. It has also given height to the presentation but I think that is because my poly was only 4' high and on the floor.

This is very easy to make, like I said I built it in my living room, with very few tools.
If you have the capabilities go for it, if you dont like it you shouldnt be out more than a hundred bucks.

Perry


Nick77

Re: My V-1s new digs
« Reply #31 on: 6 Jan 2012, 11:35 pm »
Thats a great looking diffuser.  :thumb:

Danny Richie

Re: My V-1s new digs
« Reply #32 on: 6 Jan 2012, 11:48 pm »
Man that looks awesome!

corndog71

  • Full Member
  • Posts: 1678
  • Some people call me Rob.
Re: My V-1s new digs
« Reply #33 on: 7 Jan 2012, 12:36 am »
That is mind-bogglingly cool! :o :thumb:

ebag4

Re: My V-1s new digs
« Reply #34 on: 7 Jan 2012, 01:23 am »
Too cool Perry, thanks for sharing.

Best,
Ed

Rclark

Re: My V-1s new digs
« Reply #35 on: 7 Jan 2012, 01:27 am »
Probably one of the very best looking rooms here. Total opposite here.

eclein

  • Volunteer
  • Posts: 4562
  • ..we walk the plank with our eyes wide open!-Gotye
Re: My V-1s new digs
« Reply #36 on: 7 Jan 2012, 01:32 am »
Thats phenomenal, and you DIY...amazing. The whole room top to bottom is like perfect- bravo!!! Well done.. :thumb:

django11

  • Full Member
  • Posts: 1094
  • Canuckistani
Re: My V-1s new digs
« Reply #37 on: 7 Jan 2012, 03:51 am »
Very nice!

I have a few questions:  the spray foam is expanding so how did you keep the styrofoam in place while it dried?  You used ordinary thin set mortar for the prep coat?  It's hard to tell from the pics, I assume that the piece has some texture to it (thinset texture + brush lines ?) and that the corners of the styrofoam pieces aren't perfect?  Does it have a kind of adobe wall feel to it?  TIA

PDR

  • Full Member
  • Posts: 820
  • May the best man win
Re: My V-1s new digs
« Reply #38 on: 7 Jan 2012, 04:12 am »
Thanks for the kind words everyone.

Django,

Once you spray on the foam rub the pieces together back and forth a few inches, this
keeps it from expanding (no air) and it will act as glue.

The mortar I used is actually a stucco base, its a polymer, but any mortar mix will work on the white popcorn type styro. The company I work for does a lot of stucco, being from Canada youve probably seen it go on buildings, it an E.I.F.S. system usually used on commercial buildings.

It does have a slight texture on it. I wanted the reflective quality and hardness of the
cement to protect the styro. Its not really an Adobe look, the brush lines are quite faint, but they are there. 

django11

  • Full Member
  • Posts: 1094
  • Canuckistani
Re: My V-1s new digs
« Reply #39 on: 7 Jan 2012, 06:22 pm »
Thanks for your replies.  Is the thin set you used something like this http://www.homedepot.ca/product/versabond-fortified-thin-set-mortar-50-lb-227-kg/921914