NX-3 Bravo Towers, Standard Build

Peter J

  • Full Member
  • Posts: 1976
  • Hmmmm
Re: NX-3 Bravo Towers, Standard Build
« Reply #20 on: 29 Jun 2026, 05:28 pm »
You might find this helpful for trimming veneer in shallow rabbets. I get queries on YouTube asking about it, even though I list it in video description. Perhaps water under the bridge for your build, but a handy tool none-the-less.


https://www.amanatool.com/51204-solid-carbide-short-flat-pilot-for-dado-clean-out-dado-cleaning-flush-trim-1-4-dia-x-1-4-x-1-4-inch-shank-x-1-flute.html?ff=1&fp=8482

Uncle Elvis

  • Jr. Member
  • Posts: 26
Re: NX-3 Bravo Towers, Standard Build
« Reply #21 on: 29 Jun 2026, 06:02 pm »
Looking fantastic! Thanks for taking the time to show your build. :thumb: :thumb: :thumb:

sepolansky

  • Jr. Member
  • Posts: 4
Re: NX-3 Bravo Towers, Standard Build
« Reply #22 on: 1 Jul 2026, 11:52 pm »
Thank you for posting this Rifleman455! The images and information are excellent. Very helpful.

Have you had any issue with the No-Rez staying "stuck"? I have on a couple of builds. I thought I had cleaned, vacuumed, blown off with an air hose, etc., the cabinets, but I probably missed the "tack cloth" step.

I ended up using 3M Weatherstrip adhesive. Just like your experience with the veneer, once it comes into contact. It doesn't move. No further issues.

Please do tell us about your sonic results!

Stuart

Rifleman455

  • Jr. Member
  • Posts: 34
Re: NX-3 Bravo Towers, Standard Build
« Reply #23 on: 8 Jul 2026, 04:21 pm »
You might find this helpful for trimming veneer in shallow rabbets. I get queries on YouTube asking about it, even though I list it in video description. Perhaps water under the bridge for your build, but a handy tool none-the-less.

Peter, you are absolutely right!  That looks like a wonderful tool to trim those recesses: I should have done more research.  My cabinet-maker brother-in-law later suggested this tool as well.

I'm glad others will have a chance to try this tool.  Thank you for sharing this!

Rifleman455

  • Jr. Member
  • Posts: 34
Re: NX-3 Bravo Towers, Standard Build
« Reply #24 on: 8 Jul 2026, 04:26 pm »
Have you had any issue with the No-Rez staying "stuck"? I have on a couple of builds. I thought I had cleaned, vacuumed, blown off with an air hose, etc., the cabinets, but I probably missed the "tack cloth" step.

Hi, Stuart!
To date I have not had any No-Rez come loose, and this is working in an unconditioned garage with natural (read, "a lot of") humidity bombarding the cabinets.  I will take another look at the insides to see if anything has come loose since I last looked, and I'll let you know is there was a change.

Rifleman455

  • Jr. Member
  • Posts: 34
Re: NX-3 Bravo Towers, Standard Build
« Reply #25 on: 8 Jul 2026, 05:36 pm »
Sorry that I've been away for a while: we were hit with storms near July 4th and lost power, internet , and all that stuff.  We seem to be back and stable now, which is great.  I forgot what living for days without air conditioning in 98-degree humid weather was like, much less not having our well water!

Rifleman455

  • Jr. Member
  • Posts: 34
Re: NX-3 Bravo Towers, Standard Build
« Reply #26 on: 8 Jul 2026, 05:58 pm »
The End of the Build is Getting Closer

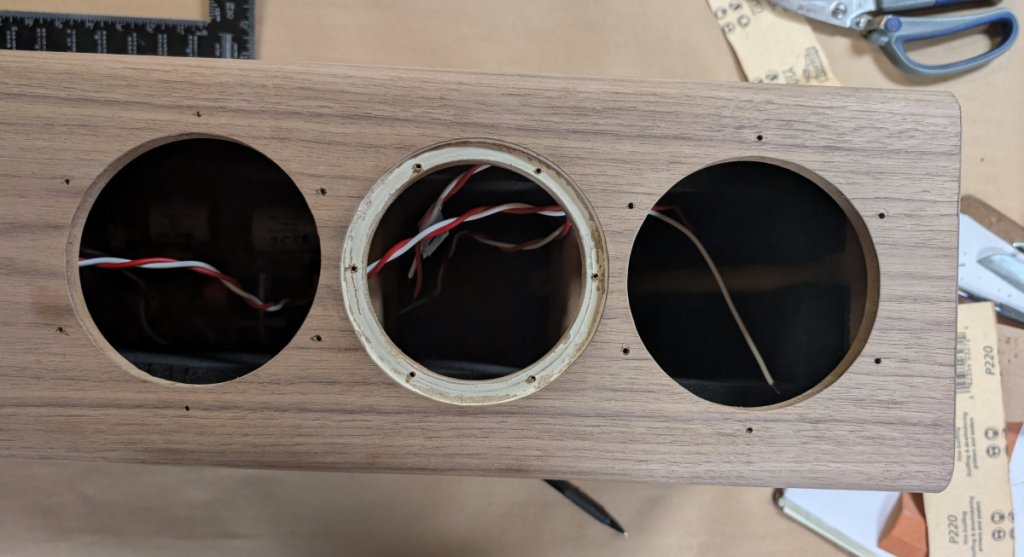
With all the veneer applied and trimmed, I located the screw holes for the woofers and waveguide.  Based on my crude measurement of screw bodies, I used a #32 bit (0.1160”, 2.95mm) for the woofer holes and a #39 bit (0.0995”, 2.53mm) for the waveguide holes.  See figure 31.  I arranged the holes as they are pictured on the web page, so the woofer holes are not inline with the waveguide’s vertical holes.

Figure 31: Drill Mounting Holes for Drivers.
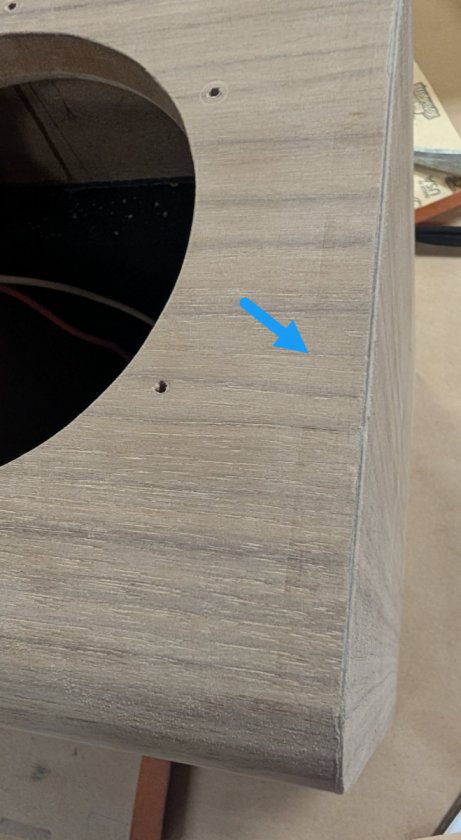
Next, I prepared for staining by giving the cabinets a light sanding with #220 sandpaper wrapped around a sanding block.  While sanding, I noticed that the router trim bit had left a faint impression in the veneer where the bearing and bit traveled, as seen at the blue arrow in figure 32.  Maybe I applied too much pressure to the router or had the bit extended too far?  Can someone with more experience give us some pointers?  A bit of careful flush sanding removed the marks and kept the overall surface flat.

Figure 32: Edge-Trimming Artifacts in Veneer Finish.
With the cabinets lightly sanded and all dust removed, I applied some wood stain to the cabinet bottoms.  I used Minwax oil stain that they call Wood Finish Penetrating Stain.  In particular, I used #231 Gunstock because it best matched our other furniture.  An oil-based stain gave me longer working time, which enabled me to stain the cabinets without the worry of dried lap marks.  I applied the stain first to the bottoms of the cabinets so I could set them on their feet to stain the rest of the surfaces.  See figure 33.  Once the bottoms were dry, I installed the speaker spikes and flipped the cabinets so they stood on their spikes.

Figure 33: Cabinet Bottoms are Stained.
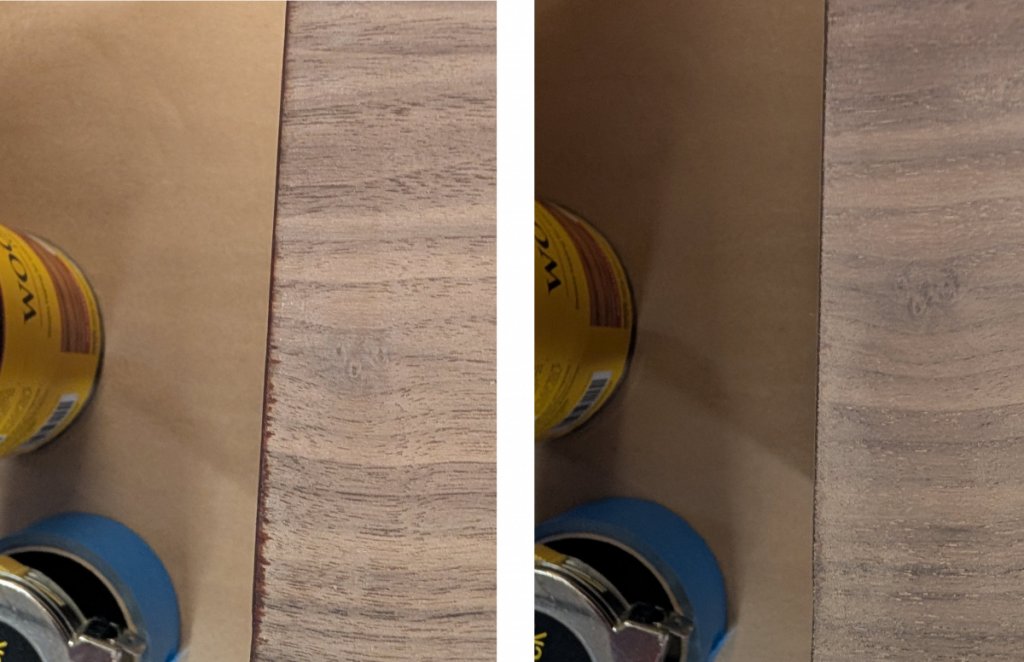
When I looked at the sides next to the bottom, I saw where the stain bled onto the sides when it was applied, as seen in figure 34.  I was afraid that the stained line at the edge would result in a darker line when I stained the sides, so I made the overrun stain less visible.  Again, a bit of careful flush block sanding lightened the stain at the edges and kept the overall surface flat.

Figure 34: Stain That Bled onto Sides (left) Was Sanded Off (right).
Now for the big move: I stained a cabinet top and then its sides, moving as fast as I could to minimize dried edges.  If I let the stain on an edge dry, then it wouldn’t look uniform when it dried.  It helped that oil-based stains tend to dissolve the finish on any drying application strokes and merge with the new application (from what I could see.)  After applying the stain, I wiped off any excess stain to promote a uniform finish.

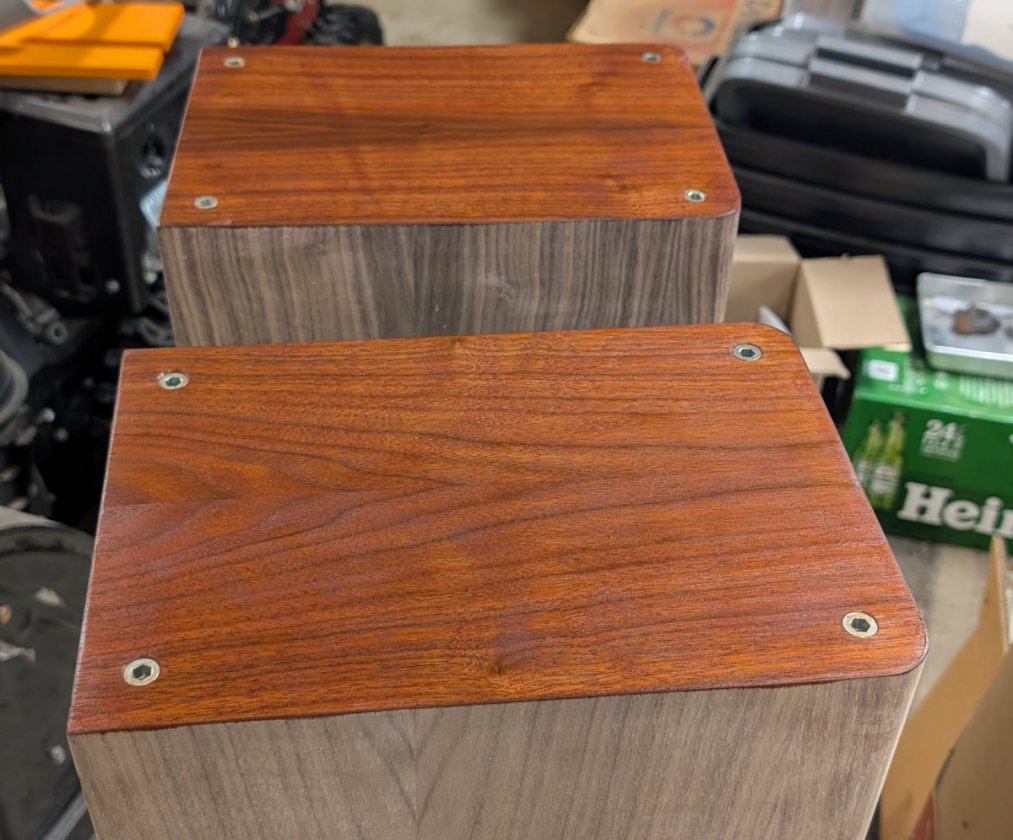
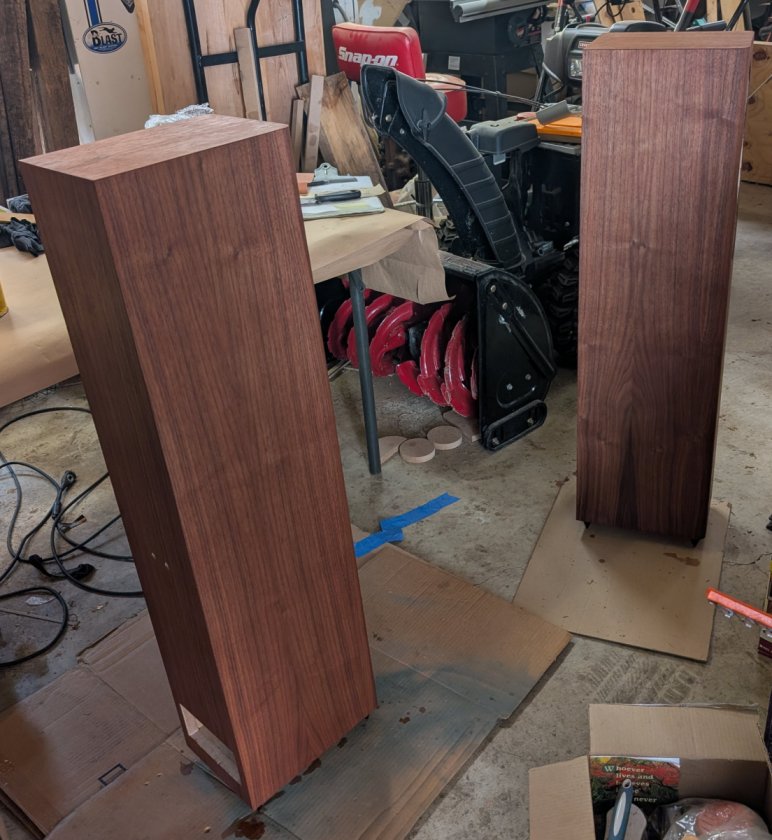
The stained cabinets looked pretty good once I was done, as seen in figure 35 in my crowded garage.  Once the stain had fully dried for at least 24 hours, I could start applying the clear coat.

Figure 35: Speaker Cabinets with Stain Applied.
Peter J

  • Full Member
  • Posts: 1976
  • Hmmmm
Re: NX-3 Bravo Towers, Standard Build
« Reply #27 on: 9 Jul 2026, 12:14 am »
Concerning the "tracks" left by bearings on flush trimmer, I'd say that's pretty normal. You've got hardened steel bearing race riding on much softer veneer. Some run masking tape where bearing contacts, but it has the effect of trimming a little less than flush so kinda creates another problem. I use an orbital sander with a hard pad but even if I was using a block, I'd start out with grittier paper to remove the marks and then progress onto finer like 220 for finish prep. Better to flatten and remove marks first than try to worry down a surface with fine paper. 120-150 is usually where I start off. Depending on finish used, I might start my finishing after 180. but more often 220 and save the finer grits for "finishing the finish". The first coat will consolidate the fibers and make things easier to get nice, flat subsequent coats after intermediate sanding.

goggle1824

Re: NX-3 Bravo Towers, Standard Build
« Reply #28 on: 9 Jul 2026, 03:25 pm »
Rifleman455, looking really nice!

Following with much interest. 👍🏼

Rifleman455

  • Jr. Member
  • Posts: 34
Re: NX-3 Bravo Towers, Standard Build
« Reply #29 on: Yesterday at 05:13 pm »
Concerning the "tracks" left by bearings on flush trimmer, I'd say that's pretty normal. You've got hardened steel bearing race riding on much softer veneer. Some run masking tape where bearing contacts, but it has the effect of trimming a little less than flush so kinda creates another problem. I use an orbital sander with a hard pad but even if I was using a block, I'd start out with grittier paper to remove the marks and then progress onto finer like 220 for finish prep. Better to flatten and remove marks first than try to worry down a surface with fine paper. 120-150 is usually where I start off. Depending on finish used, I might start my finishing after 180. but more often 220 and save the finer grits for "finishing the finish". The first coat will consolidate the fibers and make things easier to get nice, flat subsequent coats after intermediate sanding.

Hi, Peter!

Thank you again for explaining some of the less-publicized parts of woodworking!  These are the kinds of things that I attend forums to learn and I hope others are learning along with me!  Maybe I should have posted what I saw and asked for help before bulling ahead: that's something I'll keep in mind.  Preventing a mistake is easier than trying to repair one!  Please keep those lessens coming.
<Readers: note that Peter posted a YouTube video discussing veneering XL-S Encore cabinets (https://www.youtube.com/watch?v=pb5KiJmIWII&t=13s) and other videos about cabinet finishing, so take a look at some of his posting!>

Rifleman455

  • Jr. Member
  • Posts: 34
Re: NX-3 Bravo Towers, Standard Build
« Reply #30 on: Yesterday at 05:16 pm »
Rifleman455, looking really nice!

Following with much interest. 👍🏼

Thank you, Google!  It has been fun trying to learn how much and how little to post to interest folks without boring them.  I looked for a thread like this before I began building and I started this thread when I didn't find one.

Rifleman455

  • Jr. Member
  • Posts: 34
Re: NX-3 Bravo Towers, Standard Build
« Reply #31 on: Yesterday at 06:18 pm »
Applying Clear Coat

For a protective finish coat, I chose to stay with the same manufacturer for compatibility and selected Minwax Polycrylic satin clear topcoat.  I didn’t want a shiny clear coat highlighting any mistakes.  Maybe I should have chosen their Helmsman water-based spar urethane for its additional UV protection?  Consider this for your projects.

I did not sand the stained cabinets before applying a clear coat because oil-based stains do not raise the grain, eliminating the need for additional sanding.

The clear finish was applied with a good brush, working in the direction of the wood grain.  As Peter noted in Reply #27, the first coat of finish consolidates the wood fibers and make it easier for the subsequent coats to be flatter as each coat consolidates the fibers more.  Once the first coat dried, I sanded it lightly to leave a smooth surface and to provide better adhesion for the next coat of finish.  I sanded the coat with 400-grit sandpaper because I wasn’t comfortable using 220-grit paper as recommended by the manufacturer.  I used a tack cloth to remove all the sanding dust and applied a second coat the same way as the first.  Again, the second coat was sanded, dusted, and a third coat was applied.

The third coat of finish has a smooth surface and I can still see a little of the grain texture: I like this look so I’m going to stop with three coats of finish as seen in figure 36.  Considering that this was my first veneer job, and assuming the veneer doesn’t peel off in the coming months, I’m very happy with the resulting cabinets.  Pleasantly chuffed!

Figure 36: Cabinet with Three Coats of Clear Finish.


Rifleman455

  • Jr. Member
  • Posts: 34
Re: NX-3 Bravo Towers, Standard Build
« Reply #32 on: Yesterday at 06:32 pm »
Tweeter Assembly

Now that the cabinets are finished, I can mount the drivers and tube connectors to finish the assembly!  I’m almost ready to start listening!

The first thing to do is assemble the tweeters to their waveguides.  As seen on the GR-Research website, the tweeter comes as a plastic waveguide and gasket, a GR Neo3 driver, and a back cup with stuffing.  But what screws should I use to attach the driver to the waveguide?  The holes are about the size of a #38 drill bit, and they all vary in size a little, which is normal for 3D-printed holes.  I chose to use #6-5/8 sheet-metal screws and opened all the holes using a #36 bit (0.1065”, 2.71mm) so I don’t tear plastic layers apart with too tight a screw.  I laid the driver on the waveguide with the seal facing down, started all four screws, and pulled the driver snug against the waveguide, as seen in figure 37.

Figure 37: Mount the Tweeter Driver to the Waveguide.

The website recommends "sealing the cup to the back side of teeter with silicon adhesive or another similar sealants.”  I chose to use Permatex #81158 Black Silicone Adhesive Sealant because I had some on hand for car repairs.  I used my finger to apply a thin coat of sealant to the back cup as seen in figure 38.

Figure 38: Apply Sealant to Edges of Back Cup.

I used nitrile gloves because they made hand cleaning simple.  I flipped the back cup over and pressed it onto the back of the driver, centering it with the driver’s edges as seen in figure 39.  I then set it aside to cure.

Figure 39: Attach Back Cup to GR Neo3 Driver.

Tyson

  • Full Member
  • Posts: 11736
  • Without music, life would be a mistake.
Re: NX-3 Bravo Towers, Standard Build
« Reply #33 on: Yesterday at 07:16 pm »
You know, I've built several speakers from kits.  You guys that build them from scratch blow my mind.  Amazing work!

Peter J

  • Full Member
  • Posts: 1976
  • Hmmmm
Re: NX-3 Bravo Towers, Standard Build
« Reply #34 on: Yesterday at 07:41 pm »
Rifle, you've encountered a couple of my pet peeves so I'm gonna wade right in here.

 To the surprise of many, there is no such thing as "silicon" sealant. Silicon is an element and not a sealant. Silicone is a moniker that GE gave their sealant. I think you made a fine choice. Most silicone sealers are better at sealing than adhesion, but in small, low load assemblies they have plenty of adhesive strength.

Second, the attaching screws for the tweeter. I have futzed around with these things and the best way I've found to mount is #4-40 machine screw and washer. Something like a #6 tapping screw is just too large in diameter and tends to "jack" the tweeter frame on the threads. If you have the ability to heat-set inserts that's the way I'd go. I've epoxied many also, but don't know how well the epoxy would adhere to the plastic. I'm of the opinion that the mounting slots in the frame of tweeter benefit from being enlarged to alleviate screw jacking.  Might be possible to use M2 metric screws as well, but I haven't tried.

If you enlarge the mounting slots, be sure to tape off the slots in frame or the steel swarf will go right in them because of the magnets.

If you don't already know about it, McMaster-Carr is probably one of the best resources on the planet for tinkerers.
https://www.mcmaster.com/