Ahh some quick updates to the SVS build.
Had a big weekend of Jack and Jill’s and more. So, trying to fit these in. We have a bike blessing going on today as well.
Bare with me.

My helper.
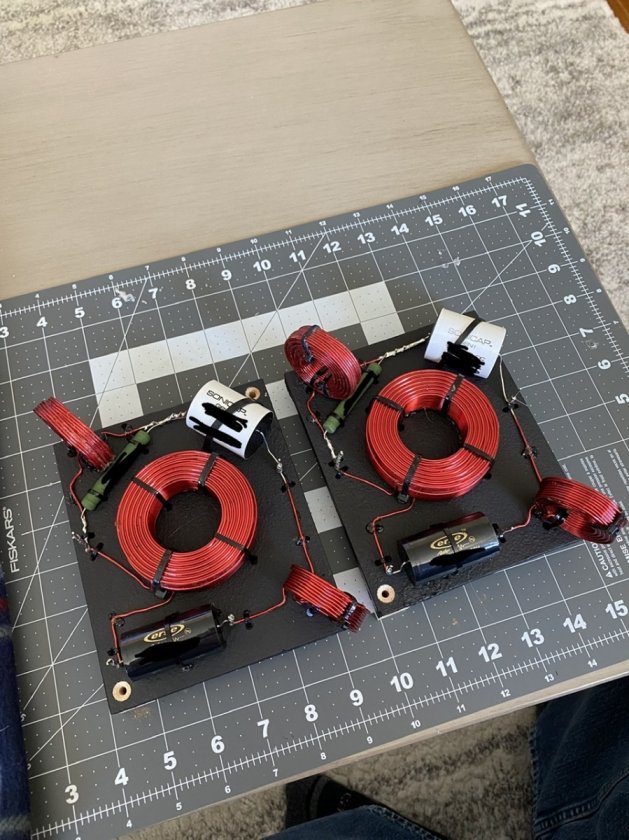
Ok, so one speaker is done, the other started. I have more photos to upload but need some editing.
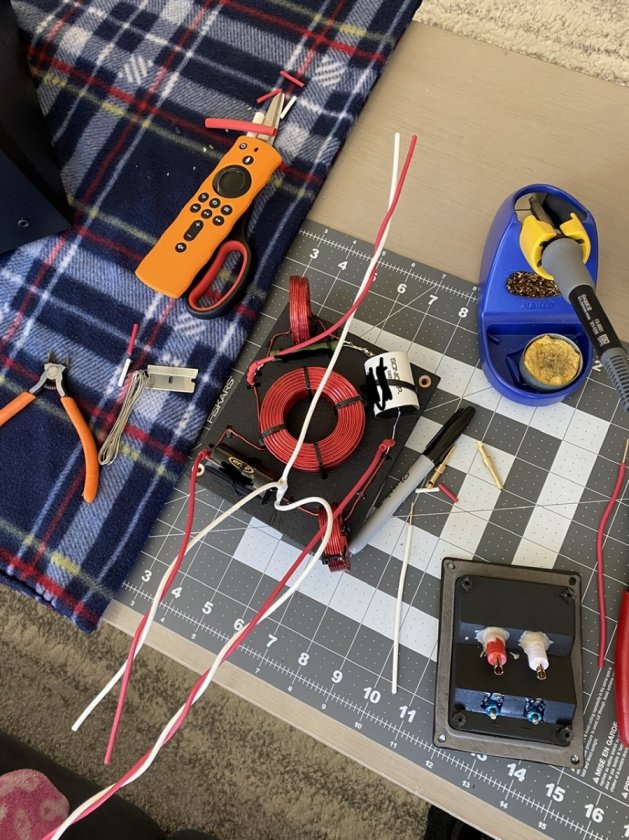
This is going forward smoothly. I actually like these speakers quiet a bit. The mid driver seems to be of decent construction. It’s not a stamped steel basket, and a fiber construction cone. The tweeters look decent as well construction of both of the drivers seem a bit better then the average unit. Nicer then Klipsch.
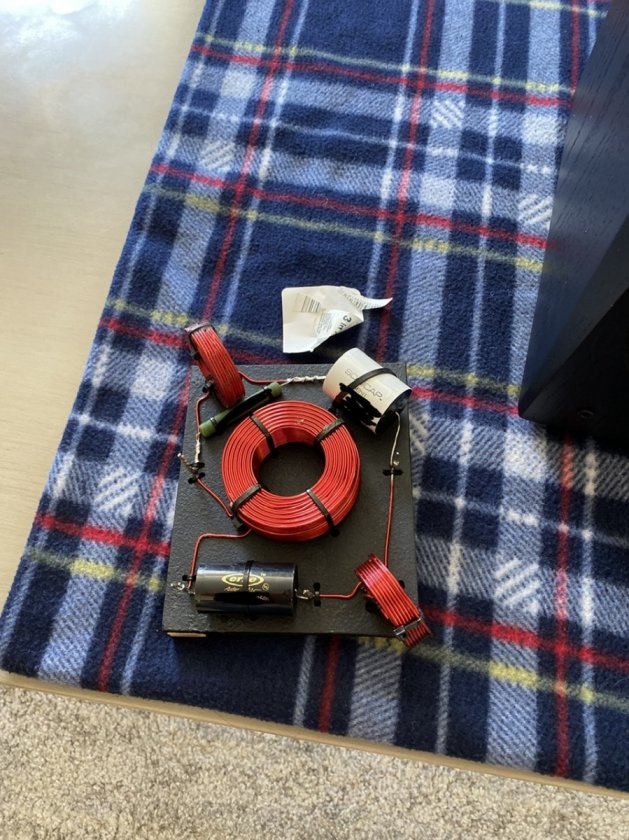
The stock network is of the worst I’ve seen. Has a nice coil, but it’s so small. Removing the binding post were a bit of a pain, they are covered in that sticky blue locking material. Box has a great brace right in the middle! Rear ported, so keep them away from the walls.
Network boards are covered in the black spray matting I’ve used for years. I’ve also went back and glued them down for extra security. Board is wired up, again 4 post on this network to hit. Negative is shared, with input and both speakers. Positive as well is shared for both input to circuit. Then just pick the correct output for your tweet and mid! Simple wire up. I can say in this kit, the wire length is plenty enough! You should not need anymore! How ever, I think it might be best to grab extra heat shrink.
I’ve noticed over the last couple packages sent the heat shrink varies quiet a bit in length. I feel that you should get a full 12 in of red and 12 inch of white. I’m once again ran out. The point of the heat shrink is to cover your soldered connections on the network, the speakers and the tube connectors. That alone, and connections normally about 1 inch in length. Do the math.. we have 4 connections on the board itself.. then 4 for the speakers. Then 2-4 for the input area. So, getting 6 inches of red and 6 of white.. I’m sorry it’s not enough.
Folks, I strongly urge you to use a two part epoxy for the tube connections. Takes an extra 15-20 minutes and it’s a great piece of mind knowing they are solid in place. I use hot glue as a backup to what ever first method I use. Tie down, then glue. This was actually using the spay as a hold down, then zip tied as well some hot glue to make sure they hold.
I see everyone is twisting there wire! Good! Don’t go over board! You don’t need to twist it so tight you loose 4 inches. A nice wrap around each other is plenty fine! As well you will notice due to the solid conductor it does not want to “go in the box” as easy when installing drivers. Help the wire go back, don’t force it. Looser wraps will help it tuck a little more easy.
So, the only connections I did not heat shrink are the extra 5-way binding posts I also wired for side by side. Also, I use this line for my customers in helping them think of the best ways. I tell them leave the posts! At least one set! This way if you ever want to move the speakers for say a party or what not.. you can then just use the binding posts. You may notice the difference when doing so.. BUT, your friend won’t, and they will think they sound amazing!!! Then bring them back into your room, hook up those tube connectors and watch as they experience sound in a whole new level.
Since these are ported.. I did not opt to use any fiberglass. Yes, fiber glass is a bit better then Pollyfill. Yet, with ported designs I have seen fibers shoot out of the port. Not knowing if kids are at play.. Polly I feel is safe. The difference won’t be huge! Better then glass particles shooting into the air. Keep that in mind folks.
I’m excited to hear these next to my Klipsch. Actually second thought.. maybe I don’t want to a-b these... I have enough projects going and don’t want to build anything but the XLs at this point. Lol.
Don’t cover the port when pushing Polly back in. Keep that clear. Oh, and take it easy with this wood finish! It can mark very easy, and I feel the cabinets on the outside are a bit soft. So driver slides into the hole I don’t suggest. Take ease installing and removing. The drivers do provide a cool gap on each side to grab and move. It does help a little. As well, the holes for the drivers are a bit tight! Not a bad thing! Just take ease when removing.
That’s all for now!
My Klipsch are almost done being broken in. At that point will do a better write up of my thoughts. I do have to REW my 504C today for another member that’s getting some strange results after his install of parts. This leads me to a whole different topic.
This is a no gripe, not being mean, just being honest mention.
To those who’ve purchased kits for installing! Please make sure the first thing you do is take all your parts out, count them, and check them with the schematic that’s in the box. If you don’t have that, contact Danny right away. We are all human and things can happen! So, if you get a schematic that states you need two .35 coils.. and you get a .37 there is a difference! Make sure before you solder and install all your parts match the sheet given! Sometimes mistakes can happen! They are not done on purpose! It’s a mistake! The part numbers can be very close and they are small to read! (Trust me, I’ve done some measuring for him and putting them away, even I got confused at one point!) (Tho it’s awesome to see parts come in with your hand writing on them. I feel, it just makes me smile a little.) Listen, I get-off on helping people. It’s my happy place! Don’t judge.
Look at all your parts! Count them up, and check them off the list given. If anything is wrong, please contact Danny right away! He will go the lengths to make it right! To my guys in the shop... J and K... your doing great! We thank you! But, double check everything.
Listen, these guys got orders! 200 orders and 3 guys! Give them a brake!
Ok, today ill be finishing the ultraBooks and on to the center.
So, I know some are reading this. I’m going to maybe start another post to ask this.
I hope some are reading this.
Those whom are building these DIY kits for others! As mentioned, it’s not the hardest, but tedious it very much is, and time consuming. You can’t just snap these out in 1 hour.
For people you do not know, what are you charging folks to build these? Thanks. You can PM me if you prefer! Just trying to gauge what to charge. I could have sworn I was told 250-300 for the books and half that for the center. Again I’ll make an official post asking this. I want to keep in-line with the rest of you! As well, I feel it’s only fair, and justified to Danny that we keep all of our prices very close! I’m sure I don’t have to explain why! But for those who wonder, we are assembling someone else’s hard work! (Danny’s) We are helping those whom have not purchased all the tools to do this, as well may not have the abilities.
Tools don’t come cheep, nor does your knowledge! Being fair is what’s needed. I feel if we can all play together, it may help those around them do more! Again, this helps your pocket, as well GR selling more products. More fair, and perfect our installs the more the work comes about, more we are trusted. I’m here to help all aspects! So to those only!!! What have you charged? Again, we are not talking for your dad you may have done them free for. We are talking for those people who just call you out of the blue.
Thanks all. Few of you have my phone number for those late night, what the hell did I do questions. I don’t mind, just remember I’m east coast time! So 12am to you, might be 1-3 for me. Lolol.
More to come