To attempt to keep this simple:
1. The original WAV files on your new hard drive should be untouched.
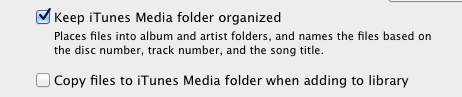
2. Open iTunes and in Preferences--Advanced, remove the check from the box saying "copy files to iTunes…" Like so. (keep iTunes organized is not relevant, checked or unchecked). This will force iTunes to simply build a little database file so it knows that the songs (your WAV files) are on that external hard drive. Whenever that drive is connected, iTunes can play the songs. Even without the drive connected, however, you can see the songs in iTunes.
3. After you change this preference setting, close iTunes and hold the Option key down (on the Mac) while opening iTunes. It will give you the option of creating a new library. This will leave your existing library untouched and available as wanted. It will create a second, empty library so you can get a fresh start. (Technically, this will be a separate xml file that iTunes puts in your iTunes music folder and where it will store its index of your music files).
4. So, with this new, blank library opened in iTunes you can use "Add to Library" to select your music folder on your external drive. In a couple of minutes it will index those files (it's fast because it's not moving them off of that hard drive).
5. If you still see files that are not WAV files in this new library, it means they are not WAV files on that hard drive. Possibly you didn't have the import setting configured correctly when you ripped the CDs originally in iTunes. It's possible for iTunes to rip and compress to AAC on import if that's how it's setup. If that's the case then you'll need to change the import settings and re-rip the affected CDs. On the Mac side, the free program XLD is best if you have older CDs that might benefit from a bit more robust error correction than iTunes ripping provides.
I hope that helps somehow.


