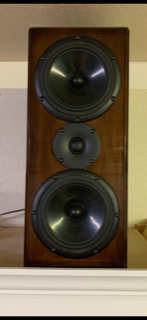
Finally finished my pair of X-CS speakers. This post is a little hasty but wanted to get it out there.
Very, very, happy with how the speakers sound! The build came out pretty good overall. Pretty good meaning they look nice from 3 feet away but if you get up close you will see the mistakes. I had some chip out and some sand through, and a few finishing issues. First pair of speakers and I have never worked with veneer. I used wood on wood veneer with 3/8 solid wood corners all the way around. That proved to be very time consuming.
Again, this is my first build so take my plan with a grain of salt. My speakers are MDF core with alder wood on wood veneer. Hope it helps someone.
1) Cut all pieces and assembled the MDF boxes (except front cover). I used dados and rabbets. That was more time consuming than I expected because I didn't have a great plan and moved my table saw fence a few times. They are very solid. Dropped one off the back of the table saw and just had to fix a little dent.
2) Cut crossover base plates then assembled crossovers. Drilled mounting pilot holes in the bottom piece of MDF for screwing in later. I marked the 4 corners of the plywood mounting plate so it would be easy to find the pre-drilled pilot holes.
3) Cut and installed No-Rez.
4) Glued on front with speaker holes already cut out.
5) Glued on all the veneer. One piece at a time. Six pieces per box with a 45 min to an hour glue up/press per piece. Took a while because I was limited on cauls and afraid I'd screw it up if I tried to do more than one at a time.
6) Cut 3/8 in rebates on every edge of the box. I had some chip out which really was a bummer on the cross grain. How can I avoid this next time? Use blue painters tape?
7) Glued on solid corner strips. This took a while also. 12 per box. I tended to use to much glue and had a lot of squeeze out that I had to clean up.

I then used a flush trim bit to trim the solid 3/8 edges flush but every time I came to a corner the bit would bump up against the next piece. Has to be a better way. Maybe next time I'll make the solid pieces so that they are just barely proud of the case.
10) Sanded (burned through the veneer in 2 places..another bummer) then finished.
11) Finish went like this. Trans tint Honey Amber, Garnett dewaxed shellac to seal, shaded the edges with trans tint walnut and to hide/mask the burn through, put on a coat of extra pale shellac because I didn't want any more color, then finally put on about 6 coats of lacquer. Leveled with 600 wet grit, then 800, then buffed with Meguiar's Ultra Cut and Ultra finish polish compounds. I should have spent more time leveling. My spray technique wasn't awesome. Had some orange peel.
Overall, I love the sound but I will probably change a few things on the way I build on the next set. The picture is a little weak but all I have right now.
