Hello,
Can someone please give me precise instructions on what to do?
Clear,
I have to remove the 4 speakers, but then?
How should I imagine this?
there is a circuit board with all the components on it,
So all the components have already been soldered?
And all the cables to the 4 speakers are already soldered onto it and you just have to plug them in (i.e. to the speaker terminals)?
And where is the crossover in my Wharfedales,
Is it located at the bottom of the floor where the bass reflex opening is?
These are all questions I ask myself before I buy something that costs about as much as all the speakers.
And isn't there anyone who has any experience with what the Wharfedales sound like after the renovation?
Best regards
Chris
You have to remove the drivers, remove any stuffing, along with the original wiring and crossover. Only the original stuffing will be reused, the wire and crossover will not.
The new crossover is
not pre-built or pre-wired, it is fully DIY, we just supply you the parts & a schematic.
You will have to assemble the new crossover according to the schematic and mount it to a board (using something like pegboard or 1/4" plywood) which will need to be small narrow enough to fit through the woofer hole and mounted somewhere inside the speaker.
Zip ties and hot glue are the easiest way to secure the parts to your board.
You will also need to wire the crossover to the input and the drivers, based on your desired mounting position of the crossover and the distance from your crossover to the drivers.
You can mount the crossover inside the speaker using short screws, or heavy duty double-sided adhesive strips.
Once your crossover is wired and mounted into the speaker, you will need to cut and install the NoRez into the speaker to cover the inside walls of the speaker.
A table saw is a great tool if you have one. If not, a pack of cheap single-edge razors (for the foam layer) and an X-Acto knife (for the vinyl layer) can be used to cut it.
Once that is done, you will then return the old stuffing back into the speaker, mainly along the back wall and around the bottom port (taking care not to cover/block it). You can use a little spray adhesive to secure the stuffing, if needed.
Next you will solder the wires to the drivers. The large tab is the + terminal small tab is the - terminal, and then mount the drivers back into place.
Lastly, will be to drill out two of the binding post holes to 7/16" (11mm) which will hold the tube connectors (secured with super glue and hot glue as needed)
then you will secure the input wires from the crossover to the tube connectors by crimping and soldering the connections, and re-installing the back panel.
if you wish you can also run short jumper wires from the remaining binding posts connecting to the wires from the crossover inputs.
This option will allow you you use either the new tube connectors or the stock binding posts.
Now you should be able to plug them in an enjoy the performance.
Danny also has a a few videos showing, basic crossover assembly (Klipsch RP600M, X-LS Encore & X-Bravo) that you can use to get an idea of how the assembly and installation process works.
600M:
https://youtu.be/9MxY5Ne1CK8Encore:
https://youtu.be/rIxig_9i-IwBravo:
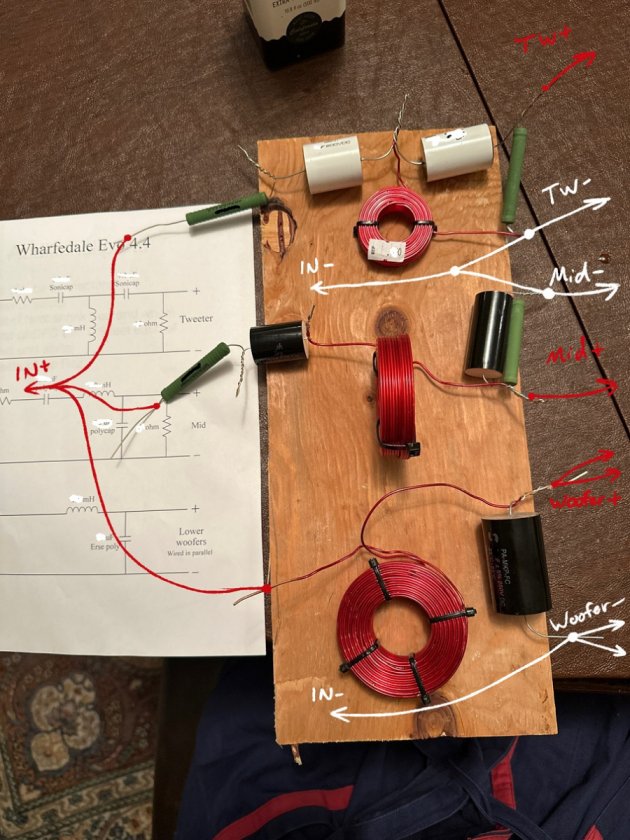
https://youtu.be/OD27rHP7VEIHere is an unfinished crossover from another customer that built out the Wharfedale 4.4 Evos.
It still needs to be mounted to the board and wired together but the layout it correct, and I've even drawn how the wiring is to be run.
The crossover can be much more condense than this, or even split onto 3 separate boards if you desire.
I hope that helps give you an idea of what is involved.