Amateur Build of the X-MTM Encore

0 Members and 1 Guest are viewing this topic. Read 28883 times.

jonsk2514

Re: Amateur Build of the X-MTM Encore
« Reply #80 on: 7 Jul 2020, 01:37 am »
Boy that is some rough and soft looking MDF. No wonder you have trouble with chunks breaking off. Next time look for some premium quality MDF You will find it much better to work with.

I'm not the only one to question your material.  Sonicjoy did the same thing a few posts above.  I don't know what you have, but it does not appear to cut or perform in the same way MDF usually does.

However, if you are so sensitive that questions like that bother you, then perhaps it would be better for others to be providing help to you without me.

Sonicjoy remarked that it looked to be soft and rough, and that I should look for a premium quality, but still called it MDF.  I’ll admit to it maybe being low quality.  We have big box stores and some small indie places, but around here it is all about “cheap”. So I got what I could and the label stapled to to each board said “MDF 0.734x49x96” (96? Don’t remember exactly).

Unfortunately there is no grading system applied to this material.  MDF is MDF, right?  Clearly not by what I am hearing.  But, if you are a person not deeply immersed in wood working, how is one to even know to ask the question or even what question to ask?    If I know to ask a question, I will ask.

Your comment (“I don’t know what you have...”) does beg the question - Do you have a good picture of what MDF is supposed to look like so I know what to look for the next time?

Like I said, your input is welcomed and ask questions if you wish.

Hobbsmeerkat

  • Industry Participant
  • Posts: 2542
Re: Amateur Build of the X-MTM Encore
« Reply #81 on: 7 Jul 2020, 02:50 am »
To be fair, the MDF at your typical "home improvement" store is always on the cheap side, and is more likely to chip, fray & flake along the edges, even with good tools. Same goes for the vast majority of "builder-grade" plywoods, but it's also accessable and readily available.

If you want the "good stuff," you need to find a place that specializes in higher quality materials.. Of course it means that you're adding to the cost of said materials. For some that extra time/money/travel isn't always an option. And its not like you can't use the cheaper products, but there are trade-offs.
In the end, you gotta come to your own decision about what compromises you consider to be acceptable.

diyman

  • Jr. Member
  • Posts: 163
Re: Amateur Build of the X-MTM Encore
« Reply #82 on: 7 Jul 2020, 06:02 am »
Please, feel free to comment about my work and how I approach this project.  Clearly you have expertise well beyond that of which I or any other amateur might have.  That expertise is of interest to me.  But, also, please be really careful on your choice of words when forming a question such as this.  It might come across as calling someone “stupid”.

There is nothing wrong with way I have written the last several posts, but if you are so sensitive to peoples wording then I think it's best for others to help you.  I have no interest in walking around on egg shells to prevent possibly offending your senses.  Considering your very unorthodox approach to things that I have commented on before you would do well to take advice from any where you can get it, and not criticize the advisor over his writing style.


hawkeyejw

Re: Amateur Build of the X-MTM Encore
« Reply #83 on: 7 Jul 2020, 11:37 am »
Jon, do some digging to see where local carpenters/cabinet builders get their supplies. Unless you're very remote, there's usually some kind of lumber yard around. If you can find something like that you should be able to find better quality MDF. It definitely is not all created equal... the stuff they have at my local HD is straight up particle board, it looks like a sponge.

Take a look at how the wood looks in this picture - you can see the panels appear totally uniform, there's no apparent "chunks" or "fibers" of wood unless you're right up close to an edge looking right at it, and even then it's more a texture thing. It cuts and glues nice and clean. You also need a good sharp blade on your table saw, MDF is not the easiest to cut.


From your photo you posted, it looks like what you have is better than particle board but still a bit lower quality than is ideal. That's not to say you can't use it, it's just not the ideal quality and will be a little more difficult to work with as a result. My guess is it will take a bit more work to sand smooth and will be a bit more absorbent when you start painting which again, is fine, you'll just have a bit more work to do to get it looking the way you want potentially. Take your time, make sure you use enough glue and clamp your joints well, and move methodically along. If you are able to get the box glued up solid but have some rough edges or edges that stick out, you can fix those with a flush trim bit on your router or sandpaper and elbow grease.

Regarding butt joints vs dados, I used simple butt joints for my X-Statics and it worked out fine. Just make sure you dry fit before you start to ensure they're square and flush, and then figure out how to get some clamps on them. I don't have the ability to do dados with my current tools & space so I just went with butt joints and went slow. Taking my time on the table saw allowed me to have minimal issues with fit when it came to the braces.

jonsk2514

Re: Amateur Build of the X-MTM Encore
« Reply #84 on: 7 Jul 2020, 12:02 pm »
To be fair, the MDF at your typical "home improvement" store is always on the cheap side, and is more likely to chip, fray & flake along the edges, even with good tools. Same goes for the vast majority of "builder-grade" plywoods, but it's also accessable and readily available.

If you want the "good stuff," you need to find a place that specializes in higher quality materials.. Of course it means that you're adding to the cost of said materials. For some that extra time/money/travel isn't always an option. And its not like you can't use the cheaper products, but there are trade-offs.
In the end, you gotta come to your own decision about what compromises you consider to be acceptable.

Like a lot of things one tries to buy these days, it takes some effort to find the “good stuff”.  But you also need to know that there is good stuff out there to buy.  But, I suspect, that for the function of the speakers, what I have is fine.  The chunking problem, I have solved that.  I just changed how I was cutting it.  There is a bit of residual “feathering” that I have to deal with, and a bit of light sand addresses that.  So far I have not had any other particular issues.  Although, I will say that an advantage of buying at some of the big box places is that, if you find a damaged piece, you can usually get a pretty good discount...   

jonsk2514

Re: Amateur Build of the X-MTM Encore
« Reply #85 on: 7 Jul 2020, 02:44 pm »
Jon, do some digging to see where local carpenters/cabinet builders get their supplies. Unless you're very remote, there's usually some kind of lumber yard around. If you can find something like that you should be able to find better quality MDF. It definitely is not all created equal... the stuff they have at my local HD is straight up particle board, it looks like a sponge.

Would you happen to know of a brand or manufacturer who makes the “good stuff”?  Actual, that question could go out to anyone who might know...


Take a look at how the wood looks in this picture - you can see the panels appear totally uniform, there's no apparent "chunks" or "fibers" of wood unless you're right up close to an edge looking right at it, and even then it's more a texture thing. It cuts and glues nice and clean. You also need a good sharp blade on your table saw, MDF is not the easiest to cut.


Your MDF is much lighter in color than mine.  Can’t quite see the texture, but I think I understand what you are saying.  For the next time, maybe.  I will see how this all finishes up with what I have, then I will decide it it is worth the effort.

My saw blade, down spiral cutter and 3/4” router bit are cutting my stuff well.  I think I am as good as I can get there.  While my cutters are all carbide, I will keep an eye on any potential dulling of these.  I would guess this stuff can be a bit abrasive.

BTY - The clamps I have seen in various post get to be really innovative.  I like the corner clamp in your picture.


From your photo you posted, it looks like what you have is better than particle board but still a bit lower quality than is ideal. That's not to say you can't use it, it's just not the ideal quality and will be a little more difficult to work with as a result. My guess is it will take a bit more work to sand smooth and will be a bit more absorbent when you start painting which again, is fine, you'll just have a bit more work to do to get it looking the way you want potentially. Take your time, make sure you use enough glue and clamp your joints well, and move methodically along. If you are able to get the box glued up solid but have some rough edges or edges that stick out, you can fix those with a flush trim bit on your router or sandpaper and elbow grease.

Regarding butt joints vs dados, I used simple butt joints for my X-Statics and it worked out fine. Just make sure you dry fit before you start to ensure they're square and flush, and then figure out how to get some clamps on them. I don't have the ability to do dados with my current tools & space so I just went with butt joints and went slow. Taking my time on the table saw allowed me to have minimal issues with fit when it came to the braces.

The elbow grease, I’ve got plenty of...   :green:
And taking time is aways a good suggestion.  Hence all of my practicing, and dry fitting.

I am going to do the butt joints for the braces, but with the quarter round as locators.  I know this is unconventional, but I have tried it several times now on practice pieces and it seems to facilitate the build nicely.  I also know the quarter round will take up internal volume, but I will compensate for that (More to come on that).  I also figure the glue I will use will compensate for any clearances I have between the braces and the side panels so I won’t have to custom fit each one.

As was suggested above, I looked into doing the Dado for the braces:
https://youtu.be/UXvLLsG5AKI

And I tried it on some scrap...
The dado is a no-go for me.  The dust is unbelievable and will be really hard for me to capture.  Also, when I saw the the “love tap” the guy had to do in the video to assemble just one joint, I figure that, with 14 tight fitting joints in my project that may need to be “tapped” together at one time and before the glue sets, is beyond what I see happening in my shop.   If the butt joints are acceptable for this speaker, then I see no point to the dado.

jonsk2514

Re: Amateur Build of the X-MTM Encore
« Reply #86 on: 7 Jul 2020, 03:03 pm »
From the photos it looks like you are not getting a square edge on the panels.  Table saw may still need more adjusting.

This I did recheck:


For the tools I have (considering the bump in the table of my table saw), this will have to do. 

In the pictures I posted that seem to show this, I am not sure I had everything fully clamped together and square in the fitup, which may be some of what is being seen as not square.  I will, however, keep an eye on this as I continue into my dry fitup.

hawkeyejw

Re: Amateur Build of the X-MTM Encore
« Reply #87 on: 7 Jul 2020, 03:39 pm »
Would you happen to know of a brand or manufacturer who makes the “good stuff”?  Actual, that question could go out to anyone who might know...

Your MDF is much lighter in color than mine.  Can’t quite see the texture, but I think I understand what you are saying.  For the next time, maybe.  I will see how this all finishes up with what I have, then I will decide it it is worth the effort.

My saw blade, down spiral cutter and 3/4” router bit are cutting my stuff well.  I think I am as good as I can get there.  While my cutters are all carbide, I will keep an eye on any potential dulling of these.  I would guess this stuff can be a bit abrasive.

BTY - The clamps I have seen in various post get to be really innovative.  I like the corner clamp in your picture.

The elbow grease, I’ve got plenty of...   :green:
And taking time is aways a good suggestion.  Hence all of my practicing, and dry fitting.

I am going to do the butt joints for the braces, but with the quarter round as locators.  I know this is unconventional, but I have tried it several times now on practice pieces and it seems to facilitate the build nicely.  I also know the quarter round will take up internal volume, but I will compensate for that (More to come on that).  I also figure the glue I will use will compensate for any clearances I have between the braces and the side panels so I won’t have to custom fit each one.

As was suggested above, I looked into doing the Dado for the braces:
https://youtu.be/UXvLLsG5AKI

And I tried it on some scrap...
The dado is a no-go for me.  The dust is unbelievable and will be really hard for me to capture.  Also, when I saw the the “love tap” the guy had to do in the video to assemble just one joint, I figure that, with 14 tight fitting joints in my project that may need to be “tapped” together at one time and before the glue sets, is beyond what I see happening in my shop.   If the butt joints are acceptable for this speaker, then I see no point to the dado.

I've not seen any brand names associated with MDF. What I have seen, is that each place you go to will have "MDF" and it's not always the same quality. Luckily for me there's a place relatively close to me with good quality stock.

The corner braces I used are called Can-Do Braces and you can get them on Amazon. I like them a lot.

Peter J

  • Full Member
  • Posts: 1876
  • Hmmmm
Re: Amateur Build of the X-MTM Encore
« Reply #88 on: 7 Jul 2020, 04:19 pm »
The two brands of high density MDF I know well are Medex and Ranger Board Platinum. The brands will vary with region of the country you're in. Shipping is expensive for manufacturers.

Here's a methodology you might consider...I think I saw a brad gun in your photos. Variations of the general theme would work too.
Around here I can get a stock molding profile from lumber yards called "chamfer strip". In one cabinet shop I worked in we called is glue blocking. I've also seen them called "cant strips". An example here:
https://craftwoodproducts.com/product/mouldings/solid-wood-mouldings/miscellaneous-wood/0w995-pine-solid-wood-chamfer-strip/


 Essentially:

1. Mark shelf brace location on sides
2. glue and nail a single strip on one side of shelf marks
3. Assemble box in the way that makes most sense
4. Install shelf braces with a little glue  and maybe a brad or two
5. Glue and possibly nail opposite side glue block, pushing into crux of side and shelf brace

Pictures mo' betta than words, methinks


jonsk2514

Re: Amateur Build of the X-MTM Encore
« Reply #89 on: 7 Jul 2020, 06:34 pm »
Thank you 2 for the information on the MDF.  That is a good point about locality and shipping.  I may not be able to get around here what you get around you.  So knowing a manufacturer might not help me.  I will look into the suggested brands.  But, maybe my best bet is to look for a supply place around here that is more high end.

I thought about using beveled pieces, as they would be easy to make myself.  I then figured the quarter round would be readily available around here.   Also, quarter round pieces would not create any bad reflections.  Would that actually be an issue?  Don’t know, but I have watch too many of Danny’s videos to think that would not happen...  :o

I like your suggestion on how to sequence the assembly of the braces.  That would be simple.  I can modify the practice box to try it.  Of course it maybe too small for the brad nailer, but I would expect the actual to be big enough.  :thumb:

AlexH

Re: Amateur Build of the X-MTM Encore
« Reply #90 on: 7 Jul 2020, 07:12 pm »
When I want Medex, I go to my local lumber yard ( not Home Depot or Lowes ) and they order it for me. Make a few calls and see what you can find.

jonsk2514

Re: Amateur Build of the X-MTM Encore
« Reply #91 on: 7 Jul 2020, 08:01 pm »
Again, something I have not thought of doing ...  Thanks

I just figure you get what they have.  I used to have a place called “Friend’s Lumber”.  They did well at having really nice lumber.  Alas, no more.  But the place now is still regional.  Maybe they can do something for me.  I’ll do some searches for the next time.  But this is good information for me and anyone else thinking of doing a speaker kit and is going at it with limited knowledge.

AlexH

Re: Amateur Build of the X-MTM Encore
« Reply #92 on: 7 Jul 2020, 09:05 pm »
Most lumber yards are small, but they all deal with suppliers. When I was in construction I used to order a lot of stuff that was not in stock.

jonsk2514

Re: Amateur Build of the X-MTM Encore
« Reply #93 on: 7 Jul 2020, 11:40 pm »
On a lot of things I have done, it is the journey that is most fun (here, I am expecting great things from the destination, too).  And part of that journey is getting to buy new things.  I don’t think I have gone overboard (yet).  Only buying “necessary” stuff...  Such as my most recent order for:

This I know I will need as I know there is no such thing as “too much glue”  :duh:


It is a Whiteside 1/4” down spiral flush trim bit.  I saw this used by someone else around here...  and I have had good luck with the down spiral cutters for some things.  I also have a more conventional straight carbide trim bit.  I can try both and see which works best for me.

I am pretty impressed with my cordless router and I bought a plunge base for it.  It seems that this is a must for some of the routing that I will need to do...


I have come a long ways since the days of cutting everything for a set of speakers using nothing but a saber saw...  :green:  Veneer covers a lot of ills... 

And this, I have no planned use for it, but it seemed like a good idea when I was clicking on things to put into my cart...  :roll:


Oh, there are also a bunch of squeeze bottles coming for glue...

Getting ready, set...at some point there will be a go...    :lol:

Then I need to place an order with Danny for components and what not.  I am sure he is waiting...  But that will be after I am sure of the cabinets.

jonsk2514

Re: Amateur Build of the X-MTM Encore
« Reply #94 on: 10 Jul 2020, 12:47 am »
I thought I would post one last picture of the MDF I bought.  Maybe this will help to steer someone away from this, or if they do get some of it, they can see what they are getting into.  This piece was first cut to size on the table saw, then it was routed to put in the recess and the recess was then trimmed to size on the table saw.  I did that last step because I am not that good with the router table and running a piece through it.  The edge came out slightly wavy, but it cut just fine.  So the trim cut was to remove the waviness.  The “burn” was from the table saw...  I think that just is what it is at this point.  I think the worst part is the surface cut by the top of the router bit and the fuzziness that it left behind.  But that is all in the glue joint and will disappear.


jonsk2514

Re: Amateur Build of the X-MTM Encore
« Reply #95 on: 10 Jul 2020, 02:16 am »
I tried to think of a good lead-in for this post...
Mo’ glue.  Mo’ better
Wingin’ it is a plan; not
There are not enough clamps in the world

Think you see where this is going?  Glueing is a Fricken Fracken misery!

I got greedy and tried to do it all in one sitting.  What was it that someone said?  Patients; take your time.  And what was my response?  Sure, that is what I do and why I practice.

Well, even with practice one needs patients (take notes Jon, good notes  :o)

I tried glueing up the practice box I built.  I had removed the quarter rounds from one set of pockets I had made to see how well Peter’s idea would work.  And then set to work glueing this thing together.

I’ll start with the success parts...
- Peter’s idea was fantastic and worked really well.
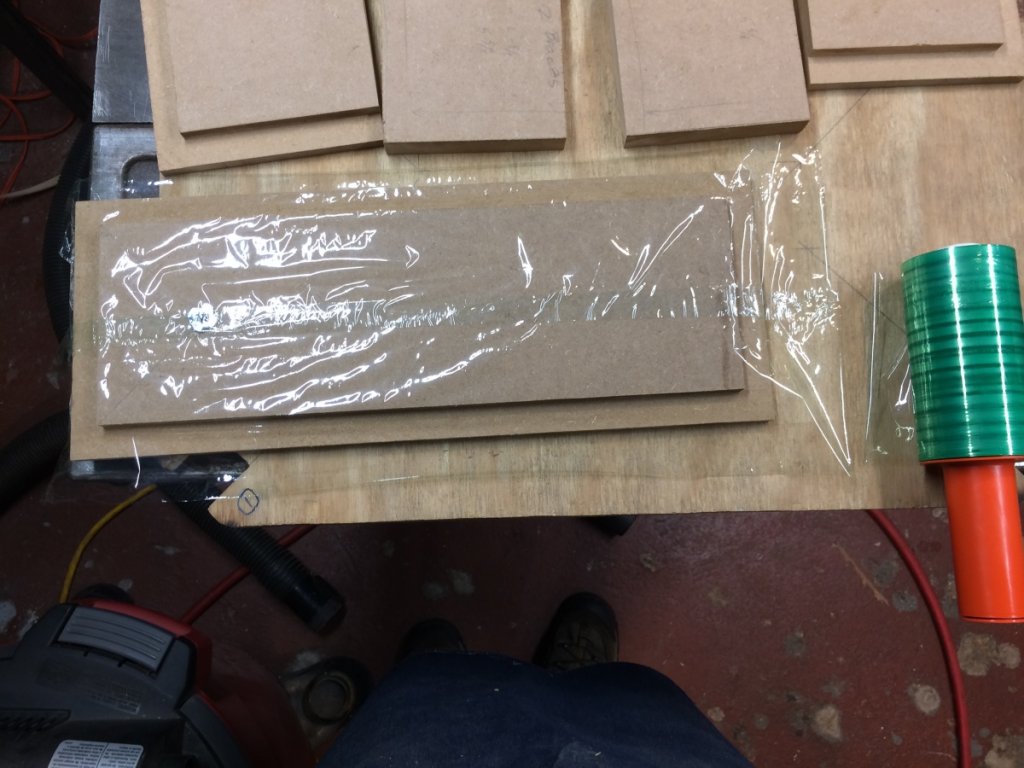
- I covered the inside face of the front panel with that stretchy, Saran Wrap like stuff that is used to bundle things together.  This was to keep from gluing the front to the rest of the assembly as that needed to be last.  It worked.
- I installed a Tee nut in the front panel where the pretend center for one of the speaker drivers would be,  This was to give myself a way to remove the front panel after the glue set up.  It worked
- The Titebond glue brushes worked well...
- The Quick and Thick glue is useful in the right areas.

What I learned:
Planning.  Lay out the clamps so they are ready for use.  Come up with a sequence to assemble the pieces.  Plan small steps that can be done one at a time and the glue allowed to set.  Peter’s idea will work nicely into this.

I need the corner clamps that were noted prior.  These will help greatly with the “small step” part.

Make sure new clamps work they way they should before needing to use them and finding out they don’t...  :oops:

Need a good glue brush holders... so they don’t fall over and get glue in/on places you don’t want it.

My basic plan is to:
- put on the one of the quarter round side of the brace locaters as Peter suggested.
- Assemble over the front panel (but not glued to) the top, bottom and 2 sides, glue the 4 corners and let it set up.  These will need to be clamped quite well; something I need to figure out.  This is where the corner clamps will be used.
- One at a time glue in the braces, lightly clamp and let setup.  I think the second corner piece is a good idea and I found that it glues into place easily.
- Check the fit of the bottom piece, adjust as needed, then glue and clump. 
- All of this will be done with front in place but not glued.

As for the good, bad and ugly...

 A couple of good things...

I installed a Tee nut in the inside of the front panel so I could pull it out after all else is glued.
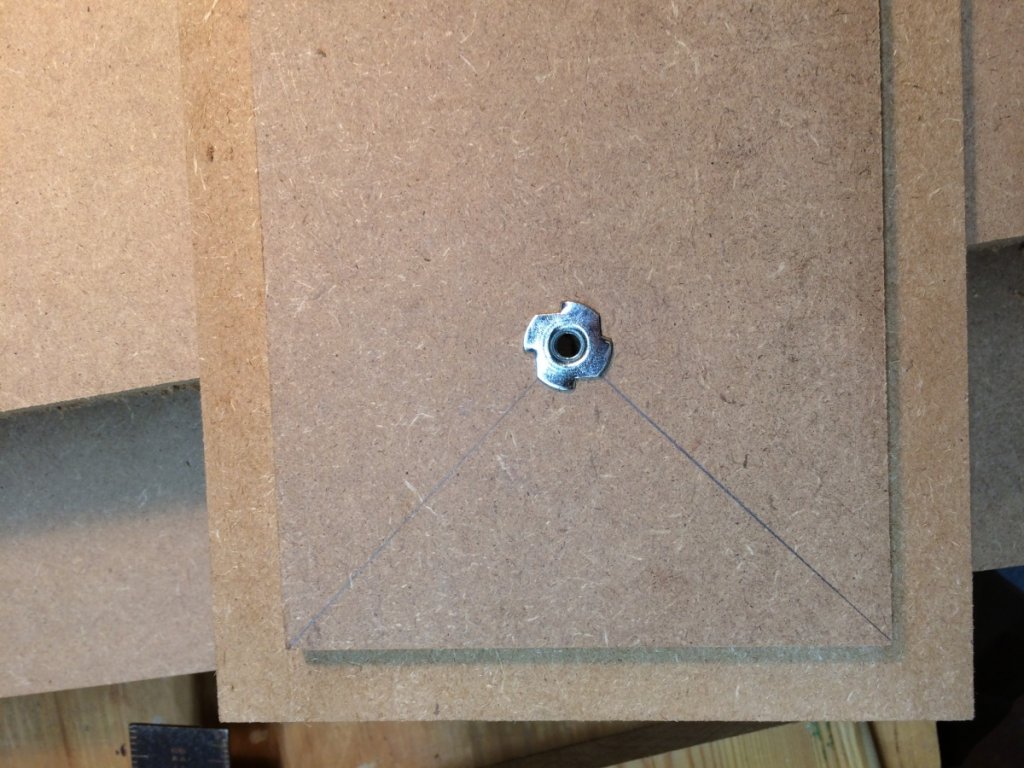


I used the front panel as a jig for the assembly of the sides.  I knew gluing had the potential to be messy so I covered it with bundling film.  I didn’t wrap it (I tried that) as it didn’t allow the sides/top/bottom pieces to fit into the recess.  The nice things about this stuff are that it is stretchy but strong, and it clings to itself so it makes a complete cover.


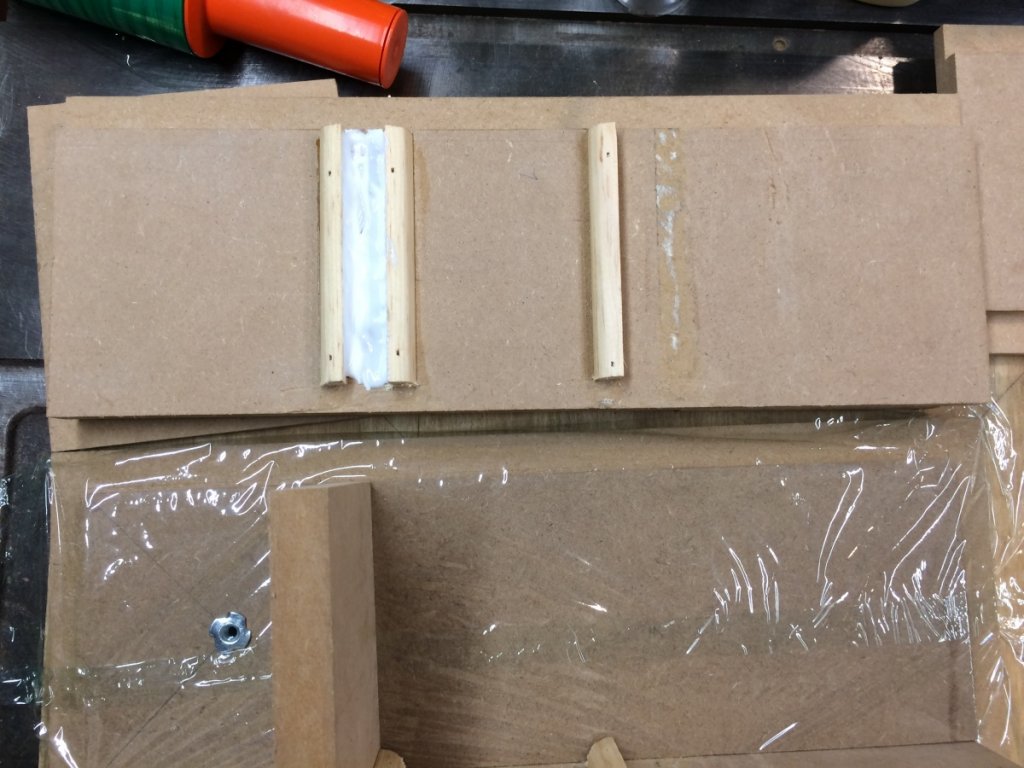
I removed one side of one of the pockets I had made in the side panels so I could try out Peter’s idea.  I left the other pocket in place so I could see how the 2 ideas compared.  The complete pocket idea turned out to be not a good one, nor would be a dado. This also show the glue I put into the pocket.  The “white” glue is the “Quick and Thick”.


Here is the brace in place in the pockets of the 2 sides.  The end cap there is just a place holder to keep things square.
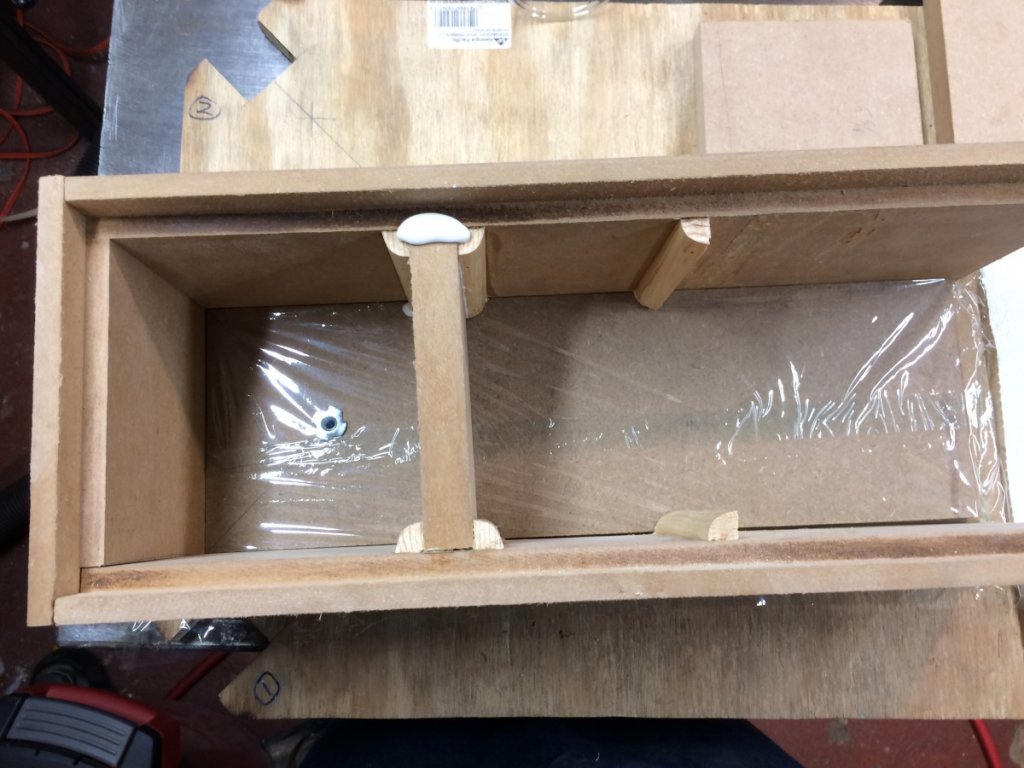


Here is the “Peter” brace.  Again I used the Thick glue which I spread on the side rail and the panel side.  it would have been a good idea to have fully marked where the brace was to go so I would know how far to spread the glue.  After pressing the brace in place I put a bead of glue (too much) in the corner for the second piece of quarter round.  The glue is thick enough to hold everything in place.
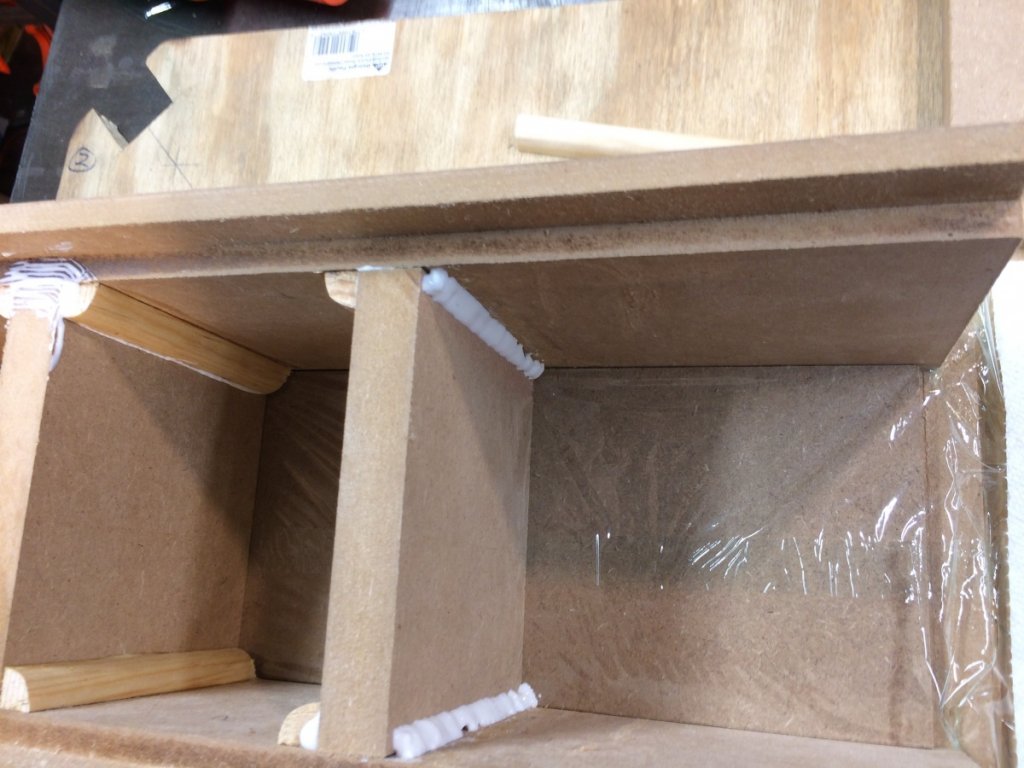


And this is where I realized that I had the sequence wrong and got flustered.  I didn’t have any way to keep this all square, without installing the top and bottom pieces.  And it went downhill from there.
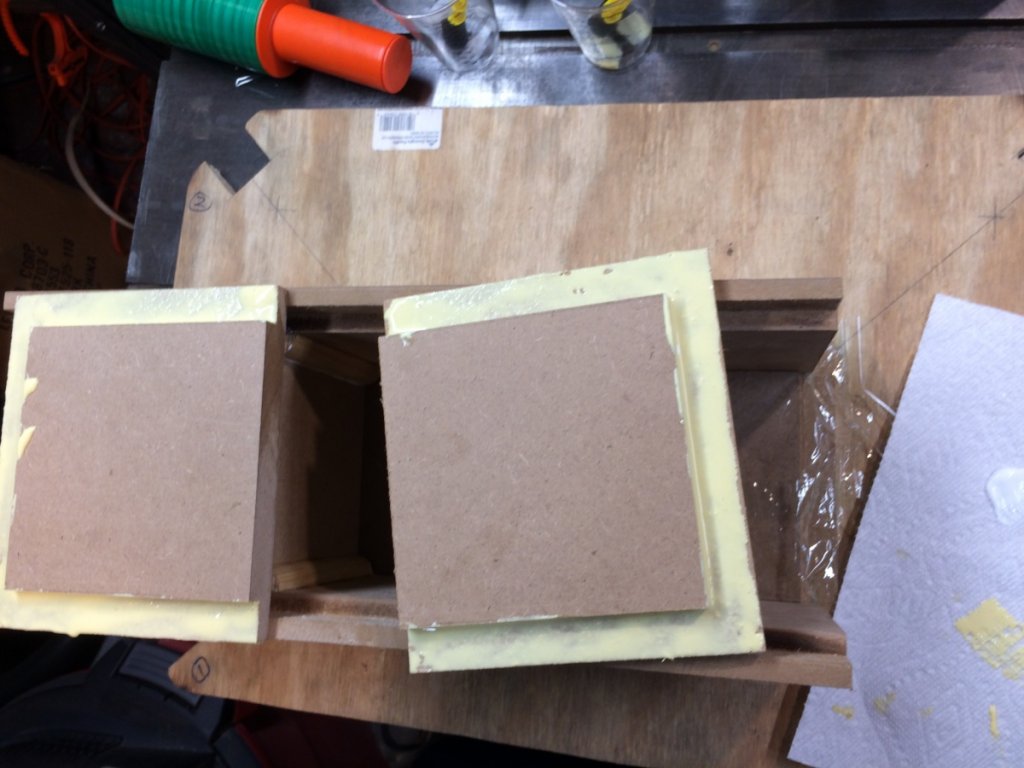


The problem at this point was that I put glue on the recess part of the top and bottom panel where the back panel would be going, but that wasn’t needed at this point and I was afraid that it would be beyond its set time before I got to the point of putting the bottom on.  So I wiped it off.  Another mess... 

Then there was clamping this whole mess...
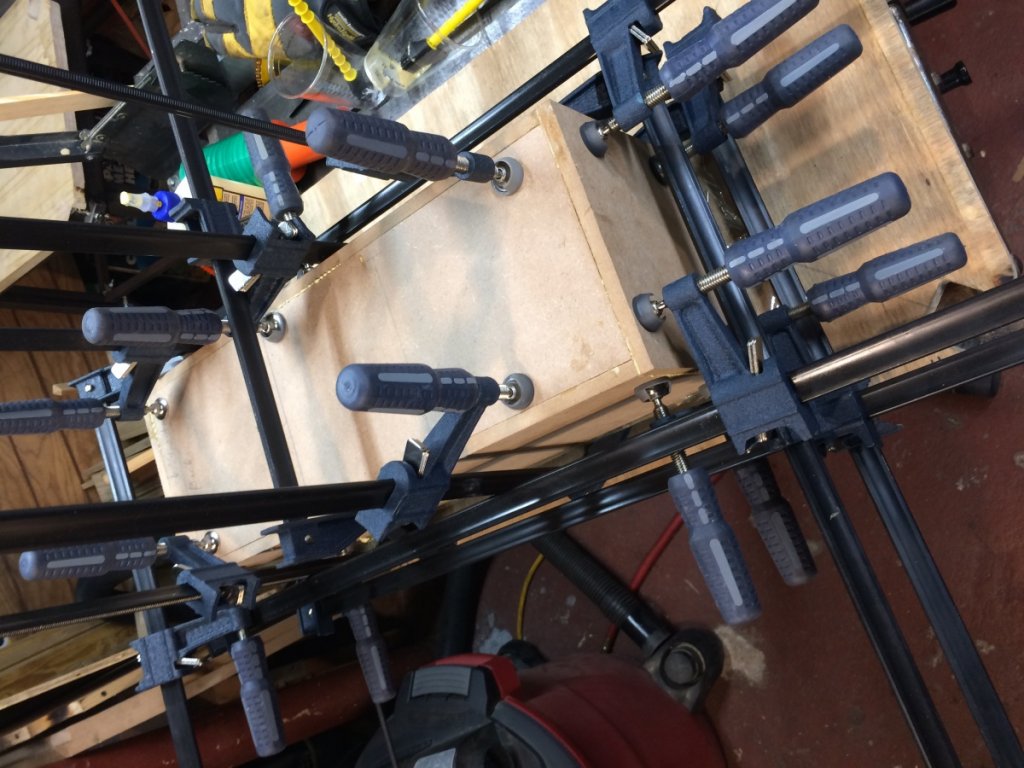


And a mess it was.  I had clamp failures.  I had too much glue.  I had glue setting up.  I couldn’t get things clamped evenly.  The MDF is too flexible for this sort of thing...   :banghead:

After a day setup, I did get the front panel off with no problems... and this was what I was faced with....
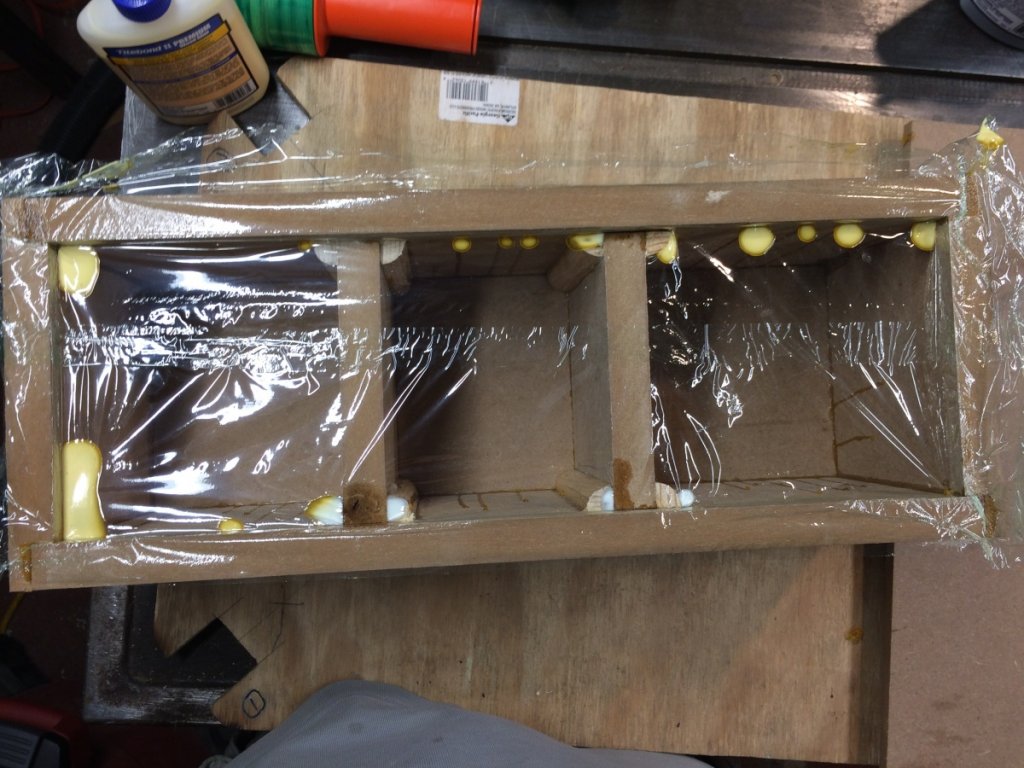


No drips, no runs, no errrors...
Yah, right! Time to rethink things.
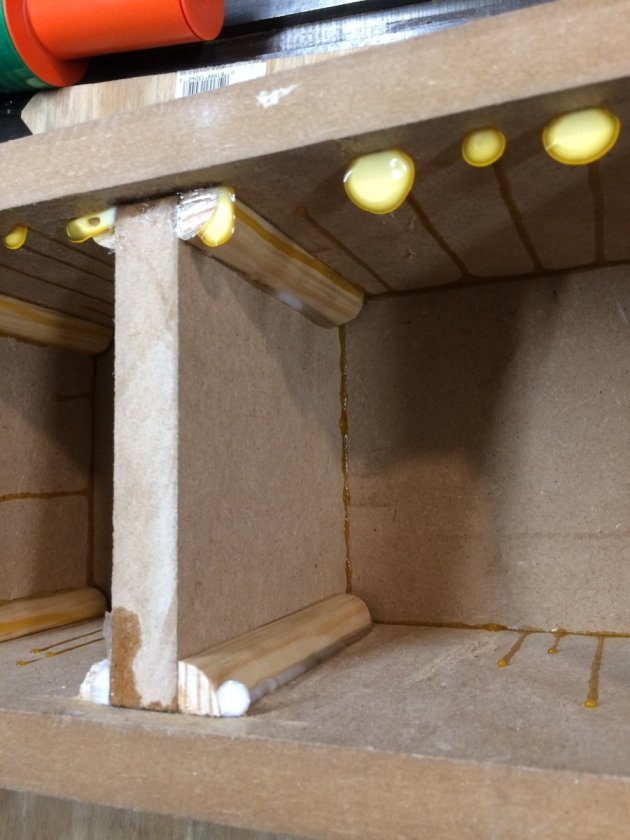


The brace in the forefront was done based on Peter’s suggestion and as you can see it is nicely located and held in place.  This was a good use of the Quick and Thick glue.

For the rest of it, because I plan to break this down into smaller steps, I plan to use the Titebond II.  It is a bit thicker than the III and I think will be easier for me to deal with.  As for working time, my planned steps should be quick, so I expect to have plenty of time.

And I know some of you got a good chuckle from all of this.  I was just glad I was able to get the front panel out after all that glue setup...   :lol: :green: A win for me...   :roll:

AlexH

Re: Amateur Build of the X-MTM Encore
« Reply #96 on: 10 Jul 2020, 11:08 am »
Woodworking is a learning process. The more you do the more you learn what not to do and what to do. Looks like  things are coming together.

jonsk2514

Re: Amateur Build of the X-MTM Encore
« Reply #97 on: 10 Jul 2020, 02:13 pm »
True, so true.

I am just glad I did this on a practice piece.  The thought went through my my mind to skip that step.  That would not have been good if I had just gone to glueing the final piece and had this mess.

I started looking for corner clamps and found the one that was posted above (Can-Do brace), but there are no dimensions for it.  It came to mind that there is little room in the width of this cabinet for an “internal” clamp like this.  I may look harder at ones that clamp from the outside.  Need to look a bit more at what will fit with all 4 corners being clamped at once.


hawkeyejw

Re: Amateur Build of the X-MTM Encore
« Reply #98 on: 10 Jul 2020, 02:55 pm »
True, so true.

I am just glad I did this on a practice piece.  The thought went through my my mind to skip that step.  That would not have been good if I had just gone to glueing the final piece and had this mess.

I started looking for corner clamps and found the one that was posted above (Can-Do brace), but there are no dimensions for it.  It came to mind that there is little room in the width of this cabinet for an “internal” clamp like this.  I may look harder at ones that clamp from the outside.  Need to look a bit more at what will fit with all 4 corners being clamped at once.

The way I got around that was to glue one piece into place at a time for the most part. It takes longer but you can get the box and the additional piece fitted and clamped, then once the glue sets up you add the next piece and clamp that one, and so forth. Trying to glue, fit, and clamp everything together all in one shot is going to be pretty tough.

Peter J

  • Full Member
  • Posts: 1876
  • Hmmmm
Re: Amateur Build of the X-MTM Encore
« Reply #99 on: 10 Jul 2020, 04:23 pm »
The "too much glue" syndrome is a pet peeve for me. It's the default way "more is better"!

FWIW I look at it like this, glue outside of the joint adds nothing except mess and sometimes work later to remove. Let's say one had 50% glue coverage on any given joint in MDF. At that, the joint strength likely exceeds the wood itself so what has been gained?

FWIW I guess I look at Titebond II as sort of a red headed stepchild. Shorter open time, higher application temp etc. It's only virtue is that it's light in color compared to III.  Between I and III, I can achieve almost everything needed, at least in the work I do.

As Alex alluded to, a lot of woodworking is an ongoing learning process. Perhaps Alanis Morissette said it best, " you live, you learn"...