Hobbs X-LS build

0 Members and 1 Guest are viewing this topic. Read 8935 times.

Hobbsmeerkat

  • Industry Participant
  • Posts: 2542
Re: Hobbs X-LS build
« Reply #60 on: 3 Sep 2020, 12:25 am »
Got my upgrade kit from Danny Yesterday, so I spent the afternoon upgrading my Rythmik L12 subwoofer.
A set of solid copper wire & a sheet of NoRez!
(I'll be getting to the tube connectors for my XLS this weekend after i get myself a crimping tool.)

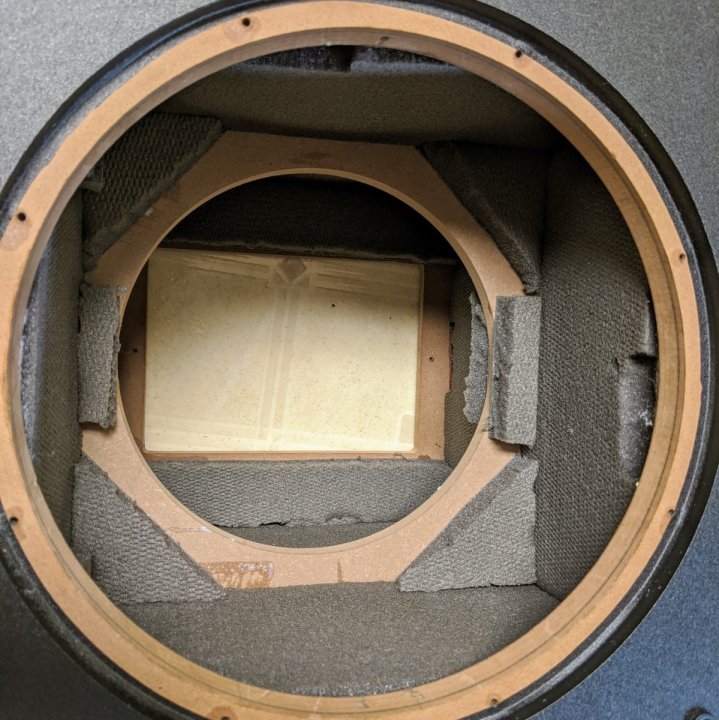
Here's how the stock L12 looks inside:


Poly-fill sheets glued to the outer walls, & a single brace in the middle.
First step was to scrape off the poly-fill and any remnants/glue I can scrape off. Then cut the No-Rez sheets to fill every flat surface as best I can. It knocked down a large chunk of the cabinet resonance. I'm sure Danny's 3-brace design does an even better job than No-Rez alone, but this is pre assembled.


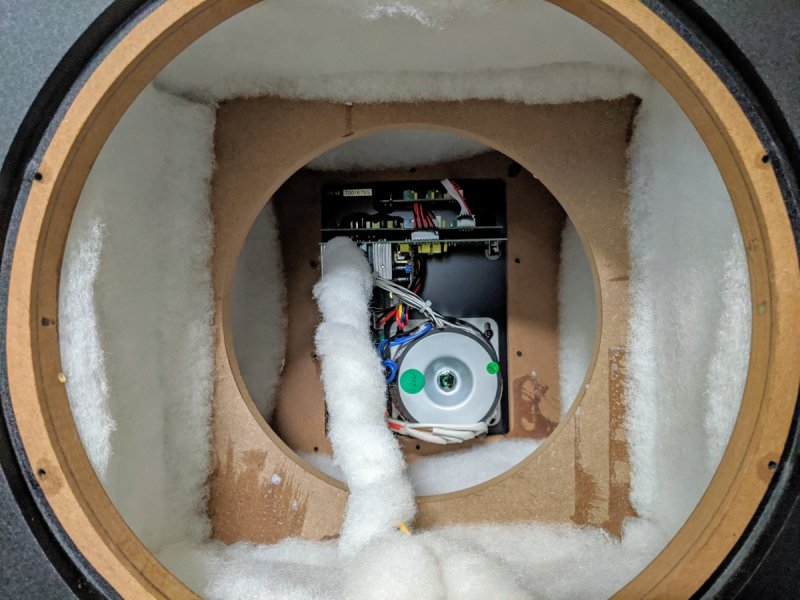
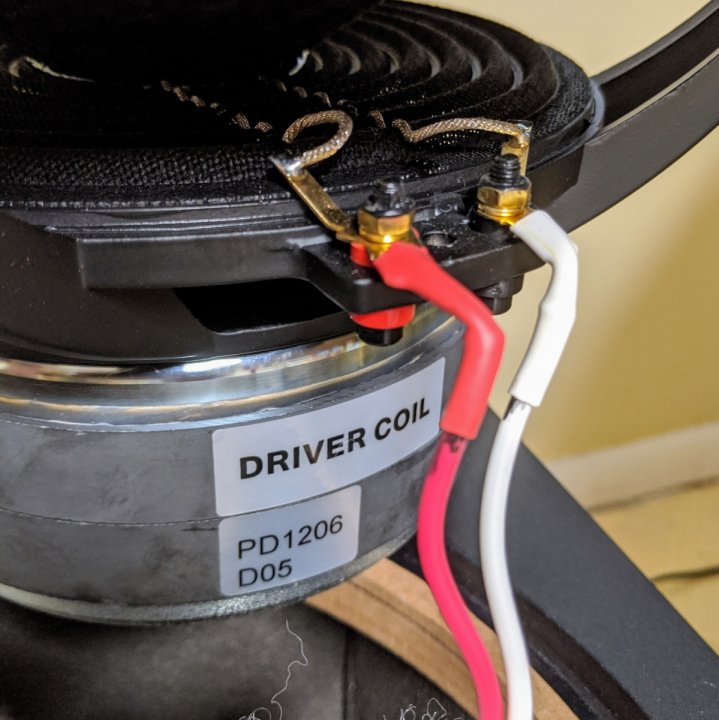
Next step was to disassemble the plate amp to get to the solder mounts for the driver and servo wires.
The hard part was removing enough solder & glue to pull out the stock wires so i could retin the thru-holes.


I made an error here 
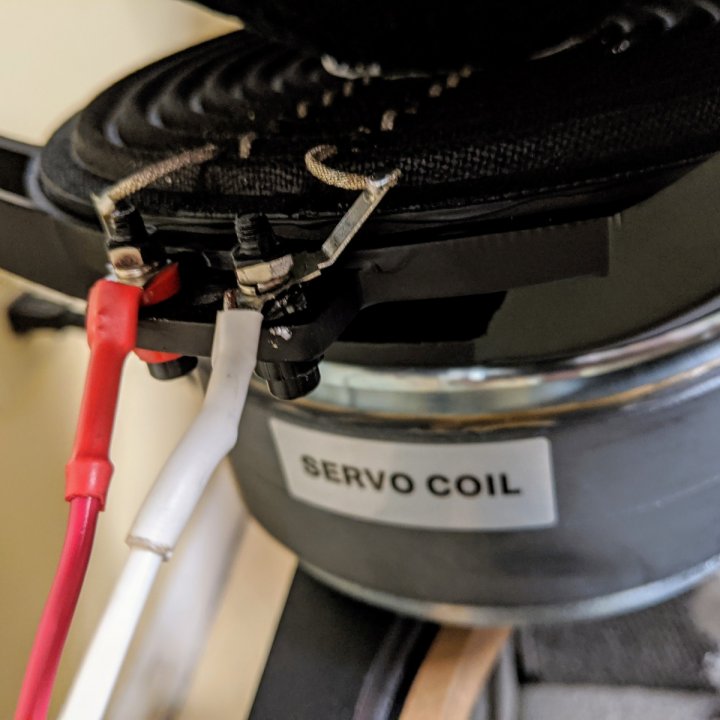
I wasn't paying close enough attention, and wired the servo holes backwards. It should be W-R-R-W but I did it as W-R-W-R. (I basically wired the servos backwards) not major, but it was an easy fix to just swap the wires on the terminal side once I realized my error.

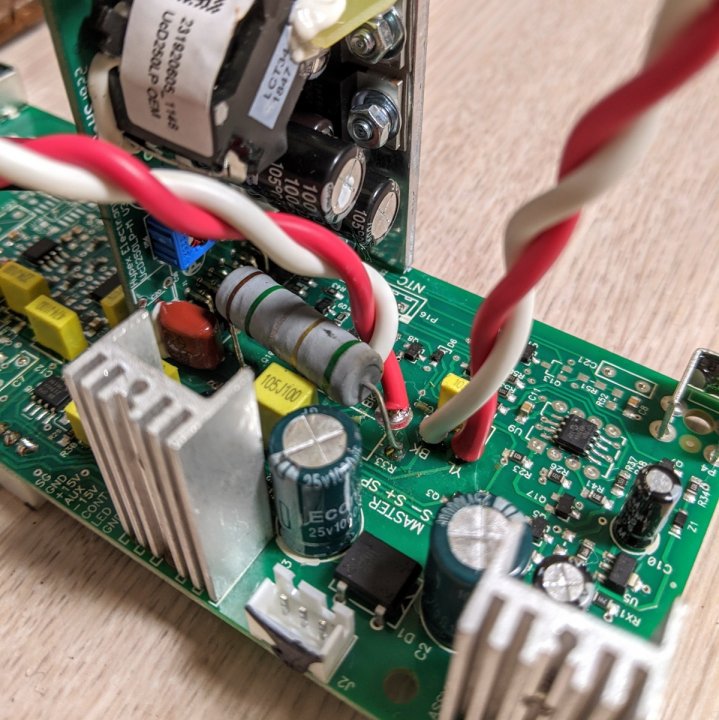
Once that was done, I replaced the thermal paste that attaches the chip-amp heatsinks to the plate side of the amp. I have lots on hand thanks to my time building gaming PCs in the past.
Then I twisted each pairs of wires together, then twisted the twitsted pairs together & wrapped the wires back up with the small strips of polyfill & some zip ties. Next was to solder the wires to the leads & cover them in heat shrink. I marked the driver cables with permanent marker to know which is which.


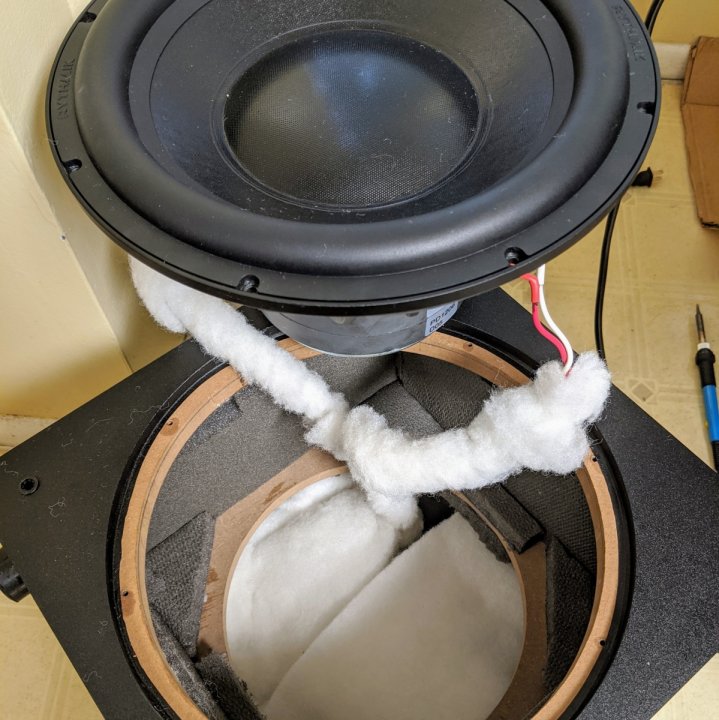
Last order of business was to stuff the polyfill back into the sub, which I put over the plate amp, then seal it all back up! (Then find out i wired the servo backwards, forcing it into a nonstop loop until i re-wired it.. lol)

I haven't had a chance to play it with music yet, but it's definitely heavier and sounds a lot less hollow now. Should help reduce sounds radiating off the sides. And it was only $70 at most? Plus i have a little extra wire to use for my Tube Connector upgrade this weekend!  :thumb:

Enjoy!
« Last Edit: 9 Sep 2020, 08:38 pm by Hobbsmeerkat »

Tyson

  • Full Member
  • Posts: 11103
  • Audio - It's all a big fake.
Re: Hobbs X-LS build
« Reply #61 on: 3 Sep 2020, 01:31 am »
Yeah that's gonna be a lot cleaner sounding now.

dolsey01

Re: Hobbs X-LS build
« Reply #62 on: 3 Sep 2020, 01:56 pm »
Nice to see Rythmik's entry-level L12 is built better than most manufacturers' TOTL subs!  I know where I'm shopping next time I need one.  :thumb:

Hobbsmeerkat

  • Industry Participant
  • Posts: 2542
Re: Hobbs X-LS build
« Reply #63 on: 3 Sep 2020, 03:03 pm »
Nice to see Rythmik's entry-level L12 is built better than most manufacturers' TOTL subs!  I know where I'm shopping next time I need one.  :thumb:

I absolutely recommend the L12, for the money. They sound incredible, with plenty of texture & detail on the low end, esp for the $560 entry price. I also wouldn't be against adding some simple bracing but im happy with the job the No-Rez alone provided.

I played an electronic "subwoofer test" song the other night, while it was still in it's stock form. Being able to tell it was just a simple sine-wave without any sort of tone, grit, or intentional distortion added, is a wild thing, and makes it seem pretty lame. Esp when bass guitars and pianos have specific tones & texture to their sound depending on the strings, pickups & wood used in their construction.
Even a lot of Synth-heavy 80s rock was more tonally interesting. :lol:

Hobbsmeerkat

  • Industry Participant
  • Posts: 2542
Re: Hobbs X-LS build
« Reply #64 on: 6 Sep 2020, 11:55 pm »
Was going to work on upgrading my XLS to Tube connectors today, but I only just realized I only have 5/16" and 1/2" drill bits. So ill need to buy a 7/16" drill bit to move forward. Not a big setback, but I wish I had realized it sooner tho.. :P

Hopefully tomorrow after work i can go pick one up.

Hobbsmeerkat

  • Industry Participant
  • Posts: 2542
Re: Hobbs X-LS build
« Reply #65 on: 9 Sep 2020, 03:49 pm »
Yay! Its tube connector upgrade time!

Poked & drilled some holes out, then removed the Woofer and binding post cup.

Added an extra 6" of wire to each lead & twitsted/soldered them together.


I then slid the tube connector over the twisted leads, & crimped/soldered the leads before sliding the heat shrink over and using a sealant to glue them in place.


Onto the 2nd speakers!  :thumb:
(Its not gunna be as pretty since i misaligned the holes :P )

Hobbsmeerkat

  • Industry Participant
  • Posts: 2542
Re: Hobbs X-LS build
« Reply #66 on: 9 Sep 2020, 06:31 pm »
2nd speaker is done, & I only have 2 words:

HOLY SH*T  :o

Theres a massive jump in clarity, detail, & depth.
It sounds that much more "REAL" & "ALIVE" than i expected. And ive gone back and forth a few times.

Vocals have more presence & focus, you can more easily pick out smaller details, spacial cues, & you can hear everything with more precision. Drums sound more life-like and snares especially stand front & center.

I expected a small difference, but it's MUCH bigger jump than I expected.. its like I mentioned in the "tube connector" thread; it's like getting a new pair of glasses after going years without getting a new prescription. The "softness" you're used to gives way to that much more clarity and focus.

I've gone back and forth several times now, & yep it's definitely there.. but the upgrade itself even made a difference to the binding posts, I'm guessing its due to having a more surface area to connect to vs bare wire??

Mind you, I still only have the stock crossover, cheap 14-gauge zip cord... They're 6" away from the wall & I'm playing CD-quality music via bluetooth...

If you're still on the fence on upgrading, GET THEM.. i 100% recommend making the jump!  :thumb:

Hobbsmeerkat

  • Industry Participant
  • Posts: 2542
Re: Hobbs X-LS build
« Reply #67 on: 9 Sep 2020, 08:24 pm »
I just realized I never shared a picture of my setup..
Guess I better do that now. :P


Sub is hiding below the desk.

Hobbsmeerkat

  • Industry Participant
  • Posts: 2542
Re: Hobbs X-LS build
« Reply #68 on: 27 Sep 2020, 08:18 pm »
Small update,

With my recent purchase of the GRS Neo3 clone I also picked up some low-mass solder-type banana plugs to replace my stock 5-way banana plugs that came with my Sprout 100. Not the highest quality obviously, but at least they wont come loose every time i need to unplug them. :P

I also soldered the spring section to the connector as some of the reviews suggested. And picked up some heat shrink so i could property mark each end with the correct color. And I now have enough to last me thru a few different builds.

I cant say it made much of a difference compared to the change of the tube connectors, but I'll take their simplicity & reliability any day. :thumb:


Danny Richie

Re: Hobbs X-LS build
« Reply #69 on: 27 Sep 2020, 11:11 pm »
Going to the mail tube connector ends should step things up for you a little bit over those.

Hobbsmeerkat

  • Industry Participant
  • Posts: 2542
Re: Hobbs X-LS build
« Reply #70 on: 27 Sep 2020, 11:32 pm »
Going to the mail tube connector ends should step things up for you a little bit over those.

For sure, and that's my plan when i order a pair of the new cables from ya for my NX-Studios.  :thumb:

RonP

  • Full Member
  • Posts: 407
Re: Hobbs X-LS build
« Reply #71 on: 1 Oct 2020, 05:19 pm »
Hobbs you are doing sound editing (semi-) professionally ? or just an enthusiasts system?

sorry if this was already answered.

Hobbsmeerkat

  • Industry Participant
  • Posts: 2542
Re: Hobbs X-LS build
« Reply #72 on: 1 Oct 2020, 05:30 pm »
Hobbs you are doing sound editing (semi-) professionally ? or just an enthusiasts system?

sorry if this was already answered.

Just an enthusiast system, I want a killer desk setup I can continue to grow into.  :thumb:

RonP

  • Full Member
  • Posts: 407
Re: Hobbs X-LS build
« Reply #73 on: 1 Oct 2020, 05:39 pm »
Keep us posted, man!  :thumb:

I'm just using headphones to edit out clicks/pops of my vinyl rips.

vkaul

  • Jr. Member
  • Posts: 4
Re: Hobbs X-LS build
« Reply #74 on: 5 Oct 2020, 09:08 pm »
I am getting close to the finish line with building my first XLS.

Was almost done by managed to butcher the Electra Cable Tube Connectors.

Danny's instructions were excellent and helpful in getting the crossover built and wired.    I tried to follow the details for how to crimp the tube connectors...but was unsuccessful.    Attached are pictures of what I have. 

The red one just didn't catch the copper wire.   so ended up the cutting them both off.   

With all the solder in them not sure what I can recover.   And given the Electra Cable Tube connector price - not sure I can afford to get a new pair.

Any suggestions on what I can do here.  Do i try get all the solder out?    Any tips?   Do I go with a banana connector.   

Frustrating...came so close.   Everything else is working just these connectors.


Peter J

  • Full Member
  • Posts: 1876
  • Hmmmm
Re: Hobbs X-LS build
« Reply #75 on: 5 Oct 2020, 10:33 pm »
Those should be salvageable.  I think easiest would be compressed air if you have available or a solder sucker. You'll probably need three hands! Heat with soldering iron just to the point of melting solder and immediately  blow air in from opposite side. Aim it somewhere other than you or the dog.

Once you've got most of the solder out, you can gently use something long and tapered, like an ice pick, to reform the barrel enough to get another go at it. If it's any comfort, I've done the same thing. Get the crimp good before solder and you should be golden...pardon the pun!


Hobbsmeerkat

  • Industry Participant
  • Posts: 2542
Re: Hobbs X-LS build
« Reply #76 on: 5 Oct 2020, 10:47 pm »
I was lucky to avoid that issue by having both binding posts & tube connectors as usable options. The leads from the binding posts got twisted together with the wire heading to the crossover, so the crimping went pretty easy for me.
But it's good info to know since my NX-Studios will have tube connectors only. So I may give a little extra lead for the wire to be folded over & twisted together within the tube connector.

But maybe that will be something you can also do to prevent the issue happening again when you re-crimp the connecting wire?

Danny Richie

Re: Hobbs X-LS build
« Reply #77 on: 6 Oct 2020, 12:52 am »
I just installed some more of these today too. They install really fast, but I have done a lot of them before.

Still, just follow the directions here: https://www.audiocircle.com/index.php?topic=94014.0

And make sure you crimp them well.

vkaul

  • Jr. Member
  • Posts: 4
Re: Hobbs X-LS build
« Reply #78 on: 6 Oct 2020, 06:48 pm »
Everybody, thanks for the tips.   I will make another go at it.   Attached is the tool I plan to use.   Its the same one I used previously.   I have marked the notch I plan to use.  Am I safe using the same notch (14 - 16) or should i use something else.


Danny,
I am a complete novice.  My son and I did watch your video several times but still managed to mess things up.   I know you mention the slit, notch etc verbally on the video.   You also tried to show things on the video.   But given focus it  wasn't fully clear.   

As a suggestion some focused closeups or a taking a video of a printed sheet or a sheet with a diagram of things might help.   For example we were confused about directionally how to position the plug on the tool which way to face things.  And confused about do we crimp the middle or do we crimp at the very end.

By the way we did manage to complete one speaker and are absolutely LOVING the sound.

Speaker Challenged

  • Jr. Member
  • Posts: 161
Re: Hobbs X-LS build
« Reply #79 on: 7 Oct 2020, 11:43 pm »
As they are thin walled by design maybe try 12-10 as the connectors look crunched to an inch of their lives. The solder should do the rest. You could always tweak them with a smaller setting if it doesn't look like holding :o

When crimping I also try to keep the wire centred as I figure the crimp needs to happen on top of the wire and encase around the wire with the connector.

I don't have a set but after Hobbs review I might save up my spare pennies for them.  :lol: Freight to Australia is a killer at the moment.

What does the team think?
SC