Subsonic's Triple Servo Subs Build

0 Members and 1 Guest are viewing this topic. Read 4329 times.

subsonic1050

Subsonic's Triple Servo Subs Build
« on: 4 Jun 2021, 05:13 am »
Hey everyone, I figured it was about time to make a post on my triple servo subs build. As I've mentioned in previous posts I'm building 2 sets of these.


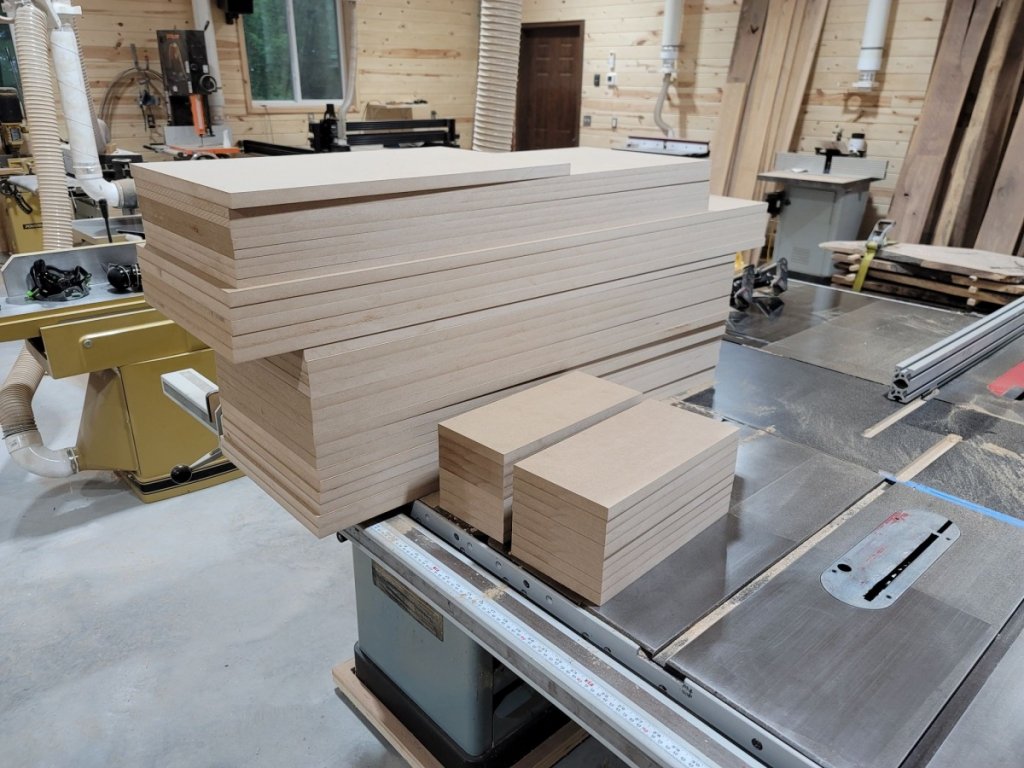
All of the 3/4" and 1/2" MDF cut to rough size to be laminated for constructing the cabinets.


Some of the panels in glue up. (I made a post about laminating sheet goods if you're curious about that)


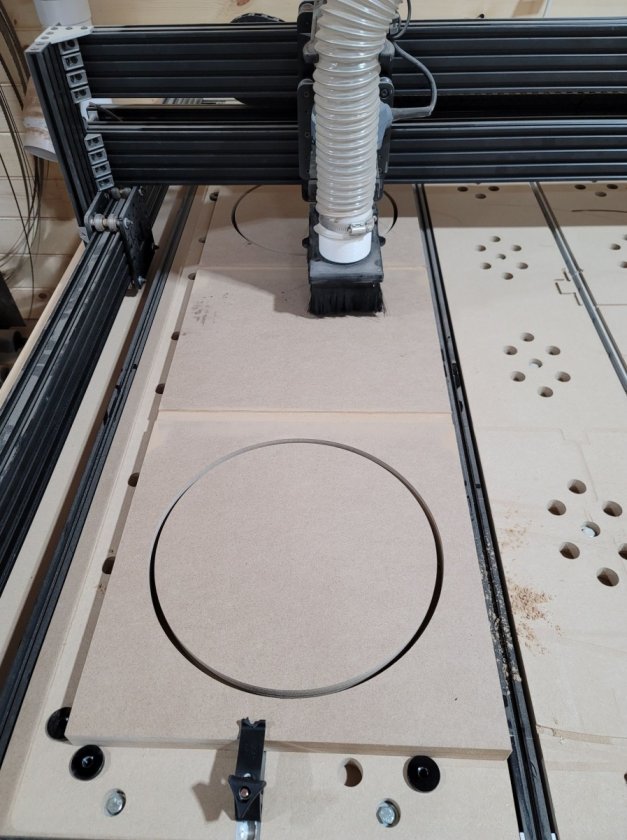
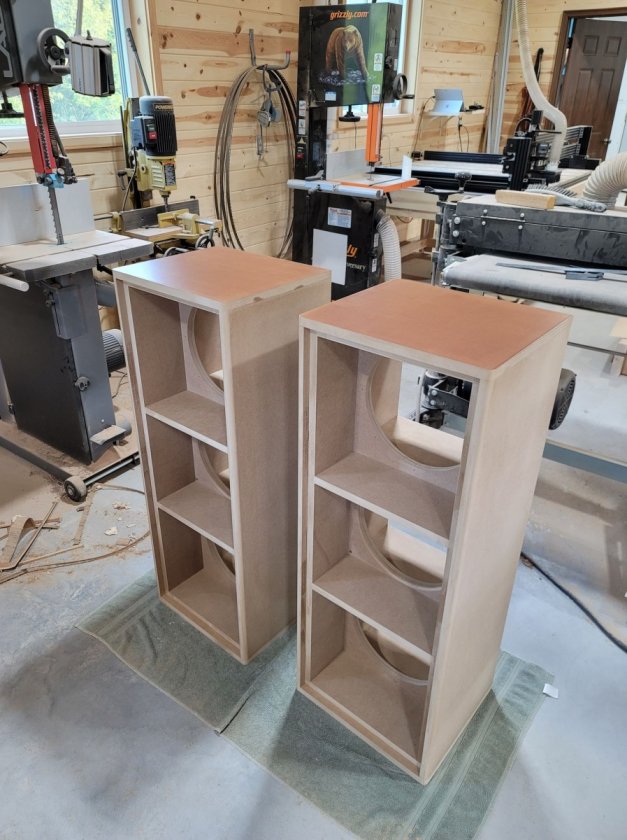
One of the baffles being cut on the CNC. My CNC is an openbuilds Lead 1515 and has an area approximately 4'x4' - not nearly as big or heavy duty as Jay's, but it gets the job done!


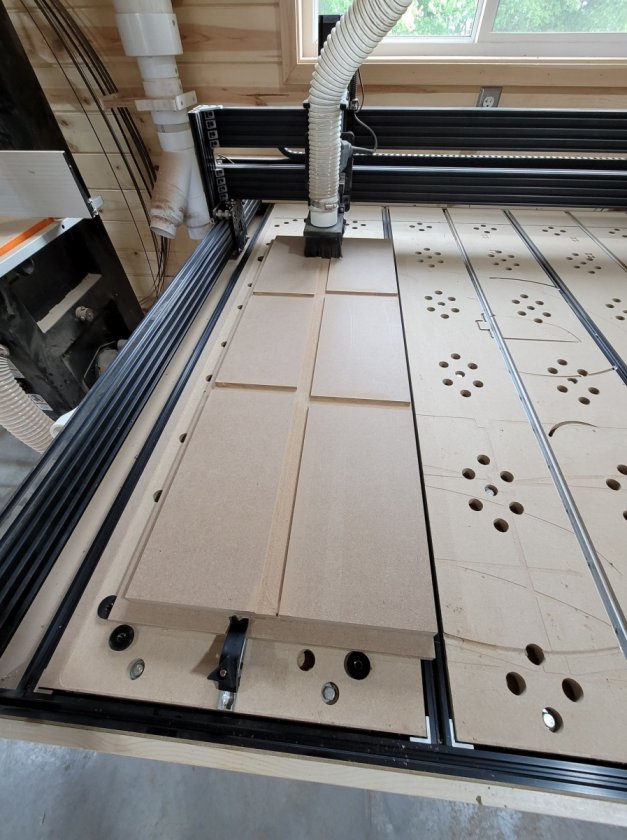
One of the side panels on the CNC. I played around with the dimensions for the dado's to get a perfect fit. All rabbets were done on the tablesaw because it's faster than my CNC.


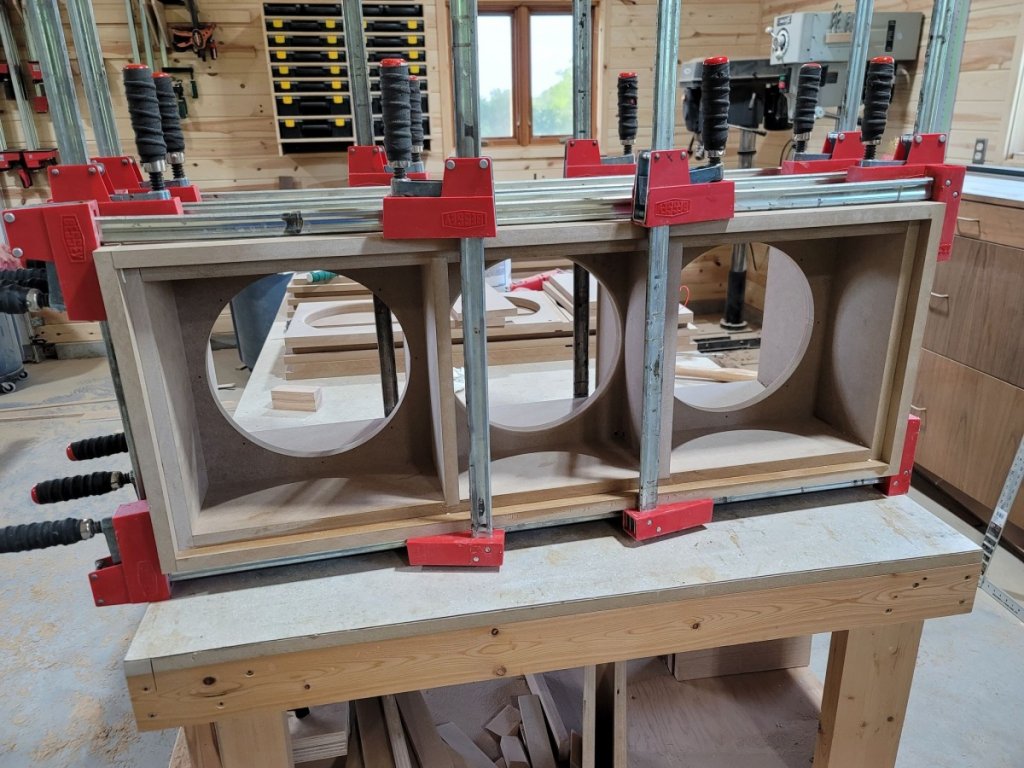
First one in the clamps.


I thought it would be smarter to paint the insides first, then sand up any overspray and then apply the veneer. I think this is the wrong order. Latex paint is sticky, and sawdust in my shop sticks to it like crazy. I'll have to respray the first 2. The 2nd pair of cabinets I veneered first - then I'll carefully mask everything off and shoot the paint.


Part of the veneering process. I'm using Heatlock glue. You apply the glue to the cabinet and the laminate - let dry, and then iron on. Make sure the glue is COMPLETELY dry. On one of my pieces the glue was about 99% dry and I was tired of waiting. The stuff acted exactly like contact cement. I couldn't reposition or remove it. I ended up peeling the entire piece off, ripping away a very fine layer of MDF in the process. The next day I spent about 3 hours carefully using a heat gun and scraper on the back of the veneer to remove the glue and sanded the cabinet again before trying again. Don't make my mistake!


First cabinet veneered. 3 more to go, along with careful trimming and sanding. As you can see I cut the top (and bottom) with the little strip that covers the top front edge and bottom front edge out of one piece of veneer so that the grain is matched and is continuous. I also veneered the tops and bottoms first, then the sides and front. That way the little bit of glue line and "edge" of the veneer is not visible from the front.


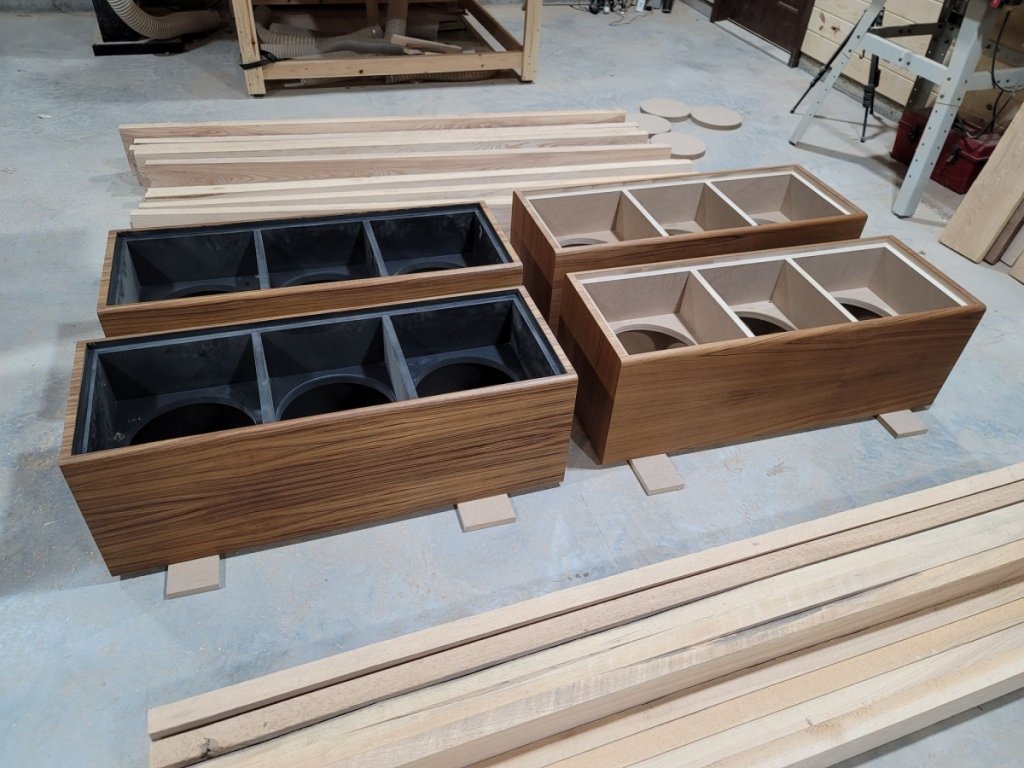
All of the cabinets veneered and the first coat of finish on. I'm using Rubio Monocoat - which is a finish I love on my furniture. Technically it only needs one coat (hence the name), but I find it gives a bit nicer finish if you apply a 2nd light coat.

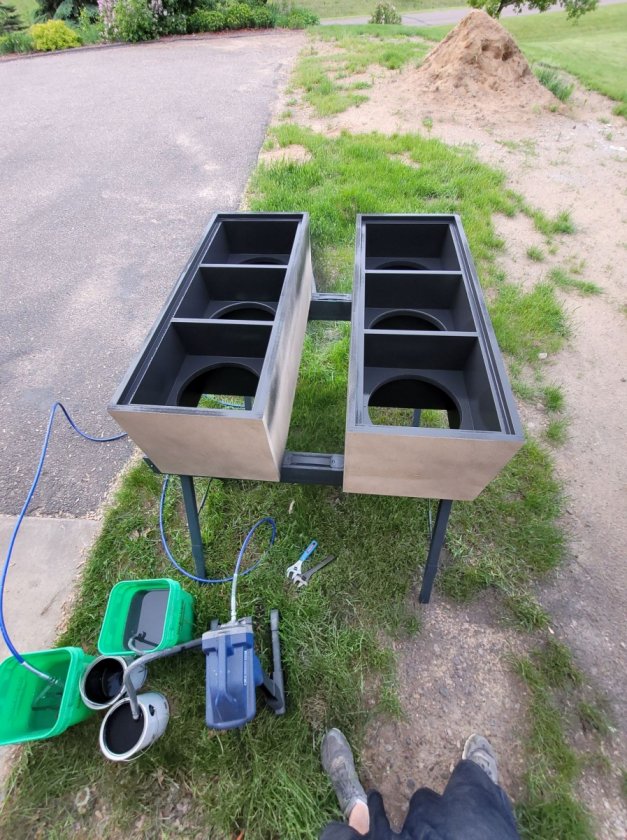
Next, all of them will get the interior painted. As you can tell from the front rabbet running around the perimeter, these will be getting grills. I'm debating over cutting the grills on the CNC, which yields a lot of waste MDF and also MDF is so weak - or making them out of hardwood.

One of the sets will also be getting a stand which will raise the speakers up about 12" to accommodate the drop in my theater/listening room which has steps. The subs will be on a floor which is 2 steps, and 12", lower than the listening position. The stand will also house the amp. I'm thinking I may partition off the rest of the base from the amp and fill the remaining cavity with sand.

« Last Edit: 4 Jun 2021, 03:14 pm by subsonic1050 »

Rock Ball

Re: Subsonic's Triple Servo Subs Build
« Reply #1 on: 4 Jun 2021, 02:16 pm »
This is a great post.  What a fantastic shop you have.

I'm anxious to hear about how well these work in your home theater.

Peter J

  • Full Member
  • Posts: 1876
  • Hmmmm
Re: Subsonic's Triple Servo Subs Build
« Reply #2 on: 4 Jun 2021, 02:51 pm »
Looking good subsonic. Can you talk about the Rubio finish a little more?  Perhaps comparisons to similar things you've tried and what you see as advantages and disadvantages.

I'm on the hunt for hand applied finishes to demo in videos because I think it'd be more accessible to folks who don't have spray capability . Out of curiosity (which seems to always be my thing), I got some Odie's Oil to try. Perhaps it's how I'm using it or maybe I'm just jaded but I'm underwhelmed. I'd like to see a little more film buildup, but so far it's not happening to the degree I want.

To be fair, I've been testing on wired oak. I suspect it might work better on a finely sanded surface.

subsonic1050

Re: Subsonic's Triple Servo Subs Build
« Reply #3 on: 4 Jun 2021, 03:24 pm »
Thanks Rock Ball - woodworking isn't what I do for a living, but my shop certainly is my "happy place" and my passion. I can't wait to hear these in my system as well! I'll be sure to post my impressions once they are up and running!

Peter J - I use all sorts of finishes in my furniture. I have an HVLP system for spraying finishes, a Graco airless sprayer for paint, and of course the ability to do any brush on or hand rubbed finishes. I've tried a LOT of stuff and Rubio Monocoat is probably my favorite at the moment. It is in a relatively new class of finishes called a "hard wax oil". I have tried other hard wax oils like Osmo and I've also tried Odie's oil, and neither one looks as nice in my opinion. Rubio is a 2 part finish - sort of like an epoxy, only the "hardener" is really just an accelerator - it makes the finish cure dry in about a day and fully cure in about a week. Without the accelerator it takes a month for it to fully cure. Rubio is great because it provides the type of finish that I like, which is the look of an oil rubbed finish, with the durability and moisture protection of a film finish. It is also repairable, so if it gets damaged you can lightly sand that area and apply more finish - it will blend right in. You can't do that with many finishes that provide much protection. It really makes grain come alive, and with a 2nd coat as I mentioned is my preference, it provides just a hint of sheen. Probably like an eggshell amount of sheen. One thing it will not do is build up - that's not the kind of finish it is. Rubio can be rubbed by hand, but in my experience is best applied using a buffer.

If you are looking for an excellent finish that will provide a film buildup, is easy to apply, looks amazing, and has slightly more gloss - try General Finishes Arm-R-Seal. The stuff is amazing. I slightly prefer the look of Rubio because it looks a little more "natural", but it is still amazing.

Oh, and most of these finishes require a pretty finely sanded surface. You probably wouldn't get good results with Rubio on a rough surface like wired oak. Arm-R-Seal could probably work under those conditions, you may just need an extra coat or 2.

mlundy57

  • Industry Participant
  • Posts: 3579
Re: Subsonic's Triple Servo Subs Build
« Reply #4 on: 4 Jun 2021, 03:57 pm »
Thanks Rock Ball - woodworking isn't what I do for a living, but my shop certainly is my "happy place" and my passion. I can't wait to hear these in my system as well! I'll be sure to post my impressions once they are up and running!

Peter J - I use all sorts of finishes in my furniture. I have an HVLP system for spraying finishes, a Graco airless sprayer for paint, and of course the ability to do any brush on or hand rubbed finishes. I've tried a LOT of stuff and Rubio Monocoat is probably my favorite at the moment. It is in a relatively new class of finishes called a "hard wax oil". I have tried other hard wax oils like Osmo and I've also tried Odie's oil, and neither one looks as nice in my opinion. Rubio is a 2 part finish - sort of like an epoxy, only the "hardener" is really just an accelerator - it makes the finish cure dry in about a day and fully cure in about a week. Without the accelerator it takes a month for it to fully cure. Rubio is great because it provides the type of finish that I like, which is the look of an oil rubbed finish, with the durability and moisture protection of a film finish. It is also repairable, so if it gets damaged you can lightly sand that area and apply more finish - it will blend right in. You can't do that with many finishes that provide much protection. It really makes grain come alive, and with a 2nd coat as I mentioned is my preference, it provides just a hint of sheen. Probably like an eggshell amount of sheen. One thing it will not do is build up - that's not the kind of finish it is. Rubio can be rubbed by hand, but in my experience is best applied using a buffer.

If you are looking for an excellent finish that will provide a film buildup, is easy to apply, looks amazing, and has slightly more gloss - try General Finishes Arm-R-Seal. The stuff is amazing. I slightly prefer the look of Rubio because it looks a little more "natural", but it is still amazing.

Oh, and most of these finishes require a pretty finely sanded surface. You probably wouldn't get good results with Rubio on a rough surface like wired oak. Arm-R-Seal could probably work under those conditions, you may just need an extra coat or 2.

With Rubio you can get a little more sheen by applying a coat of their Maintenance oil at least 48 hours after the second coat of 2C. This brings the sheen up close to satin.

Endo2112

  • Jr. Member
  • Posts: 203
  • Particularist
Re: Subsonic's Triple Servo Subs Build
« Reply #5 on: 4 Jun 2021, 04:55 pm »
I'm jealous of your set up!! Great work!

Don


SlushPuppy

Re: Subsonic's Triple Servo Subs Build
« Reply #6 on: 4 Jun 2021, 05:12 pm »
Whoa! Great job!  :thumb:

Barryg443

  • Jr. Member
  • Posts: 63
Re: Subsonic's Triple Servo Subs Build
« Reply #7 on: 4 Jun 2021, 05:59 pm »
Excellent work!  I’m impressed!

Vince in TX

  • Full Member
  • Posts: 368
Re: Subsonic's Triple Servo Subs Build
« Reply #8 on: 4 Jun 2021, 08:53 pm »
Very nice.   I wish I had access to a shop like that.   I'm just doing everything in my empty theater room for now.

For finishing mine (a pair of duals), I plan to assemble the inner cabinets and attach the base since both of them are going to be black lacquer.    Then I have a friend who knows a guy with a cabinet shop where I'll send the outer sides and the top to have a walnut veneer put on them.   I'll test fit and mark where the veneer goes on the inside of the panels.   No worries about overspray that way.     :thumb:

subsonic1050

Re: Subsonic's Triple Servo Subs Build
« Reply #9 on: 4 Jun 2021, 09:04 pm »
Thanks for the compliments everyone!

Vince - did you purchase some flat packs? My understanding is that Jay uses 1.5" MDF to make his sides rather than laminating (2) 3/4" pieces together. This is a much faster and easier way to do it, and I'd have done the same but there is a massive MDF shortage right now and none of my suppliers had any. If that is the case, I don't think your plan will work unless I'm not following what you intend to do. In any case, yes, having veneer and paint is kind of a pain! In retrospect I should have used an oil based paint rather than latex. I don't know what I was thinking. It will be fine in the end but latex is just so damn sticky until it fully cures.

Jaytor

Re: Subsonic's Triple Servo Subs Build
« Reply #10 on: 4 Jun 2021, 09:56 pm »
Yes - great wood shop, and you obviously know how to take advantage of it. Nice work!

Badd99

  • Jr. Member
  • Posts: 87
Re: Subsonic's Triple Servo Subs Build
« Reply #11 on: 4 Jun 2021, 10:51 pm »
Can you help me figure out how many sq ft and what size veneer pieces I need per triple cabinet? Looking to Verner my build of dual triples soon.

Thanks!

subsonic1050

Re: Subsonic's Triple Servo Subs Build
« Reply #12 on: 5 Jun 2021, 12:28 am »
Thanks Jaytor!

Badd99 - sure, it's actually pretty easy to figure out. I veneered the top, bottom, both sides, and the front edges on all sides. It worked out almost perfectly that one full 4x8 sheet of veneer covered a pair of triple servo subs. This is really nice because they are basically a perfect match for each other. My subs are 42" tall, so I cut the veneer into 2 44"x48" pieces, then cut 2 15.75"x44" pieces out of each of those and the resulting 17" or so wide piece was further broken down to do the tops and bottoms.

One full sheet will definitely yield enough for the pair, and you may even have enough left over to do your amp boxes if you do those as well. You'll want to cut the pieces at least 1" oversized so that you have some overhang to trim off with a flush trim bit.

nrenter

  • Full Member
  • Posts: 408
Re: Subsonic's Triple Servo Subs Build
« Reply #13 on: 5 Jun 2021, 01:53 pm »
These are my favorite threads. Thanks for documenting and sharing.

Hobbsmeerkat

  • Industry Participant
  • Posts: 2542
Re: Subsonic's Triple Servo Subs Build
« Reply #14 on: 5 Jun 2021, 03:11 pm »
Man, these are looking absolutely gorgeous!!  :o

Captainhemo

Re: Subsonic's Triple Servo Subs Build
« Reply #15 on: 6 Jun 2021, 07:21 pm »
Yes, nicely done  man   :thumb: :thumb:
Yes,   we do use solid, ULtra re-frned 1.5"  for the side panels, tops and bases   with  1" baffles and bracing.  Not having the seams is really nice if applying a high end painted finish.

Wow,  I'd have thought  a single sheet  (4x8) of veneer would be really tight  for a pair of triples,  would be absolutely  no room for  any error.
Have done anumber of nicely book matched  duals  from a single sheet ,  that includes inner grill recess, front  face of bracing, and amp boxes.

Enjoy the  subs  man,  sounds like  you're going to have a  great  theater   soon  :)

jay

subsonic1050

Re: Subsonic's Triple Servo Subs Build
« Reply #16 on: 6 Jun 2021, 07:47 pm »
Thanks very much Hobbs, Jay, and nrenter, much appreciated.

Jay - I actually had quite a bit of room for error. So much so that I'll be able to do the amp boxes for one of the pairs out of the leftovers from the 2 sheets used on the main cabinets for all 4 subs. I left at least 1" extra for overhang to make sure I didn't run into issues. It is nice that the sheets I got weren't actually 48x96 but 49x97 - like MDF sheets. That extra inch in either direction left me even more room to play with. Also, I wish I had been able to find some MDF in those thicknesses already - would have saved me a lot of work! I'm really looking forward to receiving my NX-Treme flat packs from you - really looking forward to getting started on those!

I'm also working on the stands which will house the amps. I glued them up yesterday and the heatlock glue is drying now. They'll be veneered and possibly even have finish on them by the end of the day. They are shaped the same as the subs and I positioned the amp sideways. The stands are 10 5/8" tall, so with the spikes they will be about 12.5" tall. I filled them with cat litter - I'd guess they weigh 40-50 pounds each filled like that.


dryan01uk

  • Jr. Member
  • Posts: 75
Re: Subsonic's Triple Servo Subs Build
« Reply #17 on: 7 Jun 2021, 04:28 am »
This is a great post.  What a fantastic shop you have.

I'm anxious to hear about how well these work in your home theater.

Seconded.  Amazing shop.  Fascinating build.

D

Vince in TX

  • Full Member
  • Posts: 368
Re: Subsonic's Triple Servo Subs Build
« Reply #18 on: 8 Jun 2021, 01:58 pm »
Thanks for the compliments everyone!

Vince - did you purchase some flat packs? My understanding is that Jay uses 1.5" MDF to make his sides rather than laminating (2) 3/4" pieces together. This is a much faster and easier way to do it, and I'd have done the same but there is a massive MDF shortage right now and none of my suppliers had any. If that is the case, I don't think your plan will work unless I'm not following what you intend to do. In any case, yes, having veneer and paint is kind of a pain! In retrospect I should have used an oil based paint rather than latex. I don't know what I was thinking. It will be fine in the end but latex is just so damn sticky until it fully cures.

I'm actually not sure whose they are.   I ordered them through Danny.   They are all dowel-pin aligned.   This is what the inner cabinet looks like assembled.   My thought was to just attach the base to the inner cabinets (after pre-fitting and adjusting the side panels), and have walnut veneer put on the outer side and top panels.


Hobbsmeerkat

  • Industry Participant
  • Posts: 2542
Re: Subsonic's Triple Servo Subs Build
« Reply #19 on: 8 Jun 2021, 02:19 pm »
If you ordered them on the GR website, they are from Killian.