Amateur Build of the X-MTM Encore

0 Members and 1 Guest are viewing this topic. Read 28986 times.

jonsk2514

Re: Amateur Build of the X-MTM Encore
« Reply #220 on: 29 Dec 2020, 04:10 pm »
Happy Holidays, Merry Christmas and Happy New Year to everyone.

It has been an “interesting” year for me in many respects.  “Interesting” in both a good, fun and new experience way, and in a less than good way, some of which we all experienced.  Finding out about GR Research and the available DIY projects has to be at the top of good, fun and new experience list.

Around here the holiday season has been good.  However, Mother Nature put a damper on me finishing the speakers for Christmas.  That was a good target, but a 30” snow fall put that plan on the back burner...


My 47+ year old snowblower doing the job :green:

But snow removal efforts on the third driveway I was helping with left me with having to do an emergency repair of the snowblower.  The triage pushed the speaker work off to the side while repairs were being made.


The tension pins that attach the impeller to its driveshaft have broken before because of wear and looseness of parts at this stage of its life.  You would think I would have spares...  Not that I could find, so a day lost while I waited for stores to reopen.  These pins are common hardware store parts so they are readily available, when the city hasn’t been shut down by a major snow storm... :roll:

Snow is now gone, as quickly as it came with the help of a heavy rain.

The basement is dry and I am back to completing the finish on the speaker cabinets...
And, oh, this has been an experience... :roll:

jonsk2514

Re: Amateur Build of the X-MTM Encore
« Reply #221 on: 6 Jan 2021, 09:29 pm »
Well?


I went to work on the cabinet finish after cleaning up from the snow storm.

I am in awe of those who managed to put a piano finish on their builds as I found that I am far from being able to do that.

Doing the varnish finish on my cabinets turned out to be thee frustrating part of the whole build and I wasn’t even trying for a piano finish.

I used Minwax semi-gloss polyethylene varnish, which has done well by me before.  I even followed their recommendation to use a natural bristle brush and bought a new one.

Well, it didn’t do well by me this time.  Did they recently change their formulation?  This isn’t the first thing I have finished, and I don’t recall ever having the issues I had this time.  And this was a fresh/new can of varnish.  I am sure everyone has their favorite varnish, and I bet there are much better products than this.  Feel free to post your recommendations as I will need something better for the next speakers I build...

The first thing I ran into was literally that... Runs.  And sags on the vertical sides.  I thought I was putting it on thin enough, but no.   Also, some of this happened after the varnish started to set up so there was no fixing it without leaving brush marks. The next issue was with sanding.  They recommended 220 grit.  I knew that wasn’t right and used some 320.  It leveled out the drips and sags, but it also left scratch marks over the whole thing that OO steel wool would not remove.  320 grit was still not fine enough.

Then there was blending.  I had the cabinets laying on their backs with the fronts up.  On the fronts (horizontal) the varnish laid on nicely and leveled nicely.  I brought the fresh coat down the rounded corners so when I did the sides there would be some wet varnish to run into.  Oops... This little bit of wet varnish would setup on one side while I was applying varnish to the other side.  By the time I got to the second side I was leaving brush marks in that setup wet coat...

While the varnish on the front leveled well, bubbles that the brush left behind would not pop.  There was to much surface tension to the varnish for that to happen....  Ugh!

Lighting also played into this.  I found there is never enough light and it has to come from all angles.  But when it comes from all angles, it winds up shining in one’s eyes.  There is almost no winning with this one.  But over all, more light is better.  Several of the coats of varnish I put on had to be redone because of missed spots that I couldn’t see when I was applying the varnish.  More light, please!

After 5 coats of varnish, and :banghead:  -  I am done...  Good enough!

4 more, well placed, 3’ strips of LED work lights helped a lot.  This was in addition to the 2 I had and the 6 clamp-on lights I was using.  About 300W of LED lights in total.   :o  I worked most of the bubbles out by lightly dragging the brush through the coat.  I spent more time to spread the varnish thinner on the sides, but this wasn’t 100% successful.  I found a nice 400 grit sand paper and holder that worked well, along with the OO steel wool.  I worked with a wet brush to blend the side coat into the coat from the front that was setting up.  This all basically worked. The little bit of remaining brush marks, drips and runs will be unnoticeable where they speakers will be located.  I will just think of them as adding a bit of “character” to the cabinets; an artificial rendition of a wood grain finish.   :green:

Next - installing drivers, adding the ports and testing them out...  :dance:  I think I can handle that...  :green:

jonsk2514

Re: Amateur Build of the X-MTM Encore
« Reply #222 on: 13 Jan 2021, 09:54 pm »
Wiring is done and the drivers are installed.  The only thing I did differently from what Danny recommends is I did pass the wire through the hole in the binding post tabl


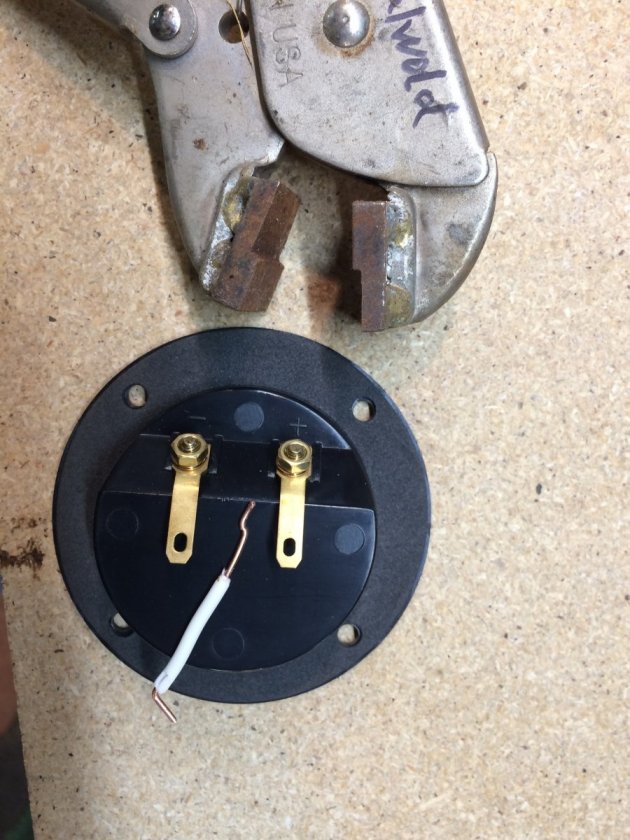
I have a set of crimpers for sheet metal that I was able to use to put a kink in the wire so it would lay flat on the binding post tab for soldering.  I had to do this as my hands are no longer steady enough to hold the wire in place the way Danny shows, and, at the same time, hold the binding post and soldering iron.  I had the cabinets upright while wiring up the binding posts as I didn’t want to lay them down on the fronts that I had just spent so much time finishing and take a chance of damaging it.

For the drivers, I laid the cabinets down on their backs and had the driver resting on the fronts that were protected with a rubber sheet.  These were soldered just as Danny shows in his video, with the wire laid flat on the tab and not through the hole.

The hardest part of all of this was remembering to put the heat shrink tubing over the wire first..  :duh:  not that I forgot to do this at least twice... :shake:

Finished


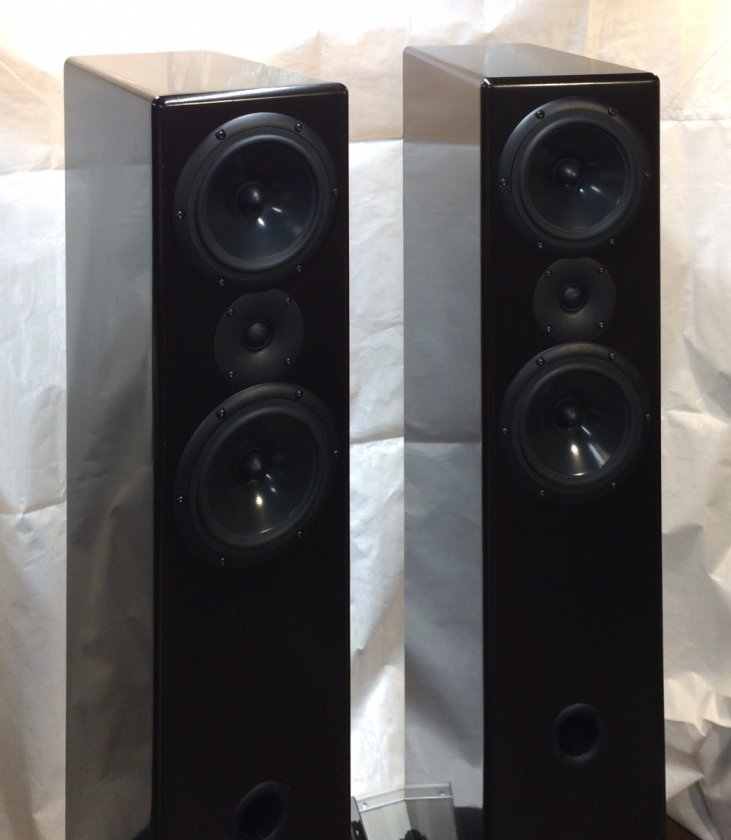
COMPLETED AND HOOKED UP


And how did they sound?

 :drums:

OMG!

AMAZING

I know that my ears are bad and I thought that was the cause for me not understanding words being spoke in TV show and in movies.  Well not any more.  Words are clear and distinct.

I got lost in listening to the 1995 recording of Cream at the Royal Albert Hall.  Jack Bruce’s and Eric Clapton’s voices are now clear not mumbling as I had thought.  Bass is solid and deep; much deeper than I expected.

In a mini concert by Nora Jones, that is done from a room in her home, I could hear the room coloring her voice.

There is a clarity and transparency to these speaker that is almost unnatural.
The base is solid and they play lower than I expected. Yes, I know what they are rated at, but I don’t know what that means when listening to them.   I would say, a subwoofer would be nice but not necessary.

These are what everyone said they would be...  :thumb:

Was I surprised? Yes, a bit.  Everyone claims their speakers to be the best, so I took those claims with a grain of salt.  Are they the best ever?  I don’t know as I have nothing worthy of that comparison to assess that possibly.  For me, though, I am more than satisfied.

And all of this is with a system that is Dime Store in comparison to what I have seen posted on here.  But as a lot of people have said:
A bad set of speaker can make a really good system sound bad,
But a really good set of speakers can make a mediocre system sound really good.

I got what I was hoping for.  Thanks everyone for your help and comments.

I have in the works a set of stands for these and someday there will be a set of gril cloths for them.  A little more to come.

Also, next is a center channel and rear speakers...   :green:

Tyson

  • Full Member
  • Posts: 11111
  • Audio - It's all a big fake.
Re: Amateur Build of the X-MTM Encore
« Reply #223 on: 13 Jan 2021, 10:50 pm »
Congrats on the getting them done - they look great!! 

Yeah, I hear you re: being surprised at how good even the 'modest' GR Research speakers are.  A friend of mine has the upgraded CST 1's Danny designed and it anchors one of the best sounding systems I've ever heard.  Just a natural clarity, combined with punchy clean bass and an easy and engaging musicality.  Sounds like you are getting exactly that too!! 

Makes you want to go and re-listen to all your favorite recordings, doesn't it?

corndog71

  • Full Member
  • Posts: 1672
  • Some people call me Rob.
Re: Amateur Build of the X-MTM Encore
« Reply #224 on: 14 Jan 2021, 02:01 am »
Those look great!  The X-Series are such a great value.  Enjoy! :thumb:

hawkeyejw

Re: Amateur Build of the X-MTM Encore
« Reply #225 on: 14 Jan 2021, 02:31 am »
I can’t believe the journey is over!! They look great Jon, and I’m glad you are enjoying them. Danny’s designs are really outstanding.

jonsk2514

Re: Amateur Build of the X-MTM Encore
« Reply #226 on: 14 Jan 2021, 01:10 pm »
Thanks everyone...  :thumb:

It has been quite a journey, one I have very much enjoyed.  But, unlike some journeys where the end is anticlimactic, the end of this journey is anything but that.  These speakers continually amaze.  We watched the animated movie Soul last night.  It is about a jazz piano player, and has some great music.  The transparency of these speakers really makes them “disappear” and it is easy to forget that there is a set of speakers there and not the live band or person that you are listening to.

And, yes, there are some old favorites that I want to re-listen to, as well as some new ones.  I am curious as to what I have been missing in those recordings...

I also realized, after listening to these, why there are some prolific builders of Danny’s speakers on this blog.  While building these I thought, maybe, it was the enjoyment of the build that drove the proliferation.  While I suspect that is part of it, I now think it has more to do with the end product and finding out what each of the designs provides the listener.  I, too, now want more... And more there shall be...  :green:

Hobbsmeerkat

  • Industry Participant
  • Posts: 2543
Re: Amateur Build of the X-MTM Encore
« Reply #227 on: 14 Jan 2021, 03:54 pm »
Congratulations on your build, they look gorgeous!
I'm glad to hear they've exceeded your expectations to boot, thats definitely how I've felt about my pair of XLS, and makes me all the more excited for the completion of my NX-Studios with even better quality components.

Enjoy them!
And im excited to see what your next project(s) will be! :thumb:

jonsk2514

Re: Amateur Build of the X-MTM Encore
« Reply #228 on: 15 Jan 2021, 08:40 pm »
Thanks!

Another couple of observations about the X-MTMs I built.  It was noted early on in this thread that having the ports in the front, like I went with, could cause some huffing noise.  For the volume levels I have gone to, no issues with that.  I haven’t quite gotten to rattling the neighbor’s windows, but plenty loud for my tastes. Also,  I have not yet played ELP’s Lucky Man, which should push most any bass driver to its excursion limits.  But for most anything else, I would say that having the ports in front will produce a quite acceptable sound.  Also, I find that my overall listening volume levels are lower than what I had used before.  I expect this is because they don’t have the dips in frequency response that my previous speakers had, and because they are so clear and precise that high volumes are no longer necessary for me to hear and understand things.

As for my next projects, the first will be a center channel - the X-CS.

After that will be rear channel speakers.  I am still up in the air for that, except they will need to be free standing towers.  There are the X-SLS, X-Omni and the AV-O.  I would really like to do the X-Omni, but at $5,000 a pair they are a bit out of my prices range :dunno: Really, I think Danny is just saying that he doesn’t have parts for them...  Next would be the AV-O, but I wonder how well they would match the X-MTMs and X-CS.  I like the idea of the omni-directional sound field Danny talks about that these speakers make and I expect the X-Omni will have the same characteristic.  The X-SLS is definitely in the mix of choices, too.

The reality is, that having to choose a rear channel set of speakers is probably 6 months out, so I am not yet over thinking this.   :roll:

Hobbsmeerkat

  • Industry Participant
  • Posts: 2543
Re: Amateur Build of the X-MTM Encore
« Reply #229 on: 15 Jan 2021, 08:48 pm »
The X-Omni arent actually $5000, it's just a place holder until it gets updated. It should be closer to the price of the XLS, youll just have to call danny for a more accurate price, and like the X-SLS it should be closest in terms of tone than the AV-O


jonsk2514

Re: Amateur Build of the X-MTM Encore
« Reply #230 on: 15 Jan 2021, 09:31 pm »
The X-Omni arent actually $5000, it's just a place holder until it gets updated. It should be closer to the price of the XLS, youll just have to call danny for a more accurate price, and like the X-SLS it should be closest in terms of tone than the AV-O

 :lol:  :lol:   :lol:

Ya, I was guessing it was something like that for the Omnis...
I do like the idea of them for the rear channel in the room they would be in.  When I get closer to the build, I will definitely be contacting Danny.  :thumb:

jn316

  • Full Member
  • Posts: 422
Re: Amateur Build of the X-MTM Encore
« Reply #231 on: 15 Jan 2021, 10:52 pm »
Basic X-Omni kit is $310
Upgrade for Sonicap capacitors and Mills resistors is $285
Upgrade for tube connectors is $50

Danny sent me that info. yesterday.

jonsk2514

Re: Amateur Build of the X-MTM Encore
« Reply #232 on: 18 Jan 2021, 12:47 am »
Basic X-Omni kit is $310
Upgrade for Sonicap capacitors and Mills resistors is $285
Upgrade for tube connectors is $50

Danny sent me that info. yesterday.

Thanks for the info.  Not surprised at the price, which is similar to that of the X-MTMs that I am building...

So the price with Sonicaps and Mills is one Zero off from what he posted...  ~$500. :lol:
Amazing how one zero, more or less, on a price of something really changes one’s perspective of it...  : :o

Have you started to building the X-Omni?

corndog71

  • Full Member
  • Posts: 1672
  • Some people call me Rob.
Re: Amateur Build of the X-MTM Encore
« Reply #233 on: 18 Jan 2021, 04:16 am »
I can confirm they work great as rear surrounds.

jonsk2514

Re: Amateur Build of the X-MTM Encore
« Reply #234 on: 18 Jan 2021, 01:51 pm »
I can confirm they work great as rear surrounds.

That is what I was looking for, and for those, I can have them away from walls so I can make them they way they are intended to be made...

Did you do a build thread for them that you can post a link to?

corndog71

  • Full Member
  • Posts: 1672
  • Some people call me Rob.
Re: Amateur Build of the X-MTM Encore
« Reply #235 on: 18 Jan 2021, 04:43 pm »
That is what I was looking for, and for those, I can have them away from walls so I can make them they way they are intended to be made...

Did you do a build thread for them that you can post a link to?

No, mine were made by AV123.  I traded a tube amp for them.  Later I upgraded the crossovers with Sonicaps which helped open the sound up more.


jn316

  • Full Member
  • Posts: 422
Re: Amateur Build of the X-MTM Encore
« Reply #236 on: 18 Jan 2021, 06:45 pm »
Thanks for the info.  Not surprised at the price, which is similar to that of the X-MTMs that I am building...

So the price with Sonicaps and Mills is one Zero off from what he posted...  ~$500. :lol:
Amazing how one zero, more or less, on a price of something really changes one’s perspective of it...  : :o

Have you started to building the X-Omni?

No, I was just curious what the cost was, especially with the upgrades.

jonsk2514

Re: Amateur Build of the X-MTM Encore
« Reply #237 on: 18 Jan 2021, 07:17 pm »
No, mine were made by AV123.  I traded a tube amp for them.  Later I upgraded the crossovers with Sonicaps which helped open the sound up more.


Darn...

You had posted that picture on the first page of this thread.  They looked to be pretty ideal for rear channel speakers in the room I have.  I was hoping to find a build thread; did a search but was unsuccessful.  I’ll do some more digging.  None the less, I am thinking that will be the way I will go...

But first, I need to finish stands for these and build a center channel...

corndog71

  • Full Member
  • Posts: 1672
  • Some people call me Rob.
Re: Amateur Build of the X-MTM Encore
« Reply #238 on: 18 Jan 2021, 10:17 pm »
Should be a relatively easy build.  It has 3 or 4 internal braces with a port on the rear.  Crossover is mounted to a bottom panel that’s screwed in.  Try calling or emailing Danny for the plans.

jonsk2514

Re: Amateur Build of the X-MTM Encore
« Reply #239 on: 30 Jan 2021, 03:18 pm »
Ok - Not sure what is going on here, but all of my pictures have disappeared from my thread here.  They seem to be in my gallery, but all of the links are gone or something like that has happened.... :bawl:

I found a “request for site help” thread and posted my finding there, along with many others:
https://www.audiocircle.com/index.php?topic=174648.new#new

That seems like a good place to post issues like this.  Hope someone comes up with a fix as this is a mess...
If anyone knows what is going on, post it there and let us all know...