Originally Posted: 01 Mar 2002 03:14 on HD
--------------------------------------------------
tools and other requirements:
-metric hex wrench set
-masking tape
-permanent marking pen
-broomstick
-a friend
-flashlight
estimated time is 20-40 minutes
Summary: After disconnecting wires from the woofer, tweeter, and the crossover, you will be left with the wires that are already connected internally to the pair of binding posts. These will then be connected directly to the woofer and the tweeter.
1. Disconnect cables after powering amps off.
2. remove 5 metric hex(allen)-head screws from the woofer.
3. carefully push the woofer out from behind using a broomstick through the rear port of the Marble 9.0. This may only be necessary the first time. Either you or your friend should catch the woofer around the outer edges.
4. carefully disconnect the stiff wires from the terminal tabs of the woofer.

5. carefully set the woofer on a flat, non-metallic surface (the magnets are incredibly strong)
6. label the woofer wires as "xo-woof" (crossover to woofer) by writing on a piece of masking tape

7. you will find another set of unconnected, unlabelled wires inside - they are connected to the front binding posts. Label them "post-tweet" (binding post to tweeter). Thes wires are for the active biamp connection directly to the tweeter, bypassing the crossover.
8. look inside to locate the crossover - you will see a "W" where the woofer wires connect, an "IN" where the input wires connect, and a "T" where the tweeter wires connect. Don't disconnect yet.

9. unscrew the 4 hex-head screws of the tweeter. reach your hand in the woofer hole and gently push it out - let your friend carefully catch it.
10. carefully disconnect the tweeter wires. The tweeter termination tabs are much more flimsy so be careful.
11. carefully set the tweeter aside on a flat non-metallic surface.
12. label the tweeter wires "xo-tweet" (crossover to tweeter).

13. Now you are ready to disconnect the first two sets of wires, that you labelled, from the crossover. Also disconnect the remaining set of wires from the crossover. So you will disconnect from the "T" connection, the "IN" connection, and the "W" connection. Pull the clips gently but firmly off their tabs on the crossover. Pull at a 90 degree angle from the crossover base of the crossover assembly (MDF or plywood).
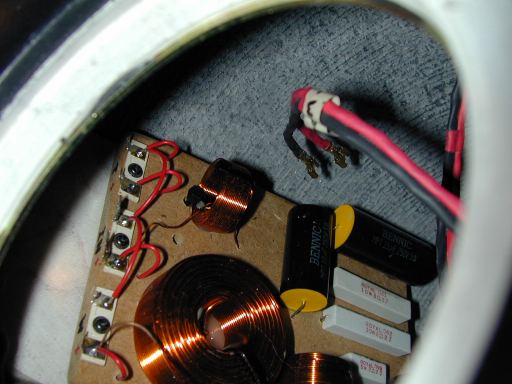
14. set the "XO-Tweet" and "XO-Woof" wires aside for storage in case you want to use the internal crossover in the future.
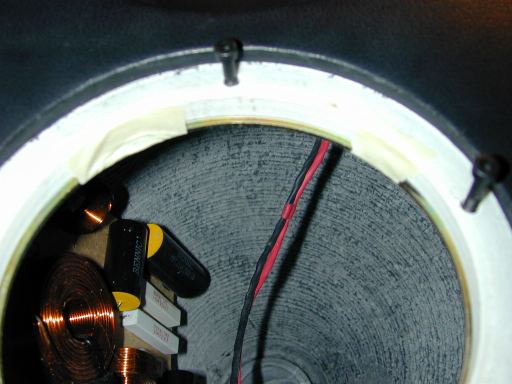
15. you will now have a set of disconnected, unlabelled wires. They were disconnected from the "IN" connection on the crossover. Label them "Post-Woof" because they will connect directly from the rear posts to the woofer for active biamping.

16. Now you will be left with only 2 sets of wires - the "Post-Tweet" wires connected to the front posts, and the "Post-Woof" wires connected to the rear posts.

17. make sure the retaining rings are still glued to the back of the baffle for the woofer and tweeter - if not, use the following trick: align the ring's holes with the holes in the baffle and screw in two of the screws in holes to hold the rings in place.
Then use a couple of pieces of masking tape to tape the rings in place
18. locate the "Post-Tweet" wires and connect them to the tweeter.
19. replace the tweeter and its 4 screws, with your hand through woofer hole to help position and support the tweeter.
20. locate the "Post-Woof" wires and carefully connect the stiff wired to the soft metal tabs. Make sure everything is align the right way or you may bend or even snap off a tab trying to twist the assemply to the correct orientation!
21. carefully fit the strong magnet through the retaining ring and replace the woofer. Screw in the 5 screws, and you re done!


