SVS Ultra Center Install of upgrades.

0 Members and 1 Guest are viewing this topic. Read 640 times.

Shives

  • Jr. Member
  • Posts: 250
  • I like French fries
SVS Ultra Center Install of upgrades.
« on: 6 May 2021, 03:46 pm »
Place holder for the SVS center.

Taking this one apart.. few things to watch and keep in mind.

Trim rings, they are very tight in place. Use a plastic tool to lift, don’t use metal. This is softwood, and I can imagine it will mark very easy!! Putting these back on the ultra books was not as tight as these are. It’s almost as if they don’t have enough room. So make sure things are lined up!

This is built well! I would get rid of the Polly and replace that all with No Res, this is a Bi-Amp center, that we will be using the higher posts again to keep them uniform.

What’s funny is the drivers in the center are a little different then the books, and have gold spade connections. We are removing the push on spades and solder directly.

Opening this up and looking. The mid driver is sealed. The tweeter is not, and woofers are also open! So woofers share the full space.

To my shock, not really.. the factory networks were not even screwed down all the way! They are loose!! And easy to vibrate around! This could be a huge issue! Lucky we are removing the stock networks for uograded parts. You’ll find 2 networks. Each sitting behind the woofers. Not much room in this unit to make a single large network, so I’ve decided to make two. I really wanted one, it makes things easy! But this won’t be to bad.

Below you’ll find some photos of my start. Questions welcome.


3 networks. I wanted to combine, but with the size of this, and the amount of inductors, I’m going to put the mid network by itself and then tie the tweeter and woofer together. This will allow me to space them out far enough to lessen the interference.

****NOTICE**** You will see the small parallel cap hidden under the larger cap. I found this spot to be best for me, but you may find different. Don’t forget this part! I just want to point out seeing you can’t really see this. It is in place.

« Last Edit: 7 May 2021, 04:18 pm by Shives »

Shives

  • Jr. Member
  • Posts: 250
  • I like French fries
Re: SVS Ultra Center Install of upgrades.
« Reply #1 on: 6 May 2021, 07:48 pm »
Made a rolling change. I laid down the tweeter inductor to better work around the woofer inductor. You see in photos to come. Boards in progress.


Moving forward. Welcome to post questions here or message me directly again if you have questions. Might be your first time. Don’t worry, we all start someplace. Proud of you for taking this on. You’ll be please at the finished results and knowing, you’ve built some cool stuff. Warning. This can be HIGHLY ADDICTIVE!

Shives

  • Jr. Member
  • Posts: 250
  • I like French fries
Re: SVS Ultra Center Install of upgrades.
« Reply #2 on: 7 May 2021, 02:14 pm »
Morning! Hoping to finish these today! I have to wire, install and line with no res. It’s possible!

Photos below. Again, I know a few people have been looking for a examples. Your more then welcome to use these.

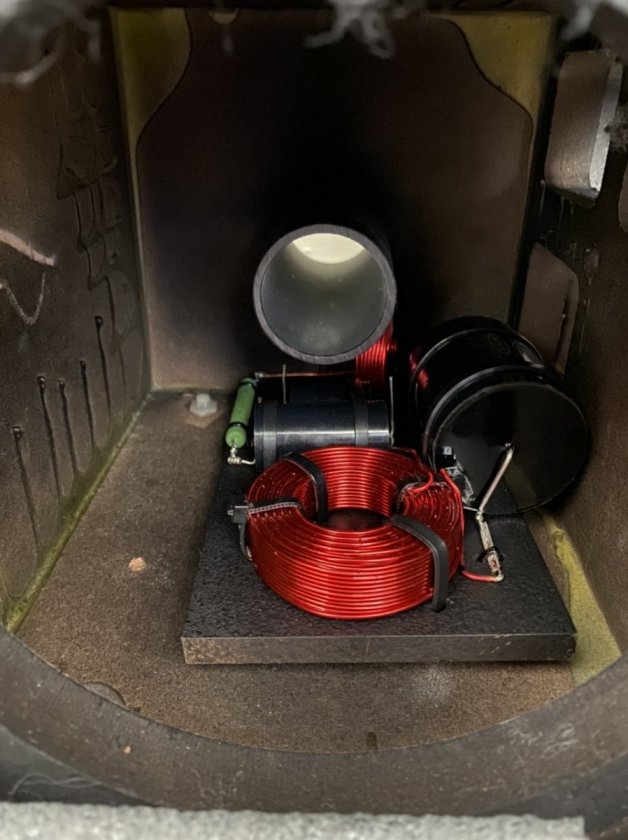
Why did I not stack? Hight in the box is very small!! Remember when cutting these boards out, you have to fit them through a 6” hole! Granted you can, if you know how flip and spin the board in the cabinet. But, to me... The worst idea you could have is placing anything in a “gravity pull” type of situation.

Shivers... WTF?

Gravity pulls down correct? So, most of you should lay these on the bottom, where you want your network placed. Not the side, not the top! (If.....if you can prevent this) Why!? What goes up, must come down. Over time, heat and vibrations of you have not 100% secured the network up in place, you’ve got a HUGE chance of it falling down, and slamming the bottom. NO NO NO.

That will just bring on the vibration, and cause issues we don’t want. All this work you are doing... don’t want it to go to hell over a architectural building snafu.

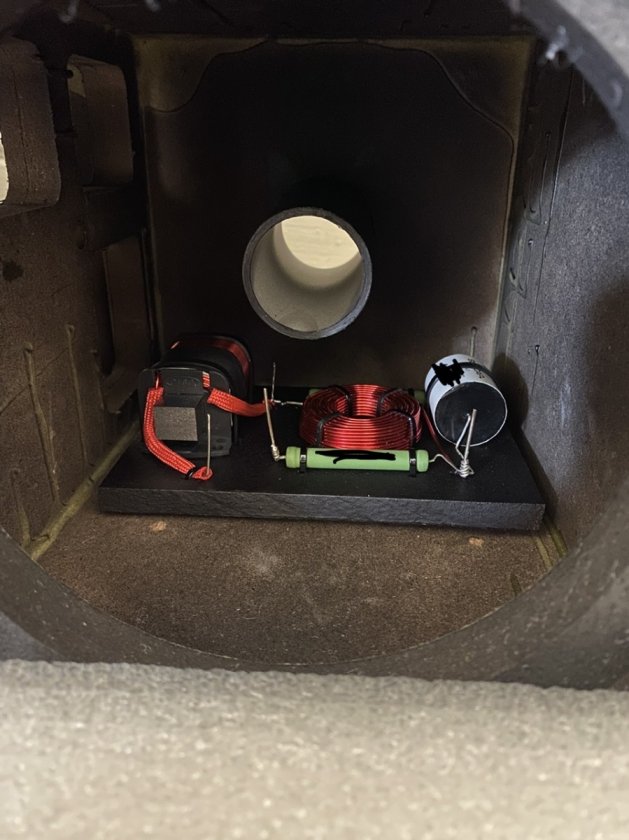
 Combined the boards weighi just over 2.6 pounds. That’s some weight to fall! So, I tried to make these compact, and make sense. Split the coils up, normally I would want to keep as many away from the tweeter circuit as possible!
Why? I think the high end circuit is more prone to audible noise. So, being it’s more easy to hear the higher stuff then the lower stuff.. I try and make sure they are split and away. Again, I could have split the networks to three, not combining the woofer inductor, but due to space.. as well main important factor... Your wire you have is limited. If you think about it. Woofers in parallel thats 4 feet of wire right there. Mid and tweeter. Another 4ft. At 8 feet before tube connectors and the wire running outside the box to the drivers in order to solder. Your connection side. I’m a little worried. First site I thought I was ok.. till I looked at the diagram, then amount of space I could use.

I feel it’s important to take these apart and figure your space out before you cut your network boards. 

Heat shrink I still feel we should get 12 inch of red and 12 of white. Counting connections like last time And I factor 1 inch for covering. Between drivers and network that’s 16 connections. Not including tube connectors. You may want to drop to 3/4 of an inch, good luck with that covering the full area that’s exposed. I’ve found 1 inch is good, your findings maybe different. That’s cool! .

Heat shrink is cheep cheep. Before you start, go to the hardware store, or order some from Amazon if your not at that point. Just get your self some white and red. I purchased a full box or assorted shrinks, as well they have a heat glue which helps seal that connection. It’s not needed.. but I like it. Again, it’s just heat shrink.. no big deal to grab some on your own.

These are just tips for anyone looking to tackle this. If you don’t need the advise, kindly pass on.. Other wise I’m sure some will be happy to see a reference to this network. I’ve seen some of you ask, and some of you post looking for an examples.


Here you go! Let’s see if you can follow the circuit. Largest is the mid, then next will be tweeter... from that the woofers have one inductor.


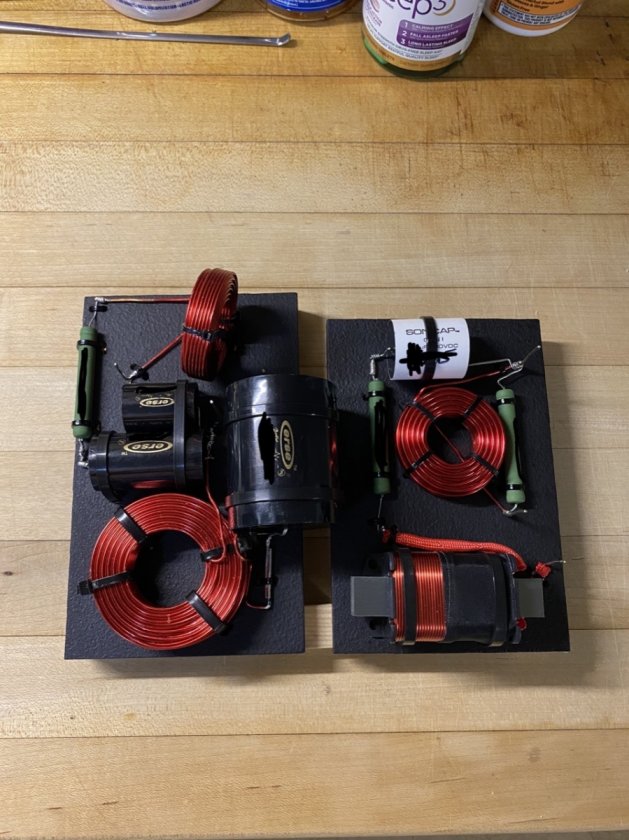
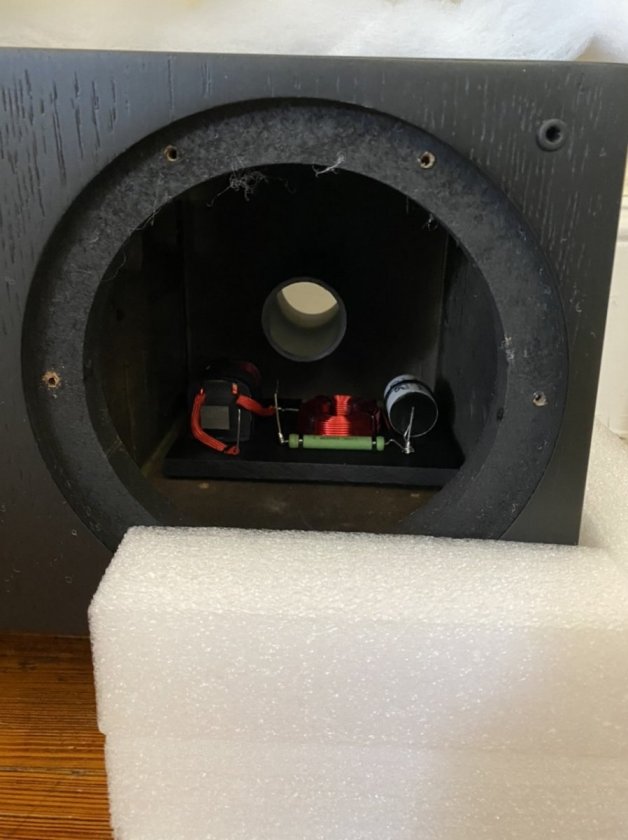
I chose my main board 4x6.5 and the secondary board was 4x6. I could have shrunk this down more, but I chose not to. I wanted extra space to wire and “nail down” the wires for the woofers. This way I have some strain relief! Don’t want these super tight where things will break.

Think for a second, you may want to pull the drivers back out to try... Fiber glass.. or maybe you had an issue! While your putting it together, consider you may take it back apart! This is why it’s good to leave slack and h ability to move, yet having those important wires locked in place not to pull out of the side of say that big inductor.

Just tips. But you can ignore everything I’m
Saying, do it your way!! Again, this is just some kind advise for folks that want to tackle this job, yet may need a photo or a question answered.

PS, if you in fact have someone help you build these, and they show you the progress... words you should not say while you have someone else building these for you..
“Wow, That looks easy”
“That’s all there is?”
“Anyone can do that”
“I can build that in 1 hour” no... no you can’t.
“Your just cutting wire and pasting into place, how difficult can this be?”

Well, it’s not hard.. very time consuming. It can be insulting to hear those comments. Lol. But I get it, this just looks like some parts on a board.

Is it easy? It’s not rocket science. But it’s a step on the way to that science! Lol. So, take caution! Or you will get something to blow up, like a rocket! 
Anyone can do that... Then why am I? Lololol

Soldering is a ton of fun! Anyone who’s soldered with regular tin mix, and then silver will see a huge difference. If your using an iron, set that as hot as you can! I run mine at 800 deg.

This will allow you to be in contact for a short amount of time. You don’t want to over heat things. Look closely, and make sure you soldered it all!

Cold solder joints..
 This is like the wolf in sheep’s clothing! Everything looks normal, but you have a connection that’s not complete! Needs more heat and reflowed solder. Keep an eye out for these!

Friends, the network is the most important part to this upgrade. Pay the most time and attention to it. No res and such.. well you can screw that up without costing you potentially a ton of money by blowing stuff up. Most amps have a protection mode, but anyone in the field will see these devices fail, and well your  AVR can go way-side.
Double, Tripple, quadruple check your wires, connections, soldiering! Don’t use the solder to bridge gaps!! That’s a no no. Do your best to twist, and or making sure your contact points are solid.

Next up, cleaning the cabinet. The glue they use almost looks like a fiberglass resin. Almost.. it’s a green glue or some sort. Your gonna want to clean the walls, and wipe it down before applying your no res. Photos of this to come.


If someone wants to see something done, or a video please fee free to ask. I truly hope these help, that’s all I’m going for!

Shives

  • Jr. Member
  • Posts: 250
  • I like French fries
Re: SVS Ultra Center Install of upgrades.
« Reply #3 on: 7 May 2021, 04:29 pm »
One method out of 45,391 ways to do this. Hot glue, spray glue, tape..... no, don’t use tape!

Does this help? Well, to help with vibration, zip ties coming loose, and the air under here.. Does this help? Hot glue on zip ties, absolutely! Double locks. The rest is an option. You could, if wanted to. The area under it could be reflection, or goofy energy vibrations whatever.. So, does this help prevent. I would think yes, I’m sure you could debate this. Does it put a smile on my face. Sure does. I have some open cell foam I could use, but I feel again I’m going overboard. This is how I do them. I did this step with the last ones, but I made it to wrap over the network. This time I’m doing it different.

I need to drill my mourning holes, add the wire (excited about this). After it’s going to be the no res time. Not looking forward to it. Lol honestly. Small stuff is a pain. Try and match your cuts when doing this. Meaning like a puzzle, laying two pieces on the wall, try and get that area to line up, so you can’t see the seam. Try.. not always the best and easy.

Set a gloves can help when cleaning the glue! Wood edges are sharp! My fingers got smacked up first time, so wear gloves. A tile scraper, this is better then your putty knifes. Why? Strong, sharp! Ridged. I’ll upload a photo of one, but it’s my new buddy to smash through the glue, and then sand a little to smooth.

Your cleaning the walls so the no res will stick! Lots of glue and humps will effect its hold. So, clean as much as you can, I sanded a little, then wipe.

After you get the RES into place, it will be time to mount the networks. Normally I get them to place, then make a map for cutting no res. Cut sheet.
I’ll place the network where I can pre drill some holes for mounting.

See ya soon


Shives

  • Jr. Member
  • Posts: 250
  • I like French fries
Re: SVS Ultra Center Install of upgrades.
« Reply #4 on: 8 May 2021, 02:59 am »
You may even try to shrink this circuit down even more. Due to the port location and not having any flat location longer the 6.5 inches, and hole size your going to be limited. I’m able to fit this between the port, and speaker.. but if I had to do it again I may try and drop down the size just a tad, maybe move the inductors closer (ehhhh) and put the cap to the side.

Folks, you’ve got some limited space! I would also fill half with no res, then add your networks and then add the rest of your no res. Really, the way this is designed, I don’t know if I would have used the no res, or maybe just stuff with a bunch of fiber glass. The box is made well. Really is.

I’ve had a rough one. Time to sleep it off

corndog71

  • Full Member
  • Posts: 1672
  • Some people call me Rob.
Re: SVS Ultra Center Install of upgrades.
« Reply #5 on: 8 May 2021, 02:58 pm »
The hot glue might be a bit overkill.  I would skip that if one might consider switching caps.

Shives

  • Jr. Member
  • Posts: 250
  • I like French fries
Re: SVS Ultra Center Install of upgrades.
« Reply #6 on: 8 May 2021, 08:36 pm »
I thought a lot about the glue. So, I’m my years as many, I’ve  seen a lot of zip ties come loose. I know this won’t be taken back apart, being the guy I’m doing it for admire he has a hard time with a screw driver. Lol. He also mentioned moving them a bit for different uses.

Yea... it is overkill. But it took me a small amount of time, in hopes it won’t come apart.

But I do hear you Lolol I do over kill things a tad bit sometimes. Ha ha. Thanks bud!