***Sub Cabinet Design***

0 Members and 1 Guest are viewing this topic. Read 34500 times.

corndog71

  • Full Member
  • Posts: 1672
  • Some people call me Rob.
Re: Sub Cabinet Design
« Reply #20 on: 25 Aug 2010, 09:28 pm »
Go for the servo sub! :thumb:

Peter J

  • Full Member
  • Posts: 1876
  • Hmmmm
Re: Sub Cabinet Design
« Reply #21 on: 19 Sep 2010, 07:22 pm »
 I went with single servo and A300 amp, although I'm building two boxes in case I want to add a second sub later. Might even build build four and see if I can peddle two to defray cost.

I'm designing modified sand box and got to wondering... well, you know how that can be!

Is there a reason for sandfilling only the sides on the plans shown on GR site? If I could surround the whole core box structure with sand including front and rear panel and keep the structure solid, any reason I shouldn't?


Peter J

  • Full Member
  • Posts: 1876
  • Hmmmm
Re: Sub Cabinet Design
« Reply #22 on: 5 Oct 2010, 09:54 pm »
Decided to build a version of the sandbox and have been teaching myself more and more Sketchup while drawing it. Here's (I hope) a link to an animation of how I'll build it.
http://www.flickr.com/photos/45559224@N03/5054967199/
 

Dracule1

  • Volunteer
  • Posts: 718
Re: Sub Cabinet Design
« Reply #23 on: 11 Oct 2010, 02:32 am »
Creativity knows no rest.  Glad you are thinking about the sand box cabinet.  If Danny approves, hope you build a prototype and let us know how it sounds.

BTW, do you use standard MDF?  Have you tried other alternative like:

http://www.sierrapine.com/index.php?pid=68

Peter J

  • Full Member
  • Posts: 1876
  • Hmmmm
Re: Sub Cabinet Design
« Reply #24 on: 11 Oct 2010, 11:38 pm »
Creativity knows no rest.  Glad you are thinking about the sand box cabinet.  If Danny approves, hope you build a prototype and let us know how it sounds.

BTW, do you use standard MDF?  Have you tried other alternative like:

http://www.sierrapine.com/index.php?pid=68

Prototype, what's a prototype?  :wink:

 I'll actually build a couple and finish them, perhaps more. My only concern is the weight. This is the second design I've done, more vertical than original...darn things get kinda bulky with all those layers and the look I want.

 One thing I'll change from Danny's design...the sand will be silica sand, much finer so density will be greater. Planned thickness of sand layer is 1/4". I'm also using ball transfer casters so I don't bust a gut moving them around.

In the past, I've used standard MDF, but saw Medex mentioned elsewhere so called supplier to check availability. They don't stock, but can have in a week. I'll give it a try when I start these.

Peter J

  • Full Member
  • Posts: 1876
  • Hmmmm
Re: Sub Cabinet Design
« Reply #25 on: 27 Oct 2010, 06:12 am »
For any of you following this, I've had some time to work on these lately. Here's some pics of progress.

Parts cut and machined, ready to start assembly:


Boxes built:


Buildout skeleton for sand space mostly done:


Danny Richie

Re: Sub Cabinet Design
« Reply #26 on: 27 Oct 2010, 02:21 pm »
That looks awesome!

Voncarlos

  • Jr. Member
  • Posts: 156
  • OB5s in Stripes
Re: Sub Cabinet Design
« Reply #27 on: 27 Oct 2010, 03:07 pm »
Looking good.
Love your mobile small-tools-cart. What's the rounded sawhorse for?

Carlos

Peter J

  • Full Member
  • Posts: 1876
  • Hmmmm
Re: Sub Cabinet Design
« Reply #28 on: 27 Oct 2010, 03:35 pm »
Looking good.
Love your mobile small-tools-cart. What's the rounded sawhorse for?

Carlos

Carlos, should look pretty cool when done. Your speakers are beautiful... I followed your build thread with interest

Cart was a fun thing to build, and useful.

Rounded horse is for bucking sheet goods onto tablesaw. If I tilt one end of a sheet onto the horse, I can pivot it to table height and rotate without busting a gut. MDF is a killer weight wise, and I'm not getting any younger!

Peter J

  • Full Member
  • Posts: 1876
  • Hmmmm
Re: Sub Cabinet Design
« Reply #29 on: 29 Oct 2010, 03:03 am »
A bit more progress, got the "skin" on one of 'em. Cabinet pretty dead even before sand and outermost shell.


Carlos, this is for you since you commented on it.


Outofthewoods

  • Industry Participant
  • Posts: 980
  • Fallen Enclosures, Inc. Crafted with Passion
Re: Sub Cabinet Design
« Reply #30 on: 29 Oct 2010, 04:41 am »
They're coming along great Peter. Well done!

Are you settled on a paint color/veneer species yet?

Got any pics of the first design you built?

Thanks,

Ruben

Peter J

  • Full Member
  • Posts: 1876
  • Hmmmm
Re: Sub Cabinet Design
« Reply #31 on: 29 Oct 2010, 02:00 pm »

Are you settled on a paint color/veneer species yet?

Got any pics of the first design you built?


Ruben, the first design never got built, I just wasn't satisfied with the way it looked on paper. It's very similar to the concept drawing earlier in this thread. Using a square "core" box just made it too squatty looking to my eye. Your design inspired me to redo.
Since my mains and surrounds
 are painted, I've decided to forego veneer and paint these as well. I'm leaning toward black top and bottom and a bronzey root beer metallic on sides.

Original design:


New and improved:


Peter J

  • Full Member
  • Posts: 1876
  • Hmmmm
Re: Sub Cabinet Design
« Reply #32 on: 4 Nov 2010, 02:48 am »
More progress on these for the photo junkies

Filled first one as a kind of shakedown............hey a pun! Ready to do the remaining three.


Here's one full ready to install front. Loading the sand proved to be harder than anticipated....well, actually getting all the sand off the skeleton while maintaining full sand compartments for glue-up is a lesson in tedium.


Makeshift shaker table worked OK, but tore itself apart.


Out of curiosity, I weighed before and after sand filling, looks like each one gained about 7 1/2 lbs.


Outofthewoods

  • Industry Participant
  • Posts: 980
  • Fallen Enclosures, Inc. Crafted with Passion
Re: Sub Cabinet Design
« Reply #33 on: 15 Dec 2010, 07:55 pm »
Hey Peter,

Lookin' good! :thumb:

Anything new to share?

Ruben

Peter J

  • Full Member
  • Posts: 1876
  • Hmmmm
Re: Sub Cabinet Design
« Reply #34 on: 16 Dec 2010, 12:24 am »
Ahhh Ruben, they sit in the shop waiting for me to get unbusy with paying work. I'm not bitching, though, last year at this time I was idle and not a thing on the horizon...not much fun :|

Peter J

  • Full Member
  • Posts: 1876
  • Hmmmm
Re: Sub Cabinet Design
« Reply #35 on: 29 Dec 2010, 06:13 pm »
Some progress while I'm taking some time off during holidays.


Sides glued up and trimmed


Ply inside panel installed for ridgidity and better attachment screw bite


Vertical edges shaped


And a quick mock-up (sides not attached) just to give me some inspiration to finish :roll:


HT cOz

Re: Sub Cabinet Design
« Reply #36 on: 29 Dec 2010, 09:16 pm »
Man those are killer.  STOUT!!!  :icon_twisted:

Peter J

  • Full Member
  • Posts: 1876
  • Hmmmm
Re: Sub Cabinet Design
« Reply #37 on: 6 Jan 2011, 07:48 pm »
 A little more progress, 'cuz I know y'all like pictures 8)

These things are going to weigh something close to 160 lbs when done, so they're getting ball transfer casters to make moving a little easier.


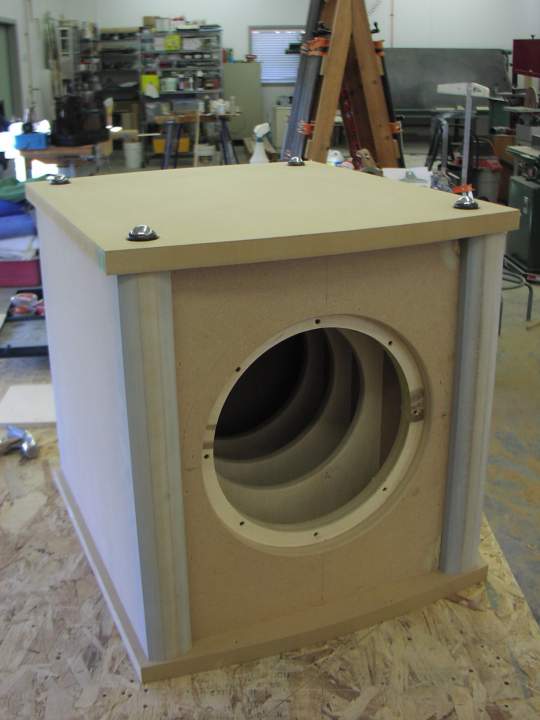
Close up of caster mounting


Grill frames machined and attaching neo magnets installed. Assembly is mocked up before take apart to prep for painting.


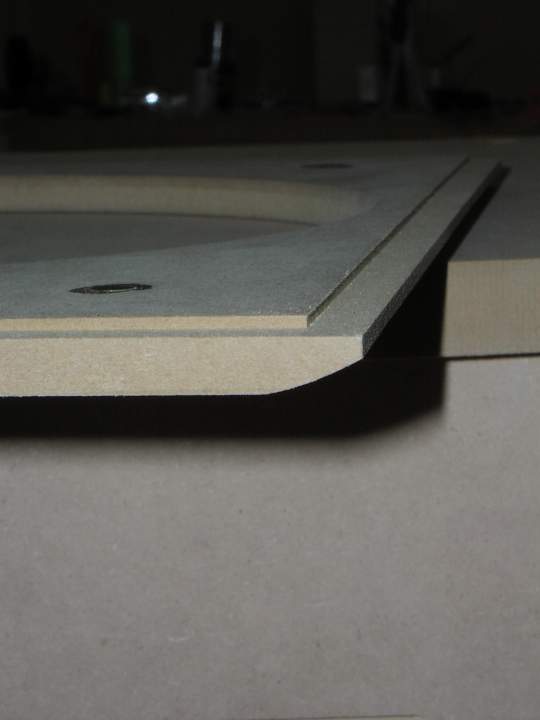
Close-up of grill intersecting side. I needed to use a thick grill frame and sink driver into cabinet to accomodate max excursion.  Didn't want to make sides, top and bottom any deeper I tapered grill with same radius that's on the sides.


Here's closeup of grill edge showing taper and back rabbet for grill cloth. Rabbeting for cloth avoids inevitable corner bunching of fabric that keeps grill from sitting flat on cabinet.


patricksalter

  • Jr. Member
  • Posts: 60
Re: Sub Cabinet Design
« Reply #38 on: 24 Jan 2011, 06:00 am »
Peter

Did you take the time to write up plans for this design?   I'm about to pull the trigger and buy a direct servo, and absolutely love your design.  Love the leatherette and would like to mimick your awesome design.  Also, any suggestions on where to get the silica sand?  I know lowes and home depot carry the stuff, but not sure if its the right sand for the job. 

Top notch work man!   


Patrick

Peter J

  • Full Member
  • Posts: 1876
  • Hmmmm
Re: Sub Cabinet Design
« Reply #39 on: 24 Jan 2011, 06:54 am »
Peter

Did you take the time to write up plans for this design?   I'm about to pull the trigger and buy a direct servo, and absolutely love your design.  Love the leatherette and would like to mimick your awesome design.  Also, any suggestions on where to get the silica sand?  I know lowes and home depot carry the stuff, but not sure if its the right sand for the job. 

Thanks Patrick, I drew the models you see in SketchUp... not really any formal writeup other than what's in this thread. The leatherette on Ruben's design is mighty handsome.
In time, I'll complete these, it's a spare time project and I vacillate on how to finish, my latest brainstorm is copper leaf on sides, but time will tell :dunno:
I used #70 white silica sand, bought at lumberyard, often used as a sandblasting medium. Much finer than play or masonry sand, and no worries about moisture content.

Good luck with your project, post your progress and pics...we likes pics :wink: