***X-SLS & X-CS Encore, AV-1RS Build***

0 Members and 1 Guest are viewing this topic. Read 45135 times.

Peter J

  • Full Member
  • Posts: 1876
  • Hmmmm
Re: X-SLS & X-CX Encore, AV-1RS Build
« Reply #20 on: 19 Nov 2011, 12:19 am »
Don't forget to put at least a 3/8" radius on the back side of the woofer holes. This is very important.

Thanks Danny, got it in the mix... will use 1/2" roundunder after I cut holes.


Onward with veneering. The pics show first of two plys that will go on surfaces with exposed MDF edges...helps to eliminate seam telegraphing later.

Raw Veneer


This is a jig to put a straight edge on veneer


After straight edging, bookmatch those edges and temporarily secure with masking tape


Veneer tape on face


Vacuum bag with SLS staged


Glue rolled on


Bookmatch aligned


Into the bag, this is where it starts getting fun!


Fully clamped. I can get around 22 inches of mercury vacuum at this altitude. If I recall, that's around 1300 psi, but don't quote me on that. It flattens out that wavy veneer like a pancake, it never ceases to amaze me! Guess I'm easily amused...


Here's the other SLS after trimming an a little scraping


And the other side after some sanding


jeffh

Re: X-SLS & X-CX Encore, AV-1RS Build
« Reply #21 on: 19 Nov 2011, 03:58 am »
Nice.  Wish I had access to a vacuum bag like that.

 :thumb:


grimace

Re: X-SLS & X-CX Encore, AV-1RS Build
« Reply #22 on: 19 Nov 2011, 01:12 pm »
Nice shop!  How do you trim the raw veneer?  I had problems when I tried that.

Peter J

  • Full Member
  • Posts: 1876
  • Hmmmm
Re: X-SLS & X-CX Encore, AV-1RS Build
« Reply #23 on: 19 Nov 2011, 07:40 pm »
Nice shop!  How do you trim the raw veneer?  I had problems when I tried that.

Thanks, I dreamed about it for years prior to building it.

 As to veneer trimming, I'll assume you mean after veneer is applied. I use a router with a specific cutter...solid carbide 1/4" down spiral flush trimming like this;


I've tried all kinds of flush trimmers and for most things this is my go-to cutter. A little spendy but it's performance is just superior. I also use non guided spirals for hole cutting. If you haven't tried them, I can almost guarantee you'll like it. Be sure to get down spiral...up would want to chip veneer.

If you were asking about cutting raw veneer in general, three tools in the arsenal; sharp utility knife, heavy scissors and handheld veneer saw. Which one is sorta dictated by what I'm doing.


Peter J

  • Full Member
  • Posts: 1876
  • Hmmmm
Re: X-SLS & X-CX Encore, AV-1RS Build
« Reply #24 on: 27 Nov 2011, 05:20 am »
Been glueing veneer so there's been not much to see...just more of what I already posted. Now that veneering's done I'm moving on to adding some psuedo-inlay trim.

Here's some mahogany hardwood I've glued black cabinet liner onto.


Then cut into strips,


After cutting into strips, I glued cabinet liner onto one side of strip and then split to get two 3/8" x 3/8" square slices with liner on two ajacent sides


Cut 3/8" x 3/8" rabbet on perimeter of box


Cut inlay slices to fit in rabbet and glued in place


Tape off and rough sanded flush. I'll eventually put a 3/8" roundover on these "inlay" corners, but will cut driver holes first.


Stay tuned for more...


grimace

Re: X-SLS & X-CX Encore, AV-1RS Build
« Reply #25 on: 28 Nov 2011, 05:08 pm »
Thanks, I dreamed about it for years prior to building it.

 As to veneer trimming, I'll assume you mean after veneer is applied. I use a router with a specific cutter...solid carbide 1/4" down spiral flush trimming like this;


I've tried all kinds of flush trimmers and for most things this is my go-to cutter. A little spendy but it's performance is just superior. I also use non guided spirals for hole cutting. If you haven't tried them, I can almost guarantee you'll like it. Be sure to get down spiral...up would want to chip veneer.

If you were asking about cutting raw veneer in general, three tools in the arsenal; sharp utility knife, heavy scissors and handheld veneer saw. Which one is sorta dictated by what I'm doing.

Thanks...meant cutting the straight-edge on your jig that you showed earlier.  I have a handheld veneer saw or do you use the downward bit?

Peter J

  • Full Member
  • Posts: 1876
  • Hmmmm
Re: X-SLS & X-CX Encore, AV-1RS Build
« Reply #26 on: 28 Nov 2011, 06:24 pm »
Thanks...meant cutting the straight-edge on your jig that you showed earlier.  I have a handheld veneer saw or do you use the downward bit?

Ahhhh, the one thing I didn't cover in my response! You could use the trimmer on that jig, but I've found it faster and a little cleaner to run it on tablesaw with a sharp many-tooth blade. I pull the veneer beyond the edge of the jig by the amount I want to trim off, clamp it down, and run through the saw with fence set at the width of jig...it this case 8".
Doing it this way, the jig will last through entire job, 'cuz I'm not cutting it, just grazing the same side over and over.
Is that helpful? I could take some photos in process if you like.

grimace

Re: X-SLS & X-CX Encore, AV-1RS Build
« Reply #27 on: 28 Nov 2011, 06:53 pm »
Ahhhh, the one thing I didn't cover in my response! You could use the trimmer on that jig, but I've found it faster and a little cleaner to run it on tablesaw with a sharp many-tooth blade. I pull the veneer beyond the edge of the jig by the amount I want to trim off, clamp it down, and run through the saw with fence set at the width of jig...it this case 8".
Doing it this way, the jig will last through entire job, 'cuz I'm not cutting it, just grazing the same side over and over.
Is that helpful? I could take some photos in process if you like.

Yep - makes sense.  Thanks

Peter J

  • Full Member
  • Posts: 1876
  • Hmmmm
Re: X-SLS & X-CX Encore, AV-1RS Build
« Reply #28 on: 1 Dec 2011, 05:57 am »
Some more progress...Christmas is looming near!

 Getting driver cutouts done and making grills

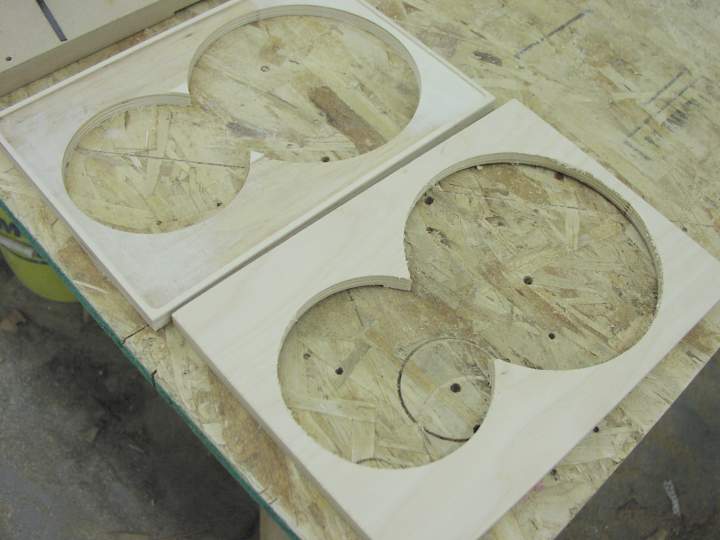
I made templates for drivers, template hole is 3/32" larger than actual cutout...you'll see why.

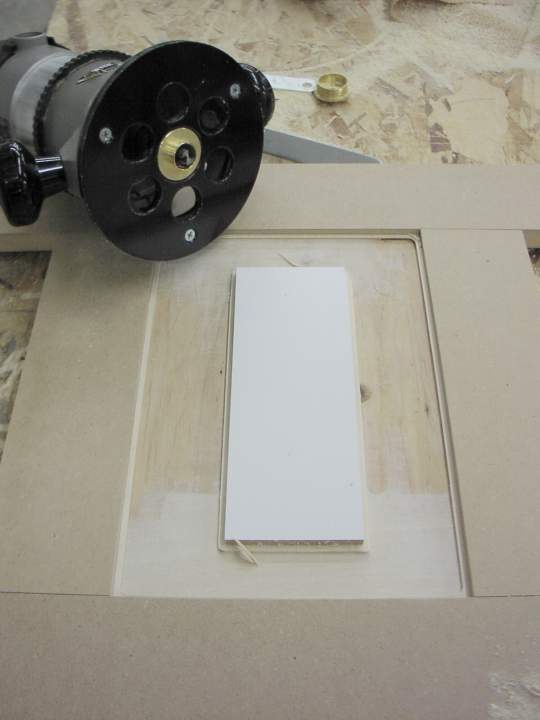
Here's the tweeter jig for RS, upside down


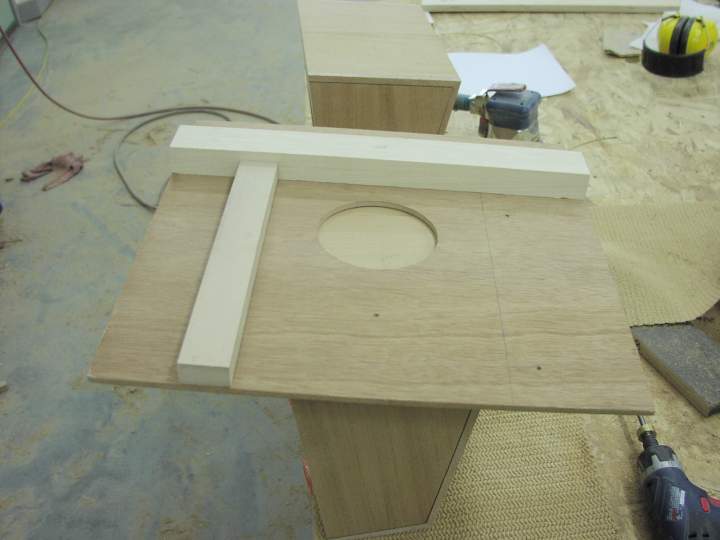
From beneath, sitting on RS


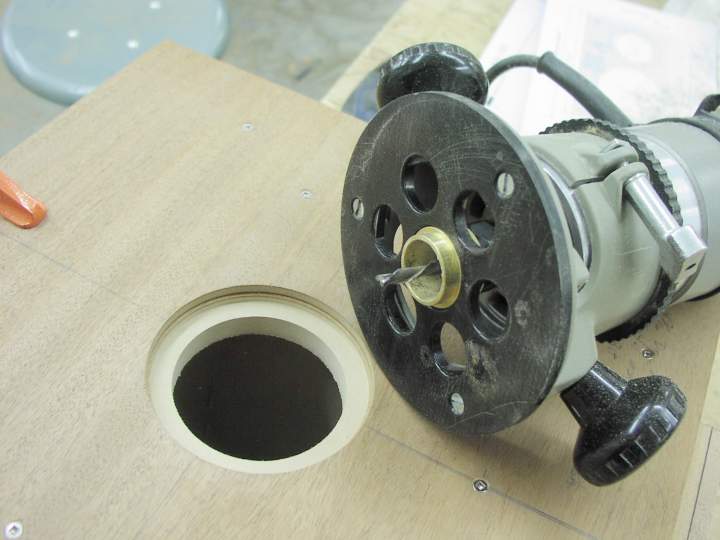
Here's top view, I used a screw to temporarily fasten to cabinet, hole is within the woofer cutout
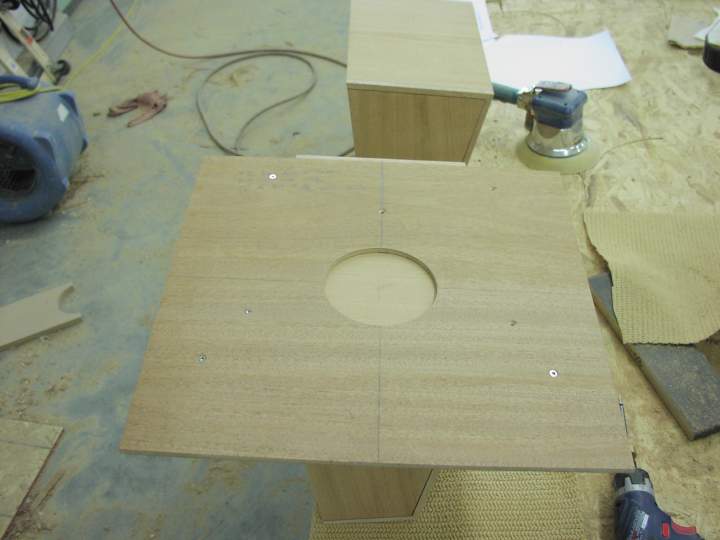
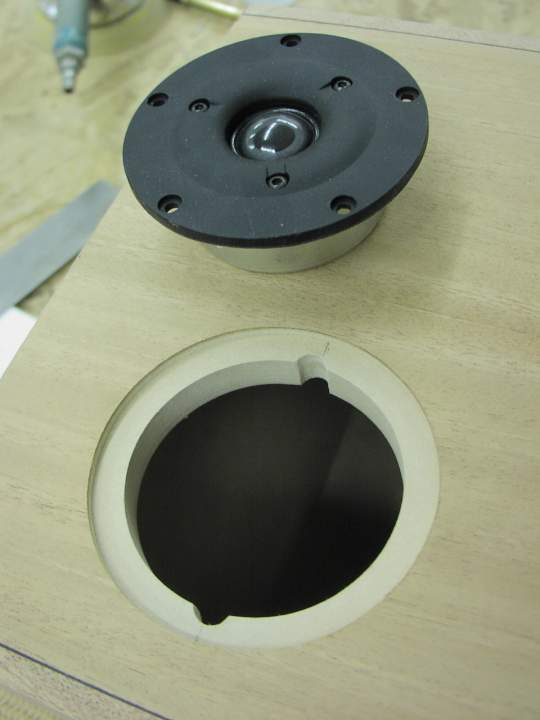
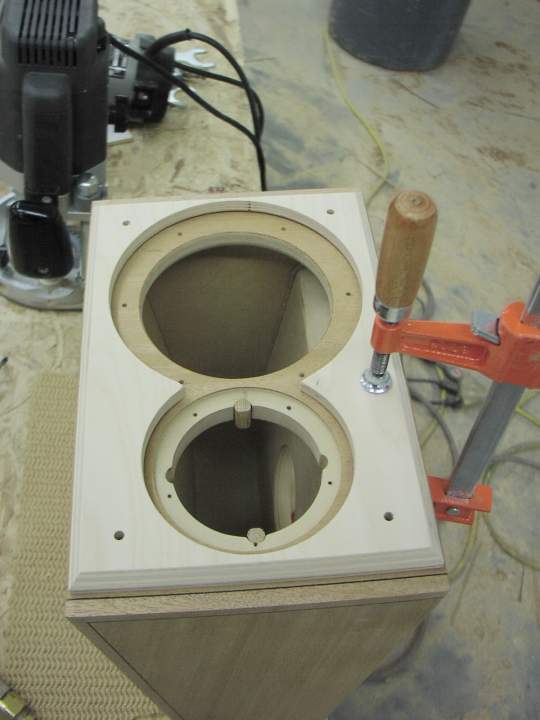


Tweeter flange cut


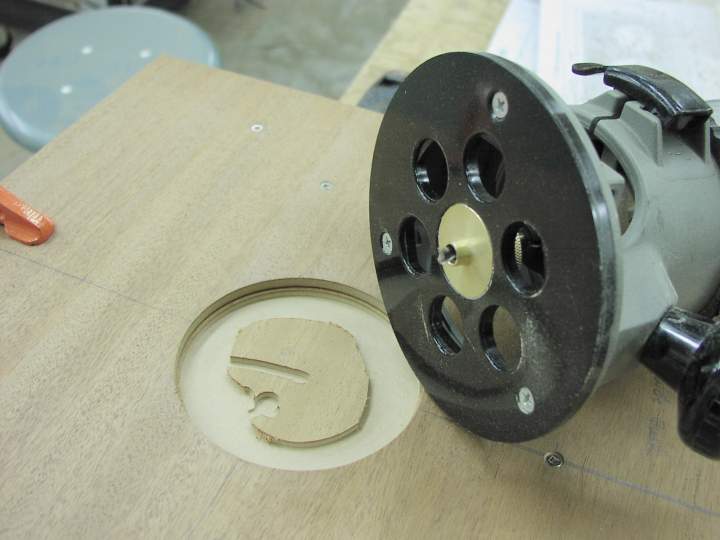
Tweeter through-hole, same bit, different template guide


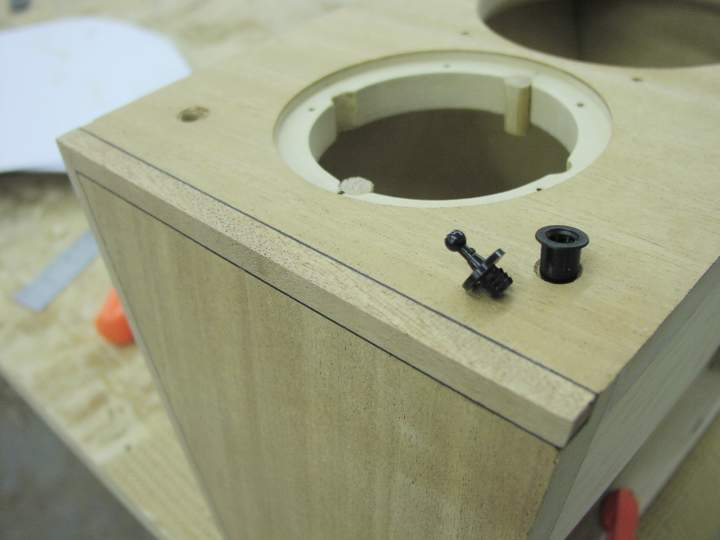
Notches for connectors...and a mistake...can you spot it?


I got indicisive on grill design, three iterations to get where I wanted, good thing I like woodworking, huh?

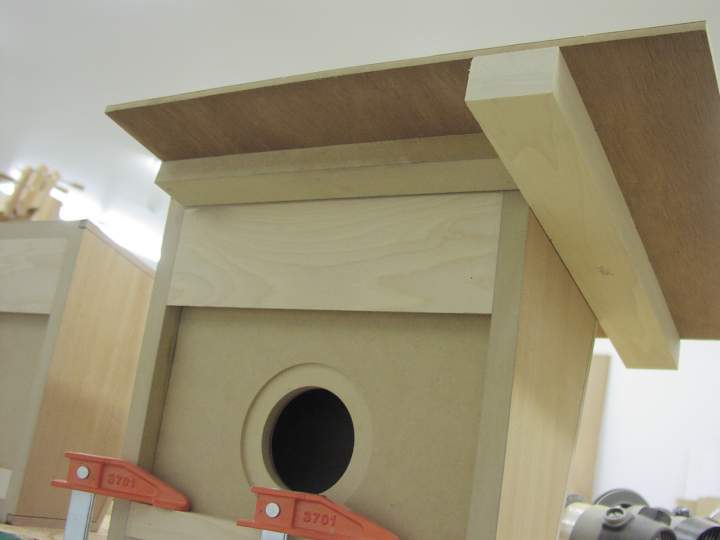
Here's the first go, 1/4" material, built up perimeter. Need 1/2" clearance off cabinet surface to accomodate woofer height


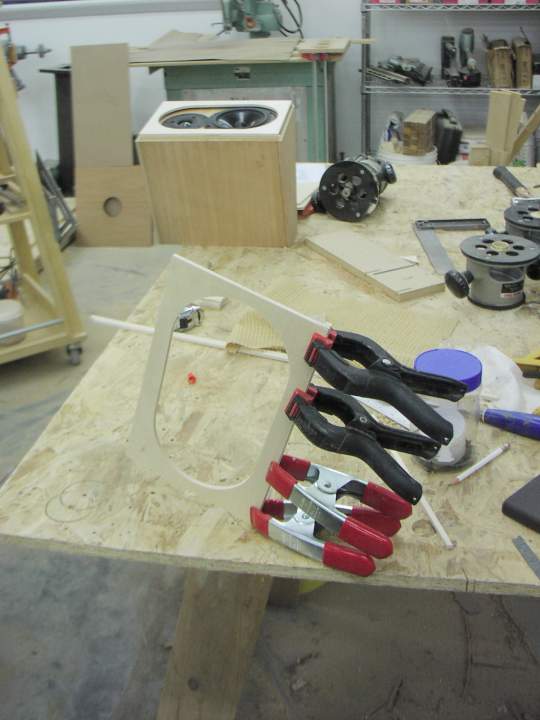
Second brainstorm, 1/2" material, different design


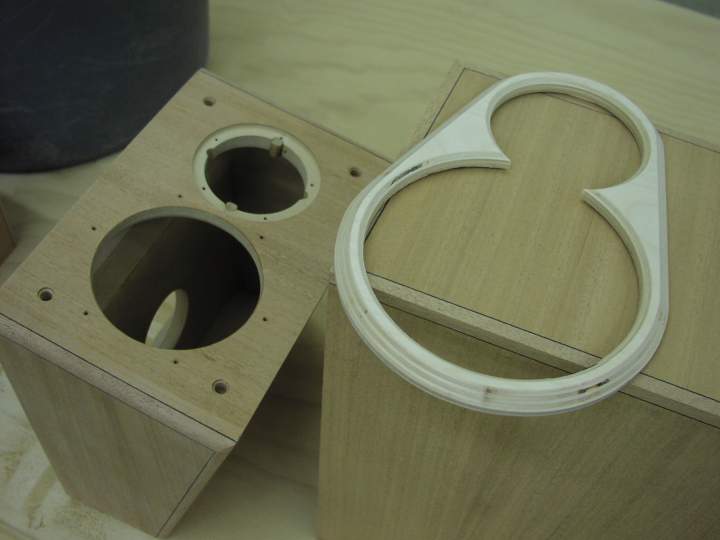
Changed my mind and went to something more squared off, just didn't like the way the roundy one looked. 1/2" material, I'm recessing back for staples and mounting clip flange.


Front & back


Using grill as guide for drilling cabinet holes for sockets


And the clips, different then I've used before, I think I like them


If these were for me, I'd have recessed magnets, but I'm thinkin' the magnetic grills would become a curiousity for inquisitive grandsons and squashing the tweeter dome would be next in line. What is it about domes and kids?


Danny Richie

Re: X-SLS & X-CX Encore, AV-1RS Build
« Reply #29 on: 1 Dec 2011, 06:04 am »
Something to keep in mind....

Surrounding the tweeter with a grill frame will cause significant diffraction that will alter the response. Try to stay as far away from the tweeter as possible with the grills frame and put a large radius on the inside edge to minimize reflections. 

Peter J

  • Full Member
  • Posts: 1876
  • Hmmmm
Re: X-SLS & X-CX Encore, AV-1RS Build
« Reply #30 on: 1 Dec 2011, 06:36 am »
Something to keep in mind....

Surrounding the tweeter with a grill frame will cause significant diffraction that will alter the response. Try to stay as far away from the tweeter as possible with the grills frame and put a large radius on the inside edge to minimize reflections.

Gees I had this all response all done and got logged out 'cuz I'm a slow typer.

Danny, I know it's not ideal, it's those surface mount woofers that throw a wrench in the gears  :wink:

There was method in the madness. Since the tweeter to grill clearance is somewhat dictated by proximity to end of cabinet, I reasoned that a partial surround would not be a huge issue...am I kidding myself?

There's still possibility to round over some of that opening. You're saying on the side nearest the cabinet (inside)? I would have thought the opposite.

Fortunatly the recipients are not audio geeks. I'll make an effort to do something different on mains and center.

Danny Richie

Re: X-SLS & X-CX Encore, AV-1RS Build
« Reply #31 on: 1 Dec 2011, 03:11 pm »
Just make the hole around the tweeter larger. Then put a radius on the inside edge. You want to remove as much flat reflective surface away for the tweeter as possible.

rajesh

  • Jr. Member
  • Posts: 194
  • Live & Let Live
Re: X-SLS & X-CX Encore, AV-1RS Build
« Reply #32 on: 3 Dec 2011, 03:33 am »
If I understand correctly, Danny is referring to the additional frame that Peter made. Since the tweeter would sit into a recess after fitting this frame, the sound from tweeter would get diffracted. Is that what you are saying Danny?

Danny Richie

Re: X-SLS & X-CX Encore, AV-1RS Build
« Reply #33 on: 3 Dec 2011, 10:15 pm »
If I understand correctly, Danny is referring to the additional frame that Peter made. Since the tweeter would sit into a recess after fitting this frame, the sound from tweeter would get diffracted. Is that what you are saying Danny?

Yes.

Peter J

  • Full Member
  • Posts: 1876
  • Hmmmm
Re: X-SLS & X-CX Encore, AV-1RS Build
« Reply #34 on: 4 Dec 2011, 07:22 am »
Some more progress, nearing the end of woodwork, will get into finishing soon.
All drivers fitted, Grill frames cut out. A few more pics, did anyone catch the mistake I referred to in last post about tweeter cutout?


Here's the improved grill frame for RS


I cut the thru hole for binding post cup before veneering, saved rabbet cut for after


Rounded inside of all woofer holes. The big base on router keeps it from tipping into hole...makes life easier.


SLS drivers fitted


Onto grills. I wanted the grills to not cover the black line which made for some close tolerances and skinny frames. I also beveled the outside edge to reduce the visual bulk of the 1/2" frame thickness. I extended the SLS grills down some for looks.


Needed to do a little clearancing to get things to fit


Here you can see why


And grill for CS


And finally the finished frames


Here's what corners look like after roundover.


skeeter99

Re: X-SLS & X-CX Encore, AV-1RS Build
« Reply #35 on: 4 Dec 2011, 08:45 am »
Man can I get you to build my next set of speakers for me?? That's some amazing woodworking! Keep it up!!

Scott

Danny Richie

Re: X-SLS & X-CS Encore, AV-1RS Build
« Reply #36 on: 4 Dec 2011, 06:00 pm »
Yeah, I like the grill frames better now.

Peter J

  • Full Member
  • Posts: 1876
  • Hmmmm
Re: X-SLS & X-CS Encore, AV-1RS Build
« Reply #37 on: 4 Dec 2011, 06:17 pm »
Yeah, I like the grill frames better now.

Danny, somewhere in my memory I stored the concept of imagining the radiation pattern of drivers expanding like a bubble from the driver forward, like blowing a bubble with gum. Sorta simplistic but is it accurate in your experience?

Peter J

  • Full Member
  • Posts: 1876
  • Hmmmm
Re: X-SLS & X-CX Encore, AV-1RS Build
« Reply #38 on: 4 Dec 2011, 06:28 pm »
Man can I get you to build my next set of speakers for me?? That's some amazing woodworking! Keep it up!!

Scott

Scott, it sounds goofy, but the grill frames were one of the most challenging parts of this build, given the constraints of original design and my desires.

FWIW, I've found projects like this satisfy the artisan in me, but it's also why I expanded my horizons into other areas, the actual time spent is way out of line with people's expectations.  I'm a little of a throwback in a CNC world, I'm afraid.

skeeter99

Re: X-SLS & X-CX Encore, AV-1RS Build
« Reply #39 on: 4 Dec 2011, 06:31 pm »
Scott, it sounds goofy, but the grill frames were one of the most challenging parts of this build, given the constraints of original design and my desires.

FWIW, I've found projects like this satisfy the artisan in me, but it's also why I expanded my horizons into other areas, the actual time spent is way out of line with people's expectations.  I'm a little of a throwback in a CNC world, I'm afraid.

I'm sure the grills were tough. I just built a center and made a grill for it and while its not finished yet (still need to pull the grill cloth on, it was definitely a challenge.

A CNC is nice but there's definitely something therapeutic about working with wood and building stuff on your own. Very nice work!

Scott