X-Statik and Voce Build

0 Members and 1 Guest are viewing this topic. Read 2223 times.

Rojo22

  • Jr. Member
  • Posts: 30
  • Sometimes, the wanderer is not lost....
Re: X-Statik and Voce Build
« Reply #20 on: 14 Jan 2023, 03:30 am »
Step 11:

Cutting the rebate filler strips for Part B:

Since I was over exuberant in cutting the rebates for Part B, I cut the strips to fill the gaps in the rebate.


Placing the strips in the gaps


Rojo22

  • Jr. Member
  • Posts: 30
  • Sometimes, the wanderer is not lost....
Re: X-Statik and Voce Build
« Reply #21 on: 14 Jan 2023, 03:42 am »
Status Update 2:

The main box is cut, and ready to be glued. I still need the long front piece, the short front piece, top and back of the cabinet, and the base cut.  I will bring some more material down to the shop and get it prepped to cut to size tomorrow.  I might wait to glue up on Monday and cut parts tomorrow.  The cat is out of the bag, my mentor knows we are making two sets of cabinets and he is very excited to know he will get a pair of cabinets as well.  Meanwhile, the debate rages on for which veneer species we will be using.  Complicating the debate is now that we have two sets of cabinets, we need two species of veneer.....Stay tuned!


Theronbo

Re: X-Statik and Voce Build
« Reply #22 on: 14 Jan 2023, 07:52 am »
I like your name for the tool ‘fly cutter’…

Found one on Amazon… ‘Circle Cutter’

General Tools 6 Circle and Wheel Cutter, Adjustable 1-Inch to 6-Inch https://a.co/d/2uiizoY

KTS

Re: X-Statik and Voce Build
« Reply #23 on: 14 Jan 2023, 12:54 pm »
Status Update 2:

The main box is cut, and ready to be glued. I still need the long front piece, the short front piece, top and back of the cabinet, and the base cut.  I will bring some more material down to the shop and get it prepped to cut to size tomorrow.  I might wait to glue up on Monday and cut parts tomorrow.  The cat is out of the bag, my mentor knows we are making two sets of cabinets and he is very excited to know he will get a pair of cabinets as well.  Meanwhile, the debate rages on for which veneer species we will be using.  Complicating the debate is now that we have two sets of cabinets, we need two species of veneer.....Stay tuned!


We’re you going to round over the bracing? I am no pro, but I have looked at a ton of builds on this forum and the bracing is almost always rounded over. Awesome build and really detailed pictures, thank you for sharing!

Kelly,

Rojo22

  • Jr. Member
  • Posts: 30
  • Sometimes, the wanderer is not lost....
Re: X-Statik and Voce Build
« Reply #24 on: 14 Jan 2023, 05:41 pm »
KTS

Thank you for alerting me to the rounding over of the baffle holes.

So, new guy questions:

1. I see rounding over of the speaker holes on the front piece on the plans, but not on the inside baffle holes.  Did I miss something?
2. If the baffle holes need to be rounded over, what radius is appropriate, and do I round both sides, or if just one side, please indicate whether it is the top or bottom side.

KTS, thanks again for alerting me, thankfully before i started gluing things up.  I will rough cut some parts today, but assembly is on hold until i can get some additional information on the baffle hole round over issue.

All feedback is gratefully received, and appreciated in making my build the best possible speaker system!

corndog71

  • Full Member
  • Posts: 1670
  • Some people call me Rob.
Re: X-Statik and Voce Build
« Reply #25 on: 14 Jan 2023, 05:48 pm »
Don’t forget to add No Rez before closing them up.

mlundy57

  • Industry Participant
  • Posts: 3561
Re: X-Statik and Voce Build
« Reply #26 on: 14 Jan 2023, 05:59 pm »
KTS

Thank you for alerting me to the rounding over of the baffle holes.

So, new guy questions:

1. I see rounding over of the speaker holes on the front piece on the plans, but not on the inside baffle holes.  Did I miss something?
2. If the baffle holes need to be rounded over, what radius is appropriate, and do I round both sides, or if just one side, please indicate whether it is the top or bottom side.

KTS, thanks again for alerting me, thankfully before i started gluing things up.  I will rough cut some parts today, but assembly is on hold until i can get some additional information on the baffle hole round over issue.

All feedback is gratefully received, and appreciated in making my build the best possible speaker system!

I use a 5/16" roundover on both sides of the internal openings. The exact size of the radii isn't that important. The idea is to allow smooth airflow inside the box. You don't want sharp edges that could turbulence.

KTS

Re: X-Statik and Voce Build
« Reply #27 on: 14 Jan 2023, 08:28 pm »
KTS

Thank you for alerting me to the rounding over of the baffle holes.

So, new guy questions:

1. I see rounding over of the speaker holes on the front piece on the plans, but not on the inside baffle holes.  Did I miss something?
2. If the baffle holes need to be rounded over, what radius is appropriate, and do I round both sides, or if just one side, please indicate whether it is the top or bottom side.

KTS, thanks again for alerting me, thankfully before i started gluing things up.  I will rough cut some parts today, but assembly is on hold until i can get some additional information on the baffle hole round over issue.

All feedback is gratefully received, and appreciated in making my build the best possible speaker system!

Glad to help! The group is super knowledgeable and extremely helpful in here. Best of luck on the build, looking forward to more pictures and listening impressions!

Kelly,

Rojo22

  • Jr. Member
  • Posts: 30
  • Sometimes, the wanderer is not lost....
Re: X-Statik and Voce Build
« Reply #28 on: 15 Jan 2023, 02:37 am »

Step 12:

Routing the interior baffle holes and half holes for Parts B and C:

Thanks to the eagle eyed KTS for alerting me to the fact I had not rounded over the holes in the baffles.  I have set up a round over bit on the router table, and have run a few scraps through and am happy with the results.  I will run the parts through the router on Monday.  I will attach pictures after I have completed the step.   Again, thank you for identifying the issue before I glued everything together!


Step 12:


« Last Edit: 26 Jan 2023, 04:51 am by Rojo22 »

Rojo22

  • Jr. Member
  • Posts: 30
  • Sometimes, the wanderer is not lost....
Re: X-Statik and Voce Build
« Reply #29 on: 24 Jan 2023, 02:14 am »
Sorry everyone, had a few things come up, build is ongoing, and we made significant progress today.  I will continue posting updates tomorrow.

Rojo22

  • Jr. Member
  • Posts: 30
  • Sometimes, the wanderer is not lost....
Re: X-Statik and Voce Build
« Reply #30 on: 26 Jan 2023, 04:54 am »
Step 13:

Cutting the top of the cabinet, which will be referenced at Part A.  The instructions show an angle of 10 degrees for this part, on both ends to match the angle for the side pieces.  I test cut my spare part A piece to get close and then cut the 10 degree angle on one end of the board, and then set up a stop to cut the rest of the pieces using a cutoff from the spare piece.


Rojo22

  • Jr. Member
  • Posts: 30
  • Sometimes, the wanderer is not lost....
Re: X-Statik and Voce Build
« Reply #31 on: 26 Jan 2023, 05:08 am »
Step 14:

One last dry fitting was done before the glue up to make sure everything was looking good and we would not have any issues with the glue up.  I used original Titebond glue for the glue up.  I decided to glue up one pair of speakers at a time, instead of gluing all 4 cabinets at once.  The second set of cabinets were glued up this afternoon and will be complete tomorrow.  The blue painters tape on the bottom piece was used to make sure I could get the bottom piece out of the glue up, in case any glue dropped onto the piece.  Once the glue was dried overnight, I took the cabinets over to the horizontal sander and sanded off the filler pieces that were sticking out of the cabinet faces.


Rojo22

  • Jr. Member
  • Posts: 30
  • Sometimes, the wanderer is not lost....
Re: X-Statik and Voce Build
« Reply #32 on: 26 Jan 2023, 05:21 am »
Status Update 3:

The cabinets are now all glued together, and are ready to be fitted for the front and back pieces.  I have cut the oversized parts for both the back and fronts today, and will size them, and start cutting the holes for speakers over the next few days.  I have to sharpen the fly cutter before I start the procedure.

I have ordered 2 panels of Norez and it should be here in the next few days.  I might have a few questions about all the surfaces that need the Norez.  I am guessing all walls, and the top and bottom receive the Norez.

I have seen a few builds with the placement for the crossovers, and have not determined where I will put mine yet.  I would like to hear about the pros and cons of the placement of the crossover in the bottom of the cabinet vs other areas.  I plan on having the cabinet slide over the bottom piece, and then screw that to the base, so it can be removeable.  I am unsure of how the crossover will be placed in the bottom, if there is a need for Norez on the bottom of the cabinet.  Again, recommendations are graciously received.

The debate is still raging on about what species of veneer will be used on the speakers.  My mentor has a pretty good idea he is headed toward some walnut veneer for his set.  He has some really nice veneers stored away that have been waiting for such a project, and they just might make it on the speakers yet.  I am still undecided.

KTS

Re: X-Statik and Voce Build
« Reply #33 on: 26 Jan 2023, 11:44 am »
Nice progress! The no-rez should cover the majority of the interior of the box walls, except where your crossover will be located and the front baffle/bracing in the box. I mount the crossover in the bottom of the box, but I glue a VCT tile to the bottom of the box before installing the crossover. Danny has a videos of him building the Encore’s, one of them is the installation of no-rez he does a good job of explaining the how and why. I prefer bottom mounting of a crossover if possible, it is easier to place loose fill insulation over it, but I know there are other options, just in my limited experience it is what I have done.

Hobbsmeerkat

  • Industry Participant
  • Posts: 2529
Re: X-Statik and Voce Build
« Reply #34 on: 26 Jan 2023, 02:24 pm »
Another small tip for the NoRez:
Keep it about 2 inches away from the holes for the lower woofers.
That little extra space allows the woofers some room to play into the cabinet rather than playing directly into the foam layer.

Stardust1

  • Jr. Member
  • Posts: 4
Re: X-Statik and Voce Build
« Reply #35 on: 27 Jan 2023, 10:15 pm »
Great to see a radial arm saw being used. My bet is your mentor is happy to teach its versatility. Looks to be much used and taken care of. Waiting for updates!

Rojo22

  • Jr. Member
  • Posts: 30
  • Sometimes, the wanderer is not lost....
Re: X-Statik and Voce Build
« Reply #36 on: 28 Jan 2023, 02:09 am »
Great to see a radial arm saw being used. My bet is your mentor is happy to teach its versatility. Looks to be much used and taken care of. Waiting for updates!

Stardust1

We have 6 radial arm saws in the shop.  We have two of them set up for general use, but the other four are set up with specific angles.  We do segmented work, and set up a saw depending on the angles we need, and then usually just leave it set up for the next set of cuts.  We take the segments and glue those up and then turn them into bowls, pens, kaleidoscopes, chess pieces  or Christmas ornaments.  We have two radial arm saws which are older than I am, and I am north of the 50 year old range.  The radial arm saw in my opinion is a much maligned piece of equipment because its reputation comes from people who do not how to use it properly and safely.  The radial arm saw is very versatile, and very accurate when used correctly.  All of the equipment in the shop is loving cared for, and can be used at a moments notice.

Some fun stuff we make:

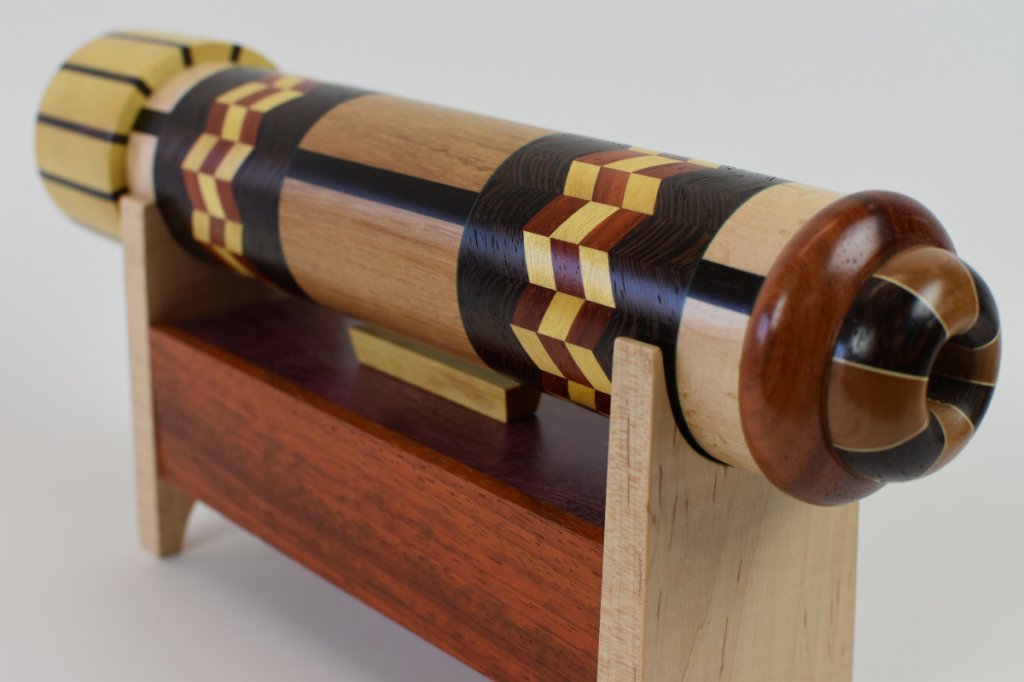
Kaleidoscopes-  We made these 3 Christmas' ago for gifts for family and friends.  We made 36 of them, all of them unique, but all of them segmented. They are about 20 inches long and 3 to 4 inches in diameter.  The stand has a compartment in it to store different fluid filled galleries to change in and out of the kaleidoscopes.  You can take the gallery out and change the colors or look to suit your taste.
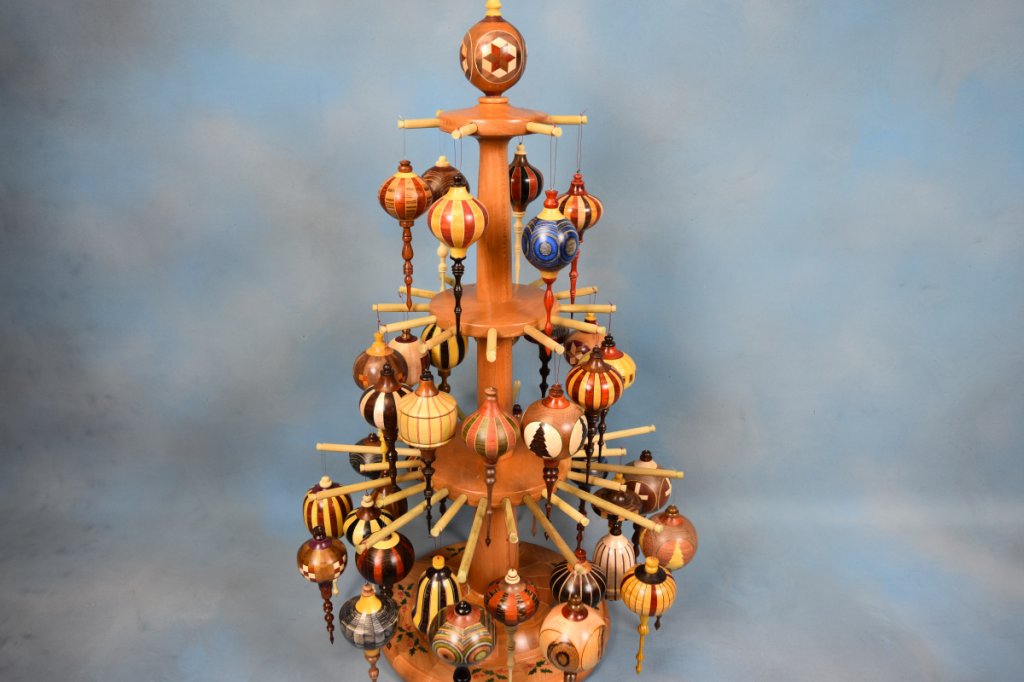


Christmas Ornaments- We make many of these for gifts for family and friends.  The tree we make and fill full of ornaments, and then give as a gift.  All of these are segmented and the diameter is usually around 2 inches give or take on the different shapes and sizes.  We have created some new styles that have as many as 500 pieces of wood in a 2 inch ball....the segments are very tiny...lots of detail.
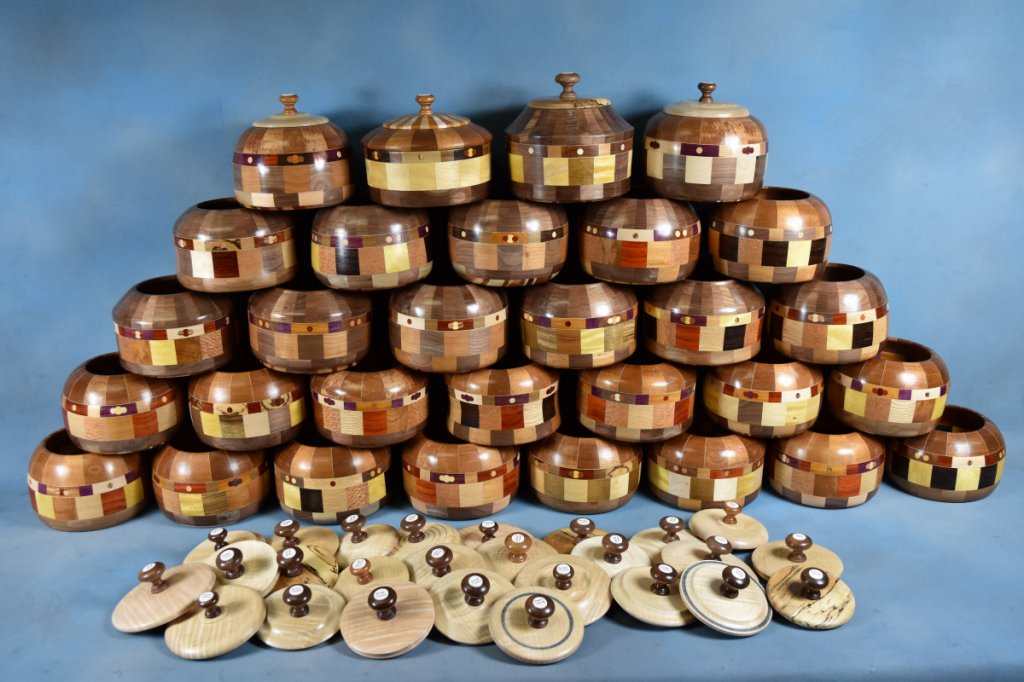


Bowls-  We make a ton of bowls, these were made for children in the hospital, and was for the Beads of Courage group.  We donated these to the children, and all are segmented.  The bowls vary in size, but usually are around 12 inches in diameter or better.


« Last Edit: 28 Jan 2023, 03:52 am by Rojo22 »

Rojo22

  • Jr. Member
  • Posts: 30
  • Sometimes, the wanderer is not lost....
Re: X-Statik and Voce Build
« Reply #37 on: 28 Jan 2023, 03:14 am »
Step 15:

The Front Pieces (Part F and Part G), along with Back of the cabinet (Part E) were cut to size, and squared.  The only piece not cut now for the cabinet is the base or foot (Part H).

Tomorrow or Monday we will cut the circles for the speaker holes and prepare for the veneering steps.

I have not settled yet on the veneer type yet...so many choices....

Parts Ready for cutting speaker holes-


Rojo22

  • Jr. Member
  • Posts: 30
  • Sometimes, the wanderer is not lost....
Re: X-Statik and Voce Build
« Reply #38 on: 31 Jan 2023, 03:41 am »
Step 16:

Cutting Holes in the Front Long piece and Front Short piece-

We set up the drill press and the fly cutter to cut the holes in the front pieces for the cabinet.  We centered the drill bit, set up a straight edge clamp, and then set up stops and hold downs to keep it all safe.


First Holes worked great, now for 400 more holes....


I have to sharpen the fly cutter again before we start tomorrow.  Now we only need the small hole for each piece and we can start thinking about....veneer!  The Norez arrived on Sunday evening, so I can start looking at how that all gets installed.


Rojo22

  • Jr. Member
  • Posts: 30
  • Sometimes, the wanderer is not lost....
Re: X-Statik and Voce Build
« Reply #39 on: 1 Feb 2023, 05:48 am »
Step 16 (Cont.):

Cutting the smaller holes in the front pieces-

A little progress today.  I set up the fly cutter to cut the smaller hole for the front pieces.  Everything is now set up to start considering veneer.  I will make the "notches" for the small hole in the next few days.  We are getting the shop ready to do some veneering!

A few pictures of the new smaller holes: (starting to look like speakers)