Hobbs X-Statik Rebuild & Upgrade

0 Members and 1 Guest are viewing this topic. Read 7247 times.

Hobbsmeerkat

  • Industry Participant
  • Posts: 2542
Re: Hobbs X-Statik Rebuild & Upgrade
« Reply #20 on: 9 Mar 2021, 12:43 am »
In the meantime, I took apart the stock X-statik, drivers, stuffing wiring etc. so I can start prepping the cabinet for paint.


This one was thankfully *much* easier to work with than the tower I lost. There was a fair bit more slack in the lines, esp for the lower woofers, making it much easier to disassemble.

Does anyone have any tips for getting out the remainder of the stuffing off the walls so i can ensure good adhesion for the Norez?

corndog71

  • Full Member
  • Posts: 1672
  • Some people call me Rob.
Re: Hobbs X-Statik Rebuild & Upgrade
« Reply #21 on: 9 Mar 2021, 01:15 am »
I wish. 

I cleaned out X-LS, X-CS, and the top section of X-SLS and all I can say is that it sucks!  I used a hair dryer, box cutter, flat tip screwdriver and it still was hard as hell. 

I never bothered with my X-Statiks or X-Omnis because I’m just done with that.

Maybe a heat gun would work better to soften the glue but be really careful.  Even with just a hair dryer it got hot inside the cabinet.

Hobbsmeerkat

  • Industry Participant
  • Posts: 2542
Re: Hobbs X-Statik Rebuild & Upgrade
« Reply #22 on: 9 Mar 2021, 06:43 pm »
Printed my tweeter crossover boards last night, and got them assembled this afternoon.  :thumb:


Managed to accidentally snap the one of connections in the crossover, so I used some of Danny's spare copper wire from a previous project to patch it.

Next will be the bass boards since they're small & I can print two at once. I do need to make a couple small changes to the holes & underside channels first, tho.

BWT, thanks for the info, Corndog71! I'll just have to take my time and what I can.  :thumb:

hawkeyejw

Re: Hobbs X-Statik Rebuild & Upgrade
« Reply #23 on: 9 Mar 2021, 06:52 pm »
Those look really nice Hobbs!

Hobbsmeerkat

  • Industry Participant
  • Posts: 2542
Re: Hobbs X-Statik Rebuild & Upgrade
« Reply #24 on: 10 Mar 2021, 01:26 am »
Thanks! I'm really happy with how they're turning out!

I actually just finished up the bass circuits too!  :thumb:


And while these boards were printing, I used up the last of my spray primer & paint to cover the woofer motor structure, I'll give it a another quick coat tomorrow, if possible, then a couple layers of clear. They're looking great so far, tbh! Only painting the two woofers that will be in the OB portion, the remaining two are the original covered models.


Next up, Mid circuits boards!  :thumb:

Hobbsmeerkat

  • Industry Participant
  • Posts: 2542
Re: Hobbs X-Statik Rebuild & Upgrade
« Reply #25 on: 10 Mar 2021, 01:44 pm »
First mid circuit is complete! :thumb:


2nd board is printing now, should be ready in about 4 hours.

Here's a direct comparison between the custom circuits and the stock board. As good as they sound stock, i cant wait to get these puppies up and running!


I'm also starting to lean against the idea of using both circuits in each system, I don't have a clean way to completely disconnect the circuits without hurting the performance. I'll probably just do the same I did with my XLS kit; binding posts into tube connectors, then into the new crossovers.

Might also sell the stock crossover boards, and offer to upgrade them to whomever wants them. Probably not much more than the cost of shipping/upgrades.

RonP

  • Full Member
  • Posts: 407
Re: Hobbs X-Statik Rebuild & Upgrade
« Reply #26 on: 10 Mar 2021, 02:43 pm »
3D Printed boards! I like that idea!

corndog71

  • Full Member
  • Posts: 1672
  • Some people call me Rob.
Re: Hobbs X-Statik Rebuild & Upgrade
« Reply #27 on: 10 Mar 2021, 04:59 pm »
I'm surprised you don't have a sonicap in the mid circuit.  I would also put a miflex bypass on that cap.

Those printed boards look cool! I just swapped caps on the original board with my upgrades.

Hobbsmeerkat

  • Industry Participant
  • Posts: 2542
Re: Hobbs X-Statik Rebuild & Upgrade
« Reply #28 on: 10 Mar 2021, 05:12 pm »
I'm surprised you don't have a sonicap in the mid circuit.  I would also put a miflex bypass on that cap.

Those printed boards look cool! I just swapped caps on the original board with my upgrades.

I honestly didn't even think about it, but its already far better than the quality of the stock crossover, and all the caps have bypass sonicaps, so it may be something it can upgrade for fun down the line, but beyond that, I'm certain I'll still be more than happy with the results. :P

Yeah! I haven't been using it lately since ive been busy with my Studio kit and life in general, so i figured this would be a great way to put it to use beyond Neo3 waveguide & deep cup prototyping.
Ill be doing the same with my Studios, once the time comes.

Hobbsmeerkat

  • Industry Participant
  • Posts: 2542
Re: Hobbs X-Statik Rebuild & Upgrade
« Reply #29 on: 14 Mar 2021, 10:36 pm »
Spent the morning working on removing as much of the glued fabric as i could, made some decent success with a scraper for the first round, and a razor blade and got out what came to roughly the size of a racket ball.


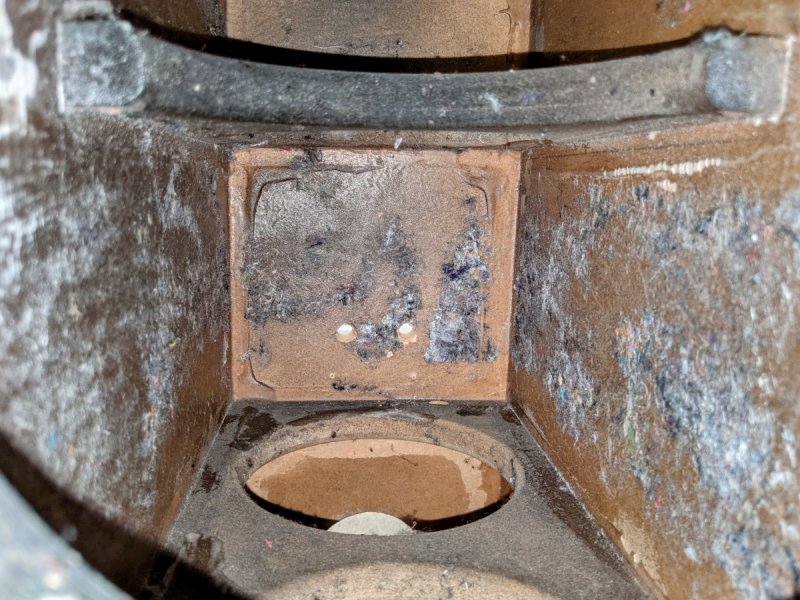
Still not perfect, but it's definitely workable. Considering just coating the insides with something that will prevent the fibers from causing adhesion issues forcthe Norez.
If anyone has any tips for that, please let me know!

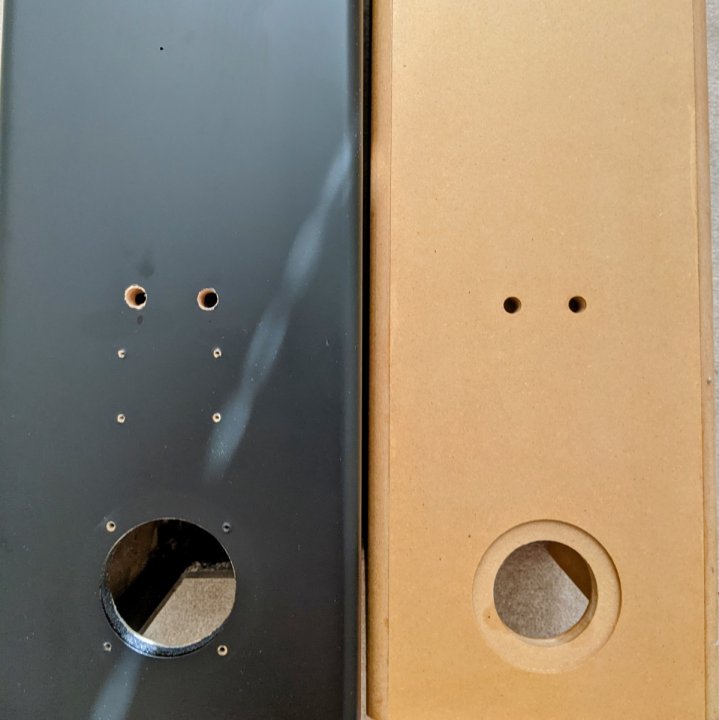
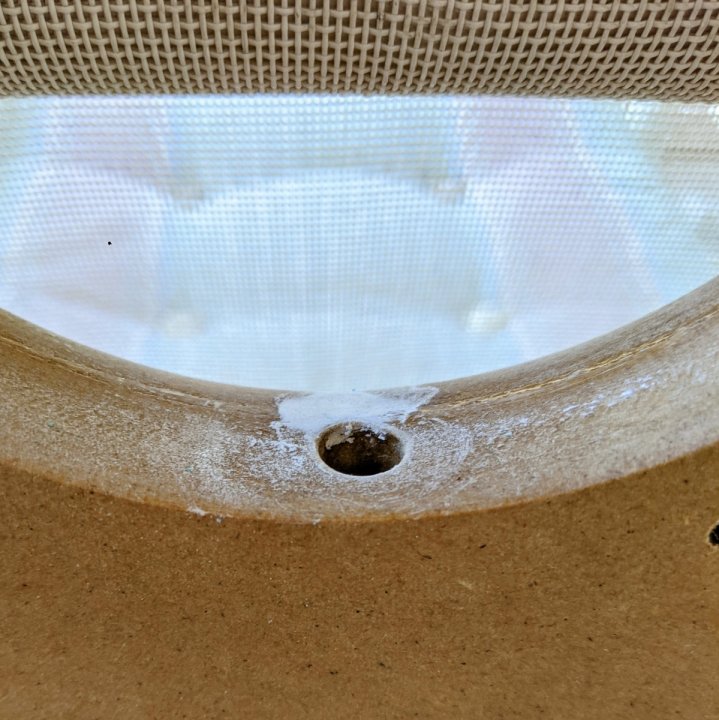
I also drilled out the holes for the tube connectors, and drilled the hole for tweeter/mid wire pass-through. (Its a 3/8 Inch hole)


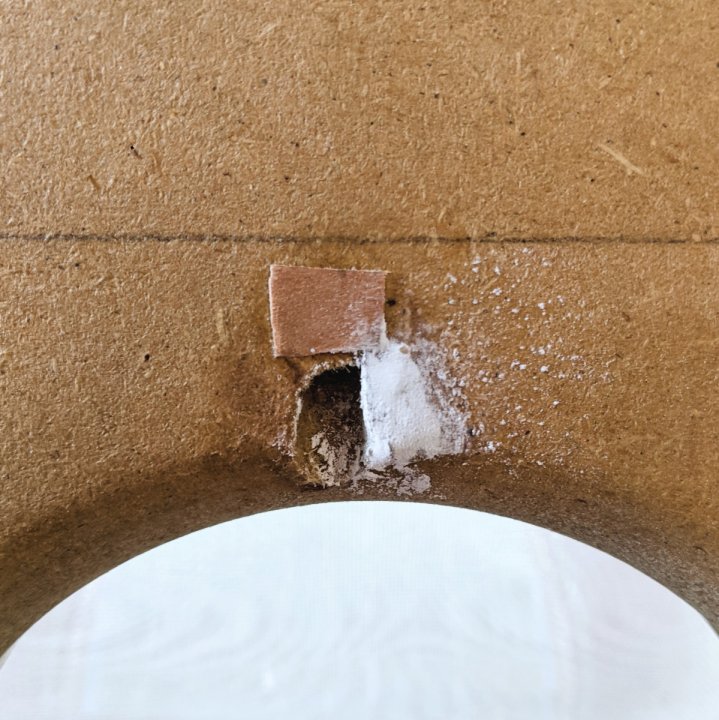
The back side had a bit of a blow out, but considering the angle, thats not too surprising. Used a small bit of veneer wood filler & a clamp to hold it in place, but it's kinda hidden inside the cabinet so its not that big of a deal if it looks like shite. :lol:


It matches the OEM model so I'm pretty happy. :thumb:

I would like to flush-mount the OEM binding post cup, but that's not really viable, sine they're a different size than the smaller ones Danny provides, and the odd size of the mounting ring is too large for the routing bits I have. It would beed to have a 0.6" depth to work.. or would mean cutting a larger hole than fhe current one...
Biggest bit I have is 1/2"..  :scratch:

Hobbsmeerkat

  • Industry Participant
  • Posts: 2542
Re: Hobbs X-Statik Rebuild & Upgrade
« Reply #30 on: 15 Mar 2021, 05:20 am »
Last update for a the next few days. :P


Decided I should go ahead and burn in the tweeter and Mids circuit, cuz I know the copper caps will need a good week of solid runtime before they're ready to go. I grabbed some spare wire i had on hand to quickly wire them all up & they're currently playing white noise on loop and burried under a couple blankets to keep the noise down at night.

After tonight I'll probably just let them play lots of random music & adjust the volume up and down every few hours.
« Last Edit: 15 Mar 2021, 01:07 pm by Hobbsmeerkat »

Sonicjoy

  • Full Member
  • Posts: 366
Re: Hobbs X-Statik Rebuild & Upgrade
« Reply #31 on: 15 Mar 2021, 01:25 pm »
But now you don't get to experience the break in process. LOL! When I built the NX-Studio's they sounded great right off the starting blocks. They got a bit smoother as they ran in, but it wasn't a huge change. Just put them together and enjoy the music. It's funny how "tweeky" we audiophile types can be LOL! 

Hobbsmeerkat

  • Industry Participant
  • Posts: 2542
Re: Hobbs X-Statik Rebuild & Upgrade
« Reply #32 on: 15 Mar 2021, 02:27 pm »
True! But the cabinets still have a ways to go before they're ready, and this will allow them to be dialed in once everything is assembled. :P

That said, I definitely plan to have some fun exploring the burn-in process of my NX-Studios, since the cabinets are about 90% finished and just need a couple touch-ups and a few coats of clear. :thumb:

Hobbsmeerkat

  • Industry Participant
  • Posts: 2542
Re: Hobbs X-Statik Rebuild & Upgrade
« Reply #33 on: 25 Mar 2021, 01:53 am »
The week-ish of burn-in is done! They should have around 200+ hours on them right now.  :thumb:

I de-soldered all of the connections & started planning the layout of the crossovers. The mids & tweeter circuit are installed on the base, & bass circuit is installed on the side behind the lowest woofer.

Then got around cut & installed the norez. It's coming along nicely, me thinks!  :thumb:


Next step is to start planning out the wiring & start soldering the main runs before finishing the glue-up & beginning the painting process.

Doing up the other cabinet will be a little more difficult since it's already assembled, but at least I've started sanding down the paint to prep the cabinet in the meantime.

Looks more like the entire crossover will be spread across the whole cabinet.


hawkeyejw

Re: Hobbs X-Statik Rebuild & Upgrade
« Reply #34 on: 25 Mar 2021, 03:20 am »
Looking really nice. I think you made a good decision not to try to stuff both crossovers in there too, they are pretty large just fitting one.

Hobbsmeerkat

  • Industry Participant
  • Posts: 2542
Re: Hobbs X-Statik Rebuild & Upgrade
« Reply #35 on: 25 Mar 2021, 03:26 pm »
Thanks!
Same here, plus after reading about someone else trying a similar setup, just having a 2nd crossover connected, it would kill the quality of the sound, so the only way to have it be functional would be to have a means to easily disconnect the stock crossover from the circuit.
And I'm not gunna be drilling holes just to install low quality switches in the signal path..  :roll:

Then going the same route of my XLS with binding posts, into tube connectors, then into the crossover is a much better situation if I ever decide to sell them. Making them easier to use in any situation.
Not to mention the wiring nightmare it would create as well... :lol:

Hobbsmeerkat

  • Industry Participant
  • Posts: 2542
Re: Hobbs X-Statik Rebuild & Upgrade
« Reply #36 on: 1 Apr 2021, 02:18 am »
Alright! I didnt expect that I would have any updates so soon, but i just sat down and got to work this evening and spent the last 2 hours completeing all the wiring, and finished it off by gluing up the front baffle!  :thumb:


The base hasn't been glued/clamped yet, but that's on the schedule for tomorrow once the baffle is properly secure.

But heres a shot of the inside with all the wiring.


Bass circuit is on the side wall to the left. While Tweeter & Mids are on the base.

Next step after gluing the base is filling/ cleaning up any imperfections and gaps in the cabinet and prep it for paint! :thumb:
« Last Edit: 1 Apr 2021, 03:34 am by Hobbsmeerkat »

hawkeyejw

Re: Hobbs X-Statik Rebuild & Upgrade
« Reply #37 on: 1 Apr 2021, 01:33 pm »
Alright! I didnt expect that I would have any updates so soon, but i just sat down and got to work this evening and spent the last 2 hours completeing all the wiring, and finished it off by gluing up the front baffle!  :thumb:


The base hasn't been glued/clamped yet, but that's on the schedule for tomorrow once the baffle is properly secure.

But heres a shot of the inside with all the wiring.

Bass circuit is on the side wall to the left. While Tweeter & Mids are on the base.

Next step after gluing the base is filling/ cleaning up any imperfections and gaps in the cabinet and prep it for paint! :thumb:

Now the real work begins.  :lol:

Sonicjoy

  • Full Member
  • Posts: 366
Re: Hobbs X-Statik Rebuild & Upgrade
« Reply #38 on: 1 Apr 2021, 02:02 pm »
Looking good.

RonP

  • Full Member
  • Posts: 407
Re: Hobbs X-Statik Rebuild & Upgrade
« Reply #39 on: 1 Apr 2021, 02:15 pm »
Keep it up, Hobbs. I'm gonna put you to work on my next set of speakers  :lol: