Amateur Build of the X-MTM Encore

0 Members and 1 Guest are viewing this topic. Read 28854 times.

mlundy57

  • Industry Participant
  • Posts: 3577
Re: Amateur Build of the X-MTM Encore
« Reply #180 on: 17 Sep 2020, 07:05 pm »
Wow, I hate to say it, but reading this thread is confirmation that I definitely made the right decision in not trying to DIY my next pair of speakers. I can solder components to PCBs all day, wire up a power supply without too much smoke, and even build up a crossover without a PCB without too much trouble. And, with the help of my drill press, a file, and some cursing I can eventually get through the case work.

But, as I'm seeing in this thread, speakers are a whole different animal from electronics. All the woodworking skills and knowledge are way above my head, not to mention that I don't actually own any woodworking tools.  :|

My brother-in-law is quite the woodworker though, and has a well equipped wood shop in his garage. Maybe one day if this pandemic ever ends I can get him to help me with the woodworking part. Not sure we'd know where to start though, as neither of us have built speaker cabinets before, and there is clearly way more to it than the cabinet plans on the GR site have led me to believe.

Kudos to those of you with the tools and the skills though. It is interesting to read and see pictures about it.  :popcorn:

The cabinet plans for all of Danny's speakers are pretty easy to follow. Your brother-in-law will have more than enough knowledge and skill to help you with the woodworking. Learning something new and doing something yo didn't think you could is a lot of fun. Give it a try  :thumb:

jonsk2514

Re: Amateur Build of the X-MTM Encore
« Reply #181 on: 17 Sep 2020, 07:24 pm »
Wow, I hate to say it, but reading this thread is confirmation that I definitely made the right decision in not trying to DIY my next pair of speakers. I can solder components to PCBs all day, wire up a power supply without too much smoke, and even build up a crossover without a PCB without too much trouble. And, with the help of my drill press, a file, and some cursing I can eventually get through the case work.

But, as I'm seeing in this thread, speakers are a whole different animal from electronics. All the woodworking skills and knowledge are way above my head, not to mention that I don't actually own any woodworking tools.  :|

My brother-in-law is quite the woodworker though, and has a well equipped wood shop in his garage. Maybe one day if this pandemic ever ends I can get him to help me with the woodworking part. Not sure we'd know where to start though, as neither of us have built speaker cabinets before, and there is clearly way more to it than the cabinet plans on the GR site have led me to believe.

Kudos to those of you with the tools and the skills though. It is interesting to read and see pictures about it.  :popcorn:

Great to hear that you read through this thread.  And there are options other than a from scratch builds that may be of interest to you...

My choice of speaker builds was not one of the easier ones, and I guess you see that from what I have written.  This has been a learning process for me and I have had a lot of helpful input from others.  What I have documented here has been how I have gotten from point A to point B, as a novice doing this.  Yes, I have cut wood before and fitted pieces together, but nothing at the level of a professional.  Hence the idea of writing this thread.

I also got a chuckle in the reading that you have no issues with doing the soldering and build circuits, as that is the area that I have read that some people dread most when looking at building a speaker... “I don’t know how to do this”...  So hats off to you  :bowdown:

There are much easier builds than this one...

My guess is that you have the talent to tackle one of these builds, but, maybe, just on a less complex scale.  I have a suggestion... That is look into buying a “flat pack”, which is pre-cut and routed cabinet that you just need to assemble; glue together.  Here is a video done by one of the followers of the blog who, I believe, makes and sells these flat packs.  There should be a link in the video description for flat pack info.
https://youtu.be/5n3ZYGnEjgE

He also has other videos posted that may be of interest.   And there maybe others out there.

There is also this thread: https://www.audiocircle.com/index.php?topic=164355.0

If you decide to tackle one of these, feel free to post back here and let me know.  I would be interested to hear...

pinkfloyd4ever

Re: Amateur Build of the X-MTM Encore
« Reply #182 on: 17 Sep 2020, 08:03 pm »
Yes, if I were to go the DIY route, my first choice would be to get a flat pack for either an X-MTM Encore, A/V-3, or even an N3 if I can get the tweeters with the deep back cups.

But I've asked around here on this forum and can't find anyone who sells flat packs for any of these speakers. If someone knows of a reputable producer of flatpacks who is experienced in packing & shipping them cross-country, let me know.

But I guess cutting the cabinets isn't as difficult as I've gathered from reading this thread. Maybe I'll forward the cabinet plans to my BIL and see what he thinks.

diyman

  • Jr. Member
  • Posts: 163
Re: Amateur Build of the X-MTM Encore
« Reply #183 on: 17 Sep 2020, 08:20 pm »
Yes, if I were to go the DIY route, my first choice would be to get a flat pack for either an X-MTM Encore, A/V-3, or even an N3 if I can get the tweeters with the deep back cups.

But I've asked around here on this forum and can't find anyone who sells flat packs for any of these speakers. If someone knows of a reputable producer of flatpacks who is experienced in packing & shipping them cross-country, let me know.

But I guess cutting the cabinets isn't as difficult as I've gathered from reading this thread. Maybe I'll forward the cabinet plans to my BIL and see what he thinks.

If your BIL has the woodworking experience and equipment that you described, my guess is that he will see this as a relatively easy, and perhaps fun, project.

Please don't be discouraged by the posts from jonsk2514.  He is by self admission not very experienced and it shows in the somewhat difficult and unconventional approaches he has taken.

jonsk2514

Re: Amateur Build of the X-MTM Encore
« Reply #184 on: 18 Sep 2020, 01:52 am »
Yes, if I were to go the DIY route, my first choice would be to get a flat pack for either an X-MTM Encore, A/V-3, or even an N3 if I can get the tweeters with the deep back cups.

But I've asked around here on this forum and can't find anyone who sells flat packs for any of these speakers. If someone knows of a reputable producer of flatpacks who is experienced in packing & shipping them cross-country, let me know.

But I guess cutting the cabinets isn't as difficult as I've gathered from reading this thread. Maybe I'll forward the cabinet plans to my BIL and see what he thinks.

Glad to hear that you are looking at moving ahead with at least having someone look at the plans.  Sorry, I don’t know of anyone doing flat packs of the larger speakers.  I would be interested in hearing in what direction you go and how you make out.

Hobbsmeerkat

  • Industry Participant
  • Posts: 2542
Re: Amateur Build of the X-MTM Encore
« Reply #185 on: 18 Sep 2020, 01:58 am »
Glad to hear that you are looking at moving ahead with at least having someone look at the plans.  Sorry, I don’t know of anyone doing flat packs of the larger speakers.  I would be interested in hearing in what direction you go and how you make out.

I'd go poke Killian Smith, he's offering to do flatpacks of the X-LS and X-SC and know others have asked him about doing an X-Statik kit, so I'm sure it possible that the more interest there is the more opportunity there is for him to produce more options going forward. :thumb:
You can find his thread here:
https://www.audiocircle.com/index.php?topic=171085.0

jonsk2514

Re: Amateur Build of the X-MTM Encore
« Reply #186 on: 18 Sep 2020, 03:43 am »
Please don't be discouraged from building your own cabinets based on this thread.  I have been very critical of jonsk2514 from the beginning. While he acknowledges being an inexperienced woodworker, he nevertheless posts lots of detail about how he is building these cabinets with the expectation that it will help other people.   I think the reality is just the opposite.

He does things in very unconventional ways and doesn't seem to interested in how experienced woodworkers would go about doing those same things, easier, faster and more accurately.  As a result he appears to be struggling through what is actually a rather straight forward build.

So you confirm my fear from the beginning that rather than help other inexperienced woodworkers exactly the opposite would occur.  But if your brother-in-law is experienced with even a minimally equipped shop building speaker cabinets is no big deal. It's really quite easy if you know what you are doing and follow conventional methods rather than trying to invent new ones.

diyman - I would suggest that, before you slam someone in their own thread, you get your facts right and then, if you make a comment, make sure it accurate reflects reality, which this comment of yours does not.  Also, let me remind you this is amateur build thread, not an amateur build thread with a running critique as to how a professional would do the job.  You can let the reader decided whether this thread is helpful or not.

diyman

  • Jr. Member
  • Posts: 163
Re: Amateur Build of the X-MTM Encore
« Reply #187 on: 18 Sep 2020, 05:16 am »
diyman - I would suggest that, before you slam someone in their own thread, you get your facts right and then, if you make a comment, make sure it accurate reflects reality, which this comment of yours does not.  Also, let me remind you this is amateur build thread, not an amateur build thread with a running critique as to how a professional would do the job.  You can let the reader decided whether this thread is helpful or not.

Exactly which facts don’t I have right?

It seems to me that the fact is your rather unconventional, self invented, and difficult ways of doing things for which there are much easier well established conventional methods is exactly the problem. 

A problem to the extent that although you claim this thread is to help other amateurs you have instead scared them off. 

And my concern about that potentially happening is exactly why I have posted some criticisms of your methods in the past.

 .

Speaker Challenged

  • Jr. Member
  • Posts: 161
Re: Amateur Build of the X-MTM Encore
« Reply #188 on: 18 Sep 2020, 07:08 am »
Exactly which facts don’t I have right?

It seems to me that the fact is your rather unconventional, self invented, and difficult ways of doing things for which there are much easier well established conventional methods is exactly the problem. 

A problem to the extent that although you claim this thread is to help other amateurs you have instead scared them off. 

And my concern about that potentially happening is exactly why I have posted some criticisms of your methods in the past.

SC
Just to take a little heat out fellas, I think as amateurs we can all use some positive criticisms. So diyman can you suggest a link to build thread that would be a good start for newbies to cut their teeth on and not be overwhelmed.

I just completed an Xls kit and while it seemed a mountain to climb on the wood working side I managed with the help of a friend and some of my own know how. :) A brother in law with a good wood shop always helps though. :)

Take care guys.
SC

 .

jonsk2514

Re: Amateur Build of the X-MTM Encore
« Reply #189 on: 24 Sep 2020, 06:02 pm »
Gluing has started in earnest!   :dance:

And before I say anything more - A big thanks to Peter for the discussion about the glues.  The Titebond Original is the best for this.  The end “grain” of the MDF suck up moisture like crazy and I could see that the quicker drying glues being really difficult to work with for this part of the project.  The Original gave me the time I needed to spread the glue and to get things into place, without rushing.

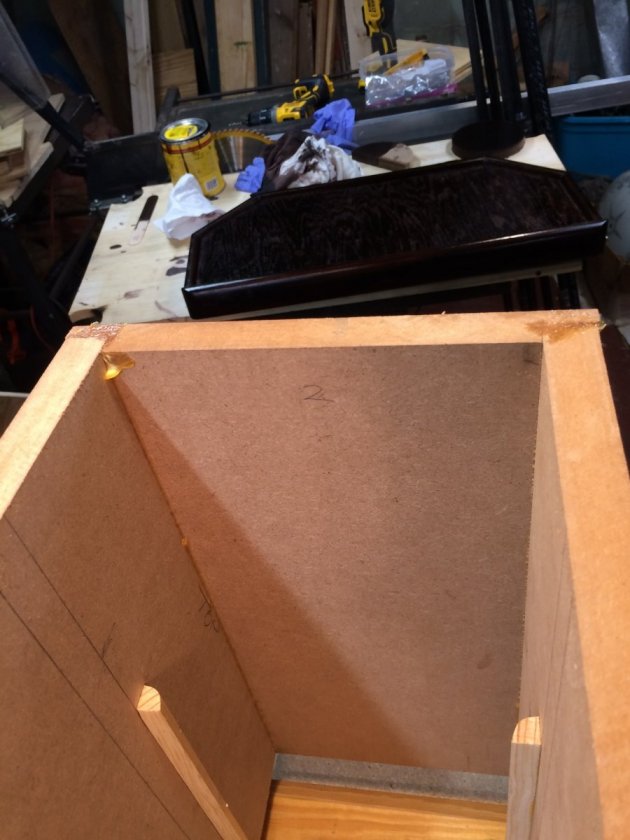
As I noted, I am gluing the cabinet in steps; the first being the top and bottom panels to the sides.   To ensure the fit up to the the front panel, I used the front panel as the “form” for gluing the sides, top and bottom.  I loosely wrapped the ends of the front panel with binding film and used an extra piece of wood to ensure it was loose enough to form around the rabbit cut.  I also made sure the film was not pinched between panels.  I did this after the panels were dry fit by lifting the panels at the end to be glued, as unit, and away from the front panel and the film.  Then set it all back in place. There are 2 layers of film and the material is stretchy enough to form nicely around the rabbit without taking up space.


In the dry fit up I traced the bottom and top panel outline onto the side panels so I would know how far to spread the glue on the side panels.


This is the side panel with glue on the ends and on the interior where it meets with the bottom/top panel.

I did the same tracing of the outline of the side panels onto the top/bottom panels where the rabbit cut is.  The top/bottom panels also had glue applied to the surfaces that will meet up with the side panels.  While this seems like a lot of glue, a lot gets sucked up by the MDF while getting the glue applied every it is needed.

I only glued one end at a time.  The other end was dry clamped to hold things together.  As noted prior, I modified clamps to act as rests for the long clamps.  These are used on the dry end so they are ready for clamping the glued ends.

With the side panels splayed outward a little, the end panel with glue on it slid easily into place.  I then put on the small clamps, lightly tightened.  Then came the long end clamps.


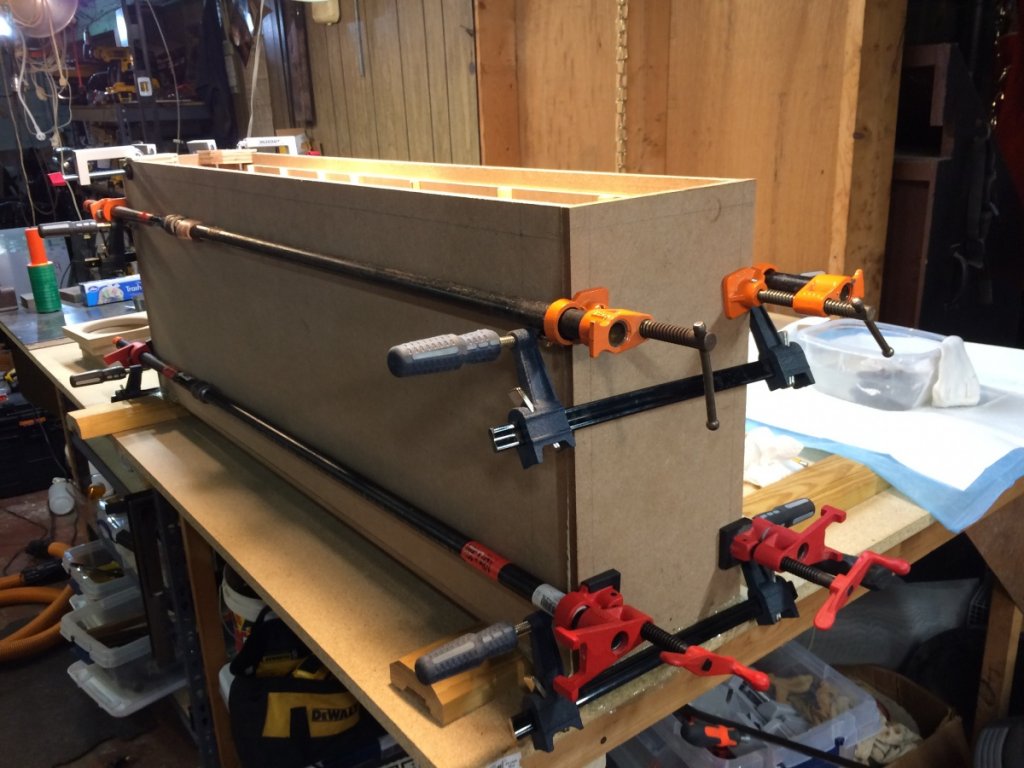
A mistake I made at this point was to not make sure the end panel was fully aligned with the side panels.  As a result one corner of the end panel was slightly higher than the corresponding corner of the side panel.  The pieces are off only slightly, but it could have been easily corrected if I had remembered to check it before fully tightening the clamps.  I had seen this in the dry fitups and just forgot to check.  Once the clamps where tightened, it was game over for realigning things.

I also didn’t like the amount I needed to tighten the clamps and concluded I needed another level of clamps.  Here I am gluing the other end of the cabinet with 3 sets of clamps.


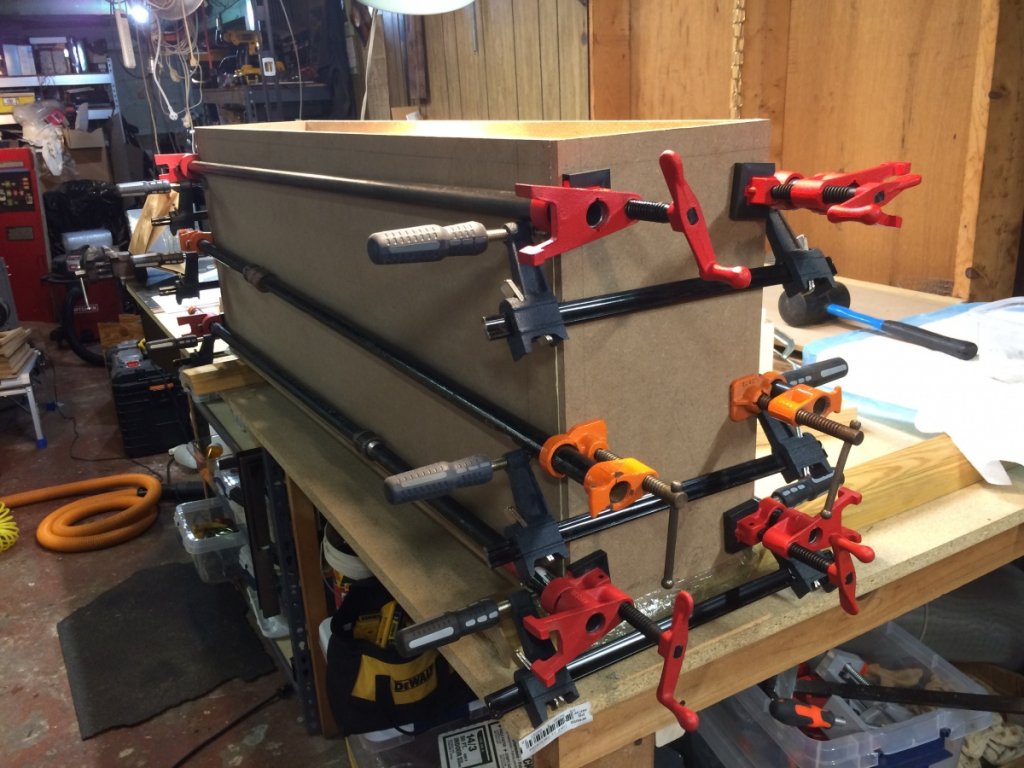
Is there such a thing as too many clamps...  :lol:

It seems that the MDF is flexible enough that it works well to have the clamps only 6 to 8 inches apart.  Not sure if others found this, but for me it took a lot less tightening of the clamps to get the glued pieces in place.

The binding film worked well and the front was easily removed once the glue had set over night.


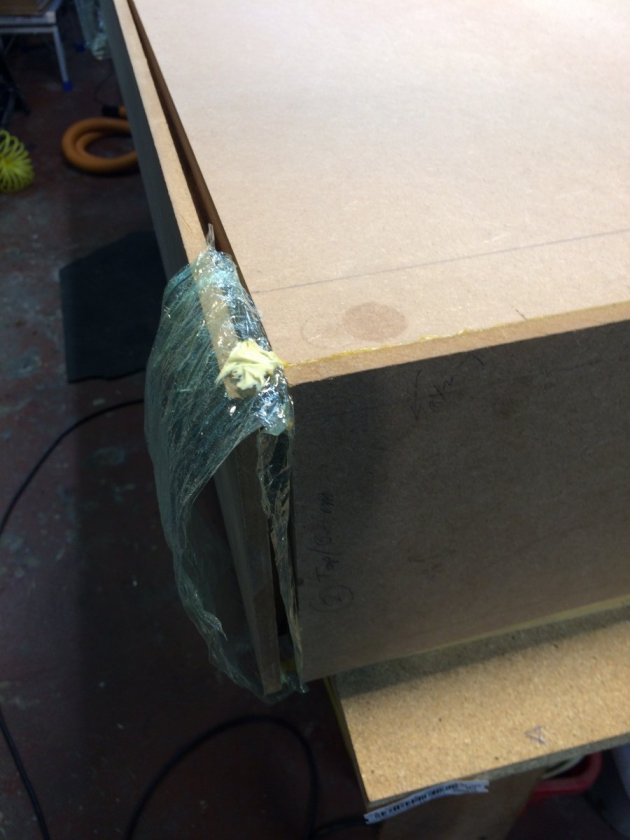
And this is the end showing where the glue drizzled down on the binding film.


I did try to clean up the wet glue, but I was unable to clean if off adequately.  On the outside, the clamps are in the way and on the inside it doesn’t matter.  Where it shows up in the rabbited area, the dried glue is easily removed with a chisel.

Another thing I found was a slight step in the rabbited area.  It is barely visible at the end of the arrow.


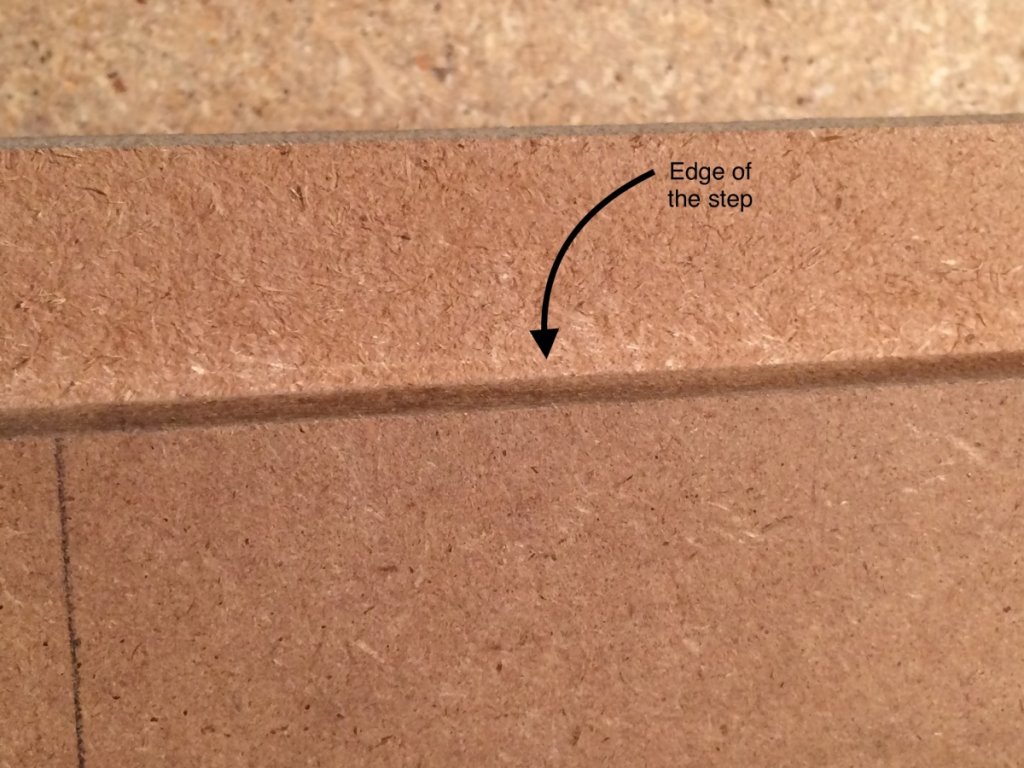
This occurred because the saw height was slightly low when I did the trim cut.  I had first routed the panel and then did a trim cut on the table saw.  I didn’t realize when I first noticed it, way back when, that it would interfere with assembly.  It did.  Easy to clean up with the chisel...

I am a big fan of these silicon rubber gluing brushes.  This was the result of not cleaning the brush and cup while the glue was still wet, and leaving it to setup over night..  :duh:


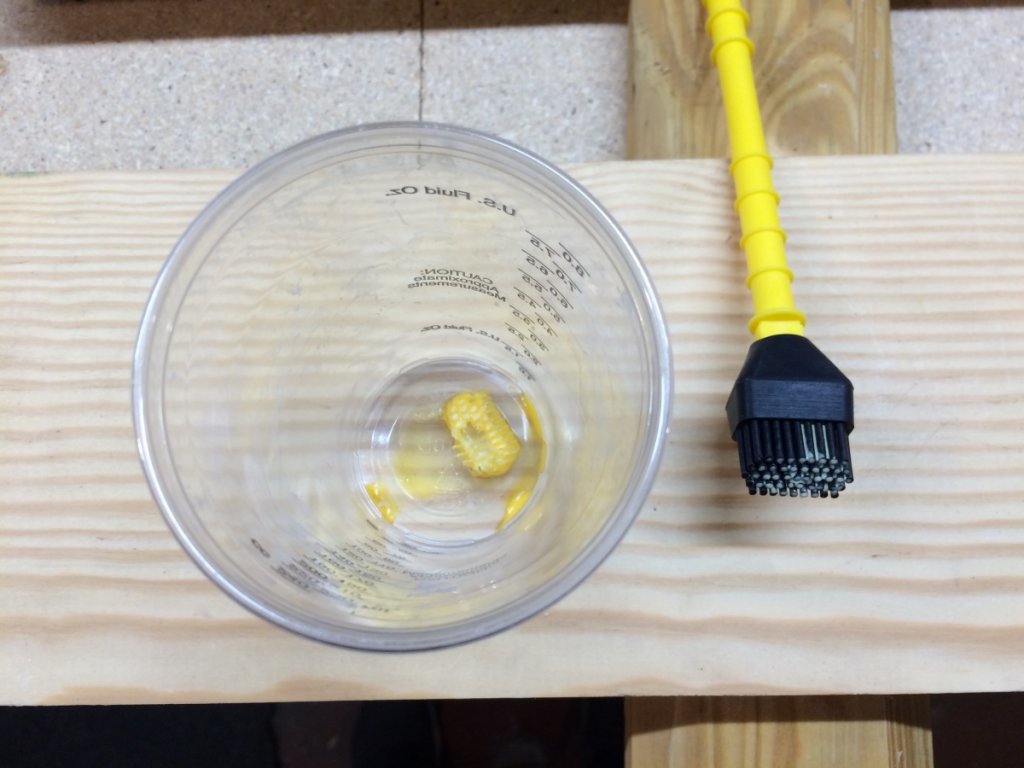
They cleaned up easily, anyway...   :P
As it is, they work really well for me for spreading the glue.

hawkeyejw

Re: Amateur Build of the X-MTM Encore
« Reply #190 on: 24 Sep 2020, 07:29 pm »
No turning back now!

Glad to see these are coming together for you.

jonsk2514

Re: Amateur Build of the X-MTM Encore
« Reply #191 on: 25 Sep 2020, 12:14 am »
No turning back now!

Glad to see these are coming together for you.

 :lol: :lol: :lol:
I think the last possibility of turning back occurred when I bought that second sheet of MDF... At times, though, I wondered if this was the right build or if I would hit a brick wall with what I could do.

I am surprised that, after all of this time, it is has all of a sudden taken a big leap towards finishing.  There is more done than I have posted (which I will post) and I am surprised, but pleased, as to how well it has progress.  I had my worries at times.

Thanks...  :thumb:

hawkeyejw

Re: Amateur Build of the X-MTM Encore
« Reply #192 on: 25 Sep 2020, 01:00 am »
You’ve prepared and practiced far more than most. I’m sure it will turn out great.

jonsk2514

Re: Amateur Build of the X-MTM Encore
« Reply #193 on: 27 Sep 2020, 01:21 am »
With the sides, tops and bottoms glued together on both cabinets, and having removed the fronts, I test fit the back panels.  On cabinet 2 the back fit into place with little effort and the resulting gluing proved to be as square as the back.  The back is a simple rectangle and cut as square as possible with the tools I have.  It fit with no flex of the sides, top or bottom.


I had similar results with refitting the front on cabinet 2 as well.


Unfortunately, the cabinet 1 came together a bit smaller and the back, front and internal braces would need slight trimming.  When I say slight, I could detect no significant different in their size.  But, clearly cabinet 1 was a hair smaller then 2.  It took only mils of trimming the other pieces to make them fit.

With glue applied to both the rabbited area on the sides, top and bottom and to the edges of the back...


Gluing of the back to the sides, top and bottom was simple enough, with the back slipping into place.  However, I forgot the side clamps on cabinet 2..  :duh:


After trimming the back for cabinet 1, the back fit easily into place and I remembered the clamps


Once again the Titebond Original proved to be the right choice here, given the time it took to spread the glue.

tmaslar

  • Jr. Member
  • Posts: 18
Re: Amateur Build of the X-MTM Encore
« Reply #194 on: 28 Sep 2020, 12:18 am »
If the bass sounds bloated because they are too close to the wall, you can partially or fully plug the ports. I know Jay built his N3s with the transmission line opening to the front instead of the rear but I haven't heard of anybody doing that with the X-MTMs. Port noise is usually described as a chuffing sound coming from the ports. The higher the volume, the more prominent the sound can be.

I have the opening of my N3s on the rear and they are only 18" from the wall. If I let them play full range the bass gets a little boomy so I cross them to the sub at 40Hz. This works very well and I don't have to plug the port. You could do the same with the X-MTMs and leave the ports on the rear.

Mike

How do you implement the higher crossover at 40Hz?

jonsk2514

Re: Amateur Build of the X-MTM Encore
« Reply #195 on: 3 Oct 2020, 04:00 pm »
Braces have gone into both cabinets.  I whipped up a clamp to hold them in place while the glue setup.


A couple of pieces of 3/4” plywood cut with bevels on the long edges to push into the quarter round pieces, which, in turn, pushes the brace up against the already installed quarter round.


A slight modification of a glue bottle was made to facilitate spreading the glue...


I once again found the Titebond II worked for this as there was done with the sides vertical and the Titebond II was thick enough to not run much.  However, it does set quickly when the pieces are pressed together.  This made clamping a bit difficult.


This was my first attempt, but I found that the side clamp didn’t work well when it was put on after the brace clamp was tightened.  The brace clamp being tightened was enough to keep the brace or the sides from moving at all with the clamps.  This meant that the clamps couldn’t push pieces into place.   A different order to the sequence of assembly steps was needed.

With a little experimentation I found that if I slid the brace in place and pushed down on it and pressed it into the already installed quarter round pieces, that it would stay in place nicely while glue was spread for the second set of quarter round pieces and they were then pressed into place.  After that, the side clamp needed to be installed to draw in the sides and hold them for the installation of the brace clamp.

I am not sure of the brace clamp pushed the sides out or if the sides warped a bit with time (if think the former), but I found that the sides were bowed slightly.  Unfortunately I found this after the glue had setup on the 1st two braces I installed...  :duh:   :nono:


Either way, I found that it was important to clamp the sides and draw them inward prior to installing the braces clamp. 

None the less, the first cabinet has sight bow to the side.  I was able to mitigate it to some extent on that cabinet by installing a series of camps along the side, with a 5/4 board on the straight side, before I glued in the remaining braces.


The results are good enough on that cabinet that the front still fits and there is still excess to trim off.  No planned rework.

For the second cabinet, I took greater care with the gluing process to mitigate bowing of the sides and to correct any warping that may have occurred.  This was done simply by snugging up a side to side clamp just after the brace was pushed into place in the glue.

Overall, I am pleased with the easy with which the braces went in.  The quarter rounds went in easily and served their function well.  I don’t very often have a block of time to spend doing a group of steps all at once on this.  With this way of doing the assembly I was able to take some time doing it and, if I wanted or needed to, I could do just one brace at a time and leave it.  This was my hope when I first thought of doing the assembly this way.  Thanks to Peter R for his helpful suggestion as to some of the assembly steps I used.

I did not expect or anticipated the bowing of the sides.  This occurred on both cabinets, although to a much lesser extent on the second because of the care I took to clamp each brace.  This may have been a result of the brace clamp I made and the bevel that pushed the quarter round into the sides.

So, I give this part of the assemble a 7 out of 10 rating.  It was successful for what I wanted, but it came with a bit of an issue.  Since starting this process I have come access a thread of a build of these speakers and that person used a different assembly process for the braces that involves using just butt joints (https://www.audiocircle.com/index.php?topic=164591.0).  I have seen butt joints used elsewhere, early on, but at the time thought they would not work for me.  However, with the experience I have gained and having seen this other build I think I can make them work for me.  In particular, what I saw would allow me to do one at a time, if I need to, and it would still simplify the build for me.  Something for my next project.  :D

jonsk2514

Re: Amateur Build of the X-MTM Encore
« Reply #196 on: 5 Oct 2020, 08:21 pm »
I have been collecting links to helpful posts for the remainder of this build.

Peter R made a YouTube video of the assembly of NX studio monitors. (https://youtu.be/CYrdScf9eyM)  Here he makes some points about clamping that are interesting.  Actually the whole video is interesting.  Thanks Peter.  But the one about clamping seems to apply to what happened to me with the bowing.  Not sure if it is exactly the same, but his point was to provide clamping to prevent this sort of thing from happening.

The other really important thing that Peter said was to go into the assembly of a cabinet with a plan.  It is a really good video to watch, even for the assembly of different speaker cabinets.  A lot of what he shows and talks about here is applicable across the board.

Another video that Peter made that will be helpful is the installation of No-Rez...
https://youtu.be/CtIe9XFNdVQ

Danny has made a video about assembling the crossover.
https://youtu.be/QT-GKorvjak

And Danny has made another one about doing the final wiring with some great ideas as to how to do this.
https://youtu.be/J_E4_CyHA5A

With that said, I have laid out the crossover for these speakers.


The black lines in the lower right of the picture, on the paper, are the boundaries of the board that will will fit into the cabinet.  For info, I fed the wires through the slot of small zip ties to hold a pair of wires together without have to resort to bending the wires.  This allow me to move things around easily while I figured out where to place everything.  Copper work hardens with bending and I didn’t want to risk breaking a wire with repeated bending.  And, yes, the one coil needs to be angled more towards the center of the other coil.  I emailed a copy of this picture to Danny and he very quickly responded that it was OK.  Thanks...

jonsk2514

Re: Amateur Build of the X-MTM Encore
« Reply #197 on: 17 Oct 2020, 03:52 pm »
I probably should have posted this picture before the one above with the crossover laid out...

The unboxing of the components...  :dance:


A dilemma I have is what to do with the spikes.  My current plan is to have a separate board attached to the bottom that is wider than the bottom to give the speaker some stability.  Then comes the question of how best to attach that board to the bottom.  I could glue it.  Or I could put in tee nuts into the bottom of the cabinet.  I am leaning towards the tee nuts.

While I am pondering that question, I am off assembling the crossovers.  With the way this speaker is, I will need to to the internal assembly with the front removed.  That means the No-Rez, crossover and wiring will need to be installed.  Then the front will be glued on, followed by installing the drivers.


The crossovers are done on pieces of 3/16” plywood that fit the space indicated on Danny’s sketches and I used as much available space possible to make the component layout the easiest.  I added a couple of raised pads for the resistors, just to make the assembly easier and to make their wires readily available.  The holes for the tie downs are all made and each piece received a coat of shellac (amber, because that is what I have).  The wood pieces above the boards will be spacers to locate the crossovers above the No-Rez.  I would rather screw into the soft pine than the MDF and risk chipping it and these can be easily glued into the cabinet.

A mistake I just realized that I made was to not factor in the thickness of the No-Rez into available width of the cabinet for the size of the piece for the crossover.  The No-Rez is 1” thick which will bring the available width down to 5”.  While the boards I cut are 5” wide and the No-Rez is a bit compressible and everything should fit OK, I should have factored that in and I would have cut the pieces to be 4.75” wide.   :duh:

I have also done some practice with making the recess and hole for the tweeter, using some scrap MDF.


The tweeter fits in snuggly.


I have done the same for the same for the woofer drivers.  I found that the hole size recommended by the plans left the drivers slightly loose, so I made a second practice cut with a 1/6th smaller diameter.  This gave those a nice snug fit with those too.

jonsk2514

Re: Amateur Build of the X-MTM Encore
« Reply #198 on: 23 Oct 2020, 09:05 pm »
Crossovers are done.


Twisting the wires together for soldering the way Danny shows in his video wasn’t too bad, although I which he had left that part in as it was left up to ones imagination as to how this is done.  One of the things I found that helped when twisting more than 2 wires together was to first twist together the thinnest of wires as a pair, where that is possible.  Where there was more than 2 wires at a junction in both the positive driver side direction and to the negative side, I also followed Danny’s diagram and first twisted the wires together of the components that were in a straight line between the input and the driver.  Then I twisted in the wire of the component that went to the negative.

A hard part was attaching the red wires that go to the base drivers.  I decided to run 2 wires, of equal length from the crossover to the drivers.  That connection becomes large in doing this, with the coil and capacitor wires coming together as a pig tail and then weaving in the 2 driver wires.  I found I could easily twist in one driver wire at a time by following the twist of the wires already twisted in.  I could start the driver wire by twisting it in by hand, then resorted to pliers once there was enough of a bunch of wire to grasp.  Hope that makes sense.

The red wire base circuit connection, with that bundle of wires, was also the hardest to solder.  My soldering iron just want not up for the task.  So, I thought it would be good to add a little extra heat from my torch setup:


 :rotflmao:

No, I didn’t do that...

But I do have a small butane torch that was perfect for the task.  Done in no time.  I covered everything on the board with heat proof welding cloth and had the wires above the components on the board to keep heat from traveling to unwanted places.

For the negative connections I ran a single wire from the binding posts up to the tweeter.  I then stripped that wire in 2 places.  One place was close to the drivers.  I cut 2 other pieces that were of the same length as the distance to that stripped area and twisted and solder them in place.  The second stripped place was at the crossover board where the coil and capacitor shunts (? Hope I got that right) go to the negative side, and were also twisted and soldered into place.

Heat shrink tubing was fitted over each of the connections to the copper speaker wires and the red and white pairs were each twisted together.


And in the cabinet...


It turns out that Danny packs just enough wire to do the job, with a little bit of excess.  Not a lot of excess, so take care with laying it out prior to cutting the wire.  If a cutting mistake were to be made it would be easy to solder it back together, but I would guess that would be undesirable.

Also, I found I need to do a better job of labeling the wires when I cut them.  Most were obvious as to where they go, but I did need to retrace and label one after getting things done.

Patients.   This took me a while to do, between twisting the wires of the components together and doing the soldering.  I also found I need a stool to sit on for this kind of work.

I tinned all of the bare copper wires before twisting them into place.  This aided with soldering.

They are coming along...  With that I am working on the side on a finish for these; something other than paint.  I know, simple has turned into complex.  I have seen too many builds with really nice finishes to let mine go with just paint...  We shall see

jonsk2514

Re: Amateur Build of the X-MTM Encore
« Reply #199 on: 25 Oct 2020, 12:26 am »
Danny’s speaker cable assembly thread:
https://www.audiocircle.com/index.php?topic=172291.0

And it is a Sticky.

As an Edit... I found the video Danny made showing how to assemble the speakers cables.
https://youtu.be/DfjQJxeTANE
« Last Edit: 26 Oct 2020, 01:01 am by jonsk2514 »