Ideal Baffle Radius Cut vs Baffle Thickness

0 Members and 1 Guest are viewing this topic. Read 825 times.

jmimac351

  • Full Member
  • Posts: 343
  • Chief Instructor - ChinTrackDays.com
Ideal Baffle Radius Cut vs Baffle Thickness
« on: 23 Sep 2023, 12:03 am »
I have 2 different speakers that I'm playing with for crossover mods. One of them has an overall baffle thickness of 1.5"; however, the woofer is countersunk and the inside baffle thickness left is slightly under 1".  The other speaker has a consistent 1.5" baffle thickness, as the woofer is surface mounted. 

I am looking at Inverted Radius Roundover / "Roundunder" bits.  Common radius profiles available are 1/4", 3/8", 1/2", and 3/4" inch.  I'm wondering... is there a "go to" radius profile size for these different baffle thicknesses?  I have found where Danny mentions "the larger the radius the better".  However, I suspect some experience with this will be a big help as I don't want to get into trouble, especially with the baffler that is just under 1" at the spot I'll be cutting. Plus, these bits aren't cheap and I need tires for the track car.  :rock:

So, what's a good radius bit for a 1.5" baffle?  What's a good radius bit for a 1" baffle.

Thanks for any advice.

Ok... the speakers are the EgglestonWorks Fontaine Danny messed with - I'm seeing if I can knock down suspect diffraction lingering because of the lack of a radius on the inside of the baffle. I going to measure the speaker before and after to see if I can learn something.  The other is a Merlin Music VSM with the "Black Magic" crossover mods. 


Danny Richie

Re: Ideal Baffle Radius Cut vs Baffle Thickness
« Reply #1 on: 23 Sep 2023, 01:58 pm »
I would at least try to find a 1/2" radius bit to use on them. Also, be careful that it doesn't hit the side walls when using it.

FullRangeMan

  • Volunteer
  • Posts: 20018
  • To whom more was given more will be required.
    • Never go to a psychiatrist, adopt a straycat or dog. On the street they live only two years average.
Re: Ideal Baffle Radius Cut vs Baffle Thickness
« Reply #2 on: 23 Sep 2023, 02:40 pm »
Hi,
Do you would post some photos on the Merlin inside?

Peter J

  • Full Member
  • Posts: 1877
  • Hmmmm
Re: Ideal Baffle Radius Cut vs Baffle Thickness
« Reply #3 on: 23 Sep 2023, 03:43 pm »
As Danny points out, clearance from driver cutout to cabinet side may dictate radius because of cutter diameter. If you want to make it kinda error proof, attach a base to your router that won't allow it to tip into driver opening. Doesn't even have to be round or pretty. And assuming you have box gutted, shop vac hose can be dropped into tweeter opening to keep the mess down.


jmimac351

  • Full Member
  • Posts: 343
  • Chief Instructor - ChinTrackDays.com
Re: Ideal Baffle Radius Cut vs Baffle Thickness
« Reply #4 on: 23 Sep 2023, 11:04 pm »
As Danny points out, clearance from driver cutout to cabinet side may dictate radius because of cutter diameter. If you want to make it kinda error proof, attach a base to your router that won't allow it to tip into driver opening. Doesn't even have to be round or pretty. And assuming you have box gutted, shop vac hose can be dropped into tweeter opening to keep the mess down.

Thanks Peter and Danny.  There are a few spots for each where there will be interference.  I may have to bust out a grinding bit. :). I have seen others suggest making a base for the router to keep it on some sort of surface the entire time.  Thank you for sharing those pics / advice.  I appreciate it.

jmimac351

  • Full Member
  • Posts: 343
  • Chief Instructor - ChinTrackDays.com
Re: Ideal Baffle Radius Cut vs Baffle Thickness
« Reply #5 on: 23 Sep 2023, 11:49 pm »
Hi,
Do you would post some photos on the Merlin inside?

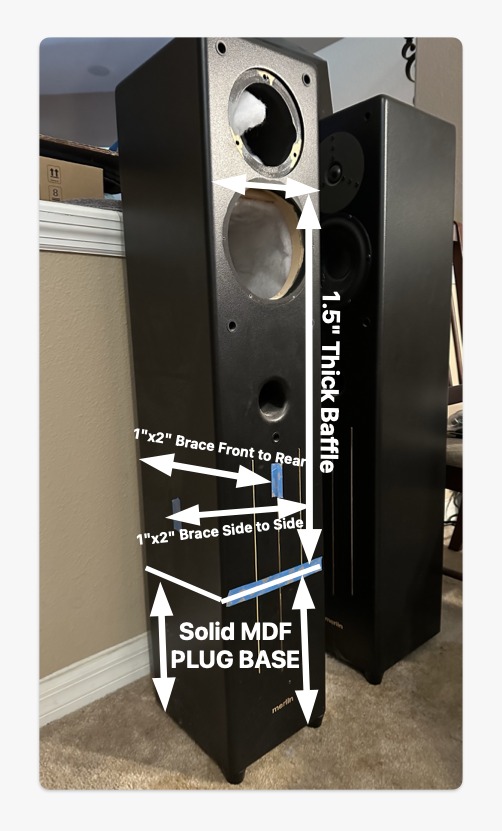
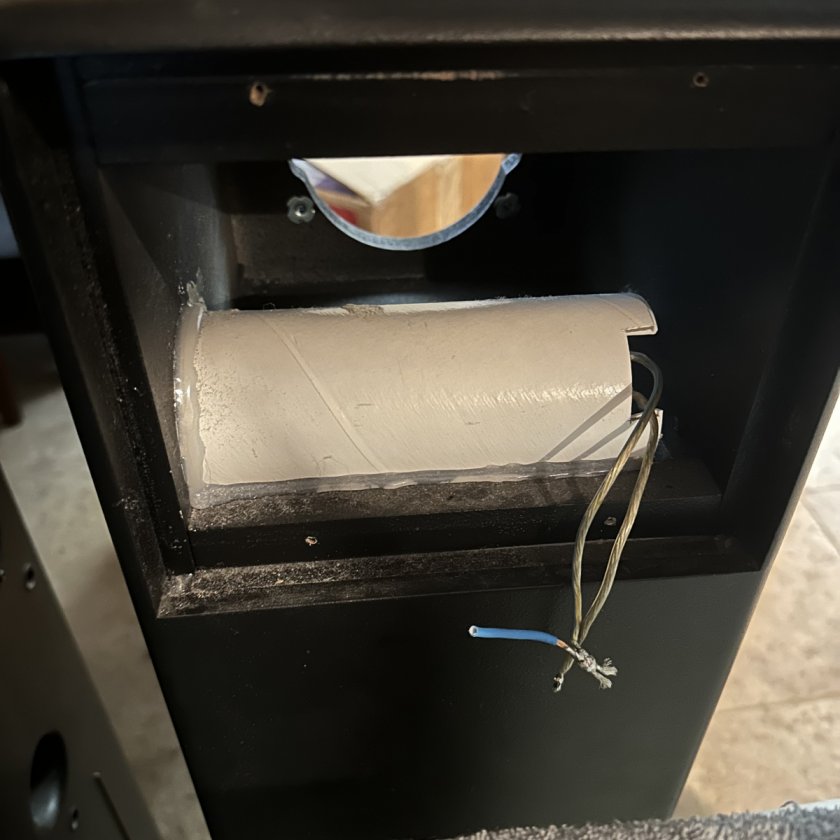
So, here's how these were made.  The baffle is 1.5" thick, but there is not much bracing on the inside.  Just a couple 1"x2" braces, 1 front to rear and the other side to side.  There is a section that separates the bass cavity from the Esotar.  There is a Stereophile review over a decade ago of the "Millennium" version of these speakers.  Atkinson mentions a cabinet resonance just below the port when he measured it with his accelerometer attached there.  So, I may get some No-Rez from Danny and put some there and elsewhere.  My speakers were made in '99-ish.  I don't think the cabinet design changed much, if any.  When you look at how little bracing is in the speaker, it gives some appreciation for the pictures of the cabinets in various GR Research speakers.  Still, even without a bunch of bracing, it weighs 85lbs... being a simple 2-way setup with Esotar tweeter and ScanSpeak 8545.

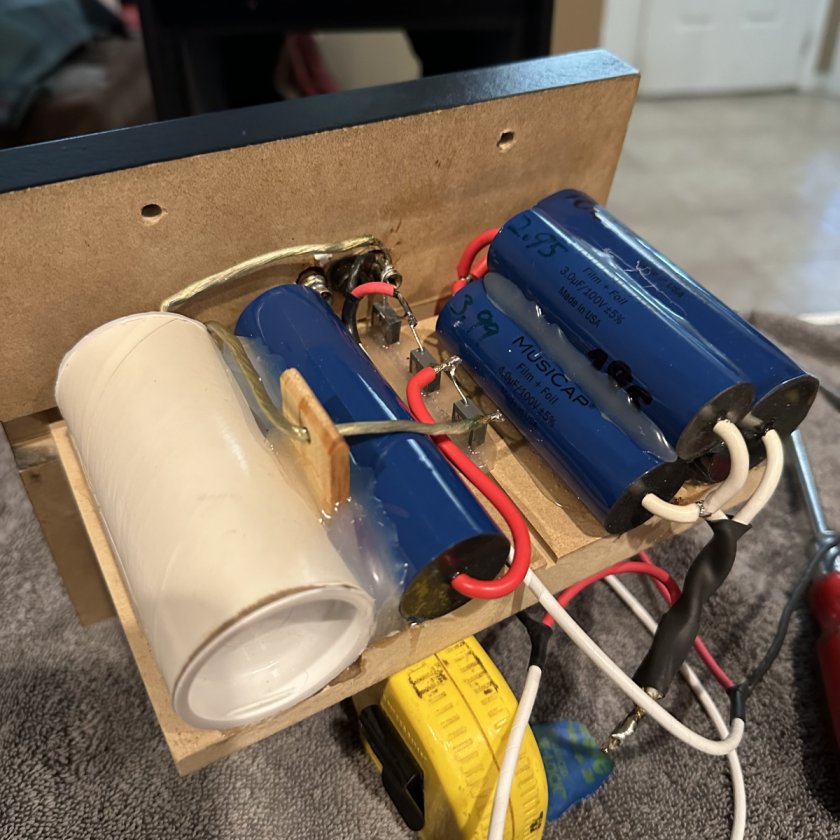
Danny measured a VSM (not my VSMs) a long time ago and sent me the measurements when they came up in conversation. I was surprised to see the measurements were not that great, as I really like this speaker.  I suspect Danny was sent an early version of the speaker. The late Bobby Palkovic went thru many tweaks on this speaker... and I don't know exactly what was done.  I had Bobby do one revision to the crossover and they definitely sounded fuller.  His final version before he passed was the "Black Magic", and I have those crossovers to install.  What is different about them versus any other version, or what Danny measured, I don't know.  There is a guy who worked very closely with Bobby who performed the crossover mods (Rich Brkich) and I'm going to ask him about that.

I do have a speaker that Danny has measured directly.  Using REW and a Umik microphone, I am going to take my own measurement of that speaker, unmodified, to see whether I can effectively reproduce his results.  If I can do that, then I'll know I can measure properly and I am going to start making simple tweaks to each of these speakers to see whether I can make them sound even better, learn a few things, and have some fun.

I think playing with this stuff is going to help me sort thru and think about what I really want for "the next speaker..."


mlundy57

  • Industry Participant
  • Posts: 3585
Re: Ideal Baffle Radius Cut vs Baffle Thickness
« Reply #6 on: 24 Sep 2023, 12:15 am »
After installing a large enough base plate so the router is always supported no matter where in the cut it is, I'd put the bit with the radius you want in the router then, with the router unplugged, move the router around the cut path and see if the bit hits the side anywhere. If it does, move down to a smaller size and repeat until the bit goes all the way around without contacting the sides. Cut a rounder using this bit. Then move up to a larger size bit. Start this cut in a section where it does not encounter the side of the cabinet. As you approach the point where the bit will encounter the cabinet side, be very careful. If the bit strikes the side of the cabinet, it could buck and try to pull the router out of your hands. If it gets sketchy or reaches a point where you do not feel comfortable continuing, stop. Use the larger bit, up to the size radius you want on the sections of the opening where it cuts safely. Then use a rasp, file, and or sandpaper to smooth out and blend the parts of the openings the router bit couldn't reach. This is slower and more hand work but safer.

Always cut withing your skill level and comfort zone. Never attempt a cut you don't feel comfortable making, even if other people do it all the time. That's a recipe for a trip to the ER. There's always more than one way to accomplish something. Stay safe, accomplish your tasks, and enjoy the fruits of your efforts.

jmimac351

  • Full Member
  • Posts: 343
  • Chief Instructor - ChinTrackDays.com
Re: Ideal Baffle Radius Cut vs Baffle Thickness
« Reply #7 on: 24 Sep 2023, 12:33 am »
After installing a large enough base plate so the router is always supported no matter where in the cut it is, I'd put the bit with the radius you want in the router then, with the router unplugged, move the router around the cut path and see if the bit hits the side anywhere. If it does, move down to a smaller size and repeat until the bit goes all the way around without contacting the sides. Cut a rounder using this bit. Then move up to a larger size bit. Start this cut in a section where it does not encounter the side of the cabinet. As you approach the point where the bit will encounter the cabinet side, be very careful. If the bit strikes the side of the cabinet, it could buck and try to pull the router out of your hands. If it gets sketchy or reaches a point where you do not feel comfortable continuing, stop. Use the larger bit, up to the size radius you want on the sections of the opening where it cuts safely. Then use a rasp, file, and or sandpaper to smooth out and blend the parts of the openings the router bit couldn't reach. This is slower and more hand work but safer.

Always cut withing your skill level and comfort zone. Never attempt a cut you don't feel comfortable making, even if other people do it all the time. That's a recipe for a trip to the ER. There's always more than one way to accomplish something. Stay safe, accomplish your tasks, and enjoy the fruits of your efforts.

Thank you for your advice.

jmimac351

  • Full Member
  • Posts: 343
  • Chief Instructor - ChinTrackDays.com
Re: Ideal Baffle Radius Cut vs Baffle Thickness
« Reply #8 on: 24 Sep 2023, 01:23 am »
Anyone know the radius size used on this image of the outside edges of the Brute? 


Hobbsmeerkat

  • Industry Participant
  • Posts: 2551
Re: Ideal Baffle Radius Cut vs Baffle Thickness
« Reply #9 on: 24 Sep 2023, 03:03 am »
It's either 3/8 or 1/2 inch. I don't remember off hand

FullRangeMan

  • Volunteer
  • Posts: 20018
  • To whom more was given more will be required.
    • Never go to a psychiatrist, adopt a straycat or dog. On the street they live only two years average.
Re: Ideal Baffle Radius Cut vs Baffle Thickness
« Reply #10 on: 24 Sep 2023, 06:05 am »
Hi Mimac,
Must thankyou for your detailed report and the enlightening photos very much apprecisted.  :thumb: