Amateur Build of the X-MTM Encore

0 Members and 1 Guest are viewing this topic. Read 29099 times.

jonsk2514

Re: Amateur Build of the X-MTM Encore
« Reply #100 on: 10 Jul 2020, 08:15 pm »
The idea of doing one joint at a time vice all 4 joints at one time has been rattling around in my head for a while without any clear winner.  But as I read what was suggested an idea interjected itself that may push things in that exact directions.  That is the plastic corner squares.  I can use those to hold the other 3 corners square-ish while the first corner sets up.  This way I can uses all 4 sides and front as a jig and then when I clamp the glued corner it will be with respect to the whole assembly and that will include any small deviations in that assembly that would make it less than perfectly square...  Hope that makes sense...

Thanks... 

As for glue, Peter,  I gathered from your videos that you liked the III.  But I am a bit surprised that you like the I over the II, but I have no real reason for thinking that.   From looking at what TiteBond says about the two glues, I thought maybe it would be an either/or and doesn’t matter.  I went to the II because of its thickness and that would mean less tendency to run on me...  I appreciate your comment and will take a look again at the I.  Maybe I discounted it too quickly.  Also, if I do one joint at a time, I can be more careful with the glueing and the thickness of the glue won’t matter as much.  We shall see. 

Say what?  The glue running down the sides doesn’t add a thing?  Yah, to the mess...   :duh:

The Quick and Thick glue bottle is not good for where less than a lot is needed.  It is designed to put out a ton of glue.  I have bottles on order that should do better.

hawkeyejw

Re: Amateur Build of the X-MTM Encore
« Reply #101 on: 10 Jul 2020, 08:32 pm »
Check out the last hack he shows in this video - https://www.youtube.com/watch?v=Pp7b-kziLqU

It's another option for a jig you can easily create for yourself to glue up corner joints and you could do one a bit smaller to help it fit inside smaller panels. But honestly, if you have cut them accurately and use a good 90 degree clamp or jig to get the first joints started, you should be able to get everything lined up from there piece by piece.

jonsk2514

Re: Amateur Build of the X-MTM Encore
« Reply #102 on: 10 Jul 2020, 09:00 pm »
I love the hacks!

Thanks!

His inside corner piece with the 2 holes would work for me, and would be easy to make.

To the best I can check, everything I have cut is reasonably square and I think you are right that I should be good glueing one corner at a time without everything else in place.  I was thinking having the 4 sides together will give me parallel surfaces to clamp against for each of the corners.  Having the front in the mix should help to ensure the front will go on at the end of the whole assembly.  At least that is my current thinking and maybe I am over thinking this, but, hey, this is the time to think...  Not when I have glue dripping off my elbows...   :lol:

Peter J

  • Full Member
  • Posts: 1876
  • Hmmmm
Re: Amateur Build of the X-MTM Encore
« Reply #103 on: 11 Jul 2020, 04:21 pm »

As for glue, Peter,  I gathered from your videos that you liked the III.  But I am a bit surprised that you like the I over the II, but I have no real reason for thinking that.   From looking at what TiteBond says about the two glues, I thought maybe it would be an either/or and doesn’t matter.  I went to the II because of its thickness and that would mean less tendency to run on me...  I appreciate your comment and will take a look again at the I.  Maybe I discounted it too quickly.  Also, if I do one joint at a time, I can be more careful with the glueing and the thickness of the glue won’t matter as much.  We shall see. 

Say what?  The glue running down the sides doesn’t add a thing?  Yah, to the mess...   :duh:

The Quick and Thick glue bottle is not good for where less than a lot is needed.  It is designed to put out a ton of glue.  I have bottles on order that should do better.

Here's my story on glue. When dinosaurs roamed, there was only Titebond and Elmers. Titebond was the de facto gold standard in the cabinet shops I worked in. If one wanted water resistance, it was resorcinol glue, a powder and liquid kinda thing, or even further out in left field was epoxy.  I grew familiar and learned to trust it for all kinds of varied tasks.

Later marketing departments locked arms with the glue engineers and a single component, water resistant glue was developed...what's now Titebond II. Years later Titebond III was developed and it was not only water resistant, but waterproof, at least by their definition.  In my mind, this left Titebond II in the middle with little  to recommend it, but its non-brown color, which is occasionally appreciated.

I'm not sure when Franklin left the picture and Loctite entered, but they recognized the marketing and sales potential that was Big Box stores. Hence all kinds of specialized variants were developed with different formulations and smart marketing to convince the consumer of their prowess in the chosen niche. I suppose companies can't rest on their laurels, but I've never lost sight of the fact that the miles and miles of glue lines squirted from Titebond (I) bottes are, as far as I know, still holding up.

So "new and better" is often just a marketing hook...and it works. In the end, almost any wood glue one chooses will far exceed the strength of the base material it's gluing.

All this to say, choice of glue is often more about chooser and less about the glue. I'd say I've split that hair about in about as many pieces as I can, so I'll digress.

jonsk2514

Re: Amateur Build of the X-MTM Encore
« Reply #104 on: 11 Jul 2020, 11:11 pm »
Great digression!

Today I glued a couple of side pieces I am making.  It will be one of those 3rd hand hacks in that video (more to come).  I used the III just to try it for glueing 2 faces together.  And I used their brushes, which are also sold generically.  The brush turned into more of a comb when spreading the glue and excess glue was sucked up into the brush “fibers”, which I had to wipe off as it got filled up.  It turned out that having wet wood show between streaks of glue was about perfect and the brush did well to control that.  When I did the clamping, I had only little dots of glue coming out the sides.  I’ll say that was a win.  And more learning.

The closest I got to doing any “professional” woodworking was a summer in college working in a kitchen cabinet shop putting together door and drawer fronts.  This was unskilled labor.  The glue that we used was a white glue of some sort that we added a catalyst to. Over time it would setup in the bottle with the consistency of white slimy jello.  That was where I learned that a 1/32” difference in wood size would leave a gap that could not be pressed out with clamps.  My ears are still burning from the owner finding that one... :oops:  And I probably lost half my hearing because of the wood planer that was near by, even though I was smart enough to bring and use my own ear plugs (what’s OSHA?   :no_speak:).

jonsk2514

Re: Amateur Build of the X-MTM Encore
« Reply #105 on: 13 Jul 2020, 12:35 am »
The hack video sparked an idea, along with the Can-do design, for an outside 3rd hand clamp for doing my assembly.

But first I went digging in my clamps box for a couple of corner clamps I had


And I tried them out:


Problem is they seem to be design to be used when first set on a table and then the wood set into them.  This would work well for a picture frame.  But I need something that can set on top of a an assembled piece with something already under it.  I tried these on top and they are clumsy.  And they are awkward and heavy.  Then I found that, when set on a table and then a couple of pieces are set in them, the handle for tightening them is too larger to clear what the are resting on and makes the piece go askew.

So, back to Amazon for something that will work.  I like the Can-do clamps, but they are an inside clamp and too large for my application.  I found something I think will work and have ordered.  More to come on that.

For the 3rd hand clamps, I started with 2 - 3/4” plywood squares, that are square; 2-3/4” a side.


Those along with the L-Clamps will be the 3rd hand clamp.

I add a piece of thin plywood to make a lip for the sides of one corner.  The opposite corner has no lip so this can be used in a recessed application too.  I am definitely getting better at glueing...


Holes drilled and L-Clamps in place.  Note there are 2 sets of holes in each wood block.  This is so either corner can be used with the clamps

Using the “lip” corner...  The black lines from the holes are so I know which holes are for which side for clamping..


The square is there to show it is reasonably square.

Recessed application...


russellberg

  • Jr. Member
  • Posts: 112
Re: Amateur Build of the X-MTM Encore
« Reply #106 on: 14 Jul 2020, 06:29 pm »
The "too much glue" syndrome is a pet peeve for me. It's the default way "more is better"!

FWIW I look at it like this, glue outside of the joint adds nothing except mess and sometimes work later to remove. Let's say one had 50% glue coverage on any given joint in MDF. At that, the joint strength likely exceeds the wood itself so what has been gained?

You are correct there is no benefit to glue outside of the joint.  However, the edge of of MDF will absorb large amounts of glue so I tend to use more in that circumstance than when I am working with hardwood.

Peter J

  • Full Member
  • Posts: 1876
  • Hmmmm
Re: Amateur Build of the X-MTM Encore
« Reply #107 on: 14 Jul 2020, 06:54 pm »
You are correct there is no benefit to glue outside of the joint.  However, the edge of of MDF will absorb large amounts of glue so I tend to use more in that circumstance than when I am working with hardwood.

Agreed. Eyeballs tell us much, but experience teaches the finer points. Cheapo MDF is certainly more like a sponge, higher density less so.

jonsk2514

Re: Amateur Build of the X-MTM Encore
« Reply #108 on: 14 Jul 2020, 08:15 pm »
I am also finding that the different glues absorb differently and therefore need to be spread differently.  The Titebond II doesn’t seem to absorb as easily as the III.  Haven’t had a chance to really compare the Titebond I to either of those.  Now the Quick and Thick is a whole other story...  That is more like caulk.

hawkeyejw

Re: Amateur Build of the X-MTM Encore
« Reply #109 on: 15 Jul 2020, 01:02 am »
You probably already know and are doing this but I’m the off chance you haven’t, make sure you have a wet rag while you clamp up your joints. Wipe away the excess that squeezes out due to clamping, and you’ll be left with very little cleanup/sanding to do once it’s cured.

jcsperson

  • Jr. Member
  • Posts: 211
Re: Amateur Build of the X-MTM Encore
« Reply #110 on: 15 Jul 2020, 01:31 pm »
For the 3rd hand clamps, I started with 2 - 3/4” plywood squares, that are square; 2-3/4” a side.


Those along with the L-Clamps will be the 3rd hand clamp.

I add a piece of thin plywood to make a lip for the sides of one corner.  The opposite corner has no lip so this can be used in a recessed application too.

I learned something new today!

I have a couple of those clamps. I use them to secure a sacrificial fence to my TS.


I'll have to pick up a few more and make some of your clamps.  :D

jonsk2514

Re: Amateur Build of the X-MTM Encore
« Reply #111 on: 15 Jul 2020, 02:27 pm »
You probably already know and are doing this but I’m the off chance you haven’t, make sure you have a wet rag while you clamp up your joints. Wipe away the excess that squeezes out due to clamping, and you’ll be left with very little cleanup/sanding to do once it’s cured.

Wonderful post!  :thumb:

Sometimes the simplest of ideas are the hardest to come up with.  No, I had not been thinking along this line... :duh:  My solution to this problem was to just smear excess glue with paper towels and/or fingers and hope for the best...  :roll:  This is what I have been doing with my practice pieces...

Thanks.

I did make a cup holder for the glue brushes.  One problem solved (needing someplace to put the brush that doesn’t fall over and put glue in unwanted places).

Now two for the books.  Oh, just thought of an idea to go with the wet rag... Get a cheap medium size SS bowl to put the wet rag in...  And I know just where to get one or 2...

jonsk2514

Re: Amateur Build of the X-MTM Encore
« Reply #112 on: 15 Jul 2020, 02:46 pm »
I learned something new today!

I have a couple of those clamps. I use them to secure a sacrificial fence to my TS.


I'll have to pick up a few more and make some of your clamps.  :D

Happy to pass along any ideas I have... 

I saw those clamps on Amazon when I was looking for other clamps and that reminded that I had those pairs and that, along with the video hacks, gave me the idea for the 3rd hand clamps I made.  Then, like you, I thought it would be a good idea to have a few more of these.  It too me forever to find them again on Amazon.  I couldn’t figure out the name for them.  Turns out one name I found for them is “Fence Clamp”.  I still didn’t come across the package deals I found the first time.

Your clamps for your fence look to be better made and stronger than the ones I have.  If you find a source for them, please post a link to it.  Never know if I will need more of them.

jcsperson

  • Jr. Member
  • Posts: 211
Re: Amateur Build of the X-MTM Encore
« Reply #113 on: 15 Jul 2020, 05:06 pm »
Your clamps for your fence look to be better made and stronger than the ones I have.  If you find a source for them, please post a link to it.  Never know if I will need more of them.

Those are Powertec clamps, $17.07/pair on Amazon. But I think next time I'll get the Milescraft clamps. They look similar but are just $11.64/pair.


jonsk2514

Re: Amateur Build of the X-MTM Encore
« Reply #114 on: 16 Jul 2020, 12:48 am »
Thanks for the links...

The Amazon Santa came today...


The corner clamps (I got 2, only 1 showing) were something I was most interested in getting.  For the limited inside clamping space, these needed to be small.  They are reasonable; about 3”.  With my 3rd hand clamps, I should have about 1/4” of space between the 2.  Have not yet checked to be sure but that should be it.  The clamps themselves seem to be good and reasonably strong.  They are a pot metal casting with a slip joint thread on the hand that seems to work well.  Mostly I need them to hold a corner square while the glue sets.  Regular clamps will be used to compress it all together.

And yes, that is a Sloth coffee cup.  That is me these days...  :lol:

jonsk2514

Re: Amateur Build of the X-MTM Encore
« Reply #115 on: 21 Jul 2020, 04:58 pm »
Dribs and drabs...

I started cutting “real” chips.  The assembly plan is to glue the sides to the top and bottom pieces first.  So I routed the top and bottom pieces as I figured these would be the easiest to do.  I decided to do the routing in a 3 step process - the actual routing is 2 steps; first is about a 3/8” cut and the second is just under 11/16”.  The 3rd is a trim cut on the table saw to get the 3/4” + just under 1/32”.  I did the routing with an extended guide that was clamped in place on the table’s guide rail.  This facilitated the use of 3/8-ish” plywood spacers for making the 2 router passes.
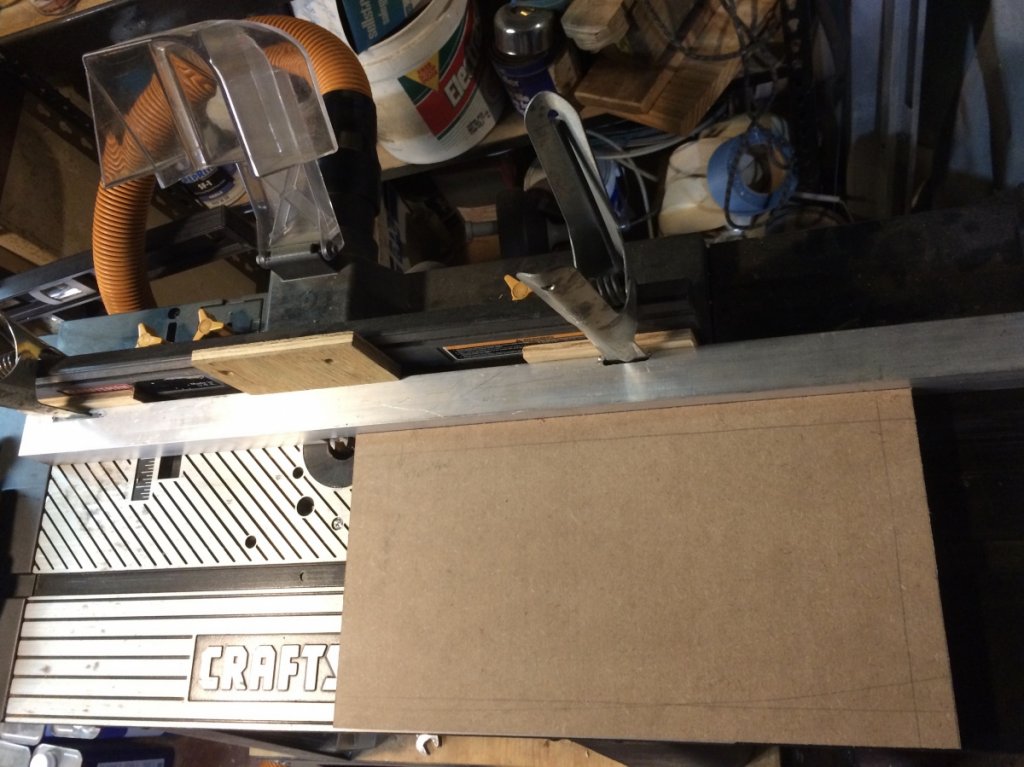


As a aide to making the routing passes, I marked the “outside” of the panel, as seen in the picture, with an outline of where the cuts were to be made.  A nice thing about the design I am using is that none of the pieces will be “handed”.  That is the top is the same as the bottom, as are the two sides, so I don’t have to worry about cutting a “left” or “right”  pieces.

The extended guide for the guide rail on the router table is intended to aid in routing the long side, and front panels.  It also works will for the shorter pieces.  This is just a 1.5”x1.5” square aluminum tube.  I cut slots in it for spring clamps and cut a notch for the router bit.  The notch is about 1/2” high so the router bit, set for a 3/8” deep cut, would clear, and there would still be an uninterrupted surface to slide the panel on.  The backside of the tube is cutout to match the vacuum hole in the table’s guide rail.  If anyone is interested, I cut the aluminum using a Dremal grinder set on a slow speed, using a RotoZip down spiral drywall cutter.  I used tube I had on hand, which is 1/8” thick.  If I was buying a piece just for this, I would have gone with the 1/16” thick tube as that would be easier to cut.

By making the final cut on the table saw, I figured the width of the routing pass (the 3/4” direction) can be less than accurate and I can concentrate on having a good, clean depth of cut.  While this may take a bit more time, it went quickly for the top and bottom pieces.

I did a dry fit with the actual side panels.
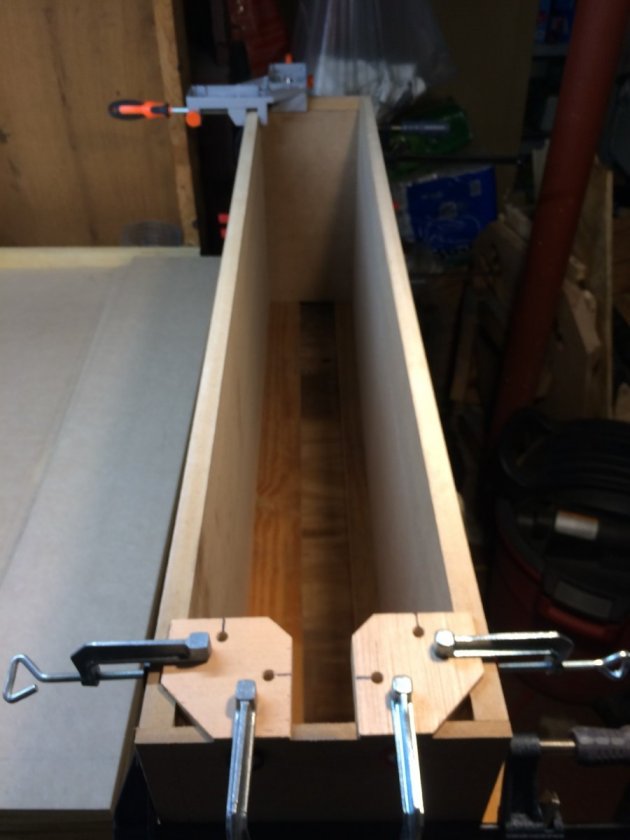


I am really liking the 3rd Hand clamps I made.  The corner clamps I bought will be good for gluing a corner but my clamps are easier to use.

The routing and trimming seems to have come out well, complete with a slight overhang of the top/bottom pieces with respect to the side pieces.  And the internal width at the clamps is 7” as per Danny’s plans.
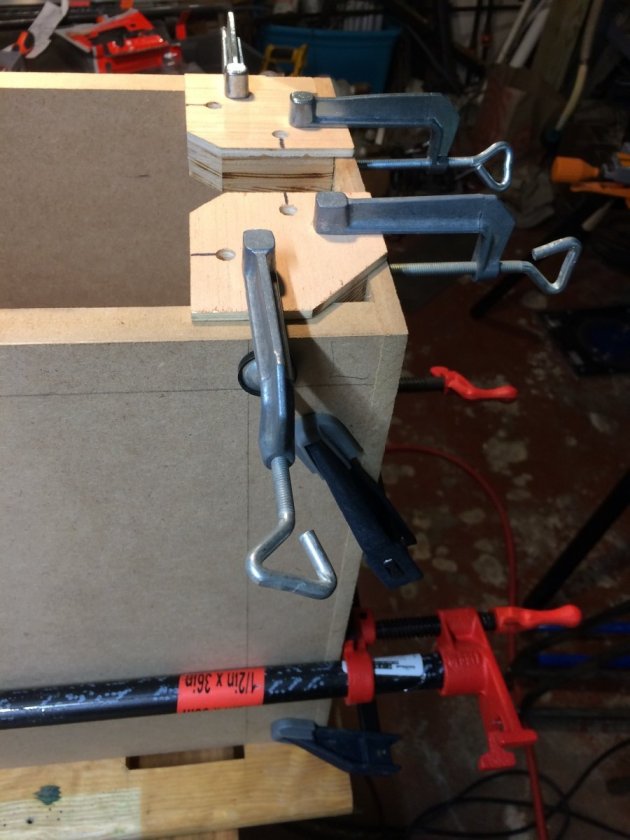


Dry fitting - Always a good thing.  It seems that no matter how much I check and measure, I miss something.  In this case I found that one of my top/bottom panels was not cut square.  I know I checked this, but missed it.  Turns out, that of the 4 panels I cut, 2 were off.   :duh:   I lucked out, though.  They were off on the high side so they could be trimmed square(er), which is a big PIA.  :shake:

The other thing I found was that the side panels are really flexible and there is no way to get a side to side measurement at any place other than where the clamps are.  That dimension will truly be set by the internal braces and the front panel (with the way I plan to do the assembly).  The back panel will need to be custom fit, the way I see it now.

There will be more dry fitting as I get other pieces routed.

Just one other note...
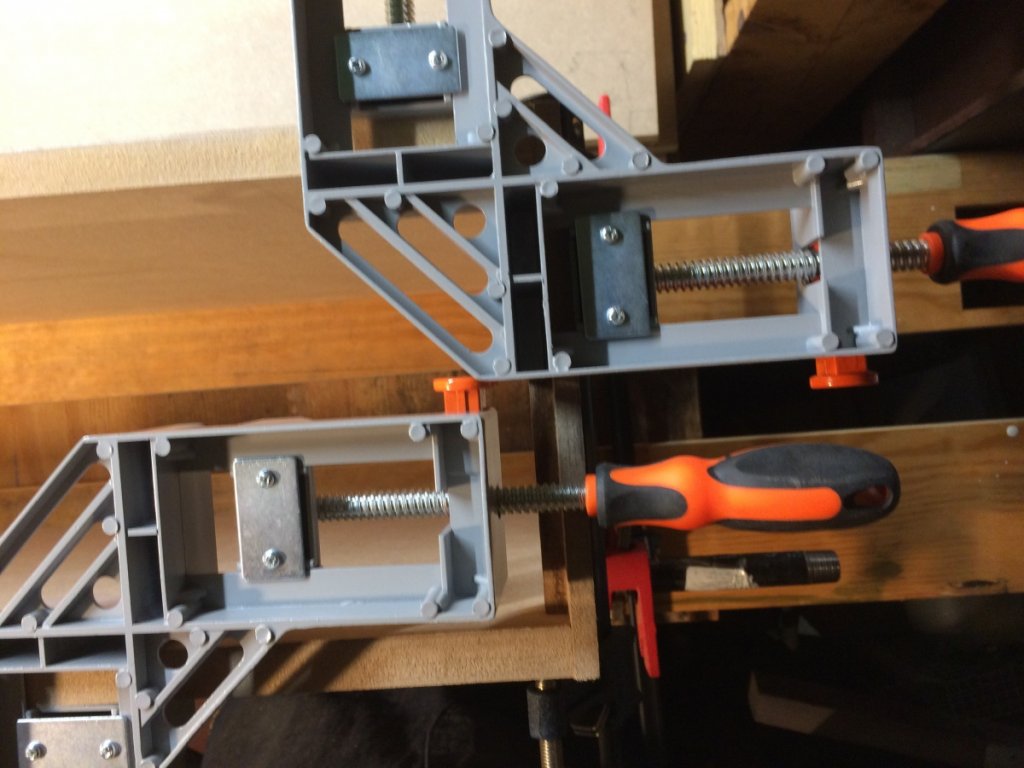
With respect to the corner clamps I bought, the quick release button is on the wrong side and interferes with having 2 clamps close together.  Something to watch out for in buying clamps...  And I have to wonder if the people who design and build things actually ever uses them....   :nono:  Why did they not put the buttons to the inside of the clamp angle?  Ugh!

jonsk2514

Re: Amateur Build of the X-MTM Encore
« Reply #116 on: 22 Jul 2020, 08:31 pm »
I am having fun reading other people’s builds, in particular for build ideas.  I think I have a few links in previous posts.  Here is another one:

https://www.audiocircle.com/index.php?topic=168181.0

Thanks Sonicjoy :thumb:

A take away for me from this is the size for the grill...  Good point on cutting  the frame smaller...

I am a ways away from doing the grill - but on planning ahead, I like the idea of using magnets for the grills.

Can anyone suggest a size magnet that would be good to use and what is a good source for them?

I have not found any magnets on Amazon that look to be large enough.  I know that the diameter could be varied to achieve different strengths.  However, I plan for an almost full length grill (around 40” long*), so I expect I it would be better to use more small-ish ones than a few larger ones.

* why 40-ish inches long?  Well, because of room placement, the ports will have to go in the front of the speaker and I want them covered along with the drivers.  Heresy, I know.  But, the room dictates that they be up against a wall...  And I don’t see the ports working well (or worse) in the back of the speaker.

Sonicjoy

  • Full Member
  • Posts: 366
Re: Amateur Build of the X-MTM Encore
« Reply #117 on: 23 Jul 2020, 01:47 pm »
Hi Jonsk2514, Glad you found my thread helpful.

Re magnets. The problem with magnets is that it can take some trial and error to get them to work the way you want. That's why I used traditional speaker grill clips on the NX Studio's. You might have to try a couple different sizes to get the desired holding power plus magnets don't always locate the way you want. Sometimes they tend to pull off to one side unless there is a recess of some kind that locates the grill. It can be done but can take some messing around to get right. The clips are very easy to install and work great and are pretty fool proof.

Good luck with your build.

jonsk2514

Re: Amateur Build of the X-MTM Encore
« Reply #118 on: 23 Jul 2020, 02:40 pm »
Thanks for the input.  I saw your use of the pegs for that top grill and that made sense to me for that application.

I have seen both used and I think I have seen some solutions to the alignment for the magnets.  I would think that a major issue with the magnets is how to attach the grill cloth and still have them work...  In most of what I have read, people prefer to wrap the cloth around a frame and then staple it to the back of the frame.  This would mean the magnets would have to be on a stand off or the grill cloth put into a recess or the magnets would have to be strong enough to work through the cloth...  Is this a buzzing issue with the grill frame up against the speaker face?  Am I talking myself out of using magnets????   :?

I need to look into this a bit more.   

jonsk2514

Re: Amateur Build of the X-MTM Encore
« Reply #119 on: 27 Jul 2020, 01:15 am »
More progress...
Much of my practice has paid off.  I have completed the routing of the long front and side panels.  The fronts are routed on all 4 edges and the sides are routed along one long edge only.

I set the router table up with 2 roller stands to support the 44” length of these pieces...


This worked really well; much better than I expected.  I wear leather gloves which helps to feed the boards through the router, without having to have hand on the end.  The other thing that worked well was the vacuum hookup on the table - no dust.

As I noted before, the routing took 2 passes.  The first at a 3/8” cut and the second at just under a 3/4” cut.  Then I would pass each panel through a 3rd time just to make sure all were clean cuts.

After I completed the routing, I ran the panels on the table saw to get just over 3/4” width for the 3/8” deep rabbit.

A flat-pack of top, bottom, front, and side panels:


The backs don’t require any routing at this time.  They will need some later for the location of the connectors.

Next is sizing (re-sizing?) the internal braces.  Right now they are slightly oversized compared to the front panel, which is not unexpected.  After that is to cut the cutouts in the braces... this should be interesting as I have never cut circles with a router before... :o