***X-Otica Main & Sub Build***

0 Members and 1 Guest are viewing this topic. Read 76287 times.

bdp24

  • Full Member
  • Posts: 884
Re: ***X-Otica Main & Sub Build***
« Reply #100 on: 13 May 2016, 06:52 pm »
I like the bevel, but it needs to be finished with a cap, either from CF sheet or a thin piece of Black Walnut. Even a piece of veneer glued on, or maybe CF vinyl wrap would finish it off. BTW/ I like your dowel lathe set-up :thumb:

Is your mandolin a Gibson?

Peter J

  • Full Member
  • Posts: 1876
  • Hmmmm
Re: ***X-Otica Main & Sub Build***
« Reply #101 on: 14 May 2016, 03:00 am »
Honestly on the the 3 design elements :

1 - Copper / Brass thumbtack on the grill way too "1962" trust me. Plus it does not go with your flow using carbon fiber legs at all. Your adding work, and calling attention to something that honestly makes it look more "Garage" built in my opinion.

2 - I am not 100% sure if these are planned for real world production or simply a concept for maybe providing flat packs or something, however you can get grill frames punched out 20 at a time from single sheets of whatever .25" material you want with all the beveling, cross bracing etc... on a CNC machine for probably 20 bucks a pair which would save you a ton of time, materials, and money unless you love the self inflicted pain doing details like this!

It's a grill so I see it as 100% industrial function for protection so I would never listen with them anyway.

By the way I do know of a mass production place super professional that can do the grill frames with state of the art CNC for any possible design you want punched out, and they will do pretty small quantities, with magnets, and all installed already, and yes they are easy to talk to, and located in the U.S. I think they will even put the fabric as a finished product, but that would cost more obviously.

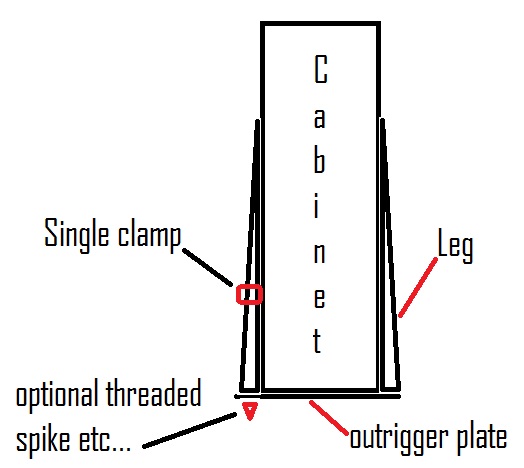
3 - The leg concept is interesting, and I get going for the "Design" element of it, but I will make a serious suggestion here.  First you are putting a ton of stress on those bolts holding it to the cabinet regardless of the clamp mechanism, so if somebody tilts this thing, or pulls its weight across the floor I think you risk some type of cracking, or damage at a point in the future. I would highly suggest simply cutting out full "Outriggers" that cross the bottom of the entire cabinet either from metal, or even wood could work, and this will take all the stress off, and give you plenty of surface area to bolt, and place wherever you like into the the speaker. Gravity will do the rest. And then use the "Legs" attached the to the top of the outrigger simply as an ornament with a single fancy clamp you came up with just for audio jewelry to give the design element your looking for, and ultimately save a ton of assembly time.

Then you don't need to try and get the shear strength of bolts like the M3 you mentioned, or anything into the tube itself for alignment, and keeping it from slipping, you just put your tube thru the clamp tighten up so it looks cool, but really has no a critical function at least that your battling with. Otherwise your putting a lot of bank on those tubes to do it all, with clamps holding a heavy speaker in the lateral plain basically "Floating". Again this can be eliminated with a simple cheap, and very effective fix using outriggers like in the photo to pull it off, and you never have to worry about the engineering on this part. Plus it still looks just as cool, and maybe even more robust than before.

Yes I have built many speakers  :thumb:


Thanks for your input. Let me see if I can address your concerns.

1. Agree with you on Copper rivet. Idea was abandoned, grills are complete.

2.There is no aspiration to mass produce this version. It's a one-of-a-kind that won't get repeated. My motivation is to push at the boundaries of my knowledge and try things I haven't seen/done before. The thread is here to make those explorations public and perhaps entertain or have someone take a little something away for their own project. If it was just about getting 'er done, I'd be listening to them now...eh?

The grills are an example of that, it's a design exercise and won't be for everyone, but then it only has to please me. CNC would be fun, and it's on my bucket list to own, but that's a long and ever changing list...time will tell.

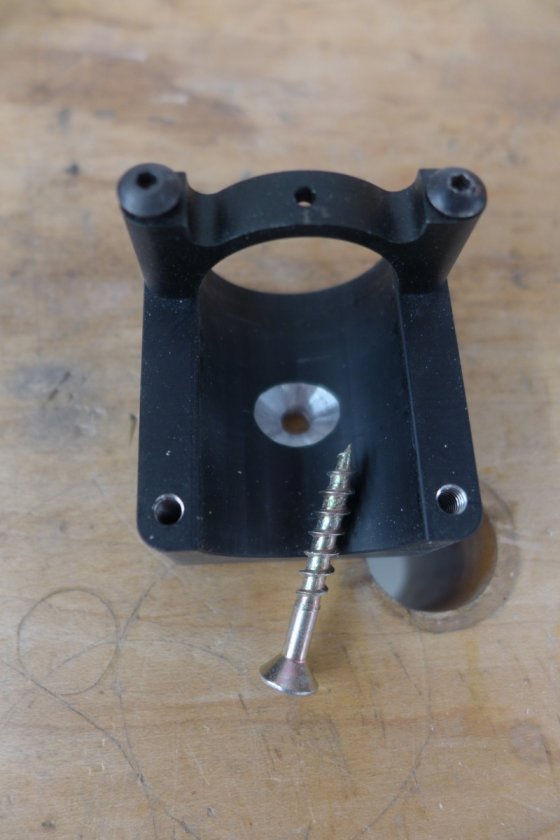
3. You raise a valid concern. I may fly by the seat of my pants, but I didn't get this far along without vetting ideas for functionality. The clamp design was partially borrowed from an existing design that's supporting significant load. Clamping force is more than you might guess and shear strength of mounting fastener is augmented by friction provided by base/substrate interface.
To test your assertion, I half assed a demonstration which I'll show some photos of here. It's not super scientific, but I'll put my stock in real world scenarios rather than conjecture most any day.
Bases were imagined to work in several ways. A 3mm pilot was drilled in center to facilitate what I envisioned. I drilled the hole to 3/16" and countersunk for #8 flathead screw. Corner holes were tapped for #6 machine screws. Machine screws were engaging threads I base by 3/16" of so. In practice I'd use longer, but it's what I had handy.


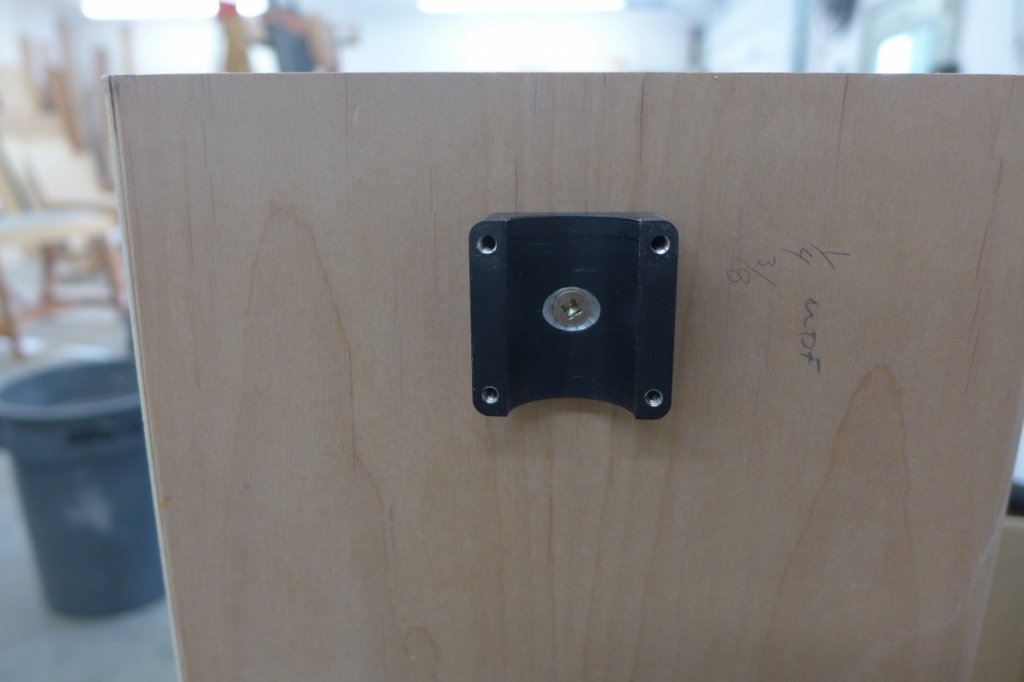
I clamped a piece of same sandwich used in speaker side in vice


The bottom insert for tubing is a barbed push in affair, so I bolted a piece of ply to it


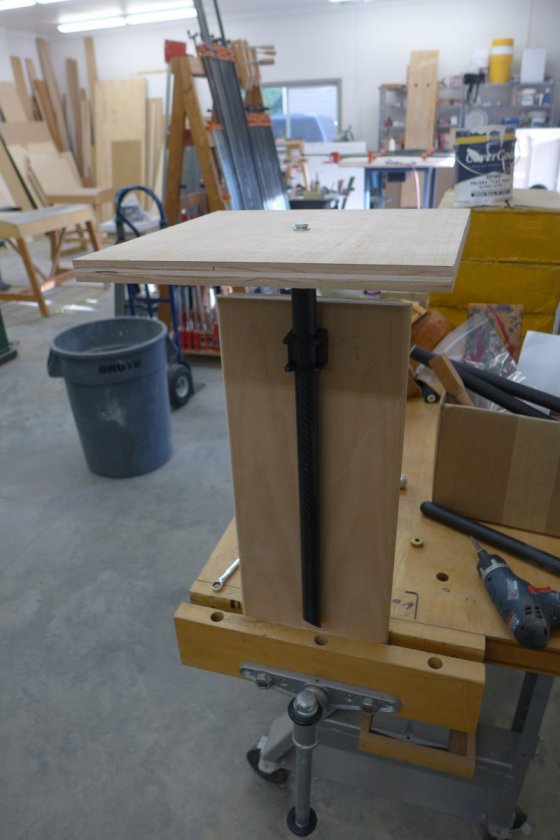
Here's a 25 lb. bag of shot and about 7 lb. in the jar


No movement whatsoever. The whole setup is kinda precarious, but I was tired...that's my excuse. As an acid test, I hung my body weight on it but it wanted to rotate or pull the threaded insert out of tubing, but no slippage of clamp. Had I been reading that last statement in a thread I imagine I'd be dubious, but I dare say if I were to rig this up a little better, I think I could stand on a pair of them...no kidding.

I do this for fun, and like most fun, there are moments of woo-hoo! and the inevitable oh, shit!. It's mostly about building the thing and in this case I've put my trust in Danny's design so I can let my imagination run on the construction part. It's my thing, ya know, to puzzle through the minutia.


Peter J

  • Full Member
  • Posts: 1876
  • Hmmmm
Re: ***X-Otica Main & Sub Build***
« Reply #102 on: 26 May 2016, 10:42 pm »
 I'm taking a little time to get some licks in on the subs. I want to do veneering and gilding on both subs and mains at same time.

What I'm gunning for, so you don't have to back peddle for a reminder


Glued up all the "sandwiches" and made rabbets and dados and sawdust, oh my...


Mostly ready for assembly


Dry run


Before I assemble these, I'm hoping those that have built them can give me their thoughts on wiring holes through baffles  and shelf so I can drill them now and not look back with the coulda-woulda-shouldas. Connection to amp will be a Speakon, but  looking for clean and least visible scheme to drivers. Nothing teaches like experience and I'm hoping y'all that have experience with them can share your horror stories insights. I'm imagining running up the side behind the No Rez and putting terminals on drivers at 9:00 and 3:00.

Captainhemo

Re: ***X-Otica Main & Sub Build***
« Reply #103 on: 26 May 2016, 11:18 pm »
Sub parts looking  good Peter .

Typically, I've done  the wiring on one side of the subs (mirrored so that each sub has the wiring running up the inside).. The last set we sent out, I  used holes in each side  of the baffle and rear brace to keep  wiring shorter... if you  go up both sides, you don't need to run back and forth to get back to the  passthrough hoels.

I've been using a  15/32  bit (if you go up both sides, you could  go smaller as you'll be passing less  wire through each hole), the baffle holes  end up in the lower "cavity" (assuming the lower driver is facing rearwards) a.  I keep the holes right near the edge so that the no rez covers up any wiring, you can  tuck it right in the  inner corner and it is not visible  until  yo upop it out to make the connection t othe  driver/servo coils.

With the current set of triples I'm building for myself, I'm going to run all 3 drivers facing forward and  see just how   rearward weighted they end up.... eliminates the  need for  holes in the baffle and might look cool too

jay

« Last Edit: 27 May 2016, 12:23 am by Captainhemo »

Peter J

  • Full Member
  • Posts: 1876
  • Hmmmm
Re: ***X-Otica Main & Sub Build***
« Reply #104 on: 27 May 2016, 12:03 am »
Thanks Jay, that helps. I don't know if you use the Speakons, but do you see any problem putting them right through the side of cabinet just behind plane of center baffle? Or perhaps dead center, modify baffle to accommodate so wire could be run on either side saving thru the baffle holes up higher? Just thinkin' out loud on that last one...

mlundy57

  • Industry Participant
  • Posts: 3579
Re: ***X-Otica Main & Sub Build***
« Reply #105 on: 27 May 2016, 12:17 am »
I do mine like Jay is describing: holes through each side of the divider behind the baffle and one on each side through the baffle below the divider (if bottom driver is facing rearward). I also run the wire along the edges so they are hidden by the NoRez as much as possible. Also, I use wire clamps like on the back of the Wedgies to keep everything tidy. However, I use a 3/8" bit.

I orient the top driver with the coils angled towards the corners rather than straight across. Gives me a little more room to get my hands in.

Mike

Peter J

  • Full Member
  • Posts: 1876
  • Hmmmm
Re: ***X-Otica Main & Sub Build***
« Reply #106 on: 27 May 2016, 12:33 am »
Thanks for the confirmation, Mike, that sounds like a good plan.

I (think I) remember something about the wiring of the servos and drivers. Servos paralleled and drivers in series or something like that. There was a drawing of a Super Vee showing connections. Does that ring a bell with anyone?

Danny Richie

Re: ***X-Otica Main & Sub Build***
« Reply #107 on: 27 May 2016, 12:36 am »
Thanks for the confirmation, Mike, that sounds like a good plan.

I (think I) remember something about the wiring of the servos and drivers. Servos paralleled and drivers in series or something like that. There was a drawing of a Super Vee showing connections. Does that ring a bell with anyone?

I can send you those drawings if you like.

Captainhemo

Re: ***X-Otica Main & Sub Build***
« Reply #108 on: 27 May 2016, 12:38 am »
LOL, yeah, facing rearward.... that's what I meant ....long day !

Peter,   I don't see an issue with  using the spectron connecotr like that.  If you use holes, you can use a little silicone to fill the holes after wirign, plus if you keep them tight to the conrers, they really aren't  obvious once the no rez is in place.

When guys have been buying the  flat packs with  front and rear grills, I've ben recommending they put the female spectron connector   ust in front of the  rear grill  rabbet.

jay

Peter J

  • Full Member
  • Posts: 1876
  • Hmmmm
Re: ***X-Otica Main & Sub Build***
« Reply #109 on: 27 May 2016, 12:40 am »
That'd be great Danny. I gotta talk to you about another thing too... you going to be around tomorrow?

Peter J

  • Full Member
  • Posts: 1876
  • Hmmmm
Re: ***X-Otica Main & Sub Build***
« Reply #110 on: 27 May 2016, 12:54 am »
Just thought of something else.  I ran a 5/8" radius on backside of driver opening. Is that adequate? Would bigger be better?

Captainhemo

Re: ***X-Otica Main & Sub Build***
« Reply #111 on: 27 May 2016, 12:57 am »
Just thought of something else.  I ran a 5/8" radius on backside of driver opening. Is that adequate? Would bigger be better?

It'll be fine Peter,  not even necessary with the long wave lengths.
I always  do them too, can't hurt   

jay

Danny Richie

Re: ***X-Otica Main & Sub Build***
« Reply #112 on: 27 May 2016, 01:02 am »
That'd be great Danny. I gotta talk to you about another thing too... you going to be around tomorrow?

That's fine.

Danny Richie

Re: ***X-Otica Main & Sub Build***
« Reply #113 on: 27 May 2016, 01:03 am »
Just thought of something else.  I ran a 5/8" radius on backside of driver opening. Is that adequate? Would bigger be better?

That's fine too.

lacro

  • Full Member
  • Posts: 602
Re: ***X-Otica Main & Sub Build***
« Reply #114 on: 27 May 2016, 02:00 pm »
Is your mandolin a Gibson?

The avatar photo is David Bromberg, and his mandolin is a Gibson,
https://en.wikipedia.org/wiki/David_Bromberg

bdp24

  • Full Member
  • Posts: 884
Re: ***X-Otica Main & Sub Build***
« Reply #115 on: 27 May 2016, 11:15 pm »
The avatar photo is David Bromberg, and his mandolin is a Gibson,
https://en.wikipedia.org/wiki/David_Bromberg

Guess I haven't seen a picture of David lately!

Peter J

  • Full Member
  • Posts: 1876
  • Hmmmm
Re: ***X-Otica Main & Sub Build***
« Reply #116 on: 5 Jun 2016, 03:01 am »
The saga continues...mistakes and all!

Glued up bass cabs.


Belt and suspenders


Y'all might remember I glued thin phenolic sheets to top and bottom on mains. This does two things; finishes bottom nicely because I won't veneer it, also keeps top glue joints from telegraphing through veneer. Rather than clamp, I had this idea to flip upside down on some Styrofoam and weight the top, figuring the foam would support evenly and save me clamping. Makes sense, no?


After drying I was surprised to find that those little ridges you see in the Styrofoam had mirror images on the phenolic...fail.


I removed the furrowed stuff and went back to what I know works


Moving on to my next learning experience. Needed to make the front applied panel pattern so I could sandwich laminate the like the mains. These will get gilded before installation so I wanted to be precise on lineup with cabinet. Thought I could do it with pocket screws, but what you can't see is it slit the narrow strips of plywood on sides...fail.


Next tried to use cabinet as pattern for routing this MDF. Just to hard to control with handheld router...fail


The bone pile


So decided to glue up frame on cabinet, just enough glue to hold it together until I can get I laminated. Clamps are just lightly screwed down to keel joints in plane


After vacuum bagging, one routed, one not


Banding perimeter with 1/4" MDF


Trimmed and ready for more nasty MDF sawdust


Routed rabbets for grills


Jig for making big radius smaller. Right is before, left is after


Square off corners with corner chisel


Routed the radius on outer perimeter, drilled and glued grill magnets


Tomorrow will shoot some primer and start to get these ready to gild.


« Last Edit: 7 Jun 2016, 04:52 am by Peter J »

DeeJayBump

  • Jr. Member
  • Posts: 167
Re: ***X-Otica Main & Sub Build***
« Reply #117 on: 5 Jun 2016, 03:28 am »
I love these build threads.

Thanks, Peter, and thanks to everyone who posts their build threads with pictures and notes.

Guy 13

Re: ***X-Otica Main & Sub Build***
« Reply #118 on: 5 Jun 2016, 04:22 am »
Thanks Peter for the very well documented post with plenty of good pictures,
I love pictures, because a picture is worth a thousand words.

Guy 13

Peter J

  • Full Member
  • Posts: 1876
  • Hmmmm
Re: ***X-Otica Main & Sub Build***
« Reply #119 on: 7 Jun 2016, 05:22 am »
Here's a few more pics for the photo junkies. And just so you know, I count myself as one of 'em.

The distributor I get a lot of supplies from has a wood finishing guru on staff and he recommended this stuff to me. In the past I've used automotive 2k primer for it's filling capability, but it's really spendy and not specifically designed for wood. This is about half the $$ and one of it's listed strengths is edge filling MDF. I cleared over it for the grills and used it for priming on all the black parts you see. Works really well and lays down really nicely.

Kind of repetitive work and dirty (because it's black), but worth the effort to get that monolithic look in the end product. Prime, fill imperfections, sand, shoot more primer, sand again and then more primer. These and the main baffles will get topcoated in red which will be the undercoat for gilding. You'll see when I get to that point.


Here they are after final coat of Clawlock. There's an MDF seam right in the middle of the roundover and the sandwich lamination on the inside of frame. Not bad, huh?


Next up more grills or maybe veneer...