Amateur Build of the X-MTM Encore

0 Members and 1 Guest are viewing this topic. Read 28936 times.

hawkeyejw

Re: Amateur Build of the X-MTM Encore
« Reply #140 on: 28 Aug 2020, 01:11 pm »
Cool to see them coming together! I'm looking forward to when you're able to fire them up and listen to them for the first time, hopefully soon!

jonsk2514

Re: Amateur Build of the X-MTM Encore
« Reply #141 on: 28 Aug 2020, 01:22 pm »
Glad to see that you’re making progress, but it would be going together much easier and faster if you had just cut dados into the sides like everybody else does.  You created a lot of extra work for yourself by using the quarter round strips instead.

Thanks

Progress comes when time allows.

As for the quarter round, you and I will have our difference of opinion on that one.  For me, I see the advantage in the assembly.  Maybe not in “time”, but in ease.  I failed miserably with the assembly of my practice box with only 2 braces being fitted into dado-like slots.  I have also watched Peter assemble the XLS Encore box with only one or two braces and having to use a mallet to get the sides and braces together.  Based on my practice box, and what I have seen the Pros do, I believe the level of difficulty is very high for me to try to assemble a cabinet with 7 braces that have to go, all at same time, into 7 slots in a side.  Once the glue goes on the parts there is no turning back and this becomes a one-shot try.  A high level of difficulty equates to high risk of failure. So, no matter how much time doing dado slots in the sides saves me, if I fail on the assembly then I loose big time and everything become scrap...

The quarter round will allow me to assemble one brace at at time into the cabinet.  Simple and no fuss.  And it has little risk of failure.  I’ll take that over saving a few minutes otherwise.

hawkeyejw

Re: Amateur Build of the X-MTM Encore
« Reply #142 on: 28 Aug 2020, 01:30 pm »
Thanks

Progress comes when time allows.

As for the quarter round, you and I will have our difference of opinion on that one.  For me, I see the advantage in the assembly.  Maybe not in “time”, but in ease.  I failed miserably with the assembly of my practice box with only 2 braces being fitted into dado-like slots.  I have also watched Peter assemble the XLS Encore box with only one or two braces and having to use a mallet to get the sides and braces together.  Based on my practice box, and what I have seen the Pros do, I believe the level of difficulty is very high for me to try to assemble a cabinet with 7 braces that have to go, all at same time, into 7 slots in a side.  Once the glue goes on the parts there is no turning back and this becomes a one-shot try.  A high level of difficulty equates to high risk of failure. So, no matter how much time doing dado slots in the sides saves me, if I fail on the assembly then I loose big time and everything become scrap...

The quarter round will allow me to assemble one brace at at time into the cabinet.  Simple and no fuss.  And it has little risk of failure.  I’ll take that over saving a few minutes otherwise.

The cool thing about woodworking is that there's lots of ways to go about building things that will work out just fine. Some people do simple glued butt joints, some angle cut butt joints, some use a domino machine, some use a table saw and cut a dado, etc. etc. etc. As long as what you're doing works for you and you're getting strong glue up, it will be fine. And it will be uniquely yours which is part of what makes DIY fun and rewarding. It seems like you enjoy the process and the challenge of solving the problem just as much as getting to the end result, nothing wrong with that.

jonsk2514

Re: Amateur Build of the X-MTM Encore
« Reply #143 on: 28 Aug 2020, 01:46 pm »
Cool to see them coming together! I'm looking forward to when you're able to fire them up and listen to them for the first time, hopefully soon!

Thanks...  :thumb:

I, too, am looking forward to the day that happens.

Sorry for this taking so long. I see others getting these builds done more quickly.  This is a “do it when I can” type of project, but I also wanted to document it.  It will help me when I do another.

That said, when I did this last dry fit, I realized that it is coming together quickly and I need to get going with order the components for it...   :duh:

More to come...   :green:

The cool thing about woodworking is that there's lots of ways to go about building things that will work out just fine. Some people do simple glued butt joints, some angle cut butt joints, some use a domino machine, some use a table saw and cut a dado, etc. etc. etc. As long as what you're doing works for you and you're getting strong glue up, it will be fine. And it will be uniquely yours which is part of what makes DIY fun and rewarding. It seems like you enjoy the process and the challenge of solving the problem just as much as getting to the end result, nothing wrong with that.

A good way to put it...
It is the journey as much as the destination...  For me, Yes...   :D

jonsk2514

Re: Amateur Build of the X-MTM Encore
« Reply #144 on: 28 Aug 2020, 02:52 pm »
I found a thread on finishing cabinets with Duratex and other water based products on MDF.  I’ll link it for future reference.
https://www.audiocircle.com/index.php?topic=171856.0

I have a black enamel paint I have used in the past that I plan to use and it comes as either water or oil based.  In reality I prefer oil based paints and found that I can recycle the paint thinner for brush and roller clean up. I just let it sit in a can for a while.  The solids settle out and I use the liquid later on for the initial several rinses of a brush or roller.  Then I do a rinse or 2 with clean paint thinner.

Having to do the finish is something that I need to start thinking about along with ordering components.  :roll:
Oh, and then there is the grill and how to attached...  Later....

hawkeyejw

Re: Amateur Build of the X-MTM Encore
« Reply #145 on: 28 Aug 2020, 06:35 pm »
If you go with more traditional paint, plan to use a good primer and sanding between coats. The end grains of MDF especially will absorb a lot of paint and if you want to avoid having an obvious difference in texture in your final coat, you're going to need to make sure you have a totally uniform surface that you start with. You're going to want to sand and then run your fingertips over the surface to find any variances in texture, and sand them down. Getting a nice finish is mostly about doing a great job preparing the surface.

I haven't worked with it but I would guess Duratex will definitely be more forgiving just based on the texture that it provides on its own.

jonsk2514

Re: Amateur Build of the X-MTM Encore
« Reply #146 on: 28 Aug 2020, 06:59 pm »
Absolutely, I will want to avoid having an uneven absorption.  However, I am looking for texture, like the Duratex.

For the room these will be going into, I plan to have them “disappear”, except for their sound.  The paint I plan to use is thick and I know that brushing it on leaves brush marks.  I am hoping to be able to take advantage of that by rolling it on and have it leave the roller texture, kind-of like I have seen in Danny’s videos in using the Duratex.  I will definitely experiment first.  Also, I have looked into the availability of the shellac based primers, which have been recommended.  My understand is that if I use that primer I will be able to use water based coatings/paints.  That will make cleanup with this paint easy.  I have a bit of experience with this paint, which is a big reason why I plan to use it.  I have also found it to be extremely durable over time on wood.  I hope that carries through to the MDF.

diyman

  • Jr. Member
  • Posts: 163
Re: Amateur Build of the X-MTM Encore
« Reply #147 on: 28 Aug 2020, 07:42 pm »
Thanks

Progress comes when time allows.

As for the quarter round, you and I will have our difference of opinion on that one.  For me, I see the advantage in the assembly.  Maybe not in “time”, but in ease.  I failed miserably with the assembly of my practice box with only 2 braces being fitted into dado-like slots.  I have also watched Peter assemble the XLS Encore box with only one or two braces and having to use a mallet to get the sides and braces together.  Based on my practice box, and what I have seen the Pros do, I believe the level of difficulty is very high for me to try to assemble a cabinet with 7 braces that have to go, all at same time, into 7 slots in a side.  Once the glue goes on the parts there is no turning back and this becomes a one-shot try.  A high level of difficulty equates to high risk of failure. So, no matter how much time doing dado slots in the sides saves me, if I fail on the assembly then I loose big time and everything become scrap...

The quarter round will allow me to assemble one brace at at time into the cabinet.  Simple and no fuss.  And it has little risk of failure.  I’ll take that over saving a few minutes otherwise.

I agree that you should do what's comfortable for you.  Just want to make sure that any others reading this realize that there is a more conventional way to do it.

In one of your recent pictures there are two corner clamps holding the parts together.  Make sure when you do the final glue up that you don't rely on those clamps to square it up.  Need to measure and match both diagonals for that purpose.
 

jonsk2514

Re: Amateur Build of the X-MTM Encore
« Reply #148 on: 28 Aug 2020, 09:44 pm »
I agree that you should do what's comfortable for you.  Just want to make sure that any others reading this realize that there is a more conventional way to do it.

In one of your recent pictures there are two corner clamps holding the parts together.  Make sure when you do the final glue up that you don't rely on those clamps to square it up.  Need to measure and match both diagonals for that purpose.

Yes, absolutely, there are multiple ways to do all of this.

I am hopeful that when others read this they, will see these discussions of these various methods.  I also hope that if people are looking for hints as how to do this or that, that they also view a few assembly videos, like the ones Peter has posted.

I will say, I understand what you are saying and I have considered how to make these cabinets “square”.  In some respects these cabinets have become a bit of a custom assembly.  Not the best idea, but working with the tools I have, I think it is the best I can do.  I am marking piece when I do the dry fit, so when I do the glue fit those other pieces do fit in.  I’ll let you know how that works when I complete that point and let everyone know the level of success I achieve.... :o

I have dry fit the pieces and they are fit to each other at this point.  So, it should all be “self-squaring” to each other upon assembly.   I will be using the front and back panels to “square” the sides to top and bottoms when I glue the sides, top and bottom together.  The front and back panels will be wrapped so they don’t get “glued” to those pieces inadvertently.  This way I can ensure those pieces will fit when it comes time to glue them in.

diyman

  • Jr. Member
  • Posts: 163
Re: Amateur Build of the X-MTM Encore
« Reply #149 on: 29 Aug 2020, 04:12 am »

I have dry fit the pieces and they are fit to each other at this point.  So, it should all be “self-squaring” to each other upon assembly.   I will be using the front and back panels to “square” the sides to top and bottoms when I glue the sides, top and bottom together.  The front and back panels will be wrapped so they don’t get “glued” to those pieces inadvertently.  This way I can ensure those pieces will fit when it comes time to glue them in.

That's not the way to do it.  Of course, you usually don't do things the proven ways that everyone else does them anyway.  You seem to always make up your own ways instead.

So here is the right way, regardless of any other ideas you may have.  Don't initially use the front or back for squaring up.  Leave them aside. Assuming that you have cut the two long side pieces to the exact same length, and also the top and bottom to their exact same lengths, then once you have applied the glue and clamps carefully measure the two corner to corner diagonals across the cabinet.  Make minor tweaks with the clamps in place until the two diagonals are exactly equal.  Your cabinet now is as square as it can possible be.

There is no other method superior to this one and it is the way all experienced woodworkers build cabinets.  Using the front and back panels for alignment instead does not guarantee the cabinet will be square.  There are too many uncontrolled variables affecting the size and shape of those panels and their fit into the rabbets. Afterwards if you have to trim the front and back panels to fit, then do so. But if they are fairly accurate to begin with and you've left a little clearance it shouldn't be necessary to trim them.

The best way, however, would have been to not cut the rabbets into the back edges of the front baffle until the box has been glued up and squared.  You would then trace the inside opening of the box onto the back of the baffle and cut the rabbets for an exact fit.   Finally you would trim the outside edges of the oversize baffle to match the sides of the box once its glued on.

You still may come out fairly square with the way you're doing it. At least square enough. One potential problem, however, is that the box corners may not come together tightly.  You'll find out when you do it.
« Last Edit: 29 Aug 2020, 07:37 am by diyman »

jonsk2514

Re: Amateur Build of the X-MTM Encore
« Reply #150 on: 29 Aug 2020, 11:50 am »
Everything is cut using a carpenter’s square.  There is no reason to be more precise than that on one piece vs another.

And has been said a number of times throughout this thread, there is more than one right way to build a cabinet.

Peter J

  • Full Member
  • Posts: 1876
  • Hmmmm
Re: Amateur Build of the X-MTM Encore
« Reply #151 on: 30 Aug 2020, 02:22 pm »
Everything is cut using a carpenter’s square.  There is no reason to be more precise than that on one piece vs another.

And has been said a number of times throughout this thread, there is more than one right way to build a cabinet.

Indeed there are many ways. Finger wagging from observers has never been much of a motivator for me, for sure. More importantly, I think it's important to gather knowledge and skill along the way and derive some pleasure from the process.

I encourage you to press on to completion. Undoubtedly, you can take what you've learned and apply it to a future project. Somewhere I read that instead of squawking about the result of some endeavor, we can simply replace all the self-talk with this; "next time I'll _____". That leaves the door open to....well, more open doors! Constant improvement is a worthy goal.

I guess I'm waxing philosophical this morning...

jonsk2514

Re: Amateur Build of the X-MTM Encore
« Reply #152 on: 30 Aug 2020, 03:12 pm »
Press on, I am.  I have fit the braces to the second cabinet.  I had cut the braces a little large.  I don’t remember exactly why; maybe just because...  Turns out it has worked out well for me, as I could easily trim them to size and I now have a nice slip fit with dry fitup.  I think this will work out well for the assembly that I plan to do.  The only thing left to do is cut the holes in that set of braces and the two cabinets will be ready for gluing. 

A mistake I made was to not pair up and mark the pieces as belonging to a specific cabinet as a lot of pieces became custom fitted.  When I recognized this, it took me a long time to sort the pieces through dry fitting them all over again.

Lesson learned if doing this sort of thing one or two at a time and not have a way to make all the pieces a universal fit.

jonsk2514

Re: Amateur Build of the X-MTM Encore
« Reply #153 on: 3 Sep 2020, 01:12 am »
Press on and making mistakes...   :duh:

Sometimes the best plans fall apart.  I cut the holes in each of the braces of the second cabinet.  I made the straights cuts in the “C” braces and then did the quarter round edges on those and the “B” braces.  The “A” braces are the short 10” long brace and have a hole and a half hole.  However, I had set those aside and wait a day before finishing them.  When I got back to those, I took a quick look at the plans, and saw the straight cuts instead of the half round and went ahead and made 2 really nice straight cuts to the hole.

You know that feeling that you get when when something doesn’t feel right?  Well, as soon as I finished the straight cuts I got that feeling and realized something didn’t look right.  It didn’t jump out at me as to what was wrong, but it didn’t take long for me to go and check the drawing again...  Crap, that was the figure for the “C” brace, not the “A” brace.


Now where are my scrap pieces of MDF?  What? No pieces large enough to replace a 7”x10” piece of MDF?  Nope.   :banghead:

I didn’t want to have to buy more MDF.  Maybe I could get a quarter sheet?  Or I could glue a couple of sheet together.  Turns out, I did have 2 pieces of scraps that would work.


Tomorrow I’ll see if it works.

hawkeyejw

Re: Amateur Build of the X-MTM Encore
« Reply #154 on: 3 Sep 2020, 02:50 am »
Lol, don’t feel bad. I did something similar with my X-statiks. I ended up laminating some scrap pieces together as well and after some putty and sandpaper, you’d never know the back panels were edge laminated scrap pieces. Be glad your mistake is an interior piece!

jonsk2514

Re: Amateur Build of the X-MTM Encore
« Reply #155 on: 5 Sep 2020, 01:46 pm »
Good thing for glue and clamps...   :lol:

And, yes, lucky this was an internal piece... :roll:

I have finished remaking that brace and all are done and sanded.   One thing I found with the up spiral cutter I used to cut the opening in the braces is that its end leaves a bit of feathering if not cutting all of the way through the MDF.  I cut the opening in 2 cuts.  I use the adjustable stops on the plug base for the first cut and I see this feathering at bottom of that cut.  The feathering is light and, maybe, 1/16” long, but it is there none the less.  It is also just below the cut made by the quarter round bit that I used to round the corners of these openings, so no luck in that cleaning it off.  Sanding did easily take that away and nicely blended everything together. 

For sanding on these curved surfaces, I tried the foam sanding blocks that are on the market now.  I used a medium grit, which worked well, but I had a few places where coarser grit would have been helpful. 

I found a couple of these in my pile of miscellaneous tools:


I made 2 of these a while ago for something I was doing.  These were made from the inexpensive clamps Harbor Freight sells.  I cut off the fixed end of 2 clamps, removed the slide clamp part from one and put it on the other.  It takes 4 clamps to make 2 of these.


I have been looking for an easy way to facilitate the use of the long clamps I will be using to clamp together the long length of the cabinet. After a while of pondering what to use and/or make for handing these long clamps, I realized the solution was right there.


These will work great for clamping the sides into the top and bottom panels and then the long clamps will rest on the the handles of these clamps, for then clamping the length of the cabinet.  I have made a second pair of these to support a second pair of long clamps.

Another note...  I have purchased a few of these HF clamps that the slide clamp part wouldn’t stay locked in place.  The spring was flabby.  This spring is just a wire loop in that slide piece and that spring just needs to be re-bent to apply more force to the locking plates.  It pops out easily using a couple of picks.


This is the way that spring in one of my clamps looked like when I pulled it out.  That one leg of the spring needed to be bent further out to match the other leg.

Peter J

  • Full Member
  • Posts: 1876
  • Hmmmm
Re: Amateur Build of the X-MTM Encore
« Reply #156 on: 5 Sep 2020, 03:36 pm »
Good thing for glue and clamps...   :lol:

And, yes, lucky this was an internal piece... :roll:

I have finished remaking that brace and all are done and sanded.   One thing I found with the up spiral cutter I used to cut the opening in the braces is that its end leaves a bit of feathering if not cutting all of the way through the MDF.  I cut the opening in 2 cuts.  I use the adjustable stops on the plug base for the first cut and I see this feathering at bottom of that cut.  The feathering is light and, maybe, 1/16” long, but it is there none the less.  It is also just below the cut made by the quarter round bit that I used to round the corners of these openings, so no luck in that cleaning it off.  Sanding did easily take that away and nicely blended everything together. 

This is the way that spring in one of my clamps looked like when I pulled it out.  That one leg of the spring needed to be bent further out to match the other leg.


Could you clarify "feathering".  If I'm imagining this right, it sounds like a misalignment or maybe cutter run-out. Perhaps plunge mechanism or pivot pin deflection.

The clamp problem doesn't surprise me. Much of Harbor Freight stuff is knocked off from existing designs but misses the mark in some small but critical details. In some cases it's of no concern, others it's apparent why it cost less when one goes to use the product.

jonsk2514

Re: Amateur Build of the X-MTM Encore
« Reply #157 on: 6 Sep 2020, 02:17 am »
Could you clarify "feathering".  If I'm imagining this right, it sounds like a misalignment or maybe cutter run-out. Perhaps plunge mechanism or pivot pin deflection.

The clamp problem doesn't surprise me. Much of Harbor Freight stuff is knocked off from existing designs but misses the mark in some small but critical details. In some cases it's of no concern, others it's apparent why it cost less when one goes to use the product.

I am definitely careful about buying Hf stuff.  Some of their stuff is pretty good.  Other is in between or low in usefulness.  The clamps are OK if not over taxed, which is not to hard to do...   :roll:

I am using a 1/8” diameter up spiral cutter


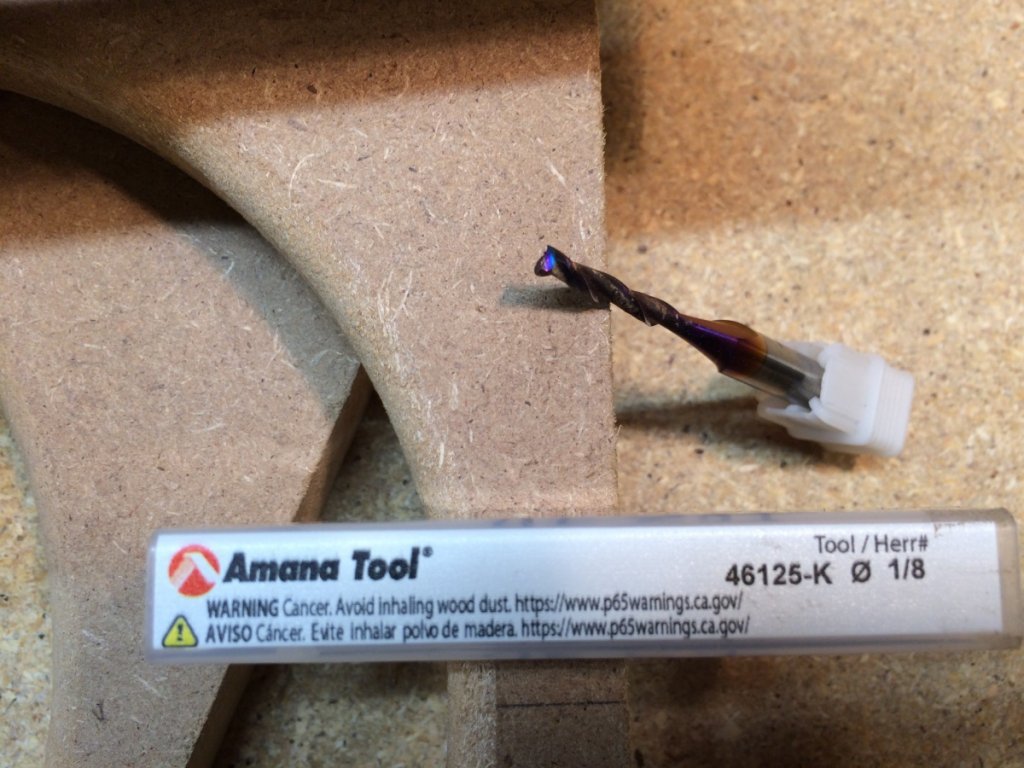
The coloring of the cutter is a coating or treatment Amana puts on; it is not from being overheated...

I do the hole cut in 2 steps just to be easier on the router and cutter.  It can be made in one step; I just prefer not to.  I cut to just under 3/4”, total, hence the ragged edge on the cut out piece which is remove by it being tapped out by hand.  That way I don’t have to fixture the cut out piece to keep it from moving while cutting. 

The first cut is at about 1/2” depth which is to one stop up on the router plunge base.  The second cut is to the full planned depth.  You can see in the picture of the brace piece the line between the one cut and the second.  On a sample of the cut-out piece the line is hardly visible.


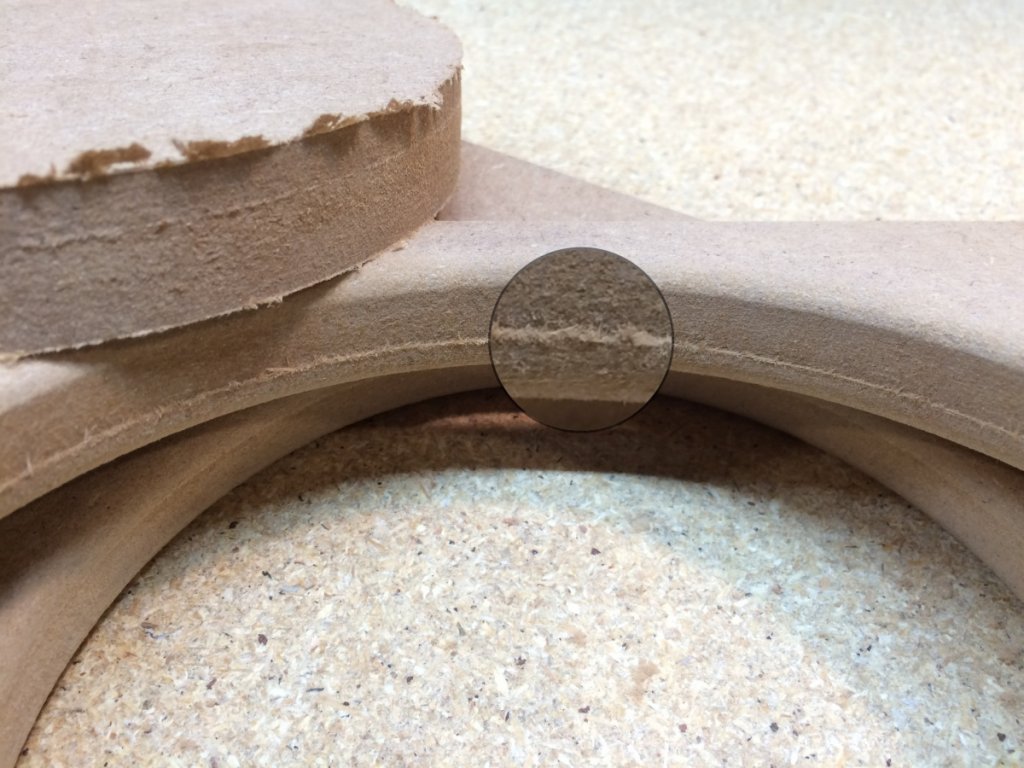
Note the cutout piece is upside down relative to the brace piece that is under it.

The feathering is at the intersection between the 2 cuts.  I believe that feathering is caused by the sharp end of the cutter being a bit ragged on the MDF I have.  I couldn’t get a good closeup of the end of the cutter, but it is shaped with 2 points and the 2 cutting edges are angled inward and downward, towards the grip end, so it makes a “V” at the end of the cutter. 

As for the line.  There is a slight step inward (maybe 1/64”, but have not tried to measure it) at the top of the second cut.  I am guessing... The cutter is flexing/bending slightly outward at its end, due to the rotation and cutting direction.  I am cutting the hole in the clockwise direction.  The cutter is spinning in the clockwise direction.  With this, there is a net force radially outward on the cutter.  Hence my thought the cutter is flexing outward.  This probably would not be seen with a 1/4” dia cutter.

Guessing again, there is no line (or little line) on the piece that is cut out because the second pass of the cutter is far enough down that there is minimal flex at the location of the line and it is “cleaned” up in the process.

I should point out that I cut all of the panels (baffles) out of the full sheet of MDF using the same brand, 1/8” cutter, that was a down cut spiral.  I believe I got a good perpendicular cut.  I did all of those as a single, full thickness cut.  Maybe there is something is the way the end of the cutter is grabbing the MDF on a partial thickness cut that is causing it to go off line a little.  This, again, is a guess.

jonsk2514

Re: Amateur Build of the X-MTM Encore
« Reply #158 on: 6 Sep 2020, 02:27 am »
Oh, on the “moving forward front”  :drums:

I have purchased the driver and crossover kit from Danny...   :banana piano:

hawkeyejw

Re: Amateur Build of the X-MTM Encore
« Reply #159 on: 6 Sep 2020, 12:29 pm »
I had similar lines in my circles due to making several passes to get through the full depth. Not sure if it’s an avoidable artifact of cutting the circles in MDF in more than one pass but a bit of sanding should fix it right up.