X-LS Encore build x2

0 Members and 1 Guest are viewing this topic. Read 3960 times.

mlundy57

  • Industry Participant
  • Posts: 3577
X-LS Encore build x2
« on: 16 Sep 2018, 09:22 pm »
I received a commission earlier in the summer to build a pair of X-LS Encores. To make the most out of the machine set-ups I cut enough pieces to build 6 pairs of cabinets. I glued up the carcasses for all 6 pairs then proceeded to build out two pairs. I had two reasons for this. First, even though it only takes a half sheet of veneer for a pair, I had to buy a full sheet so I figured I might as well use the rest and by building extras, if I messed something up I would have a spare handy without having to start over.

The veneer the client chose is a quartersawn ribbon stripped African Mahogany.
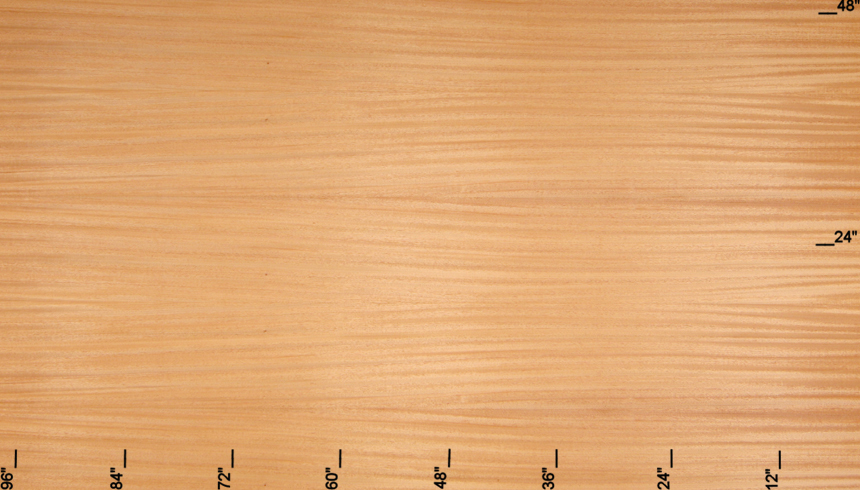


I am almost done with the veneering, just have the tops of the 4 cabinets to do. Hopefully I'll get that done tomorrow. Then I have to make up samples of different finishing options. I'm thinking of doing 4 samples. One left natural, just a clear sealer and lacquer topcoat. A second will be sealed, dyed with a red mahogany dye then topcoated. The third will be a brown mahogany dye and topcoat. Fourth is more complex: sealer, burgundy dye, dark brown grain filler, sealer, then topcoat.

Any other ideas for a finishing schedule that will yield the classic Mahogany look?

Before y'all start fussin' about pictures, I have some but I have not documented each step of the construction since I've done that in other build threads. I am going to document the finishing in some detail.

Outwardly these two pairs will look identical (unless I prefer a different finishing option). However, while they both have NoRez and AcoustaStuff, the crossovers will be different. The client's pair is being built with an older stock kit (it has the PC board). The second pair is being tricked out. This one gets Sonicaps, Platinum by-pass caps in the tweeter circuits, GenII by-pass caps in the woofer circuits, Mills resistors, foil inductors, and tube connectors. Just like the pair that won the shootout.

I'm looking forward to listening to both of them.

Mike


Captainhemo

Re: X-LS Encore build x2
« Reply #1 on: 17 Sep 2018, 03:59 am »
Mike
Anxious to see how the veneer  samples come out.
I had some fun with  a  dye   on  a pair of Encores  a while back too,  kind  of  fun    playing with  colors..
Have you ever  used Danish Oil as a  finish ?   Might  be   cool to try .. I've  always  like the  reesults  I've    ended up with using it

for the small amount it  would take,    try  upgrading the  wire  in  that  pair of Encores  as well,  maybe  some of that   Neotech OCC  solid core  16 awg ?

That and the   foil inductors   would  have been  my  next upgrades to try  in a pair  as   well,  just  haven't     gotten  to it   .....   

Looking forward to some  sample pics  :)
jay

mlundy57

  • Industry Participant
  • Posts: 3577
Re: X-LS Encore build x2
« Reply #2 on: 20 Sep 2018, 01:50 am »
Jay,

I haven’t used Danish oil before. The only thing I know about it is that it’s an oil/ arnish blend. I have three extra pieces of veneer I can use so I’ll pick up some Danish oil and gice it a try.

Mike

lacro

  • Full Member
  • Posts: 602
Re: X-LS Encore build x2
« Reply #3 on: 20 Sep 2018, 02:06 pm »
Danish Oil is a pretty nice finish. It does take several coats. It leaves a nice natural finish with the grain still showing. I like it. I used Watco Danish Oil (fruitwood) on one of my Folsom amps over Canary wood . The photo doesn't do it justice. It's more of a nice satin finish, not the shiny finish the flash created in the photo.


Captainhemo

Re: X-LS Encore build x2
« Reply #4 on: 20 Sep 2018, 02:53 pm »
Yeah,  I love the natural finish   as well.  Your  little  folsom   box looks  great :)

Here's   a vid  relating to application / grain filling  withthe   Watco Danish Oil.   this works well
https://www.youtube.com/watch?v=WTXilJCN27Q

jay

mlundy57

  • Industry Participant
  • Posts: 3577
Re: X-LS Encore build x2
« Reply #5 on: 20 Sep 2018, 03:45 pm »
I picked up some red mahogany Danish oil today to add to the mix. I’ll try a couple different ways, one multiple coats of Danish oil only and two, one or two coats of th Danish oil with a lacquer top coat. 

I’ll check the video out when I get home this evening.

mlundy57

  • Industry Participant
  • Posts: 3577
Re: X-LS Encore build x2
« Reply #6 on: 24 Sep 2018, 03:05 pm »
So far the red mahogany Danish oil is looking the best. Next step is pore filling.

cody69

Re: X-LS Encore build x2
« Reply #7 on: 26 Sep 2018, 12:00 am »
I'm also a big fan of using an oil finish, preferring an "in the wood" finish to an "on the wood" finish.
BTW Lacro, I really like your amp shown above... really clean look!

srb

Re: X-LS Encore build x2
« Reply #8 on: 26 Sep 2018, 01:21 am »
I get the best results wet sanding the danish oil in with a 1/4 sheet finishing sander and #600 wet/dry silicon carbide sandpaper.

Steve

mlundy57

  • Industry Participant
  • Posts: 3577
Re: X-LS Encore build x2
« Reply #9 on: 26 Sep 2018, 02:13 am »
In my case I’m working with paper backed veneer. The wood is presanded to 220 and only 0.010”-0.015” thick. Anything more than light hand sanding and I run the risk of burning through to the backing.

Mike

lacro

  • Full Member
  • Posts: 602
Re: X-LS Encore build x2
« Reply #10 on: 26 Sep 2018, 02:20 pm »
BTW Lacro, I really like your amp shown above... really clean look!

Thanks Cody. More here: https://www.audiocircle.com/index.php?topic=138229.msg1568589#msg1568589

Captainhemo

Re: X-LS Encore build x2
« Reply #11 on: 26 Sep 2018, 05:45 pm »
I get the best results wet sanding the danish oil in with a 1/4 sheet finishing sander and #600 wet/dry silicon carbide sandpaper.

Steve

 :thumb:  started doing  similar in  high school decades ago and   am always pleased with the results

In my case I’m working with paper backed veneer. The wood is presanded to 220 and only 0.010”-0.015” thick. Anything more than light hand sanding and I run the risk of burning through to the backing.

Mike

I know the feeling....  have  done the above  with  10 mil PB a few timesand always   have that  horrible feeling "what if".   
Using  400/600   paper with lots of the oil will take  very , very little off ...... obviously  caution  near  corners/edges  etc.
In  any event, bet they'll be  gorgeous when  you're  all done   :beer:

jay

mlundy57

  • Industry Participant
  • Posts: 3577
Re: X-LS Encore build x2
« Reply #12 on: 26 Sep 2018, 07:10 pm »
In this case, the Danish oil is for color and warmth. I'll be using a different pore filler and top coating with lacquer.

mlundy57

  • Industry Participant
  • Posts: 3577
Re: X-LS Encore build x2
« Reply #13 on: 4 Oct 2018, 09:11 pm »
Time for some pics:

For this build I decided to do the carcasses a little differently. Instead of butt joints, I cut dadoes into the sides then flush trimmed the ends after glue up.

Here's the dado setup


Here is the stack of carcass parts with the dadoes cut


Here's a carcass glued up before flush trimming


I am currently building two pairs of these. They are both getting the same veneer, African ribbon stripped Mahogany. First I veneer the back


Then I wrap a single piece around the front and sides. Those are 4 more pairs of carcasses glued up behind the speakers.


Finally I add the top and bottom pieces and cut out the veneer over the driver openings.


Next up will be pics of the color samples for finishing options.

Mike


mlundy57

  • Industry Participant
  • Posts: 3577
Re: X-LS Encore build x2
« Reply #14 on: 5 Oct 2018, 03:52 am »
Here are some pics of the color samples that turned out at least somewhat decent. My camera work still leaves much to be desired.

First up is left natural with a sealer coat applied. The sealer coat was left full strength. It probably should have been diluted 50%, especially since I wiped it on rather than spraying. I wasn't going to break out the turbine and spray gun for the small amount of area of the samples.


This one has the seal coat and red mahogany dye then dark brown grain filler


Next is sealer then brown mahogany dye and dark brown grain filler


This one is left natural, no seal coat, then dark brown grain filler. Ignore the green tape. I initially planned on doing something different with each side but decided not to.


This one is red mahogany Danish oil with no grain filler


Finally this one is red mahogany Danish oil with dark brown grain filler


Mike

cody69

Re: X-LS Encore build x2
« Reply #15 on: 6 Oct 2018, 12:29 am »
Significant differences with these finishes Mike... thanks for posting.

Which direction are you planning on heading with these?

mlundy57

  • Industry Participant
  • Posts: 3577
Re: X-LS Encore build x2
« Reply #16 on: 6 Oct 2018, 03:22 am »
Significant differences with these finishes Mike... thanks for posting.

Which direction are you planning on heading with these?

One is for a client so that one will be whichever she chooses. For the other one, I'm leaning for a lighter coat of sealer then dark brown grain filler. That should give me something akin to the fourth picture but not as brown. Then decide if I want to use a brown mahogany dye or not. It doesn't show up well in the pictures but the natural wood has an iridescence I don't want to obscure. Unfortunately I don't have any more of the veneer to experiment with.

mlundy57

  • Industry Participant
  • Posts: 3577
Re: X-LS Encore build x2
« Reply #17 on: 30 Dec 2018, 10:35 pm »
I finally got the contracted pair finished in time for Christmas.

Cabinets veneered


Getting set up to spray finish


My spray booth for this project  :?


9 coats of Target Coatings EM7000 waterborne lacquer later ...


After sanding flat, polishing, and wiring up ...


Mike

Captainhemo

Re: X-LS Encore build x2
« Reply #18 on: 31 Dec 2018, 05:17 pm »
gorgeous  Mike   :thumb:
Bet the client was  thrilled  and  just  in  time  for  Xmas   

jay

mlundy57

  • Industry Participant
  • Posts: 3577
Re: X-LS Encore build x2
« Reply #19 on: 31 Dec 2018, 07:28 pm »
gorgeous  Mike   :thumb:
Bet the client was  thrilled  and  just  in  time  for  Xmas   

jay

Jay,

She liked them. I didn't get the finish sanded completely flat. There were a few shiny specks here and there left but I was afraid of cutting too much and going into the veneer. The result is a tiny bit of orange peel here and there if you look deeply into the finish with the light at the right angle. She actually liked this effect because she felt it proves they were hand built and finished.

I had built a second pair of cabinets along side these and gave her the best two. I have since gone back and sanded the other two back much further using P600. I have them sanded to where there are no shiny spots at all. However, when I run my finger over the surface I can feel a waviness to the finish. I'm not sure what is going on with this. I used a hard sanding pad on my Festool RO125 sander so I expected the surface to be flat, not wavy.

These are the first Encores I have heard with the old stock PC board crossover (she has had the kit a couple years). I have to say they sounded pretty darn good. Bass response was solid down below 40Hz but I have a huge peak (+18dB) at 40Hz in this room which I'm sure contributed to the extended low end output of the Encores.

I need to figure out how to get the finishing done correctly.  I can watch all the YouTube videos and DVD courses I want but without someone who knows what they are doing to critique as I am going I'm flying partially blind.

Anybody have any idea why a lacquer finish would feel wavy after sanding down and what to try next?

Mike