Dual 12" OB H-Frame Construction

0 Members and 1 Guest are viewing this topic. Read 47355 times.

gregfisk

  • Restricted
  • Posts: 1349
  • Us alone in the universe? sure is a waste of SPACE
Re: Dual 12" OB H-Frame Construction
« Reply #20 on: 25 Jul 2014, 01:49 am »
Hey Greg,  any word on your   project   ?    Been anxiously awaiting to see how they are going to   look  :)

-jay

Derailing your own thread huh :lol:

All parts are apparently cut out and paint should be happening now? I can't wait either, I'm really looking forward to getting them home so I can put them together.

I will keep you posted, thanks for asking.

Greg

bdp24

  • Full Member
  • Posts: 884
Re: Dual 12" OB H-Frame Construction
« Reply #21 on: 25 Jul 2014, 10:19 am »
You're right Captain, they were Rubens. Damn memory! You're probably right about the baffle as well. With so little baffle area left once the woofers are mounted, not much left to resonate. Once again, I ask for Danny's input.


Danny Richie

Re: Dual 12" OB H-Frame Construction
« Reply #22 on: 25 Jul 2014, 01:07 pm »
You're right Captain, they were Rubens. Damn memory! You're probably right about the baffle as well. With so little baffle area left once the woofers are mounted, not much left to resonate. Once again, I ask for Danny's input.

I thought I answered your question in post number 18. Did I miss a question?

bdp24

  • Full Member
  • Posts: 884
Re: Dual 12" OB H-Frame Construction
« Reply #23 on: 25 Jul 2014, 04:29 pm »
You answered the question of not needing to double the horizontal brace. This one concerns whether or not the baffle would benefit from being doubled. Thanks Danny.

Danny Richie

Re: Dual 12" OB H-Frame Construction
« Reply #24 on: 25 Jul 2014, 05:10 pm »
You answered the question of not needing to double the horizontal brace. This one concerns whether or not the baffle would benefit from being doubled. Thanks Danny.

You could if you wanted to, but I don't see a benefit. There isn't much there but a frame when you cut the mounting hole out of it.

Danny Richie

Re: Dual 12" OB H-Frame Construction
« Reply #25 on: 25 Jul 2014, 05:14 pm »
With an H frame like the Super-V, the frame is just big enough for the woofer (13" square) and then there is a four sided box mounted to it.  So it is very solid.


« Last Edit: 25 Jul 2014, 07:29 pm by Danny Richie »

bdp24

  • Full Member
  • Posts: 884
Re: Dual 12" OB H-Frame Construction
« Reply #26 on: 26 Jul 2014, 07:23 pm »
Good enough for me. Plus, Jon's new H-Frame flat pack is made with a 3/4" baffle. I know you prefer MDF to Baltic Birch in general Danny. Any reason to go with BB in an H-Frame?.

Danny Richie

Re: Dual 12" OB H-Frame Construction
« Reply #27 on: 26 Jul 2014, 07:50 pm »
Good enough for me. Plus, Jon's new H-Frame flat pack is made with a 3/4" baffle. I know you prefer MDF to Baltic Birch in general Danny. Any reason to go with BB in an H-Frame?.

The BB will be fine for the H frame application. I like them about the same in this application. The side panels are not excited as to resonate. They are more prone to flexing under the pressure they see. So the BB works fine.

Captainhemo

Re: Dual 12" OB H-Frame Construction
« Reply #28 on: 1 Aug 2014, 03:48 am »
Ok, here's some more progress fianlly...  took   a week and a half to get the router bit I needed.
Note, pay attention to what you are ordering...  the bit arrived and it was only 1/4" shank with a 2" cutting blade !!   I can't believe they even  make such a thing  but serves me right for not paying attention . Anyway,   needless to say,  I had to trim the top  panel very slowly and  couldn't put too much  presuare on that bit,  was really worried  I was going to bend/sanp    the bit.


But I did get it  done with some patience


Next I removed the temporarily installed base after  marking it with  a couple reference points for lining it back up  once  I   was ready to permanently   attach it..  I then  rounded ove the corners with a 3/4" round over bit and also did the  upper edge


Next   I took the 3/4" round over bit to the outer edges and also to tpe   top panel of the cabinet


After giving it all a thorough sanding I reaattached the base   this time using  a nice layer of glue.  I had thought about making the  base removable but  really didn't see a need for it... permanent it is.
There is one little knick in the upper  right corner (verwed from front) that I must have    done with the router,  will have to     touch it up tomorrow. 


Slipped  out to HD this eve and picked up a piece of  1/2 MDF   so I'll   whip up a grill frame tomorrow afternoon and maybe get  the magnets set in place.  Not sure  I'll even use a grill  but better to  have it and not use it  rather than  want it and not have it   :lol:

-jay

ZAKski288

Re: Dual 12" OB H-Frame Construction
« Reply #29 on: 1 Aug 2014, 04:31 am »
Nice Job :thumb:  Someday I hope to make a pair myself.

Captainhemo

Re: Dual 12" OB H-Frame Construction
« Reply #30 on: 2 Aug 2014, 04:39 am »
Nice Job :thumb:  Someday I hope to make a pair myself.

Thanks man.  I'd have liked to have done a pair at the same time but  couldn't swing  the funds so doing   1 H Frame at a time.  Hopefully it woun't be tooo long before I can do the 2nd  .

Ok,  grill frame....

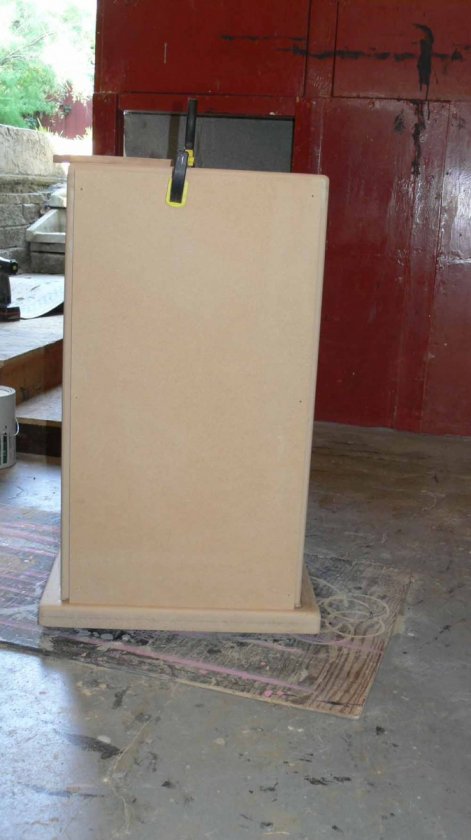
1st I cut the piece of  1/2" MDF to  the size I wanted for the grill.  Sized it so it would sit  1/2"  insded the cabinet outer edges on the sides and top, it will site down  on the  base at the bottom.  Once I had that cut,  I  marked out the 6 locations for  the magnets and then used a 1/8" drill bit to  drill  right through each spot.  With my  low vision, I find doing it this way  is much easier  than rasfering the measurments to the cabinet, plus I can use the  through holes  later.  Once I'm done and the  magnets are epoxied in, I can  just    fill the little holes with  either a little glue or wood filler.
Once the holes are all drilled I clamp the  grill blank in place on the cabinet, spacing it equally  on both sides then  use the same 1/8" drill bit to  mark the  cabinet at each spot.


After each hole is  marked on the cabinet,  I remove the grill blank and proceed to drill the  holes for the magnets.  In this case I had planned on  using  1/4 x 1/4 N52 cylinder magnets (thought I had some)  but  after looking closer at what I had on hand,  I found I only had  3/16 x 1/4 N52's which are going to have to do.  I'm sure using 12 ( 6 in cabinet, 6 in grill frame) will work fine, these little guy are  surprisingly  strong.

After drilling the holes in the cabinet, I  epoxy the mangents in place.  I usually  smear a little wood filler over each one just to fill in the "edge"  around each magnet.   Run a  piece of 120 grit over each one  using a block after  it drives. 


Now it is on to the  frame itself.   I decided to   leave the frame 1" wide on the edges.   It's 15" wide  so a 13"  cut out should work great...   I left the bottom frame 1.5"  thick for  something later.  Befroe routing out the holes,  Ir ounded each corner  and then ran a 3/8" round over  around the outside.  Then  I  routed out the  large  holes


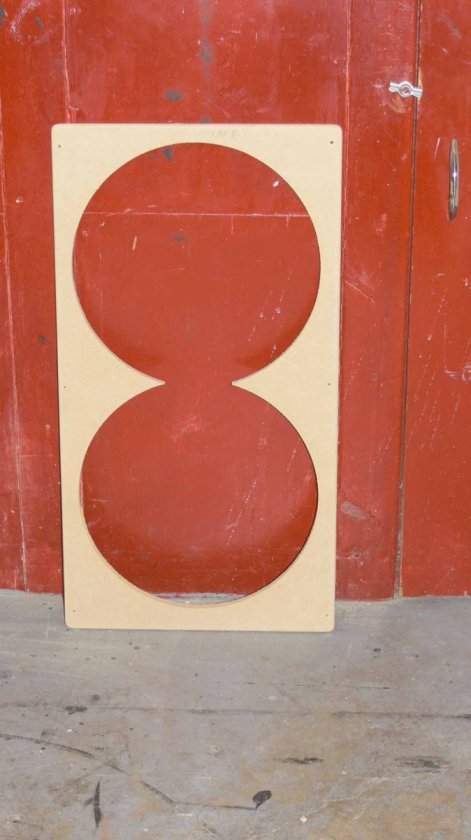
After this, it's just a matter of  getting rid of the little  pieces left over in the middle. Time to put those little 1/8" holes  I drilled all the way through to use again.   I use them to run a  #6 x 1"  wood screw through and attach a  guide for  a flush trim bit to cut out the little excess pieces.  This works well as long as you aren't distracted  and thinking about  other things  :duh:  Note the little  blooper in the lower left corner,  don't ask what I was dong  cuz I can't  tell you.  At least it is only a grill frame  and  some MDF  saw dust mixed with some glue easily filled it in.   


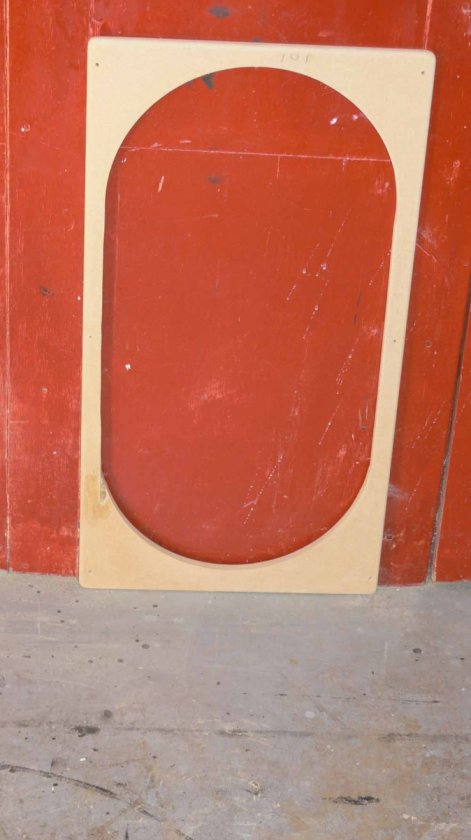
I wanted to finish this up this eve but  I'm going to let that patch  cure overnigh before I run a 2/8" rond over around the inner edge of the frame

-jay

bdp24

  • Full Member
  • Posts: 884
Re: Dual 12" OB H-Frame Construction
« Reply #31 on: 2 Aug 2014, 07:17 am »
I really like the proportions of your H-Frame. They're about the same as those of the flat pack Jon is now offering, except that yours has a doubled thickness MDF top. I've been envisioning an H-Frame along the same lines, but for anyone thinking of also making their own frame (though Jon's flat pack makes that unnecessary) with this difference: Instead of attaching the grill frame to the front edge of the double-thickness top and side panels, I was going to make the outer 3/4" panel of the top, bottom, and sides extend past the inner 3/4" panels by 1". Then a grill frame could be made slightly smaller than the inner dimensions between the top & bottom and two sides, and inserted into the front cavity, making it (with the thickness of the grill cloth, and Velcro to hold the grill in place) about flush with the outer panels, like speakers from the 60's and into the 70's (picture the AR-3). Just an idea.

monte

  • Jr. Member
  • Posts: 147
Re: Dual 12" OB H-Frame Construction
« Reply #32 on: 2 Aug 2014, 10:50 am »
Jay your grill is exactly what I was thinking about. Have you decided on a color or veneer.

Captainhemo

Re: Dual 12" OB H-Frame Construction
« Reply #33 on: 2 Aug 2014, 03:53 pm »
bdp24

Yeah, the dimensions I used are pretty much the same as the  Super V H frame....Side panels are 3/4" taller as I didn't stagger the  braces , just ran the dado straight  across and also the extra 3/4" from the  douoble layer top panel
Leaving the  ouoter panels a bit  wider to create a recess for the grill would work and probably look prety cool  :thumb:  I'd prefer the magnets over the velcro as they are never seen... just remember to make a little tab or something to remove the grill,  those little magnets are strong and with  the  frame inside a  recess,  it may prove awkward to remove  without something to  grasp.  You  could also do as Jon suggested over in his flatpack thread ...  make the cabinet as is  and make a full sized grill .  Just omit the round over on the  outer edges of the H frame and make the grill frame pretty much flush .  I did exactly that  onthe  XSL Encores for my neice and I like   how the look.

monte ,
I wanted the grill frames "match"  my  OB7's.  The H frame will  be painted in the same Dupli Color  Metallic paint I used for the OB7's but  the next darker  color , which is called  Metallic Graphite .   Back on page  1,  there is a picture of the amp box painted in it. Figured by going  darker,  the subs  would pretty much go with anything if I shold ever decide to   change speakers.... not  likely for some time though  . The 7's are  in Metallic Charcoal but you can see the  "look" should be similar


-jay

mlundy57

  • Industry Participant
  • Posts: 3577
Re: Dual 12" OB H-Frame Construction
« Reply #34 on: 2 Aug 2014, 04:52 pm »
Looking really good there Jay.

Mike

Captainhemo

Re: Dual 12" OB H-Frame Construction
« Reply #35 on: 2 Aug 2014, 10:43 pm »
Fixed up  that little  mistake  from yesterday   and  put a 3/8" round over on the inside edge of the  grill frame this morning


Epoxied in al lthe  magnets


Gave the whole thing a light sanding  and poped it on the  H frame.  Amazing little magnets,  that thing snaps into place.   As with any of the magnets I've used, once it's in place,  yo can shift it slightly  from side to side  for fine adjustment if yo are  a detail freak


Now just need to  roll a coat of paint  over it and  wrap in grill cloth :beer:

-jay

cody69

Re: Dual 12" OB H-Frame Construction
« Reply #36 on: 2 Aug 2014, 11:35 pm »
Quote
Now just need to  roll a coat of paint  over it and  wrap in grill cloth

Jay - Am following your build with great interest. If you wouldn't mind, appreciate if you'd post a few pics showing how you wrap and fasten the cloth to the grill frames. My woodworking skills are pretty fair, but my grills are nothing to write home about. The outside looks fine, but when pulled off, the inside looks somewhat amateurish. The corners throw me off, pleats... gathering... folding... have not found a technique that doesn't bunch up the fabric when I turn a corner.

Captainhemo

Re: Dual 12" OB H-Frame Construction
« Reply #37 on: 3 Aug 2014, 12:08 am »
Jay - Am following your build with great interest. If you wouldn't mind, appreciate if you'd post a few pics showing how you wrap and fasten the cloth to the grill frames. My woodworking skills are pretty fair, but my grills are nothing to write home about. The outside looks fine, but when pulled off, the inside looks somewhat amateurish. The corners throw me off, pleats... gathering... folding... have not found a technique that doesn't bunch up the fabric when I turn a corner.

Afraid I'm  in the same boat man.  Mine always look good fromthe front, but I always tell people  just don't turn them over and look at theback  :lol:   Honestly, I'm embarrassed by the back of them
Not really sure what the answer is maybe someone  who is good at upholstery can give us  some pointers  .
I know some guys use the  spray adhesive instead of staples,  was thinking of trying that  but I just don't see it being sstrong enough and it  doesn't help the issues with the corners.  If  I can do any better with the back of this,  I might actually show  the back but no promises  !!

-jay

Guy 13

Re: Dual 12" OB H-Frame Construction
« Reply #38 on: 3 Aug 2014, 12:17 am »
Afraid I'm  in the same boat man.  Mine always look good fromthe front, but I always tell people  just don't turn them over and look at theback  :lol:   Honestly, I'm embarrassed by the back of them
Not really sure what the answer is maybe someone  who is good at upholstery can give us  some pointers  .
I know some guys use the  spray adhesive instead of staples,  was thinking of trying that  but I just don't see it being sstrong enough and it  doesn't help the issues with the corners.  If  I can do any better with the back of this,  I might actually show  the back but no promises  !!

-jay

Hi Jay.
I saw my cabinet maker installing the grill cloth on my V1
and on the back he uses some liquid adhesive
and with a cloth iron with just a little heat even out all the wrinkles.
It does a nice job.

Guy 13

mlundy57

  • Industry Participant
  • Posts: 3577
Re: Dual 12" OB H-Frame Construction
« Reply #39 on: 3 Aug 2014, 12:52 am »
Gave the whole thing a light sanding  and poped it on the  H frame.  Amazing little magnets,  that thing snaps into place.   As with any of the magnets I've used, once it's in place,  yo can shift it slightly  from side to side  for fine adjustment if yo are  a detail freak

-jay

Jay,

I was thinking along the lines of Ed's suggestion about insetting the grill but that really looks good.

Mike