Wedgie Revisited

0 Members and 1 Guest are viewing this topic. Read 7214 times.

Keithh

  • Jr. Member
  • Posts: 101
Wedgie Revisited
« on: 21 Jun 2017, 12:55 am »
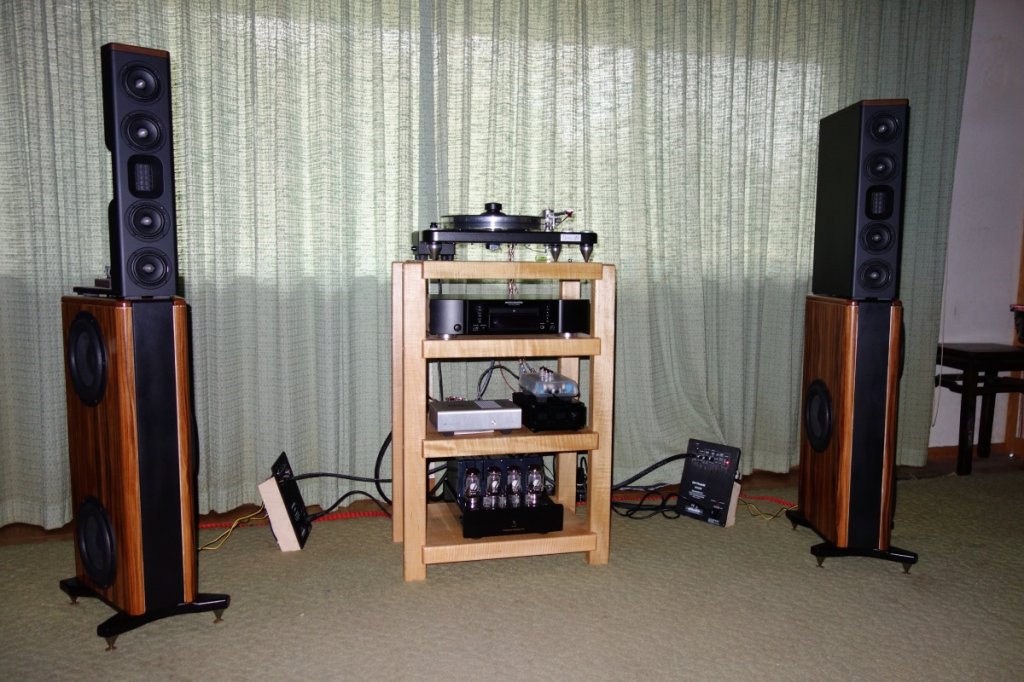
I really haven't been in the mood to do anything with the eyesore in my living room called the Wedgie. It is one the best speakers
I have ever heard but it suffered from a serious lack of output, which I found out had a lot to do with the equipment I was using.
I was using a passive preamp which is not the best setup for running a power amp and plate amp together. I recently purchased a
Schiit Saga buffered preamp and it made quite a difference in the 3-8's output. So I decided to do cosmetic changes to the Wedgies.

Original Wedgies


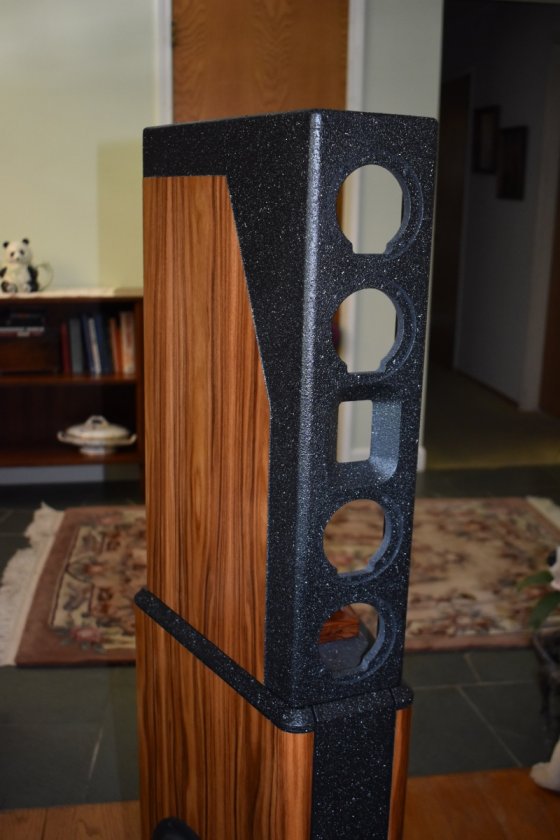
The first thing I had to correct was that ugly gap between top and base due to the Herbies Big Dots. I routed holes 3/16" deep for
the Big Dots to go in so now the top is only about 1/16" above the base. Then I ran a 45 deg chamfer around the top of the base
to provide a nicer transition from the base to Wedgie than the 3/8" roundover provided.


I removed all the drivers from the Wedgies to measure the top section. I was going to rebuild the top section but I just didn't have
enough veneer left over from the base. I have never bought the idea that the Wedgie was too hard for the average woodworker to
make. When I measured it all out I found out I was right. All this about being too hard to make and having a special CNC waveguide
was a bunch of BS. I went out to the garage and made a Wedgie front baffle in about 3 hours.I was kind of pissed knowing how long we
had to wait for the flat pack to be made.
I put a piece of veneer on the Wedgie top keeping the grain pattern matching the base.


I have always wanted to see what Rustoleum Stone Creations looked liked, and it seemed perfect for people like me with no talent
for painting. I loved the results.I painted the rest of the Wedgie, the top and front panel of the base with black granite.


Since the crossover is out in the open I wanted to make it look a little nicer, so i borrowed some ideas from other people.
This the original crossover


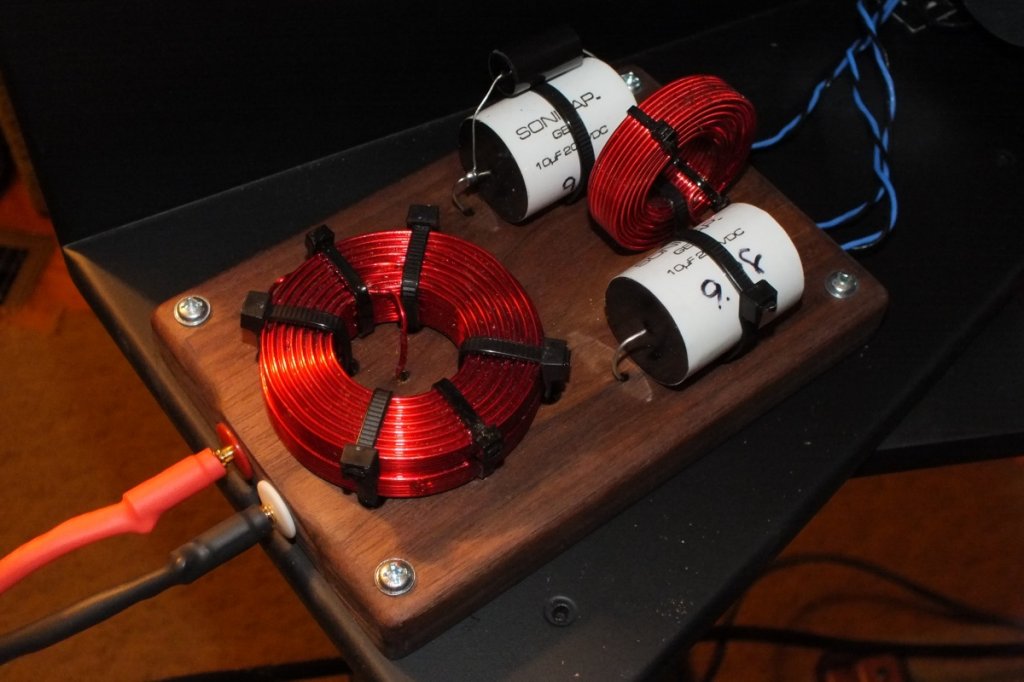
On the original all the wiring and solder joints were in a cut out area under the top.
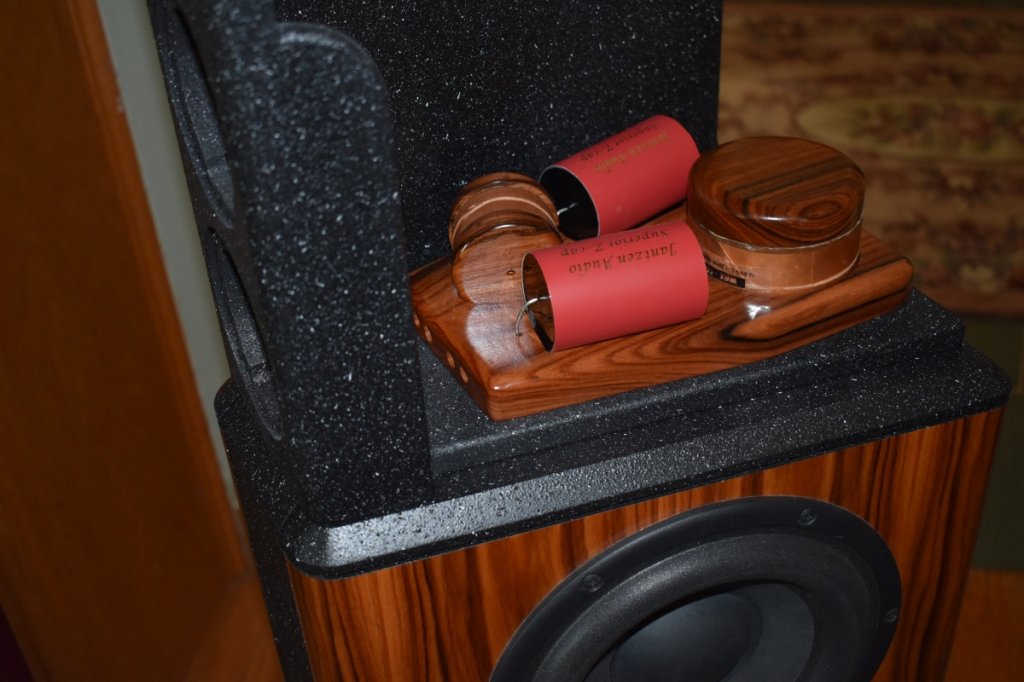
I did some upgrading to the components which took the Wedgie to a whole new level but physically they are quite a bit bigger
than the stock caps and coils. I still wanted to run the wiring underneath but I made recesses in the solid Rosewood to get the
height lower.


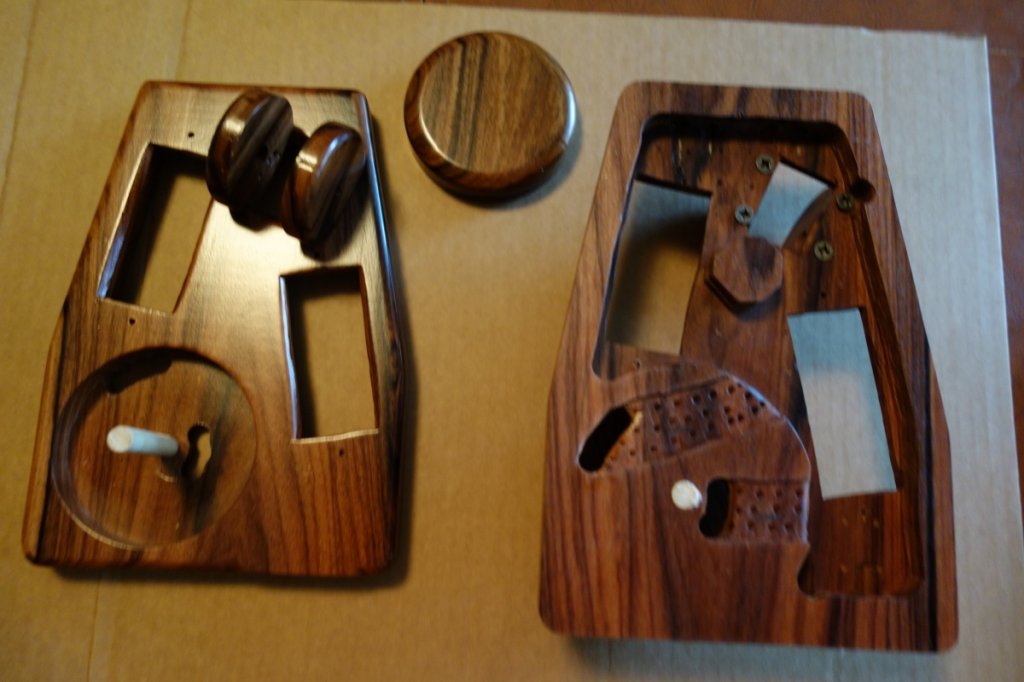
I cut out tops and sides for the coils.


What it looks like on the Wedgie. They will be screwed on from the bottom.
In about a week I can started rubbing out the lacquer on the top section to match the base.


ebag4

Re: Wedgie Revisited
« Reply #1 on: 21 Jun 2017, 01:06 am »
Beautiful work Keith, really attractive speaker.  I would offer that you left average woodworker in the rear view mirror long ago. :thumb:

Thanks for sharing.

Best,
Ed

TrungT

Re: Wedgie Revisited
« Reply #2 on: 21 Jun 2017, 01:26 am »
Awesome  :thumb:

SoCalWJS

Re: Wedgie Revisited
« Reply #3 on: 21 Jun 2017, 01:55 am »
That is absolutely beautiful! Gorgeous wood!

ArthurDent

  • Full Member
  • Posts: 15366
  • Don't Panic / Mostly Harmless
Re: Wedgie Revisited
« Reply #4 on: 21 Jun 2017, 09:01 pm »
Very nice work.  :thumb:

Danny Richie

Re: Wedgie Revisited
« Reply #5 on: 22 Jun 2017, 04:00 pm »
Man, if you can make those baffles then you are way ahead of the average hobbyist and wood worker.

Nice job on everything.

Vedder323

  • Full Member
  • Posts: 494
  • vinyl reviews and more, check out Newrecordday.com
    • New Record Day
Re: Wedgie Revisited
« Reply #6 on: 22 Jun 2017, 04:03 pm »
 :o Those are sick!!!

mlundy57

  • Industry Participant
  • Posts: 3577
Re: Wedgie Revisited
« Reply #7 on: 22 Jun 2017, 04:14 pm »
They looked good before but really good now

Keithh

  • Jr. Member
  • Posts: 101
Re: Wedgie Revisited
« Reply #8 on: 22 Jun 2017, 05:03 pm »
Thank you everyone. I actually love the basic look of the Wedgies. It is just that a fine furniture quality Rosewood veneered with hand rubbed lacquer finish
base looks terrible with a flat black flat pack on top of it. The 1/4" gap between the two even makes it look even worse. Even though the top and base obviously
go together it still looked like two different speakers. The textured paint works well in making two pieces appear as one and the even though
it does not show in the pictures the Black Granite paint really looks like granite.
At least now they are looking almost as good as they sound.

randytsuch

Re: Wedgie Revisited
« Reply #9 on: 22 Jun 2017, 06:08 pm »
Where's the "final" pic, with the new wedgies with everything installed, back in your room?

jcotner

  • Jr. Member
  • Posts: 189
Re: Wedgie Revisited
« Reply #10 on: 22 Jun 2017, 06:22 pm »
I am a little puzzled about the baffle. Did you buy a Flat Pack and then remake a new
baffle by measuring that? To my knowledge Danny never released plans for the baffle
because he said the wave guide was too complicated.
I'm like you, my thinking is there are some that can make these baffles, but probably
many that can't. I can understand Danny's logic, because of those that thought they
could machine a waveguide and couldn't; their speakers would never sound as good
as they should and likely blame the design.

mlundy57

  • Industry Participant
  • Posts: 3577
Re: Wedgie Revisited
« Reply #11 on: 22 Jun 2017, 07:58 pm »
How did you cut the baffle?

Keithh

  • Jr. Member
  • Posts: 101
Re: Wedgie Revisited
« Reply #12 on: 23 Jun 2017, 01:22 am »
The speaker in the picture is the flat pack from the kit. I just measured everything when I pulled out the drivers
to refinish it last month. I probably will rebuild it later on using a solid wood baffle in the future when I get tired of
the Rosewood. I just wanted to see if I could cut out a baffle for it. The small size of the Wedgie makes finding beautiful
wood for it much easier. I am just waiting until I come across something special at work.

Making the baffle jig is actually pretty easy. I won't use any actual dimensions, other than the waveguide is 45 deg., since Danny
has not put out the plans for the Wedgie. So if you already own  the Wedgie you can just measure yours.
You need a accurate table saw and router with a round base that is aligned with the spindle as if you were using bushings
and a 90 deg V Groove bit with a cutting surface long enough to cut the 3/4" baffle. I used a 2" dia. bit. 1/2" baltic birch for the jig.
First you need to measure the rectangular hole, the open part or the back of the waveguide, and the radius of the corner.
You have to recreate how a CNC router machines so you will be using the the spindle centerline as a reference. when you have the
radius of the corner double it for the diameter of the straight bit you will need for cutting the rectangular hole. I will be using a 1/4" straight bit
for the example and a waveguide size of 2" x 3". Remember you are using the router spindle center line as a reference point.

You will now build a jig that uses the bottom plate of the router as a guide. Measure the base diameter of the router. You will add that to measurement
to the waveguide dimension. I will use 6" as an example of router base. Double the corner radius, 1/8" as the example, and subtract that from the
waveguide dimension and add the router base diameter. So 2" minus 1/4" + 6" = 7-3/4" wide. For the 3" side it works out to be 8-3/4" tall.
You are now building a box for the router to sit in that is 7-3/4" by 8-3/4" and using a 1/4" bit will cut out a 2" x 3" rectangle.

Since the Wedgie baffle is about 20" long, cut a 7-3/4" x 24" and a 7-3/4" x 8-3/4" piece of 1/2" BB. also cut  some 1-1/2" strips of BB to use as stops.

Center 1-1/2" strips to both 24" sides and one end  of the 7-3/4 x 24 piece so it is T shaped. This is used to align the jig with the baffle.
Next center the 7-3/4 x 8-3/4 piece the middle between the strips and  install 1/2" strips on each side, then remove the 7-3/4 x 8-3/4 piece. This creates
the top of the router guide that the router sits in.

Now on the bottom of the guide you need to put in a spacer to center the waveguide on the baffle. Using a 5" baffle width as an example that would
mean with a waveguide width of 2" there would be an 1-1/2" on each side of the waveguide. The router base has a 3" radius and the straight bit has
a 1/8" radius making it 2-7/8" to the edge of the rectangle. Putting in a 1-3/8" strip along the bottom side of the jig will then center the waveguide.

Make the Wedgie baffle around 24" long to start and screw the jig to the baffle at each end. using the 1/4" straight bit rout out the 2x3 rectangle.
Then install the 90 deg V groove bit and make the chamfer down to the correct depth. it will follow the outline of the rectangle perfectly.

I hope this isn't too confusing, it really isn't that hard. I will try to post a picture of it later which might make more sense.
I think I built the jig faster than than this post took.

mlundy57

  • Industry Participant
  • Posts: 3577
Re: Wedgie Revisited
« Reply #13 on: 23 Jun 2017, 02:22 am »
Keith,

Thanks. Yes a picture would be helpful.

Mike

Danny Richie

Re: Wedgie Revisited
« Reply #14 on: 23 Jun 2017, 03:01 am »
I think a lot of people would be stunned at how good these speakers really sound. They are still among my favorites.

Keithh

  • Jr. Member
  • Posts: 101
Re: Wedgie Revisited
« Reply #15 on: 23 Jun 2017, 05:22 am »
Every person that have heard mine are stunned how good they sound, especially for their small size.

Keithh

  • Jr. Member
  • Posts: 101
Re: Wedgie Revisited
« Reply #16 on: 23 Jun 2017, 03:58 pm »
This an example of an adjustable one you can buy.


All you are doing is making a frame for the router base to sit in. Most of the time we use the router bit bearing to
guide our work. In cutting a rectangle out we use the router base as the bearing surface. The only difficult thing for most
people is figuring out what size to make the frame to cut your desired rectangle. All I did was cut a piece of BB to the correct
width, and nailed on 1-1/2" strips on each side to serve as guides for the router base. The nice thing about a 45 deg
waveguide is that nothing changes in the setup. I won't be back home until after the 4th so I can't show the one I made until then.

mlundy57

  • Industry Participant
  • Posts: 3577
Re: Wedgie Revisited
« Reply #17 on: 28 Jun 2017, 01:37 am »
Keithh,

Why would you use a 90 degree V bit instead of a 45 degree chamfer bit?

Mike

Peter J

  • Full Member
  • Posts: 1876
  • Hmmmm
Re: Wedgie Revisited
« Reply #18 on: 28 Jun 2017, 02:14 am »
I'm not Keith's proxy Mike, but you're describing is virtually the same thing with one difference. 90° vee bit won't have, and in this case doesn't need, a guide bearing at the bottom. Since you're using the router base as the guide, the bearing is extraneous and possibly in the way. I suppose you could remove the bearing on a chamfer bit.

The key to using Keith's method is a router arbor that's absolutely centered within the base. Here's one jig to do just that.

https://www.amazon.com/gp/product/B004Z8SM6M/ref=oh_aui_detailpage_o02_s00?ie=UTF8&psc=1

mlundy57

  • Industry Participant
  • Posts: 3577
Re: Wedgie Revisited
« Reply #19 on: 28 Jun 2017, 02:40 am »
Peter,

Thanks

One of my router jigs came with a centering tool like that.

Good to know about the bits. I thought the same thing about removing the bearing. One issue I have run into is finding a 90 V long enough to cut the 1-1/2" thick baffle of an NX-Otica.

Since they are wide open I have been toying with the idea of making a pair out of solid wood. It would certainly be a lot easier to finish than veneer or paint/veneer. Also, since it is not a closed box, wood movement wouldn't be a problem as long as I bolt the base on using the method which I think you recommended way back when I built the N3's, 1/4" bolts with 1/2" through holes and 1" recess for washers.

I do need to figure out how to laminate 3/4" solid wood to 3/4" MDF in such a way wood movement wouldn't be a problem for the matching H-Frames though  :scratch:

Mike