Finished X-CS Encore

0 Members and 1 Guest are viewing this topic. Read 1200 times.

Lebo

  • Jr. Member
  • Posts: 24
Finished X-CS Encore
« on: 27 Mar 2021, 03:54 am »
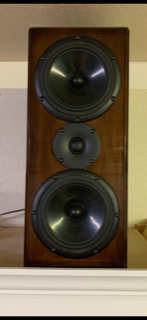
Finally finished my pair of X-CS speakers.  This post is a little hasty but wanted to get it out there. 

Very, very, happy with how the speakers sound!  The build came out pretty good overall.  Pretty good meaning they look nice from 3 feet away but if you get up close you will see the mistakes.  I had some chip out and some sand through, and a few finishing issues.  First pair of speakers and I have never worked with veneer.  I used wood on wood veneer with 3/8 solid wood corners all the way around.  That proved to be very time consuming.

Again, this is my first build so take my plan with a grain of salt.  My speakers are MDF core with alder wood on wood veneer.  Hope it helps someone.

1) Cut all pieces and assembled the MDF boxes (except front cover). I used dados and rabbets.  That was more time consuming than I expected because I didn't have a great plan and moved my table saw fence a few times.  They are very solid.  Dropped one off the back of the table saw and just had to fix a little dent.
2) Cut crossover base plates then assembled crossovers. Drilled mounting pilot holes in the bottom piece of MDF for screwing in later.  I marked the 4 corners of the plywood mounting plate so it would be easy to find the pre-drilled pilot holes.

3) Cut and installed No-Rez.
4) Glued on front with speaker holes already cut out.
5) Glued on all the veneer.  One piece at a time.  Six pieces per box with a 45 min to an hour glue up/press per piece.  Took a while because I was limited on cauls and afraid I'd screw it up if I tried to do more than one at a time.

6) Cut 3/8 in rebates on every edge of the box.  I had some chip out which really was a bummer on the cross grain.  How can I avoid this next time? Use blue painters tape?
7) Glued on solid corner strips.  This took a while also.  12 per box.  I tended to use to much glue and had a lot of squeeze out that I had to clean up.
8) I then used a flush trim bit to trim the solid 3/8 edges flush but every time I came to a corner the bit would bump up against the next piece.  Has to be a better way.  Maybe next time I'll make the solid pieces so that they are just barely proud of the case. 

10) Sanded (burned through the veneer in 2 places..another bummer) then finished.
11)  Finish went like this.  Trans tint Honey Amber, Garnett dewaxed shellac to seal, shaded the edges with trans tint walnut and to hide/mask the burn through, put on a coat of extra pale shellac because I didn't want any more color, then finally put on about 6 coats of lacquer.  Leveled with 600 wet grit, then 800, then buffed with Meguiar's Ultra Cut and Ultra finish polish compounds. I should have spent more time leveling. My spray technique wasn't awesome.  Had some orange peel.

Overall, I love the sound but I will probably change a few things on the way I build on the next set.  The picture is a little weak but all I have right now.


Lebo

  • Jr. Member
  • Posts: 24
Re: Finished X-CS Encore
« Reply #1 on: 27 Mar 2021, 04:02 am »
Pic of the other one.


Norman Tracy

Re: Finished X-CS Encore
« Reply #2 on: 27 Mar 2021, 05:01 am »
Lebo,

Your X-CS Encores look fantastic. You obviously have very high standards. When we finish a build the falls from perfection loom large. Once a plan is in place to do better next time forget the imperfections and enjoy.

Happy Listening

Tyson

  • Full Member
  • Posts: 11111
  • Audio - It's all a big fake.
Re: Finished X-CS Encore
« Reply #3 on: 27 Mar 2021, 05:04 am »
I agree - they look exceptionally good.  Very nice work man!

Dagoods

  • Jr. Member
  • Posts: 38
Re: Finished X-CS Encore
« Reply #4 on: 27 Mar 2021, 11:39 am »
They look fantastic. Love the color and finish. They are not mistakes they are lessons learned and besides it's a real accomplishment to work with veneer and make them look that good!

I hope my triple subs look half as good when I finish them. My first time with veneer to. So I know your pain!

Enjoy!

AlexH

Re: Finished X-CS Encore
« Reply #5 on: 27 Mar 2021, 01:11 pm »
Nice job! You should be proud of your accomplishment. Most will say it all about the sound and I agree, but it doesn't hurt when the are nice to look at as well. Now enjoy the sound.

Camtjfreak

  • Jr. Member
  • Posts: 43
Re: Finished X-CS Encore
« Reply #6 on: 27 Mar 2021, 01:16 pm »
Yeah they look very good... Enjoy your hard work!

Hobbsmeerkat

  • Industry Participant
  • Posts: 2543
Re: Finished X-CS Encore
« Reply #7 on: 27 Mar 2021, 01:25 pm »
Those are absolutely gorgeous!
Fantastic work!  :thumb:

AverageNiceGuy

  • Jr. Member
  • Posts: 85
Re: Finished X-CS Encore
« Reply #8 on: 27 Mar 2021, 01:32 pm »
Nice!  8)

Freo-1

Re: Finished X-CS Encore
« Reply #9 on: 27 Mar 2021, 01:41 pm »
Well done!   8)

Peter J

  • Full Member
  • Posts: 1876
  • Hmmmm
Re: Finished X-CS Encore
« Reply #10 on: 27 Mar 2021, 02:31 pm »
They look great. For me, and I'd say you too, the woodworking is a good bit of the fun.

Concerning chip out on cross grain rabbets, I might offer a few things.

1. Good, sharp cutters. New doesn't necessarily mean sharp. HSS cutters can be sharpened to a finer edge, but lose that edge much faster than carbide. Wood species plays a part too. Wood backed veneer can also contribute. Paper is more forgiving.
2. Tape can help but I've found it's not a panacea. Sometimes it's just in the way.
3. Perhaps reverse the veneer and corner insert sequence. Inserts into raw MDF box, then veneer overall. When the edges are chamfered, it will expose the hardwood. It will also expose veneer edge but it's barely visible especially if coloring.
4. I like routers, perhaps too much, but I've found a sharp blade in table saw is often a better plan for many operations, including chamfers and rabbets. Router table or shaper next best. Handheld offers most variable results.

To me, the knowledge gained from doing is a stepping stone. Proof of that comes when one says "next time I'll..."

Lebo

  • Jr. Member
  • Posts: 24
Re: Finished X-CS Encore
« Reply #11 on: 27 Mar 2021, 02:38 pm »
Thanks guys.  I really enjoy them.    I did leave out a major step on the finish.  After the first coat of shellac I glazed with a walnut gel stain to set the overall color.   Then I went on to the other steps.  Sealed with the extra pale shellac, then I shaded to hide the burn through then the lacquer. 

Lebo

  • Jr. Member
  • Posts: 24
Re: Finished X-CS Encore
« Reply #12 on: 27 Mar 2021, 02:39 pm »
Thanks Peter.

Ozrikconan

  • Jr. Member
  • Posts: 26
  • Hi fi lo bux
Re: Finished X-CS Encore
« Reply #13 on: 30 Mar 2021, 11:11 pm »
Beautiful!

E-Zee

  • Industry Participant
  • Posts: 149
    • Diy speaker resources and crossover assembly services
Re: Finished X-CS Encore
« Reply #14 on: 31 Mar 2021, 05:59 pm »
One trick that has been successful for me to avoid endgrain tear-out especially with veneer is to sandwich your veneer with a sacrificial board.  1/8 hardboard is very cheap and rigid enough to be a good sacrificial piece.  Place the hardboard down on your tablesaw and your veneered piece on top of that. Use enough downward pressure to keep the veneer pinched as you make the cut.  As long as it's a good blade and your piece isn't wobbling around, you should be tearout free.  I've had mixed results with painter tape. If you have a really precise zero clearance insert or a very accurate saw and fence it might be  enough,  but unsupported the tape alone isn't always enough.

I think your end product looks great. Congratulations.

Sonicjoy

  • Full Member
  • Posts: 366
Re: Finished X-CS Encore
« Reply #15 on: 1 Apr 2021, 12:52 am »
Great job! Your next ones will be even better. Enjoy! :icon_lol: