Hi gig, some suggestions these based on both my profession as an electrical engineer and owner and big fan of Counterpoint.
When you said that your “SA-220 modified (with new boards and transistors) in the early 2000's” was it by the late Michael Elliott owner of Counterpoint when their bank forced the shutdown circa 1998? He continued as “Elliott Audio Science & Engineering” both modifying Counterpoint and building new designs. I regret procrastinating and missing getting him to work on my SA-3000 or buying a manual from him.
I ask if you have Elliott’s mods because the SA-220 is a wonderful but temperamental beast. Original units tended to fry output MOSFETs on a too regular basis. Mods by Elliott or others fix that and change to MOSFETs presently available as the original power MOSFETs are long out of production. Sounds like the unit phi70 cared for was on that path. These are IMHO worth the effort and cost as even today a high powered Tube+MOSFET hybrid amp is rare and at this level would be $10,000+.
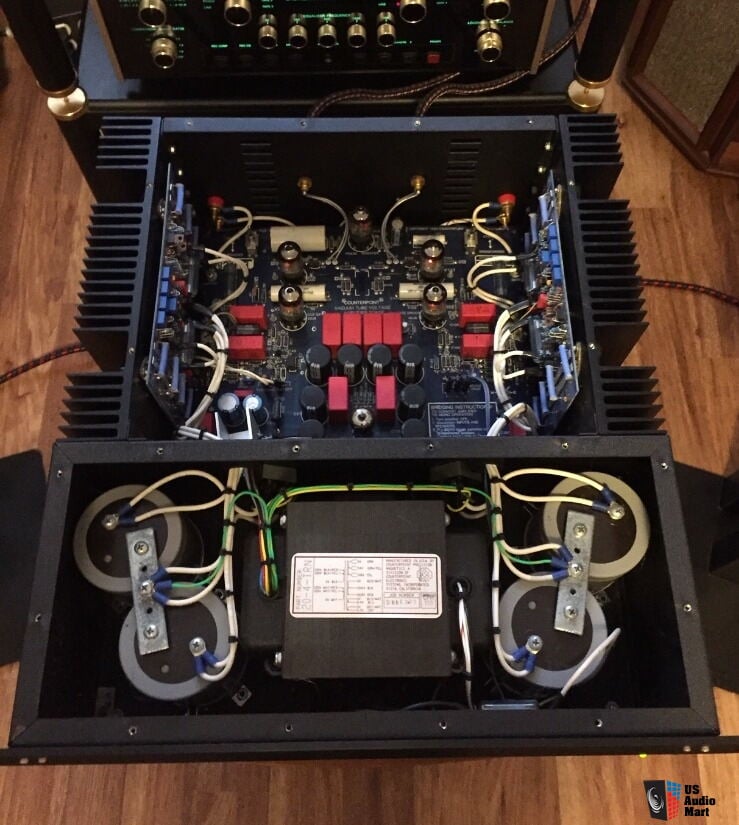

Regarding replace the 4 caps I vote ‘yes’, its time. I am not crazy about the part you link above. Cornell Dubilier make fine parts, my concern is the 10x increase in uF. Thanks to demand from computer mother boards, graphic processor cards, and power converters there have been massive R&D investments made in aluminum electrolytic capacitors’ technology. Chief among these is the size of cap for a given uF at volts has shrunk considerably. Your specs “2500uf, 75vdc, 4.25" (108mm) tall and 3" (76.2 mm) in diameter” from the 1990s in the 2020s break. At the size needed you get 10 time the uFs. Or hold the uFs around 2500 uF and accept smaller case size. While some will argue “more uF always better” my concern going 10x more is inrush current when the amp is switched on. My old Hafler DH-500 welded its power switch closed due to the in rush current. Perhaps the less cost constrained SA-220 has a soft start circuit, but why stress this classic further. So I counsel stay in the 2500 uF range. Also be aware higher than 75 volt rating is ok (lower volts NOT OK) to widen the search net. I also note the 25000 uF Cornell are $62 each, the budget will thank you for staying 2000-3000 uF range. And allow a few bucks for the different size cap clamps you may need.
Candidates to consider, in stock at Mouser:
Kemit Mfr. #: PEH169PD4220QB2 2200uF 100v Diameter: 36.6 mm Length: 97.5 mm Life: 18000 Hour $24/ea.
Kemit Mfr. #: ALS40A222DB100 2200uF 100v Diameter: 36 mm Length: 62 mm Life: 6000 Hour $13/ea.
Cornell Dubilier Mfr. #: 500C252T100AA2B 2500uF 100v Diameter: 35 mm Length: 54 mm Life: 5000 Hour $19/ea.
Nichicon Mfr. #: LNT2A332MSE 3300uF 100v Diameter: 35 mm Length: 80 mm Life: 5000 Hour $19/ea.
Finally can I presume you are aware of the need to be careful working on tube circuits and caps this large? Amp unplugged and caps discharged through a resistor to 0 volts before touching? And how to observe polarity when connecting caps? You (or other reading this)
M U S T note electrolytic capacitors must never be connected backwards
AND in a plus and minus power supply like this the caps on the negative rails are 'backwards' on purpose because they are across negative voltages. Notes and pictures before disassembly are your friends.


