Amateur Build of the X-MTM Encore

0 Members and 1 Guest are viewing this topic. Read 28891 times.

jonsk2514

Re: Amateur Build of the X-MTM Encore
« Reply #120 on: 28 Jul 2020, 01:10 am »
Cross over build reference:
https://youtu.be/rIxig_9i-Iw

Danny does a nice job with showing how to assemble a crossover.

jonsk2514

Re: Amateur Build of the X-MTM Encore
« Reply #121 on: 1 Aug 2020, 12:58 pm »
A set back... :(

A while back I noticed some oily spots on the MDF and passed it off as maybe being something that was there from the store...  Recently, however, I found a big splotch on the outside of the front panel that wasn’t there when I routed it, so I knew it was something of my doing...  And a quick search on my work table turned up an old oil spill on my work bench that pretty well blended in and I didn’t see it until I was actually looking for it.  Ugh  :shake:

I can’t believe how well the MDF sucked that stuff up.  It is like a sponge.  Of course, my concern is for later on when I go to put the finish on.  I plan a painted finish, so staining isn’t an issue.  I just need to make sure the finish/paint sticks.

So now comes the process of cleaning it out of the panels.  Right now I have tried paint thinner and paper towels, which seems to have removed some of it.  After I do that a few times, I plan to wipe it down with some alcohol.  I would rather go this route than have to go get another sheet of MDF and cut new panels.

Any suggestions out there as to getting rid of this mess?  Or am I on the right path with the paint thinner?

Abby356

Re: Amateur Build of the X-MTM Encore
« Reply #122 on: 1 Aug 2020, 02:05 pm »
If you intend to paint the baffles, I would use the classic BIN shellac base primer.

Which is what i used when prepping these early E. Geddes kits for professional paint with House of Kolor automotive paint. BIN is a great all around sealer for MDF to prevent MDF from soaking up humidity or moisture later (paint inside of box/enclosure too), and sands incredibly smooth.


Peter J

  • Full Member
  • Posts: 1876
  • Hmmmm
Re: Amateur Build of the X-MTM Encore
« Reply #123 on: 1 Aug 2020, 02:11 pm »
Bummer. First thing to determine is what the nature of the oil is. Most oil is petroleum based, so alcohol won't be a solvent for it, but paint thinner (mineral spirits) probably would be.

You could make a poultice of sorts with a tight wad of cloth or paper towel lightly dampened with solvent (paint thinner) and set on surface for a bit. The glue in MDF won't be affected in a short exposure, but off the cuff, I think I'd limit to perhaps an hour.  Rubbing actually isn't very effective as it just tends to suspend the oil and move it around.

When it comes time to paint, a stain blocking primer or dewaxed shellac might be a good first coat as it will help to seal whatever residue remains and keep if from affecting subsequent topcoats. At least some prep will depend on what you intend to finish with. Solvent or oil base will be less affected than water base in my experience.

jonsk2514

Re: Amateur Build of the X-MTM Encore
« Reply #124 on: 1 Aug 2020, 02:56 pm »
Bummer!  Good word for it.

I thought about using shellac as an undercoat.  Thanks for the advice on the primer/sealer version.  I have used plain shellac as a finish coat before.  I am not sure if it is de-waxed though, I would just get the primer version.

It didn’t take me long to remember remember the oil spill from a long time ago.  The smell is a dead give-away... 90w gear oil.  The smell of that stuff is memorable.

Also good advice on making a poultice (I wonder how many people are familiar with that word... :lol:).  I had already thought of just putting some “speedy dry” (basically clay cat litter) on it and let it sit.  But soaking it with paint thinner first and then doing that might work.  It seems that would draw it out better.

I did soak it with paint thinner and then blotted it.  This worked to some extent.  But I didn’t soak it for very long as I was afraid of the paint thinner drawing the oil further into the MDF. 

So, I will continue on with this advice and will let you know how well I do.

Thanks for posting back with the suggestions...

BTW - I really like the teal colored speakers - nice job on them.   :thumb:

mlundy57

  • Industry Participant
  • Posts: 3577
Re: Amateur Build of the X-MTM Encore
« Reply #125 on: 1 Aug 2020, 03:15 pm »
Listen to Peter  :thumb:

jonsk2514

Re: Amateur Build of the X-MTM Encore
« Reply #126 on: 1 Aug 2020, 03:57 pm »
 :bowdown:

 :lol:

Already working on it...

AlexH

Re: Amateur Build of the X-MTM Encore
« Reply #127 on: 1 Aug 2020, 07:35 pm »
If you intend to paint the baffles, I would use the classic BIN shellac base primer.

Which is what i used when prepping these early E. Geddes kits for professional paint with House of Kolor automotive paint. BIN is a great all around sealer for MDF to prevent MDF from soaking up humidity or moisture later (paint inside of box/enclosure too), and sands incredibly smooth.


BIN primer is a good idea as well. BIN is just a white pigmented shellac.

jonsk2514

Re: Amateur Build of the X-MTM Encore
« Reply #128 on: 1 Aug 2020, 08:10 pm »
I was at my local hardware store earlier today after the suggestion was made and found the BIN shellac primer...

Thanks for the advice and endorsement.  Even before this happened I was wondering about whether this should be primed on the outside, at least, before painting it.  I guess that is a given now...  :roll:

Right now the front panel has been wet down with mineral spirits and has several layers of paper towel and a scrap piece of MDF over that, and all of that is being compress under about 50# of weight.  The speedy-dry didn’t do much from what I could tell.  There didn’t seem to be enough surface area contact to draw the oil out.  This stuff is more for a pool of a liquid than my current need.

hawkeyejw

Re: Amateur Build of the X-MTM Encore
« Reply #129 on: 1 Aug 2020, 09:42 pm »
Definitely prime and sand MDF before your top coat. It will soak up a lot and be inconsistent otherwise.

jonsk2514

Re: Amateur Build of the X-MTM Encore
« Reply #130 on: 1 Aug 2020, 09:53 pm »
Does the BIN shellac primer sand the same or similarly to ordinary shellac.  Or does the white pigment cause it to be gummy?

Peter J

  • Full Member
  • Posts: 1876
  • Hmmmm
Re: Amateur Build of the X-MTM Encore
« Reply #131 on: 1 Aug 2020, 10:05 pm »
The BIN will sand OK and is a good barrier coat. For best sanding, I've found Cover Stain, also made by Zinnser to powder when sanding and build a little more. This is for oil based stuff. I think the water base can be in spray cans too, but I'm not as fond of it. Cover Stain is best if left to dry overnight. BIN will be faster.

AlexH

Re: Amateur Build of the X-MTM Encore
« Reply #132 on: 1 Aug 2020, 11:12 pm »
Yeah, Cover Stain is good stuff. Most of Zinsser's stuff is good. They make my favorite varnish Quick Satin 15. I cringed when they were bought by Rustoleum.

jonsk2514

Re: Amateur Build of the X-MTM Encore
« Reply #133 on: 5 Aug 2020, 08:30 pm »
Just a quick update to say that I think I have solved the oil in the MDF issue...  Baby powder...  Actually, cornstarch, which is the main ingredient of baby powder these days.

I soaked the oily area down with paint thinner, let it sit for a minute or two (not long at all).  Then I put a layer of baby powder over that.  The cornstarch dries the MDF and appears to pull the oil out with the paint thinner.  I had the MDF on top of some paper so I could scrape the power off the MDF and onto the paper.  This was then easy to ball up and throw away,  and I wasn’t clogging up the shop vac filter with the powder.

Success!  :green:

I also made 2 more of my 3rd hand clamps, this time using the MilesCraft clamps.  The hole size for these is 21/64 inch, as compared to the others which is 15/16 inch.  The only thing about the MilesCraft clamps is that they are a bit heavier than the other 2 clamps I made, but nothing like the other corner clamps I bought.  These should be good and really handy for dry fitup:


jonsk2514

Re: Amateur Build of the X-MTM Encore
« Reply #134 on: 12 Aug 2020, 10:21 pm »
I thought that I should clean out the oil from the MDF the best I could before proceeding any further with the build, hence part of my delay in posting.  I think I have achieve responsibly good success.  Here is a sample of what I have been dealing with.

Here is a side panel that had soaked up a lot of oil:


I wiped the oily spots with paint thinner, soaking the spots with several applications of the thinner.  It doesn’t stay wet very long as the MDF is a pretty good sponge:


This is followed up with the application of a thick layer of cornstarch baby powder.  Being baby powder isn’t so important as being cornstarch, which I believe helps to draw out the oil and thinner.  Also, the container that the baby power comes in does really well at spreading the powder.


After about 24 hrs, I scrapped the cornstarch off with a wide blade putty knife, onto a waiting paper towel.  This way the cornstarch is easily cleaned up without using a vacuum and clogging the filter.  This is the result:


I took a second shot at cleaning that residual oil.  This is what it looked like after this second application and 24hr wait:


The putty knife gets about 90% of the powder off.  A light wipe down with a dry paper towel seems to do well at getting most of the remaining powder off.  This should be good enough until I am sanding the cabinets and then cleaning that dust off.

To be honest, I am not sure how much the cornstarch helped over just wiping the oily spots with paint thinner.  But the combination seems to have worked.

With this piece and several other piece that had oil on them now cleaned of the oil, I am now back to work with the build.

jonsk2514

Re: Amateur Build of the X-MTM Encore
« Reply #135 on: 13 Aug 2020, 12:14 am »
One of the things I found to be helpful in this build is having a piece of straight of rectangular aluminum tube.  Now any really straight piece of something would work for what I am doing, I just happen to have on hand the aluminum tube.

I have proceeded ahead with laying out the places on the side panels where the braces will go.  I still plan to use quarter round molding for the rails to locate the braces.  To facilitate the layout, I have secured the tube to the workbench and have butted the “control” edge of the side panel up against it.  This makes for a nice edge to lay the carpenter square up against to mark off the locations for the braces.  It is important that the same edge  (the “control” edge) be used for both side panels so when they placed facing each other (they will be mirror images of each other), the location lines match and there is no mismatch in the angle of the lines.  I chose the to locate off the front edge of the side panels.  Nothing is perfectly square, no matter how well you make it, so using that same edge insures the lines are as close to being mirror images as possible...


You can see the straight edge and the carpenter’s square.  The panel edge that is up against the straight edge is the one that will be butted up against the front panel.

In this picture the layout for the braces starts at the bottom and moves to the top of the picture.  Because of the way Danny lays out his decisions, starting from the bottom of the cabinet, I had to subtract 3/8” from each of his dimensions, because the bottom end of each of the side panels sits in a rabbit in the top and bottom panels and that rabbit is 3/8” deep.

I did a couple of over checks.  One was to mark the edge of each side panel where the braces would go.  Then I laid the one panel on top of the other to make sure the marks lined up on the two panels.  The other thing I did was to measure down from the top of each panel for the location of the speaker drivers to make sure those measurements lined up with the center of the braces, per Danny’s sketches.

Then I cut the quarter round molding for each of the braces; 4 for each brace.  Then laid them out on the side panels to make sure of the cuts.  The 15” long ones were cut to 14-7/8” to allow a 1/16” gap to the front and back panels.  The 10” long pieces were cut only 1/16” gap to the back panel.  Those don’t reach the front panels.


My plan is to install only one side of the brace rails prior to gluing together the top, bottom and 2 sides.  Then I will install the braces and the other side rail.  This should be clearer when I post pictures of the dry fit I plan to do once all of the braces are sized.   I need to do a trim cut on each of the braces I cut as they are all slightly oversized to the interior of the cabinet.

jonsk2514

Re: Amateur Build of the X-MTM Encore
« Reply #136 on: 14 Aug 2020, 11:15 pm »
Hole cutting 101

First rule of hole cutting is Don’t Over Think It!

So what have I been doing?  Over thinking it. And this is after having bought the really nice Jasper hole cutting jig.


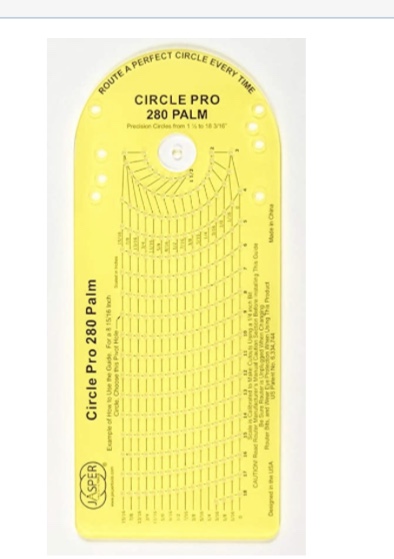
It should have been a no-brainer; just mount it to the router base and go.  But, no.  What if this; what if that...

Finally a Nike commercial hit - just do it! - and I did.  Ugh, that was way too easy.  Just follow the directions.

I had purchased an 1/8” up spiral bit for the router.  The down spiral one worked really well for cutting the panels from the sheet of MDF.  I thought the up spiral cutter would work for the hole cutting.  In using the down spiral cutter, I made the cuts in a single pass so the down cut bit made sense for dust collection.  For the hole cutting I thought that I would do the cutting in multiple passes so the up spiral would be better for clearing the cuttings.  These cutters have been da bomb for this...  :D

I have the Dewalt cordless 20v router and really like it for this work (as in - no freakin’ cords to deal with :evil:).  Plenty of power with the 1/8” bits.  The thing I don’t like about Dewalt is they nickel and dime you for every add on.  So I have had to purchased the plunge base and dust collector for it separately...   The dust collector connects perfectly to the Dewalt hose for their cordless 20v shop vac... go figure.

Another thing I really like are the Nite Ize gear tie products (https://www.niteize.com/product/Gear-Tie-Mega.asp).  These are super big twist ties that actually do something.  I used one of these to suspend the vacuum hose from the basement ceiling and up above the router.


The only issue I had was getting the center peg for the hole cutting jig into the correct hole in the jig and then into the center hole of the piece I was cutting.  This is all done blind and the pin want to drop out of the jig.  I found that it worked best to place the pin into the proper jig hole for the size I want to cut, hold it in place with a finger, turn it over and the put the whole assembly over and into the centering hole in the piece to be cut.

BTW - the multiple cuts shown in the picture, included a mistake and several checks on the hole diameter I was getting with the 1/8” bit.  The jig is sized for use with a 1/4” bit.  In this case a 1/8” correction is needed to the printed hole size vs the cut hole size.

Otherwise, cutting holes with this jig is no harder that reading the instructions on the package...   :duh:

jonsk2514

Re: Amateur Build of the X-MTM Encore
« Reply #137 on: 14 Aug 2020, 11:43 pm »
An issue with the way I am building these cabinets is the use of the quarter round for locating the braces.  These take up volume inside the box and that will change the performance of the cabinet.

Now how much space could a little bit of 1/2” quarter round take up?  More than I expected...  over 70 cubic inches worth of space.  Or about 2“ inches of the 7”x15” interior spaces.  I could have made the cabinet taller by that amount, but I didn’t know what that would do to the speaker’s performance.   Or I could have made the speaker depth greater.  Ok, that might not have been too bad (about 0.25” larger).  But, still, what would have been the acoustic performance change?   I thought I would just make the holes larger in the braces.  This keep all of the dimensional changes as close to each other as possible, which I figured would have the least amount of impact on the acoustic performance of the speakers.  I also figured the quarter round would compensate for the slightly less stiff braces because of their larger holes.

What I calculated was the hole size in the braces needs to increase to be about 5-7/8” vs the 5-1/2” hole in Danny’s sketches.  This makes for about a 1 for 1 switch in volume, or no net volume change.


jonsk2514

Re: Amateur Build of the X-MTM Encore
« Reply #138 on: 27 Aug 2020, 07:43 pm »
Sometimes you find something that you didn’t even know you were looking for it.  Case in point:


I saw this sticky stuff and thought it would do great for the dry fit of the brace rails.  I had previously marked out where each brace rail is to go to locate/support each of the internal braces.  The Fun-Tak would give me a way to temporarily install the brace rails as part of a dry fitup.  The product description says it may leave an oily mark but on a test piece I first tried it on, that took several days before it occurred.  In this dry fit, there was no visible oil residual after the hour or so that it was on the pieces.  It peeled off easily and any bits of residual were easy to see with their blue color.  A dab with another piece of Fun-Tac easily took off any remaining bits.


My plan is to start at each end of the cabinet and work toward the center installing each of the braces  That way I can use the brad nailer to facilitate the installation of each of the rails for the opposite side of the brace.  The final set of brace rails will need to be held in place by some other means, as the space between any 2 braces is too small for the brad nailer.

Looking closely you will see that at the far end of the side the braces are installed with the flat facing the camera and at the close end they are facing away from the camera.  This will facilitate the installation of the braces working from each end and towards the middle, which will allow the use of the brad nailer inside the cabinet.


I can get the brad nailer in at about 45 deg which will work for tacking the opposite side rail in place.


This is what it will look like with everything installed.  This picture is looking down inside of the cabinet from the backside.  The front side is face down on the work bench.  This is opposite of how I plan to do this part of the assemble.


Note, I didn’t put in all of the brace rails; just enough are installed to get a feel for how this will work.

I still need to fit the back panel to the sides, top and bottom.  Once that it done and I know the braces will still fit, I plan ito glue together the four corners of the cabinet (top to side to bottom to side to top) using the front panel as the assembly jig.  Then glue the back side panel into place.  This way I will be able to glue each of the braces into the sides and back all at one time and the two short braces will just rest on the back panel while the glue sets up.  Leaving the front panel off will allow access to the interior for installing wiring, crossover and NoRez... 

diyman

  • Jr. Member
  • Posts: 163
Re: Amateur Build of the X-MTM Encore
« Reply #139 on: 28 Aug 2020, 07:19 am »
Glad to see that you’re making progress, but it would be going together much easier and faster if you had just cut dados into the sides like everybody else does.  You created a lot of extra work for yourself by using the quarter round strips instead.